linux系统的启动过程
linux系统的启动过程
linux系统的启动过程
1、开机自检
2、从硬盘的MBR从中读取引导程序GRUB2
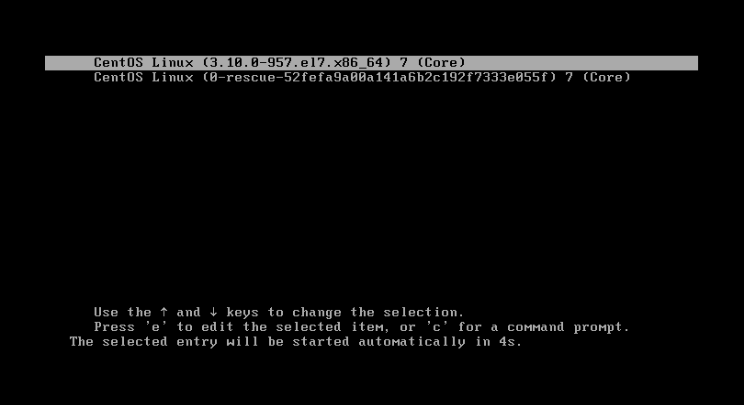
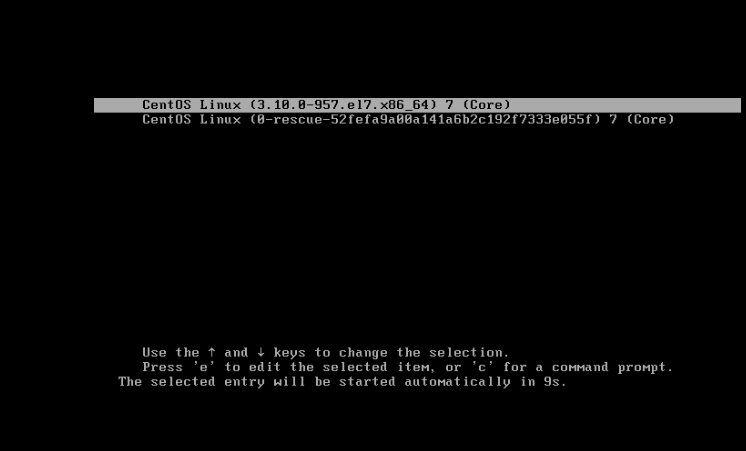
3、引导程序(GRUB2)根据配置文件/boot/grub2/grub.cfg加载配置并显示引导菜单
4、引导程序加载linux内核文件
5、当内核全部载入内存后,GRUB的任务完成,此时全部控制权限就交给linux内核,
cpu开始执行linux内核代码,比如初始化任务调度、内存分配、加载驱动等。
就是将建立一个内核的运行环境。
6、内核代码执行完成后,开始执行linux系统的第一个进程systemd。进程号为1.
运行级别7中 0-6
0 关机
1 单用户界面
2 多用户,但是没有网络
3 完全多用户,命令行界面 multi-user.target
4 保留
5 图形化界面 graphical.target
6 重启
7、systemd进程启动后就会读取/etc/systemd/system/default.target文件
(该文件的作用是设置系统的运行级别)。systemd会根据此文件设置系统的运行级别并启动相应的服务。
8、服务启动完成后,将引导login弹出的登录界面。
总的来说,linux系统启动可以分为以下几大步骤
1、开机自检
2、MBR引导
3、GRUB菜单
4、加载linux内核
5、运行systemd进程。
查看默认的运行级别
systemctl get-default
[root@ws ~]# systemctl get-default
graphical.target
图形化界面
设置默认的运行级别
systemctl set-default multi-user.target/graphical.target
[root@ws ~]# systemctl set-default multi-user.target
Removed symlink /etc/systemd/system/default.target.
Created symlink from /etc/systemd/system/default.target to /usr/lib/systemd/system/multi-user.target.
[root@ws ~]# systemctl get-default
multi-user.target
命令行界面
临时调用图形化
systemctl isolate graphical.target
[root@ws ~]# systemctl isolate  graphical.target
[root@ws ~]# systemctl get-default
multi-user.target
临时启用图形化界面但是级别还是命令行
init3
init5
引导程序GRUB2
[root@ws boot]# ls
config-3.10.0-957.el7.x86_64
efi
grub
grub2
initramfs-0-rescue-52fefa9a00a141a6b2c192f7333e055f.img
initramfs-3.10.0-957.el7.x86_64.img
symvers-3.10.0-957.el7.x86_64.gz
System.map-3.10.0-957.el7.x86_64
vmlinuz-0-rescue-52fefa9a00a141a6b2c192f7333e055f
vmlinuz-3.10.0-957.el7.x86_64
[root@ws boot]# cd grub2/
[root@ws grub2]# ls
device.map  fonts  grub.cfg ** grubenv  i386-pc  localegrub.cfg这个文件是由多个文件组成[root@ws grub2]# cd /etc/grub.d/
[root@ws grub.d]# ls
00_header  01_users  20_linux_xen     30_os-prober  41_custom
00_tuned   10_linux  20_ppc_terminfo  40_custom     README
脚本
[root@ws default]# ls
grub  nss  useradd
改变Linux启动的时间
现在启动的时间是五秒钟要改成10秒
[root@ws ~]# cd /etc/default/
[root@ws default]# ls
grub  nss  useradd
[root@ws default]# vim grub

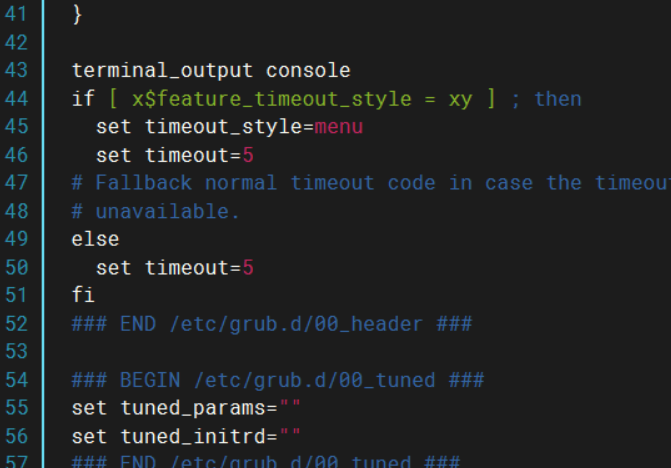
grub.cfg文件的时间没有改需要把grub.cfg文件覆盖
[root@ws ~]# grub2-mkconfig > /boot/grub2/grub.cfg
Generating grub configuration file ...
Found linux image: /boot/vmlinuz-3.10.0-957.el7.x86_64
Found initrd image: /boot/initramfs-3.10.0-957.el7.x86_64.img
Found linux image: /boot/vmlinuz-0-rescue-52fefa9a00a141a6b2c192f7333e055f
Found initrd image: /boot/initramfs-0-rescue-52fefa9a00a141a6b2c192f7333e055f.img
done
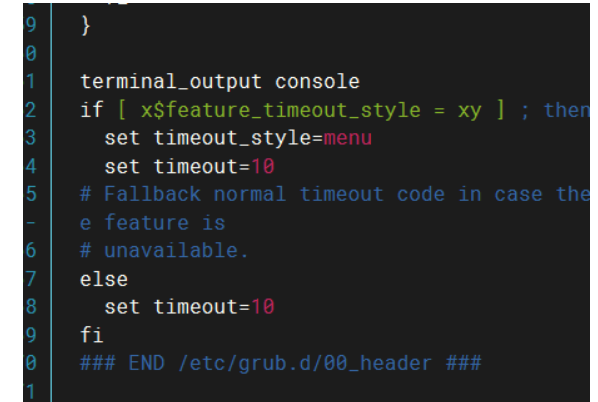
时间改成了10秒
grub2-mkconfig -o /boot/grub2/grub.cfg
或者使用
grub2-mkconfig > /boot/grub2/grub.cfg
删除grub.cfg配置文件怎么找回来
[root@ws ~]# cd /boot/grub2/
[root@ws grub2]# ls
device.map  fonts  grub.cfg  grubenv  i386-pc  locale
[root@ws grub2]# rm -rf grub.cfg
[root@ws grub2]# ls
device.map  fonts  grubenv  i386-pc  locale   // 没有grub.cfg文件
[root@ws grub2]# grub2-mkconfig > /boot/grub2/grub.cfg
Generating grub configuration file ...
Found linux image: /boot/vmlinuz-3.10.0-957.el7.x86_64
Found initrd image: /boot/initramfs-3.10.0-957.el7.x86_64.img
Found linux image: /boot/vmlinuz-0-rescue-52fefa9a00a141a6b2c192f7333e055f
Found initrd image: /boot/initramfs-0-rescue-52fefa9a00a141a6b2c192f7333e055f.img
done
[root@ws grub2]# ls
device.map  fonts  grub.cfg  grubenv  i386-pc  locale
修复grub2
如果把grub2整个目录删除了,相当于把我们启动引导器删除了
1、在硬盘上安装启动引导器
grub2-install /dev/sda
2、grub2目录是恢复了,但是grub.cfg没有恢复
grub2-mkconfig -o /boot/grub2/grub.cfg
[root@ws boot]# ls
config-3.10.0-957.el7.x86_64
efi
grub
grub2
initramfs-0-rescue-52fefa9a00a141a6b2c192f7333e055f.img
initramfs-3.10.0-957.el7.x86_64.img
symvers-3.10.0-957.el7.x86_64.gz
System.map-3.10.0-957.el7.x86_64
vmlinuz-0-rescue-52fefa9a00a141a6b2c192f7333e055f
vmlinuz-3.10.0-957.el7.x86_64
[root@ws boot]# rm -rf grub2  //删除grub2
[root@ws boot]# ls
config-3.10.0-957.el7.x86_64
efi
grub
initramfs-0-rescue-52fefa9a00a141a6b2c192f7333e055f.img
initramfs-3.10.0-957.el7.x86_64.img
symvers-3.10.0-957.el7.x86_64.gz
System.map-3.10.0-957.el7.x86_64
vmlinuz-0-rescue-52fefa9a00a141a6b2c192f7333e055f
vmlinuz-3.10.0-957.el7.x86_64
[root@ws boot]# grub2-install /dev/sda    //安装grub2
Installing for i386-pc platform.
Installation finished. No error reported.
[root@ws boot]# ls
config-3.10.0-957.el7.x86_64
efi
grub
grub2
initramfs-0-rescue-52fefa9a00a141a6b2c192f7333e055f.img
initramfs-3.10.0-957.el7.x86_64.img
symvers-3.10.0-957.el7.x86_64.gz
System.map-3.10.0-957.el7.x86_64
vmlinuz-0-rescue-52fefa9a00a141a6b2c192f7333e055f
vmlinuz-3.10.0-957.el7.x86_64
[root@ws boot]# cd grub2/
[root@ws grub2]# ls		//安装了grub2没有grub.cfg文件需要
fonts  grubenv  i386-pc  locale
[root@ws grub2]# grub2-mkconfig > /boot/grub2/grub.cfg  //内容覆盖
Generating grub configuration file ...
Found linux image: /boot/vmlinuz-3.10.0-957.el7.x86_64
Found initrd image: /boot/initramfs-3.10.0-957.el7.x86_64.img
Found linux image: /boot/vmlinuz-0-rescue-52fefa9a00a141a6b2c192f7333e055f
Found initrd image: /boot/initramfs-0-rescue-52fefa9a00a141a6b2c192f7333e055f.img
done
[root@ws grub2]# ls
fonts  grub.cfg  grubenv  i386-pc  locale
修复/boot目录
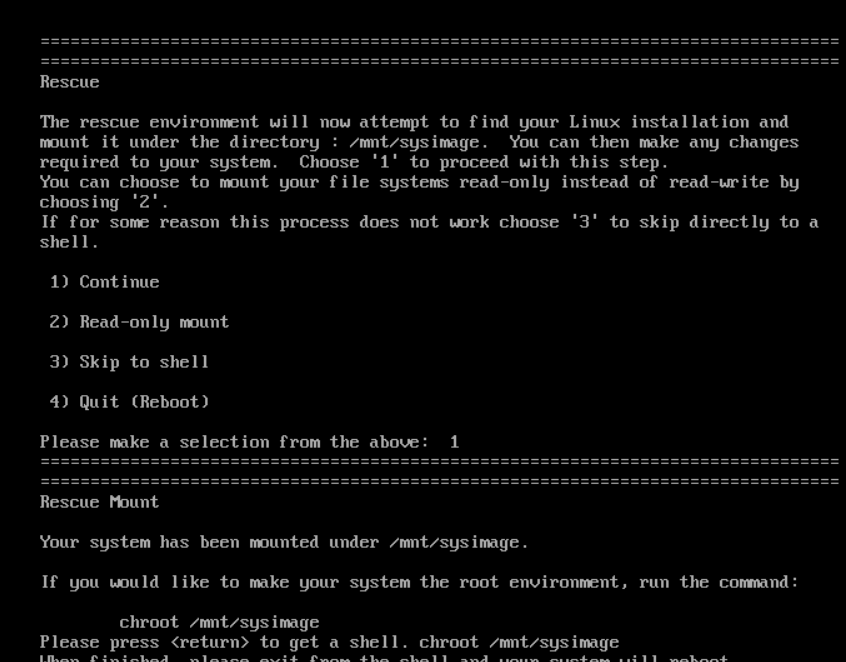
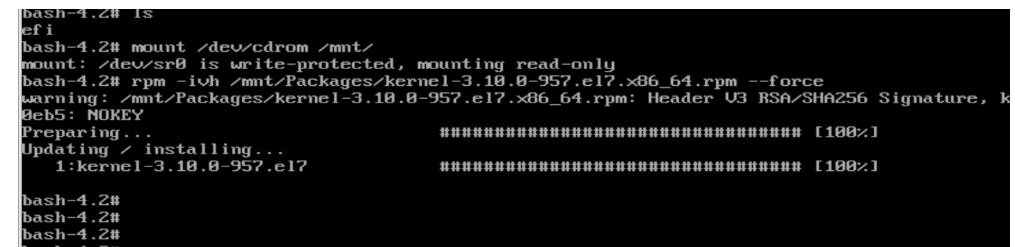
1、进入救援模式
2、chroot /mnt/sysroot
3、安装内核
mount /dev/cdrom /mnt
rpm -ivh /mnt/Packages/kernel-3… --force
4、恢复grub2目录
grub2-install /dev/sda
5、恢复grub.cfg文件
grub2-mkconfig > /boot/grub2/grub.cfg
6、exit
7、exit
[root@ws ~]# cd /boot/
[root@ws boot]# ls
config-3.10.0-957.el7.x86_64
efi
grub
grub2
initramfs-0-rescue-52fefa9a00a141a6b2c192f7333e055f.img
initramfs-3.10.0-957.el7.x86_64.img
symvers-3.10.0-957.el7.x86_64.gz
System.map-3.10.0-957.el7.x86_64
vmlinuz-0-rescue-52fefa9a00a141a6b2c192f7333e055f
vmlinuz-3.10.0-957.el7.x86_64
[root@ws boot]# rm -rf *
[root@ws boot]# ls
efi
[root@ws ~]# umount /boot/     // 取消挂载
[root@ws ~]# df -Th
Filesystem     Type      Size  Used Avail Use% Mounted on
/dev/sda2      xfs        50G  3.9G   47G   8% /
devtmpfs       devtmpfs  2.0G     0  2.0G   0% /dev
tmpfs          tmpfs     2.0G     0  2.0G   0% /dev/shm
tmpfs          tmpfs     2.0G   13M  2.0G   1% /run
tmpfs          tmpfs     2.0G     0  2.0G   0% /sys/fs/cgroup
tmpfs          tmpfs     394M   24K  394M   1% /run/user/0
/dev/sr0       iso9660   4.3G  4.3G     0 100% /run/media/root/CentOS 7 x86_64
[root@ws ~]# sync
[root@ws ~]# sync
[root@ws ~]# sync	//保存
打开电源时进入固件


破解linux管理员root密码
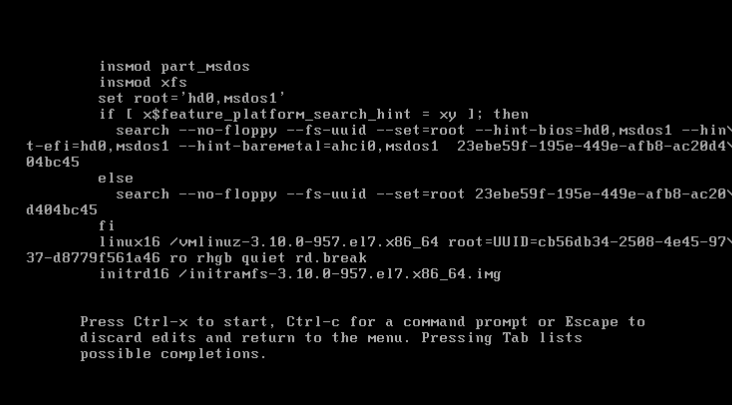
1、reboot
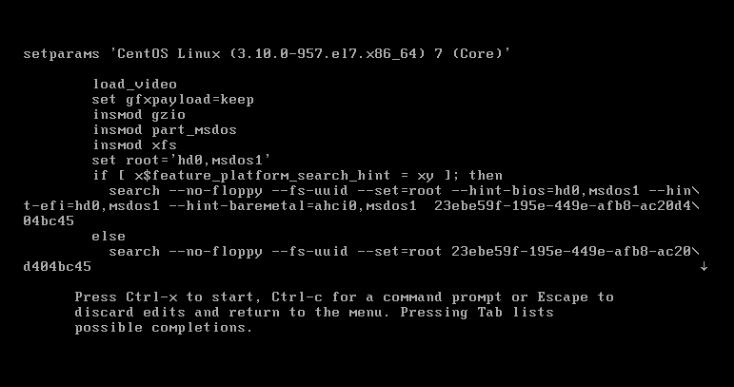
2、按e编辑grub2菜单
3、找到linux内核所在的这一行,在末尾写入rd.break,然后Ctrl+X启动
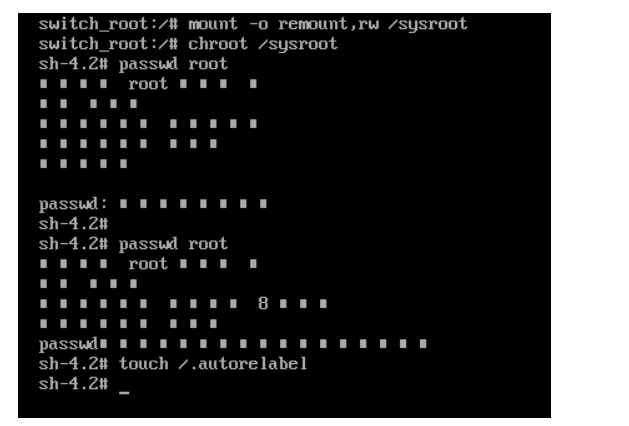
4、进入伪系统,重新挂载,并给读写权限
mount -o remount,rw /sysroot
5、进入硬盘中的系统(真系统),修改root密码
chroot /sysroot
passwd root 或者 echo linux123 | passwd --stdin root —给root用户设置密码为linux123
6、写入selinux,重打标签
touch /.autorelabel
7、退出,启动系统
exit
exit
GRUB2加密
1、明文加密
vim /etc/grub.d/00_header
cat << EOF
set superusers=“zhangsan”
password zhangsan 123456
EOF
加载 grub2-mkconfig -o /boot/grub2/grub.cfg
[root@ws grub2]# cd /etc/grub.d/
[root@ws grub.d]# ls
00_header  01_users  20_linux_xen     30_os-prober  41_custom
00_tuned   10_linux  20_ppc_terminfo  40_custom     README
[root@ws grub.d]# vim 00_header
[root@ws grub.d]# grub2-mkconfig > /boot/grub2/grub.cfg
Generating grub configuration file ...
Found linux image: /boot/vmlinuz-3.10.0-957.el7.x86_64
Found initrd image: /boot/initramfs-3.10.0-957.el7.x86_64.img
Found linux image: /boot/vmlinuz-0-rescue-52fefa9a00a141a6b2c192f7333e055f
Found initrd image: /boot/initramfs-0-rescue-52fefa9a00a141a6b2c192f7333e055f.img
done
2、密文加密
给密码设置密文密码
grub2-mkpasswd-pbkdf2
复制密文密码(务必记住,别把空格复制进来)
vim /etc/grub.d/00_header
cat << EOF
set superusers=“tom”
password_pbkdf2 tom 粘贴密文密码
EOF
[root@ws ~]# grub2-mkpasswd-pbkdf2
输入口令:
Reenter password:
PBKDF2 hash of your password is grub.pbkdf2.sha512.10000.B8A01A451F1F4CFE9A9B012CADD01B9061D2E15BB474C6812D705453D64CEEF7901A21016DF31061BCB5915B1D2B23D0E93AAC15DD439E58B6E0A8669C3A4368.8E7326CF01EA91D495906D9D765E9A2DF0E4DC1D4BC4306961D2DE21B890E453328E7FE56724CF1005B7B7246D029F3CF819E48404CDDFCCB0596C58D124C022
[root@ws ~]#
[root@ws grub.d]# vim 00_header
[root@ws grub.d]# grub2-mkconfig > /boot/grub2/grub.cfg
Generating grub configuration file ...
Found linux image: /boot/vmlinuz-3.10.0-957.el7.x86_64
Found initrd image: /boot/initramfs-3.10.0-957.el7.x86_64.img
Found linux image: /boot/vmlinuz-0-rescue-52fefa9a00a141a6b2c192f7333e055f
Found initrd image: /boot/initramfs-0-rescue-52fefa9a00a141a6b2c192f7333e055f.img
done