负载均衡集群HAproxy
什么是 HAProxy?
HAProxy(High Availability Proxy) 是一款开源的高性能负载均衡器和反向代理服务器,主要用于在多个服务器之间分发网络流量,提升服务的可用性、可靠性和处理能力
HAProxy 的核心功能
- 负载均衡
- 反向代理
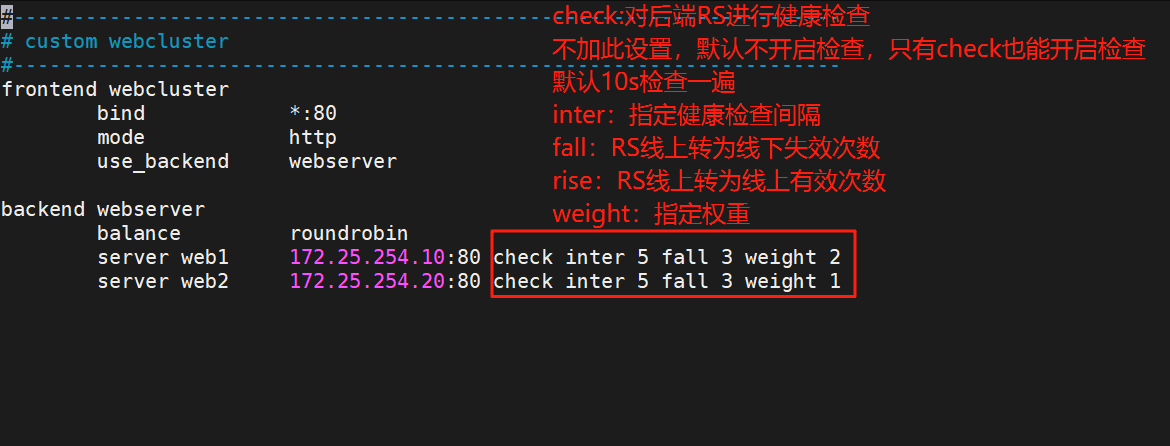
- 高可用与健康检查
- 流量控制与优化
- 日志与监控
haproxy相关文件
启动文件: /lib/systemd/system/haproxy.service
主配置目录: /etc/haproxy/
主配置文件: /etc/haproxy/haproxy.cfg
子配置目录: /etc/haproxy/conf.d[root@haproxy ~]# haproxy -v #查看版本
haproxy负载均衡简单实例
在RS上安装nginx,开启服务与关闭火墙或放行80端口,生成发布文件
[root@RS1 ~]# dnf install nginx -y
[root@RS1 ~]# systemctl enable --now nginx
[root@RS1 ~]# echo RS2-172.25.254.10 > /usr/share/nginx/html/index.html
[root@RS1 ~]# systemctl disable --now firewalld.service[root@RS2 ~]# dnf install nginx -y
[root@RS2 ~]# systemctl enable --now nginx
[root@RS2 ~]# echo RS2-172.25.254.20 > /usr/share/nginx/html/index.html
[root@RS2 ~]# systemctl disable --now firewalld.service
安装haproxy
#haproxy主机上安装软件包,开启服务与关闭火墙或者放行80端口
#由于client与haproxy是独立的TCP连接所以要在端口放行80端口
[root@haproxy ~]# dnf install haproxy -y
[root@haproxy ~]# systemctl restart haproxy.service
[root@haproxy ~]# systemctl disable --now firewalld.service
#编辑配置文件
[root@haproxy ~]# vim /etc/haproxy/haproxy.cfg
......
defaults
......
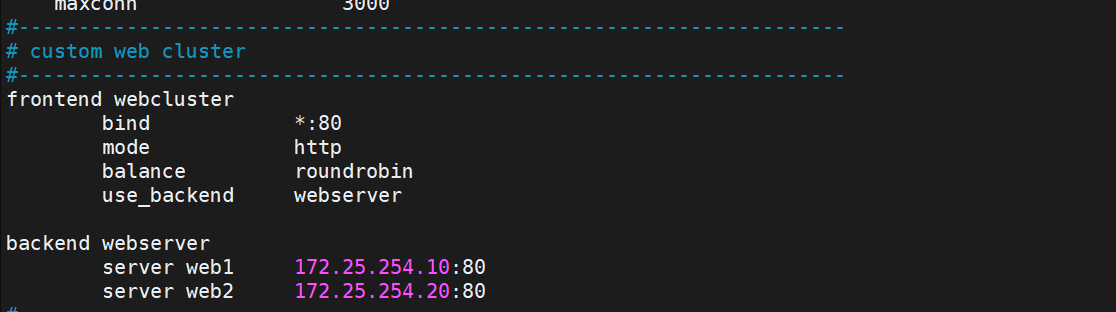
frontend webcluster #定义了一个名为 webcluster 的前端。前端部分用于接收客户端的请求,并根据配置将请求转发到后端bind *:80 #指定 HAProxy 监听所有网络接口(*)的 80 端口。mode http #设置 HAProxy 的工作模式为 HTTP 模式balance roundrobin #指定负载均衡的算法为轮询(roundrobin)。use_backend webserver #表示将接收到的请求转发到名为 webserver 的后端(backend)。backend webserver #定义了一个名为 webserver 的后端。后端部分包含了一组实际处理请求的服务器。server web1 172.25.254.10:80 #定义了一个名为 web1 的服务器,其 IP 地址为 172.25.254.10,端口为 80。这是后端服务器之一,HAProxy 会将请求转发到这台服务器上进行处理。server web2 172.25.254.20:80 #同理
......
测试
#使用测试机去访问haproxy服务器
for i in {1..10}
> do
> curl 172.25.254.100
> done
RS2-172.25.254.20
RS1-172.25.254.10
RS2-172.25.254.20
RS1-172.25.254.10
RS2-172.25.254.20
RS1-172.25.254.10
RS2-172.25.254.20
RS1-172.25.254.10
RS2-172.25.254.20
RS1-172.25.254.10#在RS上查看日志
[root@RS1 ~]# cat /var/log/nginx/access.log
[root@haproxy ~]# vim /etc/haproxy/haproxy.cfg
#---------------------------------------------------------------------
# common defaults that all the 'listen' and 'backend' sections will
# use if not designated in their block
#---------------------------------------------------------------------
defaultsmode                    http		log                     globaloption                  httplogoption                  dontlognulloption http-server-close
#   option forwardfor       except 127.0.0.0/8	#透传客户端真实IP至后端web服务器#注释后在RS日志上就看不到是谁通过调度器来访问option                  redispatchretries                 3timeout http-request    10stimeout queue           1mtimeout connect         10stimeout client          1mtimeout server          1mtimeout http-keep-alive 10stimeout check           10smaxconn                 3000#在RS上查看日志
[root@RS1 ~]# cat /var/log/nginx/access.log
haproxy的基本配置信息
haproxy的配置文件分为两大部分组成global,proxies
global
进程及安全配置相关的参数
性能调整相关参数
Debug参数
proxies
defaults:为frontend, backend, listen提供默认配置
frontend:前端,供客户端访问的IP前端
backend:后端,通过调度访问的RS上
listen:同时拥有前端和后端配置,配置简单,生产推荐使用
global配置
global
log 127.0.0.1 local2 					#定义全局的syslog服务器;日志服务器需要开启UDP协议,最多可以定义两个
chroot /var/lib/haproxy 				#锁定运行目录
pidfile /var/run/haproxy.pid 			#指定pid文件
maxconn 100000 							#指定最大连接数
user haproxy 							#指定haproxy的运行用户
group haproxy 							#指定haproxy的运行组
daemon 									#指定haproxy以守护进程方式运行
# turn on stats unix socket
stats socket /var/lib/haproxy/stats 		#指定haproxy的套接字文件
nbproc 2 								#指定haproxy的work进程数量,默认是1个
cpu-map 1 0 							#指定第一个work绑定第一个cpu核心
cpu-map 2 1 							#指定第二个work绑定第二个cpu核心
nbthread 2 								#指定haproxy的线程数量,默认每个进程一个线
程,此参数与nbproc互斥
maxsslconn 100000 						#每个haproxy进程ssl最大连接数,用于haproxy
配置了证书的场景下
maxconnrate 100 						#指定每个客户端每秒建立连接的最大数量
Proxies配置-defaults
defaultsmode http # 默认使用 HTTP 模式(而不是 TCP 模式)log global # 使用 global 段定义的日志配置option httplog # 启用详细的 HTTP 请求日志格式option dontlognull # 不记录没有有效数据的连接日志(减少日志噪音)option http-server-close # 允许服务器关闭连接(节省资源)option forwardfor except 127.0.0.0/8 # 在请求头中添加 X-Forwarded-For,除了本地地址option redispatch # 如果后端服务器不可用,重新分发请求到其他可用服务器retries 3 # 连接后端失败时重试 3 次timeout http-request 10s # 客户端发送完整请求头的超时时间timeout queue 1m # 请求在队列中等待的最大时间timeout connect 10s # 与后端服务器建立连接的超时时间timeout client 1m # 客户端连接空闲超时时间timeout server 1m # 后端服务器响应超时时间timeout http-keep-alive 10s # HTTP keep-alive 连接空闲超时时间timeout check 10s # 健康检查的超时时间maxconn 3000 # 每个进程的最大并发连接数(全局限制)errorfile 503 /etc/haproxy/errorpage/503.http # 当返回 503 错误时,使用自定义错误页面Proxies配置-frontend
frontend 配置参数:
bind:指定HAProxy的监听地址,可以是IPV4或IPV6,可以同时监听多个IP或端口,可同时用于listen字段中
#格式:
bind [<address>]:<port_range> [, ...] [param*]#注意:如果需要绑定在非本机的IP,需要开启内核参数:net.ipv4.ip_nonlocal_bind=1backlog <backlog> #针对所有server配置,当前端服务器的连接数达到上限后的后援队列长度,注意:不支持backend
Proxies配置-backend
定义一组后端服务器,backend服务器将被frontend进行调用。
注意: backend 的名称必须唯一,并且必须在listen或frontend中事先定义才可以使用,否则服务无法启动
mode http|tcp       #指定负载协议类型,和对应的frontend必须一致
option				#配置选项
server				#定义后端realserver,必须指定IP和端口
Proxies配置-listen
使用listen替换 frontend和backend的配置方式,可以简化设置,通常只用于TCP协议的应用
[root@HAProxy ~]# vim /etc/haproxy/haproxy.cfg
listen webculsterbind        *:80mode        httpbalance     roundrobinserver web1 172.25.254.10:80 check inter 5s fall 3server web2 172.25.254.20:80 check inter 5s fall 3server web3 172.25.254.100:80 check inter 5s fall 3
socat工具
热处理
安装与环境配置
#安装soct工具
[root@haproxy ~]# dnf install socat -y
[root@haproxy ~]# vim /etc/haproxy/haproxy.cfg
......
#修改目录权限为600,管理等级为管理员
stats socket /var/lib/haproxy/stats mode 600 level admin
......
[root@haproxy ~]# systemctl restart haproxy.service
常用配置
#查看帮助
[root@haproxy ~]# socat -h
[root@haproxy ~]# echo "help" | socat stdio /var/lib/haproxy/stats
#查看haproxy状态
[root@haproxy ~]# echo "show info" | socat stdio /var/lib/haproxy/stats
#查看集群状态
[root@haproxy ~]# echo "show servers state" | socat stdio /var/lib/haproxy/stats
#查看集群权重
[root@haproxy ~]# echo "get weight webcluster/web1 1" | socat stdio /var/lib/haproxy/stats
2 (initial 2)
[root@haproxy ~]# echo "get weight webcluster/web2 2" | socat stdio /var/lib/haproxy/stats
1 (initial 1)
#更改集群权重
[root@haproxy ~]# echo "set weight webcluster/web1 1 " | socat stdio /var/lib/haproxy/stats
#更改完后查看
[root@haproxy ~]# echo "get weight webcluster/web1 1" | socat stdio /var/lib/haproxy/stats
1 (initial 2)
#下线后端服务器
[root@haproxy ~]# echo "disable server webcluster/web1 " | socat stdio /var/lib/haproxy/stats
#上线后端服务器
[root@haproxy ~]# echo "enable server webcluster/web1 " | socat stdio /var/lib/haproxy/stats
以上为单进程处理,下面为多进程处理
[root@haproxy ~]# vim /etc/haproxy/haproxy.cfg
[root@haproxy ~]# systemctl restart haproxy.service
#这样每个进程都会有单独的sock文件来进行单独管理
[root@haproxy ~]# ll /var/lib/haproxy/
total 0
srw------- 1 root root 0 Jul 18 13:02 stats
srw------- 1 root root 0 Jul 18 13:02 stats1
srw------- 1 root root 0 Jul 18 13:02 stats2
haproxy的算法
什么是算法?算法就是决定了haproxy服务器收到的客户请求“分配给谁”,算法的核心目标包括:
均衡后端服务器负载(避免某台服务器过载);
优先选择性能更好的服务器;
支持会话保持(如用户登录状态绑定到特定服务器);
适配后端服务器的特性(如静态资源服务器、动态应用服务器)。
haproxy的算法分为静态算法与动态算法,区别就在于动态算法会根据服务器的负载状态结合算法进行调度。
静态算法
静态算法有着一下共同的特点:
不支持运行时利用socat进行权重的动态调整(只能为0和1,不支持其他值),只能靠重启haproxy生效。
不支持慢启动
tips:慢启动是指在服务器刚刚启动上不会把他所应该承担的访问压力全部给它,而是先给一部分,当没问题后在给一部分。
static-rr
可以基于权重赖进行调度
其后端主机数量没有限制
static-rr相当于lvs的wrr,可以基于权重进行轮询调度。
first
根据服务器在配置列表的位置,自上而下进行调度
只有当上一台服务器连接数满载了,才会调度到下一台服务器
忽略服务器的权重设置
特点鲜明,只有当第一台服务器满载“累死”才到下一台服务器。
动态算法
共同特点:
1. 可以利用socat工具在运行时进行权重与上下线的动态调整无需重启服务
2. 基于后端服务器的负载情况结合算法来调整调度情况
3. 支持慢启动
roundrobin
基于权重来轮询调度
后端最多只能支持4095个RS,并不是无上限
roundrobin也为动态rr为默认调度算法使用最为广泛,与static-rr不同的是能结合负载来进行调度。
leastconn
选择当前连接数最少的服务器处理请求
支持加权,在连接数靠近时权重更高的服务器更可能被选中
适用于长连接服务,如数据库连接调用等长时间占用服务器资源较长时间,避免了使用轮询导致的连接堆积。
其他算法
其他算法即可作为静态算法,也能通过添加一致性hash参数来变为动态算法,静态时称为取模法。
souerce
[root@haproxy ~]# vim /etc/haproxy/haproxy.cfg
[root@haproxy ~]# systemctl restart haproxy.service
......
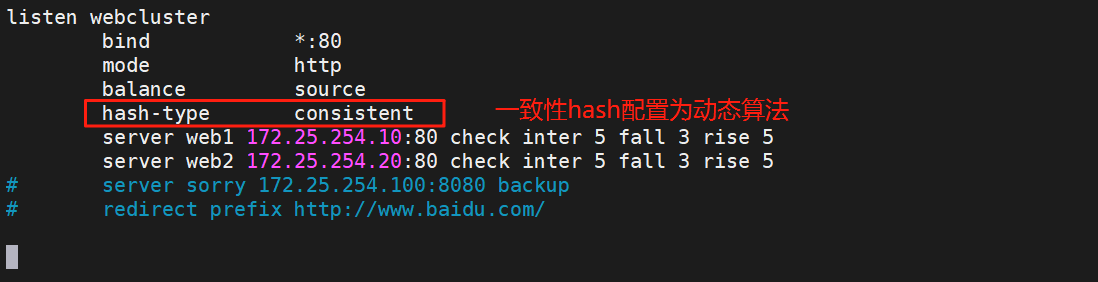
balance source
hash-type consistent #将hash类型配置为一致性,变为动态算法
......
测试
for i in {1..10}; do curl 172.25.254.100; done
RS2-172.25.254.20
RS2-172.25.254.20
RS2-172.25.254.20
RS2-172.25.254.20
RS2-172.25.254.20
RS2-172.25.254.20
RS2-172.25.254.20
RS2-172.25.254.20
RS2-172.25.254.20
RS2-172.25.254.20
#由于是用一个客户端访问,源地址被hash后这个客户端就会一直访问RS2,除非RS下线后就会重新调度到另一台RS上,如果此时有其他客户端也在通过haparoxy访问RS,那么会话就会中断需要重新调度;做了一致性hash后,只有在先前访问下线的RS的客户端需要重新调度,其他正常访问RS的客户不会重新调度
高级功能及配置
基于cookie的会话保持
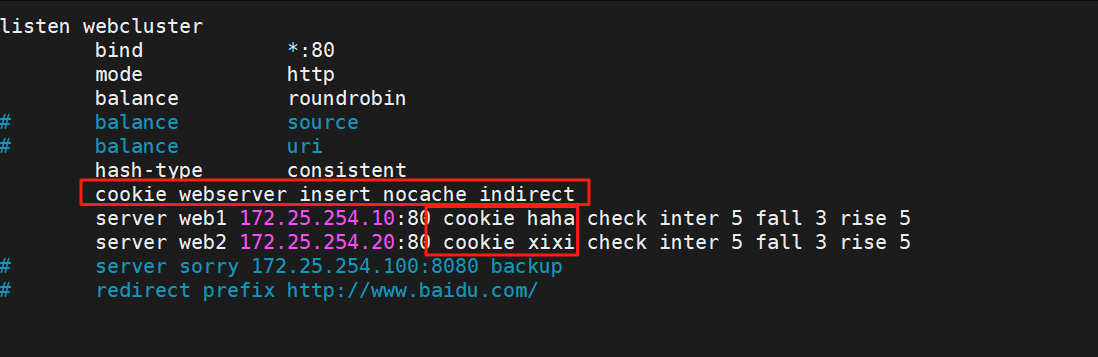
[root@haproxy ~]# vim /etc/haproxy/haproxy.cfg
[root@haproxy ~]# systemctl restart haproxy.service
webserver		#cookie的key名称,自定义,用于实现持久连接
insert 		#插入新的cookie,默认不插入cookie
indirect	#如果客户端以及由cookie,则不会再发送cookie信息
nocache		#当client和hapoxy之间有缓存服务器(如:CDN)时,不允许中间缓存器缓存	cookie,因为这会导致很多经过同一个CDN的请求都发送到同一台后端服务器.
在调度RS上添加cookie值
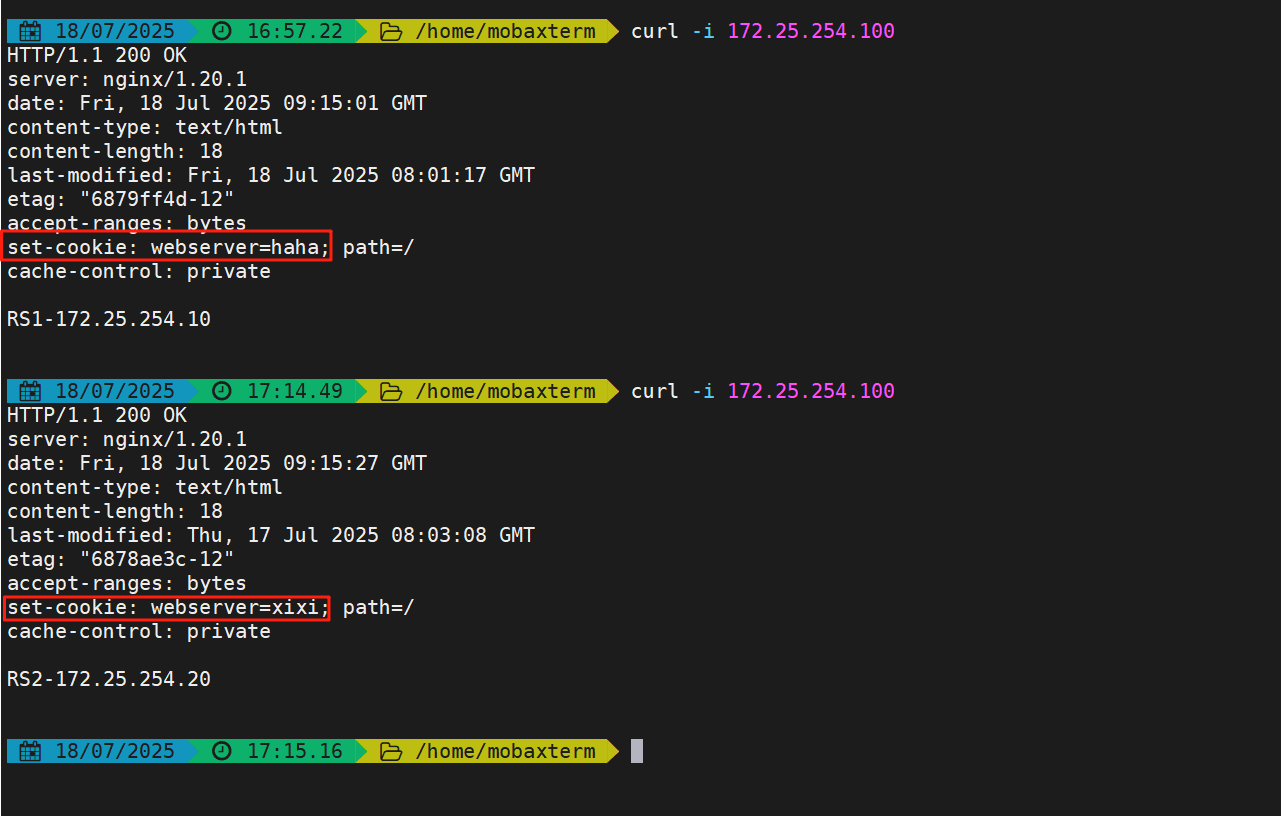
测试
查看访问RS上的添加的cookie值
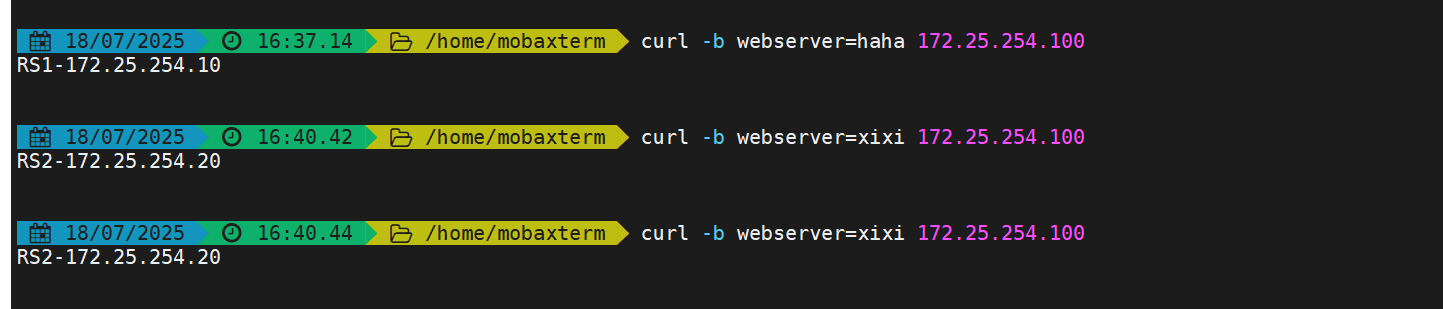
访问时指定cookie值
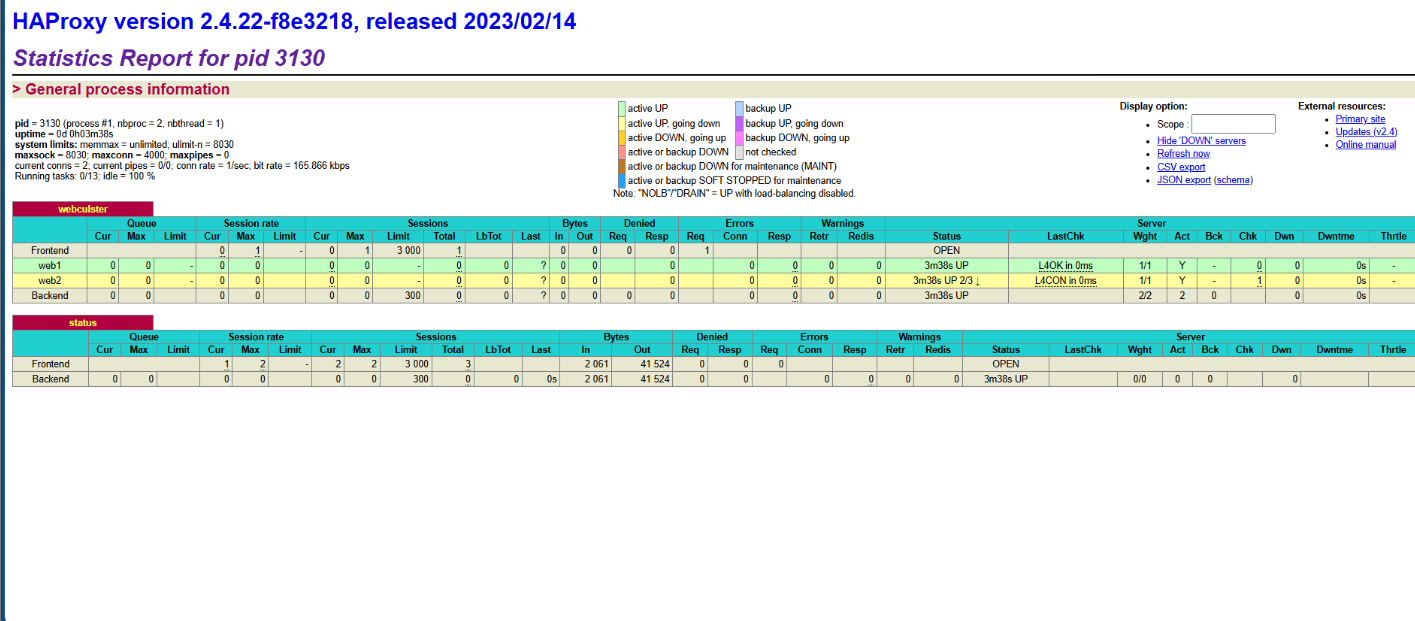
haproxy状态界面
haproxy状态界面是给运维人员查看后端服务器的状况
[root@haproxy ~]# vim /etc/haproxy/haproxy.cfg
[root@haproxy ~]# systemctl restart haproxy.service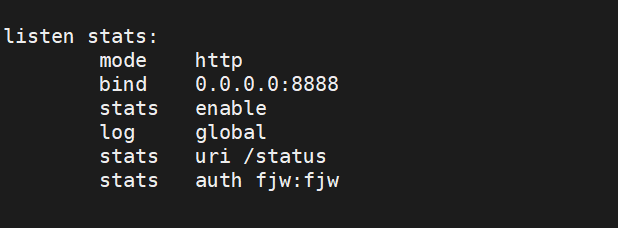
直接在浏览器访问172.25.254.100:8080/stats
IP透传
七层
[root@haproxy ~]# vim /etc/haproxy/haproxy.cfg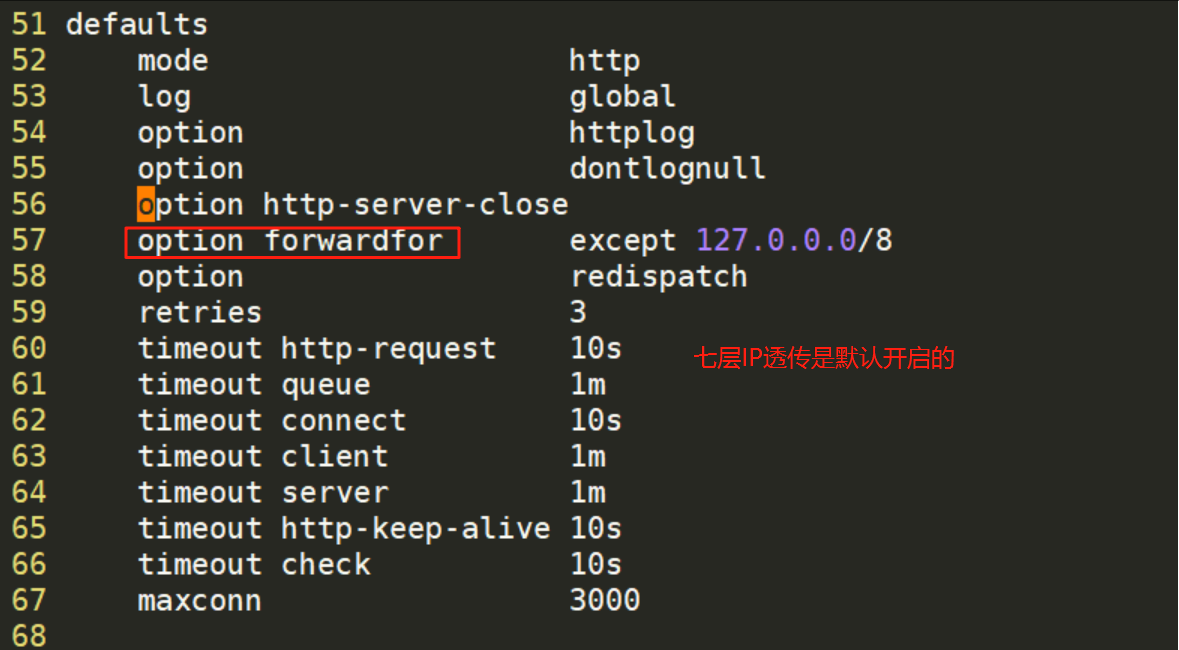

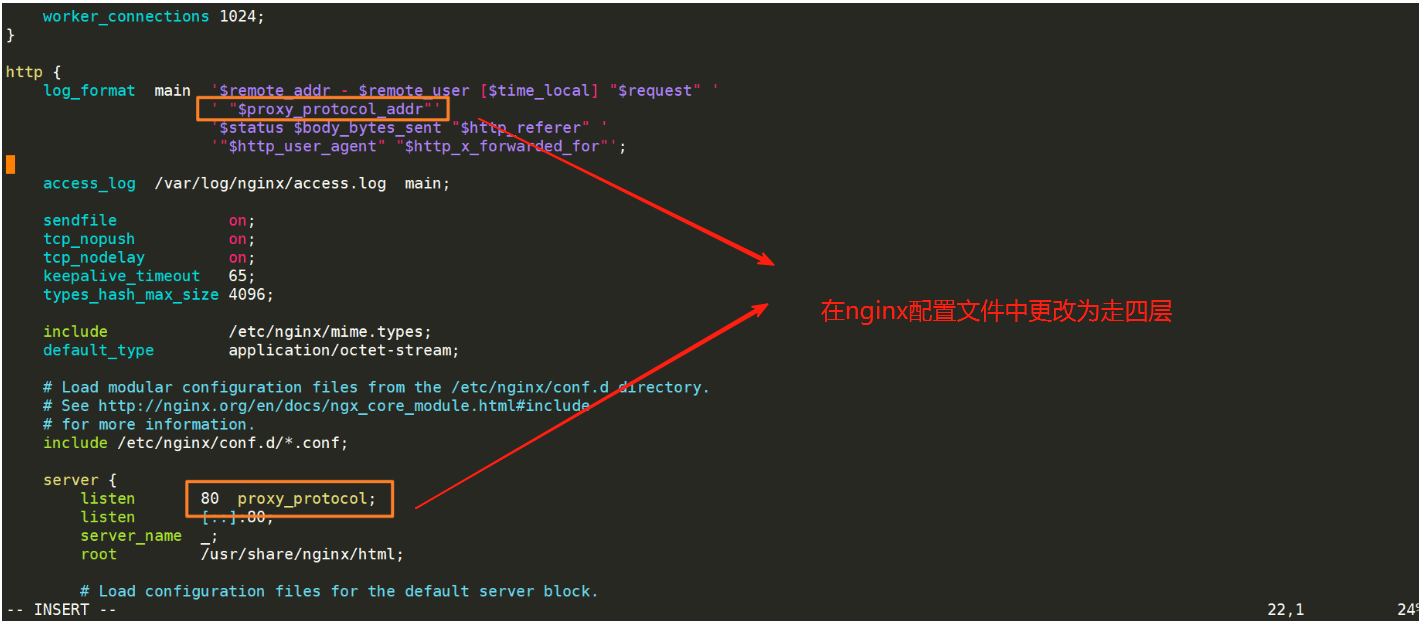
四层
要想开启四层IP透传就要把mode变为tcp走四层,并且nginx搭建的web服务器也要走四层

测试

ACL
ACL编写格式
acl acl名称 匹配规范 匹配模式 具体操作符 操作对象类型
acl名称:可以使用大字母A-Z、小写字母a-z、数字0-9、冒号:、点.、中横线和下划线,并且严格区分大 小写,比如:my_acl和My_Acl就是两个完全不同的acl
ACL-匹配规范
hdr string,提取在一个HTTP请求报文的首部
hdr([<name> [,<occ>]]):完全匹配字符串,header的指定信息,<occ> 表示在多值中使用的值的出
现次数
hdr_beg([<name> [,<occ>]]):前缀匹配,header中指定匹配内容的begin
hdr_end([<name> [,<occ>]]):后缀匹配,header中指定匹配内容end
hdr_dom([<name> [,<occ>]]):域匹配,header中的dom(host)
hdr_dir([<name> [,<occ>]]):路径匹配,header的uri路径
hdr_len([<name> [,<occ>]]):长度匹配,header的长度匹配
hdr_reg([<name> [,<occ>]]):正则表达式匹配,自定义表达式(regex)模糊匹配
hdr_sub([<name> [,<occ>]]):子串匹配,header中的uri模糊匹配 模糊匹配c 报文中a/b/c也会匹
配
#示例:
hdr(<string>) 用于测试请求头部首部指定内容
hdr_dom(host) 请求的host名称,如 www.timinglee.org
hdr_beg(host) 请求的host开头,如 www. img. video. download. ftp.
hdr_end(host) 请求的host结尾,如 .com .net .cn
#示例:
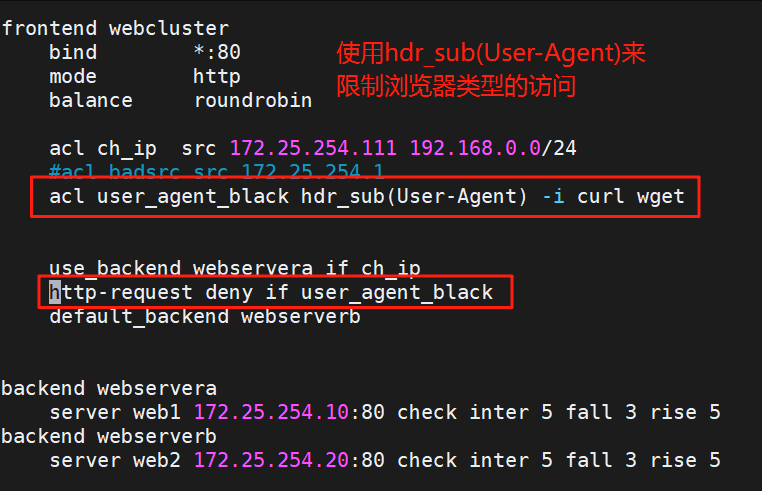
acl bad_agent hdr_sub(User-Agent) -i curl wget
http-request deny if bad_agent
#有些功能是类似的,比如以下几个都是匹配用户请求报文中host的开头是不是www
acl short_form hdr_beg(host) www.
acl alternate1 hdr_beg(host) -m beg www.
acl alternate2 hdr_dom(host) -m beg www.
acl alternate3 hdr(host) -m beg www.base : string
#返回第一个主机头和请求的路径部分的连接,该请求从主机名开始,并在问号之前结束,对虚拟主机有用
<scheme>://<user>:<password>@#<host>:<port>/<path>;<params>#?<query>#<frag>
base : exact string match
base_beg : prefix match
base_dir : subdir match
base_dom : domain match
base_end : suffix match
base_len : length match
base_reg : regex match
base_sub : substring matchpath : string
#提取请求的URL路径,该路径从第一个斜杠开始,并在问号之前结束(无主机部分)
<scheme>://<user>:<password>@<host>:<port>#/<path>;<params>#?<query>#<frag>
path : exact string match
path_beg : prefix match #请求的URL开头,如/static、/images、/img、/css
path_end : suffix match #请求的URL中资源的结尾,如 .gif .png .css .js .jpg .jpeg
path_dom : domain match
path_dir : subdir match
path_len : length match
5.4.1.3 ACL-flags 匹配模式
ACL匹配模式
path_reg : regex match
path_sub : substring match
#示例:
path_beg -i /haproxy-status/
path_end .jpg .jpeg .png .gif
path_reg ^/images.*\.jpeg$
path_sub image
path_dir jpegs
path_dom timingleeurl : string
#提取请求中的整个URL。
url :exact string match
url_beg : prefix match
url_dir : subdir match
url_dom : domain match
url_end : suffix match
url_len : length match
url_reg : regex match
url_sub : substring matchdst #目标IP
dst_port #目标PORT
src #源IP
src_port #源PORT
#示例:
acl invalid_src src 10.0.0.7 192.168.1.0/24
acl invalid_src src 172.16.0.0/24
acl invalid_port src_port 0:1023
ACL-匹配模式
-i 不区分大小写
-m 使用指定的正则表达式匹配方法
-n 不做DNS解析
-u 禁止acl重名,否则多个同名ACL匹配或关系
ACL-具体操作符
整数比较:eq、ge、gt、le、lt
字符比较:
- exact match (-m str) :字符串必须完全匹配模式
- substring match (-m sub) :在提取的字符串中查找模式,如果其中任何一个被发现,ACL将匹配
- prefix match (-m beg) :在提取的字符串首部中查找模式,如果其中任何一个被发现,ACL将匹配
- suffix match (-m end) :将模式与提取字符串的尾部进行比较,如果其中任何一个匹配,则ACL进行
匹配
- subdir match (-m dir) :查看提取出来的用斜线分隔(“/")的字符串,如其中任一个匹配,则ACL
进行匹配
- domain match (-m dom) :查找提取的用点(“.")分隔字符串,如果其中任何一个匹配,则ACL进行
匹配
ACL-操作对象
- Boolean #布尔值
- integer or integer range #整数或整数范围,比如用于匹配端口范围
- IP address / network #IP地址或IP范围, 192.168.0.1 ,192.168.0.1/24
- string--> www.timinglee.org
exact #精确比较
substring #子串
suffix #后缀比较
prefix #前缀比较
subdir #路径, /wp-includes/js/jquery/jquery.js
domain #域名,www.timinglee.org
- regular expression #正则表达式
- hex block #16进制
ACL组合调用方式
多个ACL逻辑处理
与:隐式(默认)使用
或:使用“or" 或 “||"表示
否定:使用 "!" 表示
实验:与逻辑的测试
测试
ACL示例
示例-基于域名匹配
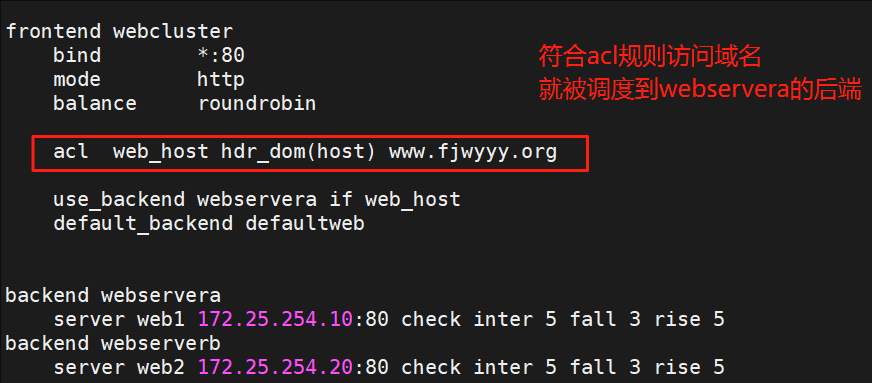
测试

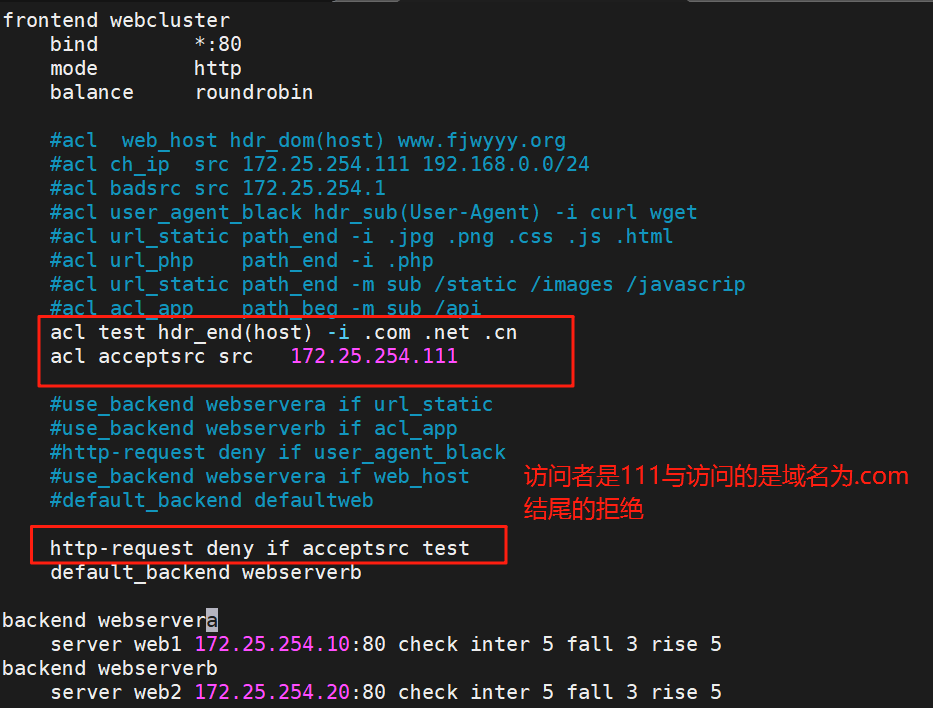
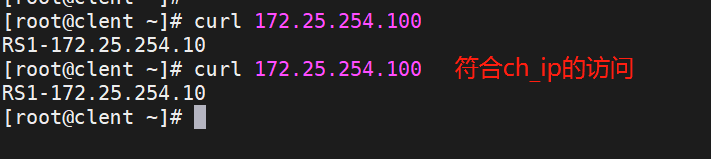
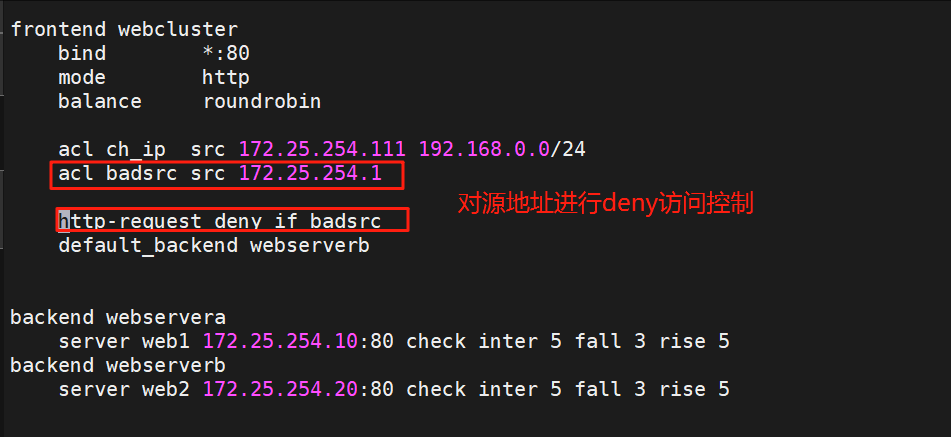
示例-基于源地址与子网的调度访问控制
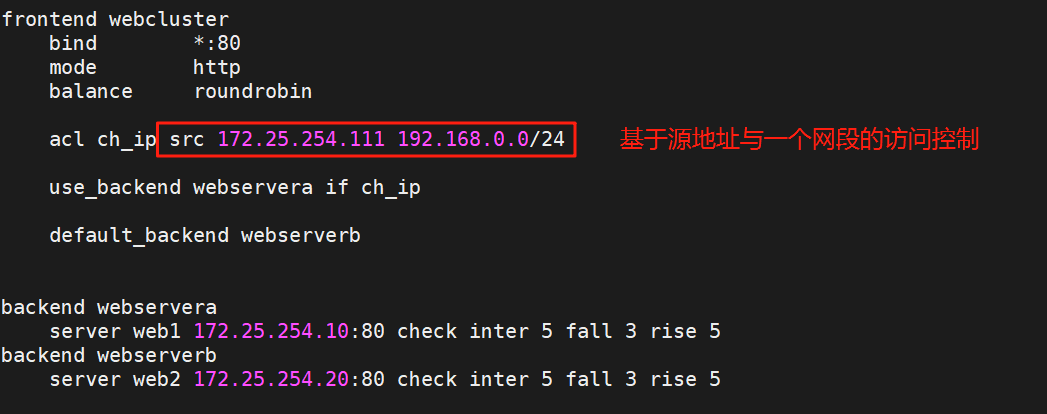
测试

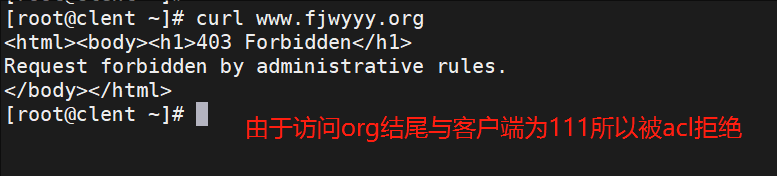
示例-基于源地址的访问控制
测试

示例-匹配浏览器类型
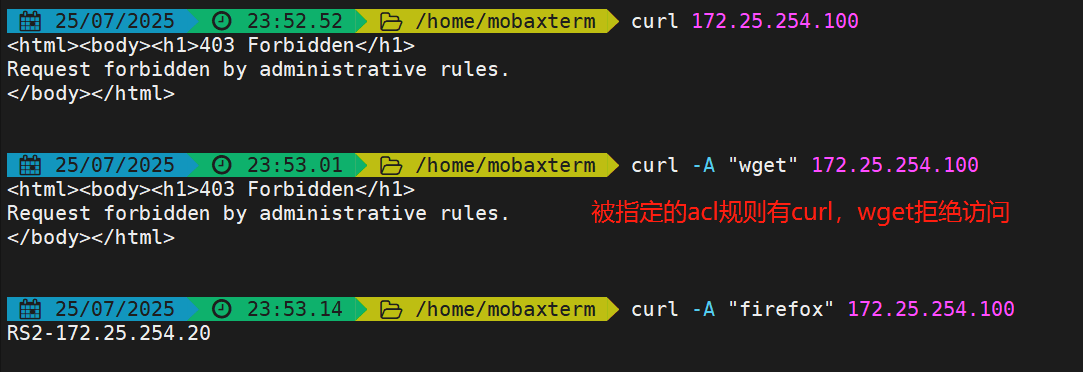
测试
#指定HTTP请求的用户代理(User-Agent)
curl -A "firefox" 172.25.254.100
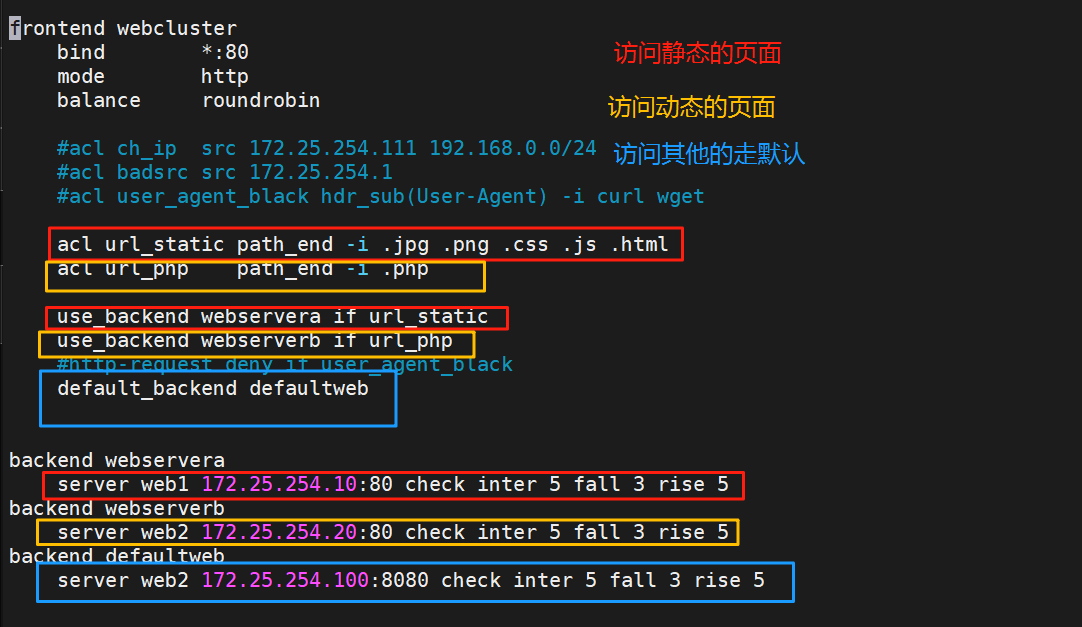
示例-基于文件后缀名实现动静分离
测试
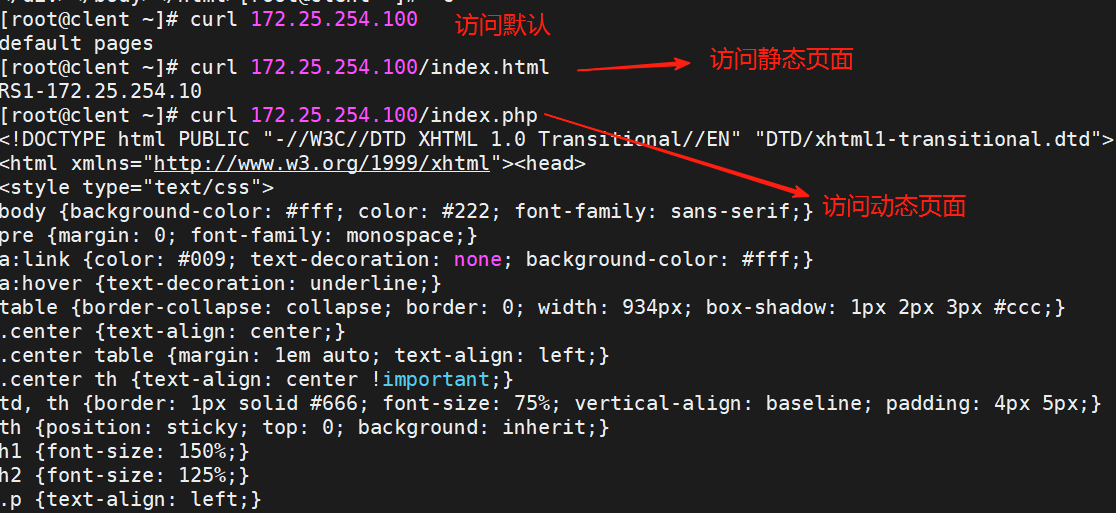
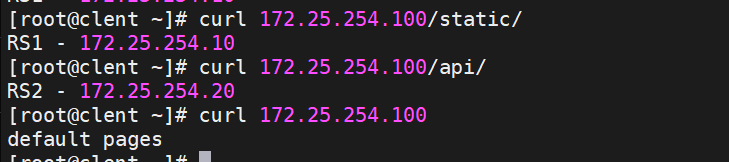
示例-基于匹配访问路径实现动静分离

测试
自定义haproxy错误界面
自定义错误页面文件
#查找haproxy的安装包
[root@haproxy ~]# rpm -qa | grep haproxy
haproxy-2.4.22-3.el9_3.x86_64
#查找软件包安装后的文件列表
[root@haproxy ~]# rpm -ql haproxy-2.4.22-3.el9_3.x86_64 | grep -E http$
/usr/share/haproxy/400.http
/usr/share/haproxy/403.http
/usr/share/haproxy/408.http
/usr/share/haproxy/500.http
/usr/share/haproxy/502.http
/usr/share/haproxy/503.http
/usr/share/haproxy/504.http#编辑自定义的错误页面文件
[root@haproxy ~]# mkdir /haproxy/errorpages/ -p
[root@haproxy ~]# cp /usr/share/haproxy/503.http /etc/haproxy/errorpages/503.http
[root@haproxy ~]# vim /etc/haproxy/errorpages/503.http	#错误页文件建议.http结尾
HTTP/1.0 503 Service Unavailable
Cache-Control: no-cache
Connection: close
Content-Type: text/html;charset=UTF-8<html><body><h1>什么动物生气最安静</h1>
赖俊希!!
</body></html>#在配置文件指定自定义错误页
[root@haproxy ~]# vim /etc/haproxy/haproxy.cfg
defaults
......
errorfile 503  /etc/haproxy/errorpages/503.http
......#自定义错误页格式
errorfile <code> <file>
<code> #HTTP status code.支持200, 400, 403, 405, 408, 425, 429, 500, 502,503,504
<file> #包含完整HTTP响应头的错误页文件的绝对路径。 建议后缀".http",以和一般的html文件相区分
测试:
关闭后端的RS主机,然后用浏览器去访问172.25.254.100haproxy
重定向错误页面
[root@haproxy ~]# vim /etc/haproxy/haproxy.cfg
defaults
......
#相当于errorloc302 利用302重定向指定URL
errorloc 503 https://www.baidu.com
......
测试:
关闭后端的RS主机,然后用浏览器去访问172.25.254.100haproxy
haproxy的https实现
[root@haproxy ~]# mkdir /etc/haproxy/certs
#证书制作
[root@haproxy ~]# openssl req -newkey rsa:2048 \	#发起ssl签证请求,创建加密为2028位的rsa公钥
> -nodes -sha256 -keyout /etc/haproxy/certs/fjwyyy.key \	#-nodes忽略服务开启时输入的密码,生成MD5sha256加密的私钥到指定目录
> -x509 -days 365 -out /etc/haproxy/certs/fjwyyy.crt 		#生成x509的证书格式,指定有效时间位365天,指定生成的证书到目录[root@haproxy ~]# cd /etc/haproxy/certs/
#将私钥与证书生成到一个文件中用于在haproxy指定
[root@haproxy certs]# cat fjwyyy.key fjwyyy.crt > fjwyyy.perm
[root@haproxy ~]# vim /etc/haproxy/haproxy.cfg
......
frontend webcluster_80bind *:80redirect scheme https if !{ ssl_fc } #把访问http的请求重定向到https#如果访问的网址没有ssl加密就把//前的内容转为httpsmode httpuse_backend webserverfrontend webcluster_443bind *:443 ssl crt /etc/haproxy/certs/fjwyyy.pem #指定ssl加密私钥与证书的路径mode httpuse_backend webserverbackend webservermode httpbalance roundrobinserver web1 172.25.254.10:80 check inter 3 fall 3 rise 2server web2 172.25.254.20:80 check inter 3 fall 3 rise 2......测试
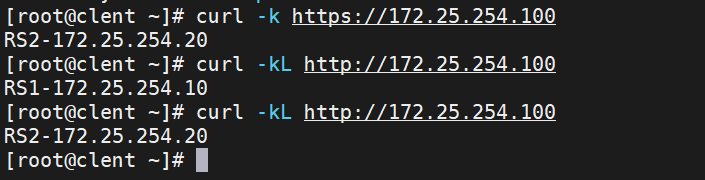
curl -k https://172.25.254.100 #-k跳过证书验证
curl -kL http://172.25.254.100 #-L跟随重定向 -L查看报文响应头