【机器学习深度学习】LLamaFactory微调效果与vllm部署效果不一致如何解决
目录
前言
一、问题本质
1.1 问题说明
1.2 问题本质示意
二、常见原因
LLaMAFactory对话模板规则定义
模型对话模板定义规则
三、解决方法
提取代码myset.py
创建jinja文件
安装VLLM
运行VLLM
安装运行open webui流程
四、流程梳理

前言
本文主要讲述的主要内容是关于在LLaMAFactory中微调后加载的模型测试效果和加载到其他推理框架(VLLM,LMDeploy)的测试效果不一致是什么原因导致的?又该如何解决?
主要原因是对话模板不一致所导致的
一、问题本质
1.1 问题说明
LLaMA-Factory 使用内置对话模板(
chat_template)来格式化训练/推理数据,而vLLM、LMDeploy等推理框架则可能使用自己的模板体系或根本不管模板。
这就是导致微调效果与部署效果不一致的核心原因之一。
LLaMA-Factory 的微调过程使用的是 HuggingFace Transformers 格式,而 vLLM 在推理时,依赖精确的:
-
tokenizer 配置
-
模型 config
-
权重格式(尤其是 LoRA 或 QLoRA)
-
prompt 模板
如果这些配置在部署时和训练时不一致,模型生成效果就会发生偏差。
1.2 问题本质示意
在 LLaMA-Factory 中使用的训练模板(例如 chatml):
<|im_start|>system
你是一个智能助手<|im_end|>
<|im_start|>user
你好<|im_end|>
<|im_start|>assistant
而 vLLM 默认可能认为只需要:
用户:你好
助手:
或者根本不加模板,直接拼接文本。这会让模型生成完全跑偏。
二、常见原因
2.1 原因汇总
| 问题类别 | 具体原因 | 解决方案 |
|---|---|---|
| Tokenizer 不一致 | tokenizer_config.json、special_tokens_map.json 中信息缺失或被修改 | ✅ 确保 tokenizer 跟随微调模型一起保存并部署到 vLLM |
| Prompt 模板不一致 | 如使用 chatml、alpaca、baichuan 模板不同会导致上下文格式变化 | ✅ 明确使用的 prompt 格式,在 vLLM 推理端加上相同格式的 系统提示 + 用户输入 + assistant 结构 |
| LoRA 权重未合并 | 微调后未合并 LoRA 层,推理端加载的是 base 模型 | ✅ 使用 merge_and_save 合并权重,再加载 |
| Quantization 不一致 | 训练中使用了 QLoRA 等量化策略,而部署端未支持或解码异常 | ✅ 部署前使用 LLaMA-Factory 的 export_model.py 导出标准 FP16 或 INT4 GGUF 权重 |
| vLLM 加载错误配置 | vLLM 读取模型参数时未正确加载 config.json 或 generation_config.json | ✅ 检查是否带上 --tokenizer、--trust-remote-code 等参数 |
2.2 LLaMAFactory对话模板规则定义
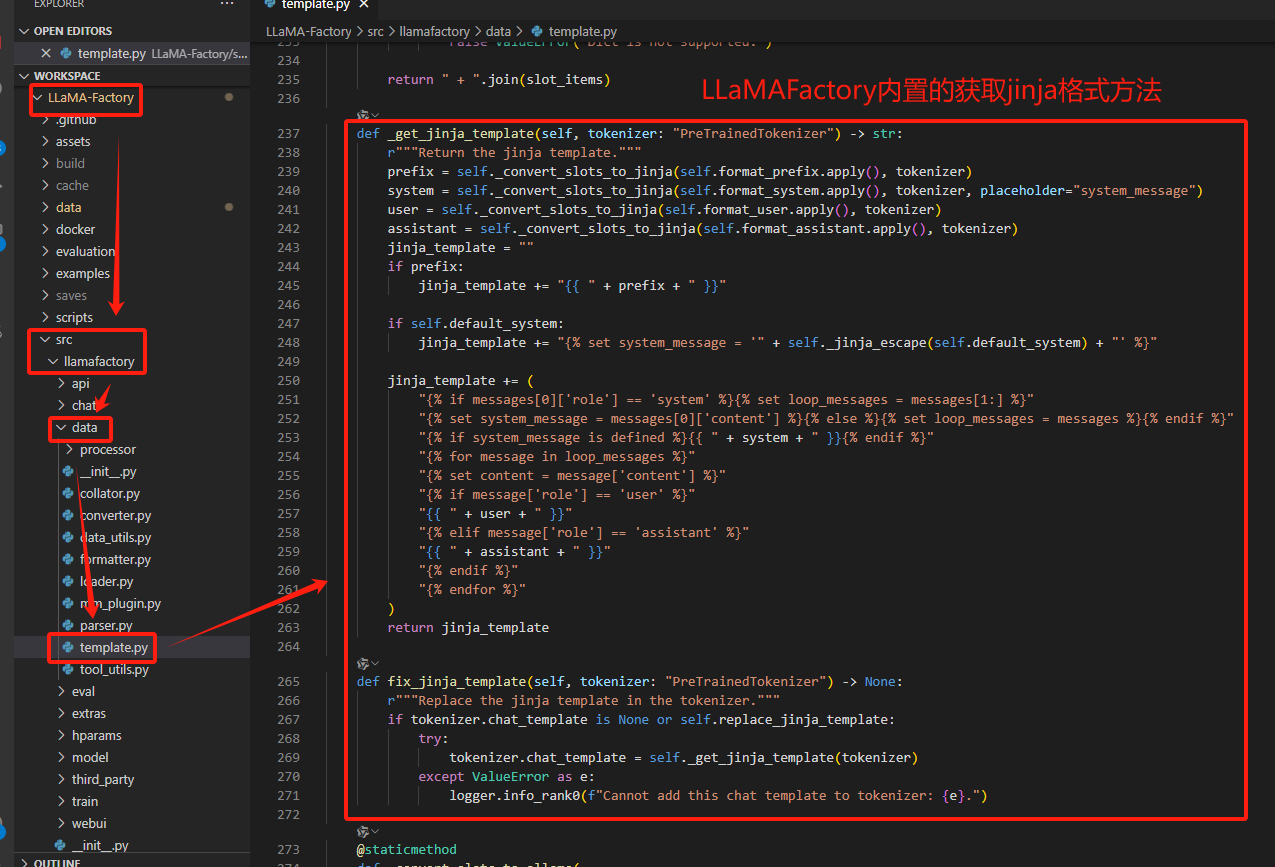
对话模板路径:LLaMA-Factory/src/llamafactory/data/template.py
在LLaMAFactory文件夹中有个template文件(LLaMA-Factory/src/llamafactory/data/template.py)定义了各个模型的对话模板规则,template.py中定义了大部分主流,通用的模型对话规则。
如下图展示的是qwen的几个对话模板

单独拿出一个对话示例模板,也就是【1.2】所展示的LLaMAFactory对话模板格式示例:
# copied from chatml template
register_template(name="qwen",format_user=StringFormatter(slots=["<|im_start|>user\n{{content}}<|im_end|>\n<|im_start|>assistant\n"]),format_assistant=StringFormatter(slots=["{{content}}<|im_end|>\n"]),format_system=StringFormatter(slots=["<|im_start|>system\n{{content}}<|im_end|>\n"]),format_function=FunctionFormatter(slots=["{{content}}<|im_end|>\n"], tool_format="qwen"),format_observation=StringFormatter(slots=["<|im_start|>user\n<tool_response>\n{{content}}\n</tool_response><|im_end|>\n<|im_start|>assistant\n"]),format_tools=ToolFormatter(tool_format="qwen"),default_system="You are Qwen, created by Alibaba Cloud. You are a helpful assistant.",stop_words=["<|im_end|>"],replace_eos=True,
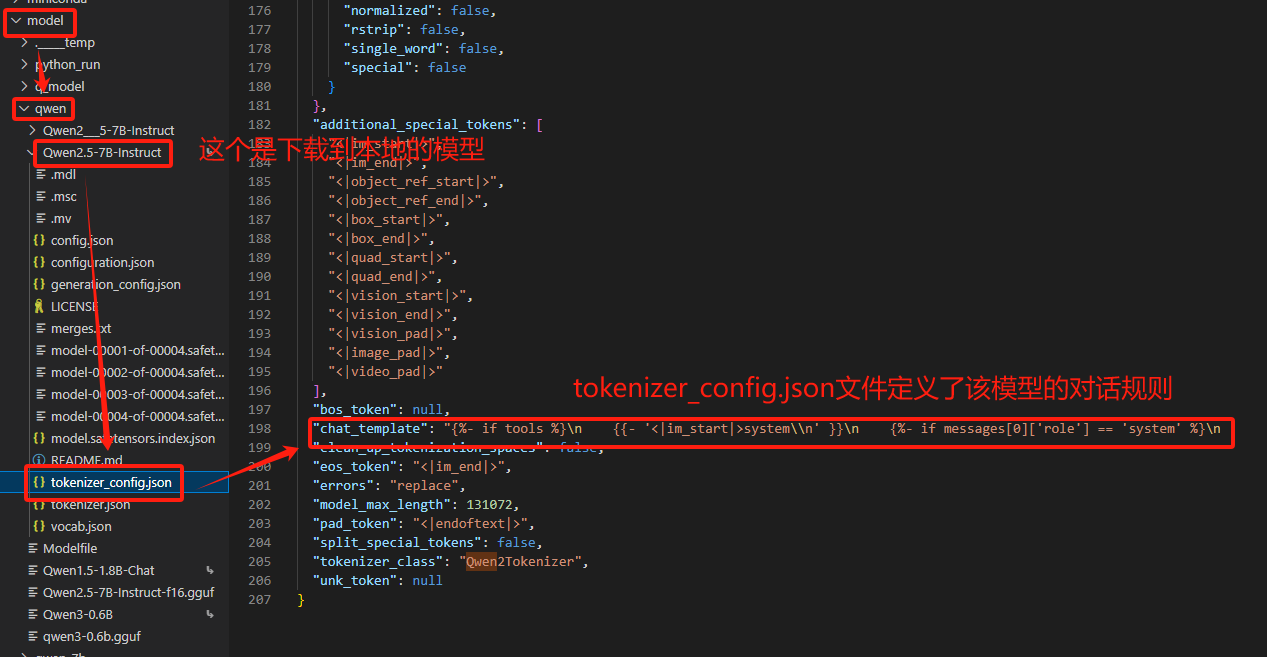
)2.3 模型对话模板定义规则
模型对话模板路径:模型名称/tokenizer_config.json
如果LLaMAFactory的内置对话模板中定义了相同的对话模板规则,回复效果自然也就没有差异,但在大多数情况下,对话模板的规则一致的条件是很难满足的。
三、解决方法
把在LLaMAFactory微调时的那套对话模板规则模板导出。使用微调时的对话规则,再部署到其它推理框架上就能够保证模型的输出效果一致了。
3.1 提取代码myset.py
# mytest.py
import sys
import os# 将项目根目录添加到 Python 路径
root_dir = os.path.dirname(os.path.dirname(os.path.dirname(os.path.dirname(os.path.abspath(__file__)))))
sys.path.append(root_dir)from llamafactory.data.template import TEMPLATES
from transformers import AutoTokenizer# 1. 初始化分词器(任意支持的分词器均可)
tokenizer = AutoTokenizer.from_pretrained("/mnt/workspace/model/qwen/Qwen2.5-7B-Instruct")# 2. 获取模板对象
template_name = "qwen"  # 替换为你需要查看的模板名称
template = TEMPLATES[template_name]# 3. 修复分词器的 Jinja 模板
template.fix_jinja_template(tokenizer)# 4. 直接输出模板的 Jinja 格式
print("=" * 40)
print(f"Template [{template_name}] 的 Jinja 格式:")
print("=" * 40)
print(tokenizer.chat_template)
【替换片段】
# 1. 初始化分词器(任意支持的分词器均可) tokenizer = AutoTokenizer.from_pretrained("/mnt/workspace/model/qwen/Qwen2.5-7B-Instruct")▲/mnt/workspace/model/qwen/Qwen2.5-7B-Instruct:模型路径,里面必须包含分词器tokenizers.json,下载的模型文件会自带这个文件;
template_name = "qwen" # 替换为你需要查看的模板名称▲qwen:在LLaMA-Factory/src/llamafactory/data/template.py中的内置对话模板规则,根据需求选择;
#
【使用说明】
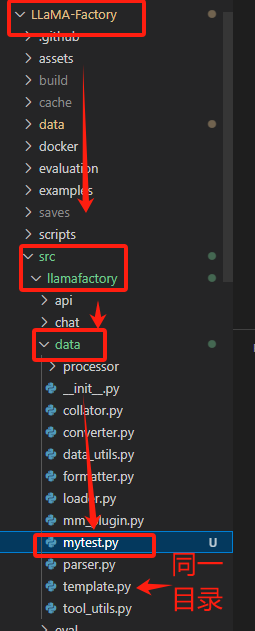
1、放置位置:LLaMA-Factory/src/llamafactory/data/mytest.py
2、创建虚拟环境配置
#创建虚拟环境llamafactory
conda create -n llamafactory python=3.11#激活虚拟环境
conda activate llamafactory
3、安装依赖
在虚拟环境内安装依赖
# 基础依赖
pip install transformers# 必须安装的依赖(LLamaFactory 相关)
pip install jinja2
pip install torch  # PyTorch 基础库# 安装 LLamaFactory 及其依赖(推荐从源码安装)
git clone https://github.com/hiyouga/LLaMA-Factory.git
cd LLaMA-Factory
pip install -e .  # 可编辑模式安装# 可选但推荐的依赖(用于完整功能)
pip install datasets accelerate sentencepiece
4、运行提取程序mytest.py
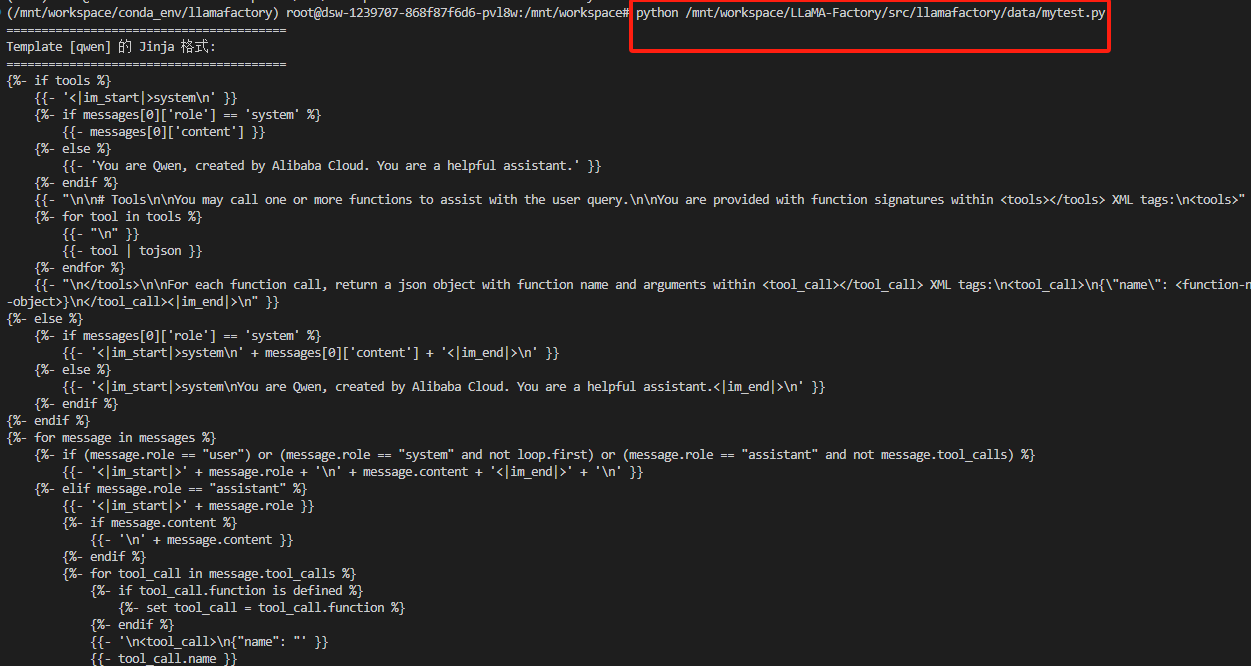
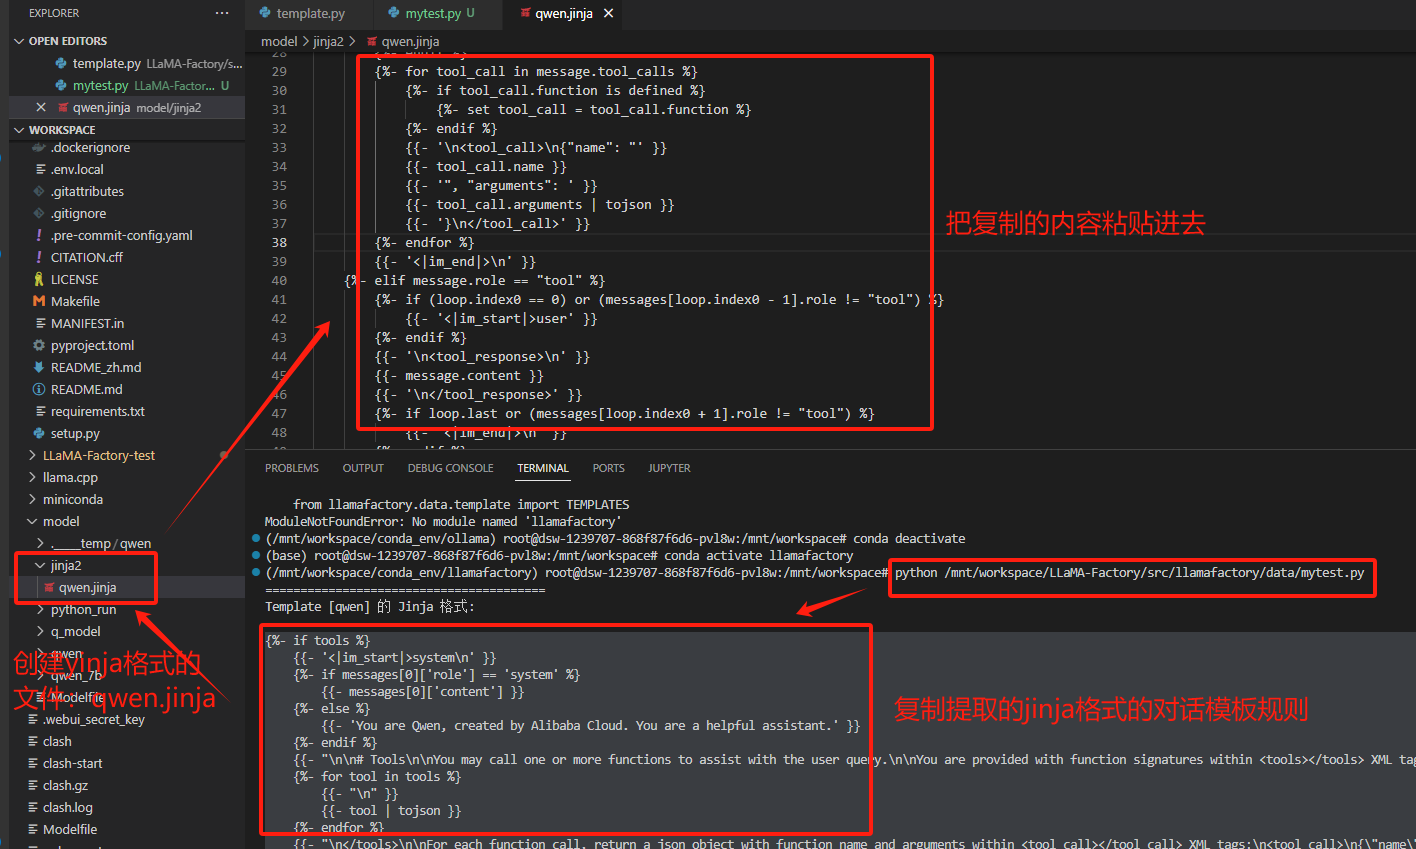
python /mnt/workspace/LLaMA-Factory/src/llamafactory/data/mytest.py▲/mnt/workspace/LLaMA-Factory/src/llamafactory/data/mytest.py:表示myset.py路径
5、运行结果
========================================
Template [qwen] 的 Jinja 格式:
========================================
{%- if tools %}{{- '<|im_start|>system\n' }}{%- if messages[0]['role'] == 'system' %}{{- messages[0]['content'] }}{%- else %}{{- 'You are Qwen, created by Alibaba Cloud. You are a helpful assistant.' }}{%- endif %}{{- "\n\n# Tools\n\nYou may call one or more functions to assist with the user query.\n\nYou are provided with function signatures within <tools></tools> XML tags:\n<tools>" }}{%- for tool in tools %}{{- "\n" }}{{- tool | tojson }}{%- endfor %}{{- "\n</tools>\n\nFor each function call, return a json object with function name and arguments within <tool_call></tool_call> XML tags:\n<tool_call>\n{\"name\": <function-name>, \"arguments\": <args-json-object>}\n</tool_call><|im_end|>\n" }}
{%- else %}{%- if messages[0]['role'] == 'system' %}{{- '<|im_start|>system\n' + messages[0]['content'] + '<|im_end|>\n' }}{%- else %}{{- '<|im_start|>system\nYou are Qwen, created by Alibaba Cloud. You are a helpful assistant.<|im_end|>\n' }}{%- endif %}
{%- endif %}
{%- for message in messages %}{%- if (message.role == "user") or (message.role == "system" and not loop.first) or (message.role == "assistant" and not message.tool_calls) %}{{- '<|im_start|>' + message.role + '\n' + message.content + '<|im_end|>' + '\n' }}{%- elif message.role == "assistant" %}{{- '<|im_start|>' + message.role }}{%- if message.content %}{{- '\n' + message.content }}{%- endif %}{%- for tool_call in message.tool_calls %}{%- if tool_call.function is defined %}{%- set tool_call = tool_call.function %}{%- endif %}{{- '\n<tool_call>\n{"name": "' }}{{- tool_call.name }}{{- '", "arguments": ' }}{{- tool_call.arguments | tojson }}{{- '}\n</tool_call>' }}{%- endfor %}{{- '<|im_end|>\n' }}{%- elif message.role == "tool" %}{%- if (loop.index0 == 0) or (messages[loop.index0 - 1].role != "tool") %}{{- '<|im_start|>user' }}{%- endif %}{{- '\n<tool_response>\n' }}{{- message.content }}{{- '\n</tool_response>' }}{%- if loop.last or (messages[loop.index0 + 1].role != "tool") %}{{- '<|im_end|>\n' }}{%- endif %}{%- endif %}
{%- endfor %}
{%- if add_generation_prompt %}{{- '<|im_start|>assistant\n' }}
{%- endif %}
3.2 创建jinja文件
创建一个jinja文件,将执行结果复制进去
3.3 安装VLLM
参考文章:【VLLM】大模型本地化部署_vllm部署大模型-CSDN博客
直接看这篇文章的【三、部署VLLM】即可
3.4 运行VLLM
vllm serve <model> --chat-template ./path-to-chat-template.jinja▲<model>:表示训练模型路径;
▲./path-to-chat-template.jinja:表示jinja文件的路径;
示例
vllm serve /mnt/workspace/model/qwen_7b --chat-template /mnt/workspace/model/jinja2/qwen.jinja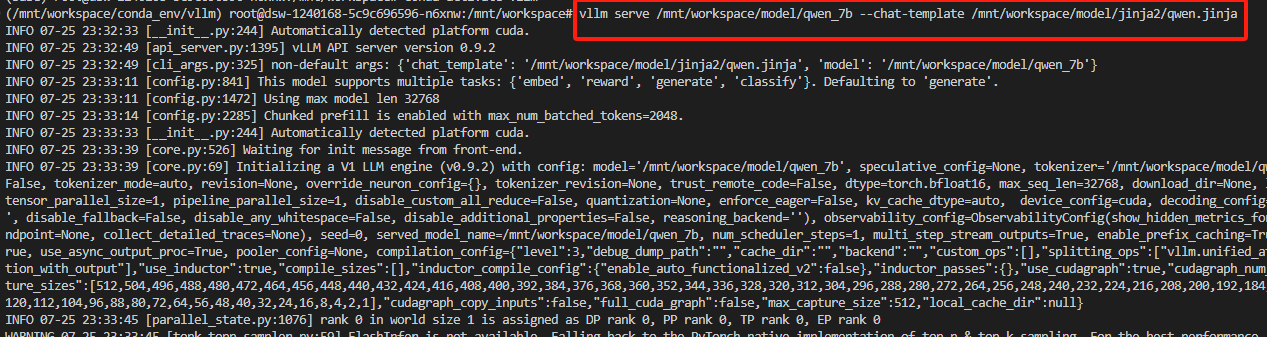
3.5 安装运行open webui流程
#创建一个open-webui的conda环境
conda activate open-webui
# 安装open-webui
pip install -U open-webui torch transformers# 切换到新建的环境
conda activate open-webui
#配置
export HF_ENDPOINT=https://hf-mirror.com
#因为open-webui默认为ollama框架,所以使用vllm框架启动大模型的话需要将这里改为false
export ENABLE_OLLAMA_API=false
#调用大模型的地址,vllm的默认启动端口为8000
export OPENAI_API_BASE_URL=http://127.0.0.1:8000/v1#启动openwebui
open-webui serve
四、流程梳理
具体部署流程可看:【VLLM】open-webui部署模型全流程-CSDN博客
1、下载模型到本地(可选):根据业务场景选择合适的模型即可;
3、安装vllm:用虚拟环境隔离安装,安装教程:【VLLM】大模型本地化部署_vllm部署大模型-CSDN博客;
4、安装open-webui:用虚拟环境隔离安装;
5、运行vllm和open-webui:
方法1:vllm环境中启动下载的本地模型
vllm serve <模型存放路径>方法2:vllm环境中启动微调后导出的本地模型
vllm serve /mnt/workspace/model/qwen_7b --chat-template /mnt/workspace/model/jinja2/qwen.jinja▲/mnt/workspace/model/qwen_7b:表示微调后导出的模型的存放路径;
▲/mnt/workspace/model/jinja2/qwen.jinja:LLaMAFactory中提取的内置对话模板规则路径
加上LLaMAFactory导出的内置对话模板规则,随后开启open-webui服务,在vllm框架下,模型的回复效果就和在LLaMAFactory上测试的效果是一样的啦;