基于 KeepAlived + HAProxy 搭建 RabbitMQ 高可用负载均衡集群
基于 KeepAlived + HAProxy 搭建 RabbitMQ 高可用负载均衡集群
基于 KeepAlived + HAProxy 搭建 RabbitMQ 高可用负载均衡集群实战指南
一、前言
在企业级应用中,消息队列的高可用性是系统稳定性的重要保障。RabbitMQ 作为主流的消息中间件,虽然自身支持集群模式,但客户端连接仍存在单点风险。本文将手把手教你如何利用 KeepAlived + HAProxy 构建一个 高可用且具备负载均衡能力 的 RabbitMQ 集群,实现故障自动切换与流量分发。
二、架构设计
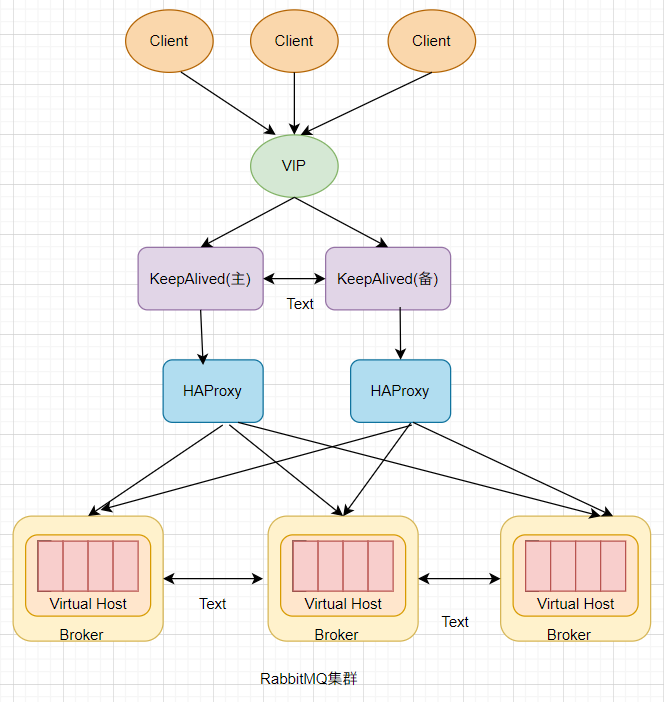
2.1 核心组件
- RabbitMQ 集群:3 节点(1 磁盘节点 + 2 内存节点)
- HAProxy:提供 4 层 TCP 负载均衡,健康检查
- KeepAlived:基于 VRRP 协议实现 VIP(虚拟 IP)高可用
2.2 集群架构图示
2.3 网络拓扑图
                VIP: 192.168.61.159┌───────────────────┐│   KeepAlived      ││   (Master)        │┌────────┴────────┐          ││   HAProxy       │          ││   192.168.61.156│          │└────────┬────────┘          ││                   │
┌──────────────┼───────────────────┼──────────────┐
│              │                   │              │
│   ┌──────────┴─────────┐ ┌──────┴────────┐     │
│   │ RabbitMQ (Memory)  │ │RabbitMQ(Memory)│     │
│   │ 192.168.61.157     │ │192.168.61.156  │     │
│   └────────────────────┘ └────────────────┘     │
│                                                 │
│         ┌──────────────────────┐               │
│         │ RabbitMQ (Disk)      │               │
│         │ 192.168.61.158       │               │
│         └──────────────────────┘               │
└─────────────────────────────────────────────────┘
三、环境准备
3.1 软件版本
- Erlang:23.1
- RabbitMQ:3.8.9
- HAProxy:1.8+
- KeepAlived:1.3+
3.2 节点规划
| 主机名 | IP 地址 | 角色 | 部署服务 |
|---|---|---|---|
| rabbitmq-1 | 192.168.61.156 | Master | RabbitMQ + HAProxy + KeepAlived |
| rabbitmq-2 | 192.168.61.157 | Backup | RabbitMQ + HAProxy + KeepAlived |
| rabbitmq-3 | 192.168.61.158 | Disk 节点 | RabbitMQ |
四、RabbitMQ 集群搭建
4.1 安装 Erlang 和 RabbitMQ
# 三台机器同步执行
cd /usr/local/soft
wget https://github.com/rabbitmq/erlang-rpm/releases/download/v23.1/erlang-23.1-1.el7.x86_64.rpm
wget https://github.com/rabbitmq/rabbitmq-server/releases/download/v3.8.9/rabbitmq-server-3.8.9-1.el7.noarch.rpmyum install -y erlang-23.1-1.el7.x86_64.rpm
yum install -y rabbitmq-server-3.8.9-1.el7.noarch.rpm# 启用管理插件
rabbitmq-plugins enable rabbitmq_management
具体参考博客:Linux快速安装Erlang和RabbitMQ单机版
4.2 配置集群
# 1. 同步 .erlang.cookie
# 所有节点必须保证该文件内容一致
chmod 600 /var/lib/rabbitmq/.erlang.cookie
scp /var/lib/rabbitmq/.erlang.cookie root@rmq157:/var/lib/rabbitmq/
scp /var/lib/rabbitmq/.erlang.cookie root@rmq158:/var/lib/rabbitmq/# 2. 配置 hosts
cat >> /etc/hosts << EOF
192.168.44.156 rmq156
192.168.44.157 rmq157
192.168.44.158 rmq158
EOF# 3. 启动并加入集群
# 在 rabbitmq-3 (磁盘节点) 执行:
rabbitmq-server -detached
rabbitmqctl start_app# 在 rabbitmq-1 和 rabbitmq-2 执行:
rabbitmq-server -detached
rabbitmqctl stop_app
rabbitmqctl join_cluster --ram rabbit@rmq158
rabbitmqctl start_app# 4. 设置镜像队列
rabbitmqctl set_policy ha-all "^" '{"ha-mode":"all"}'
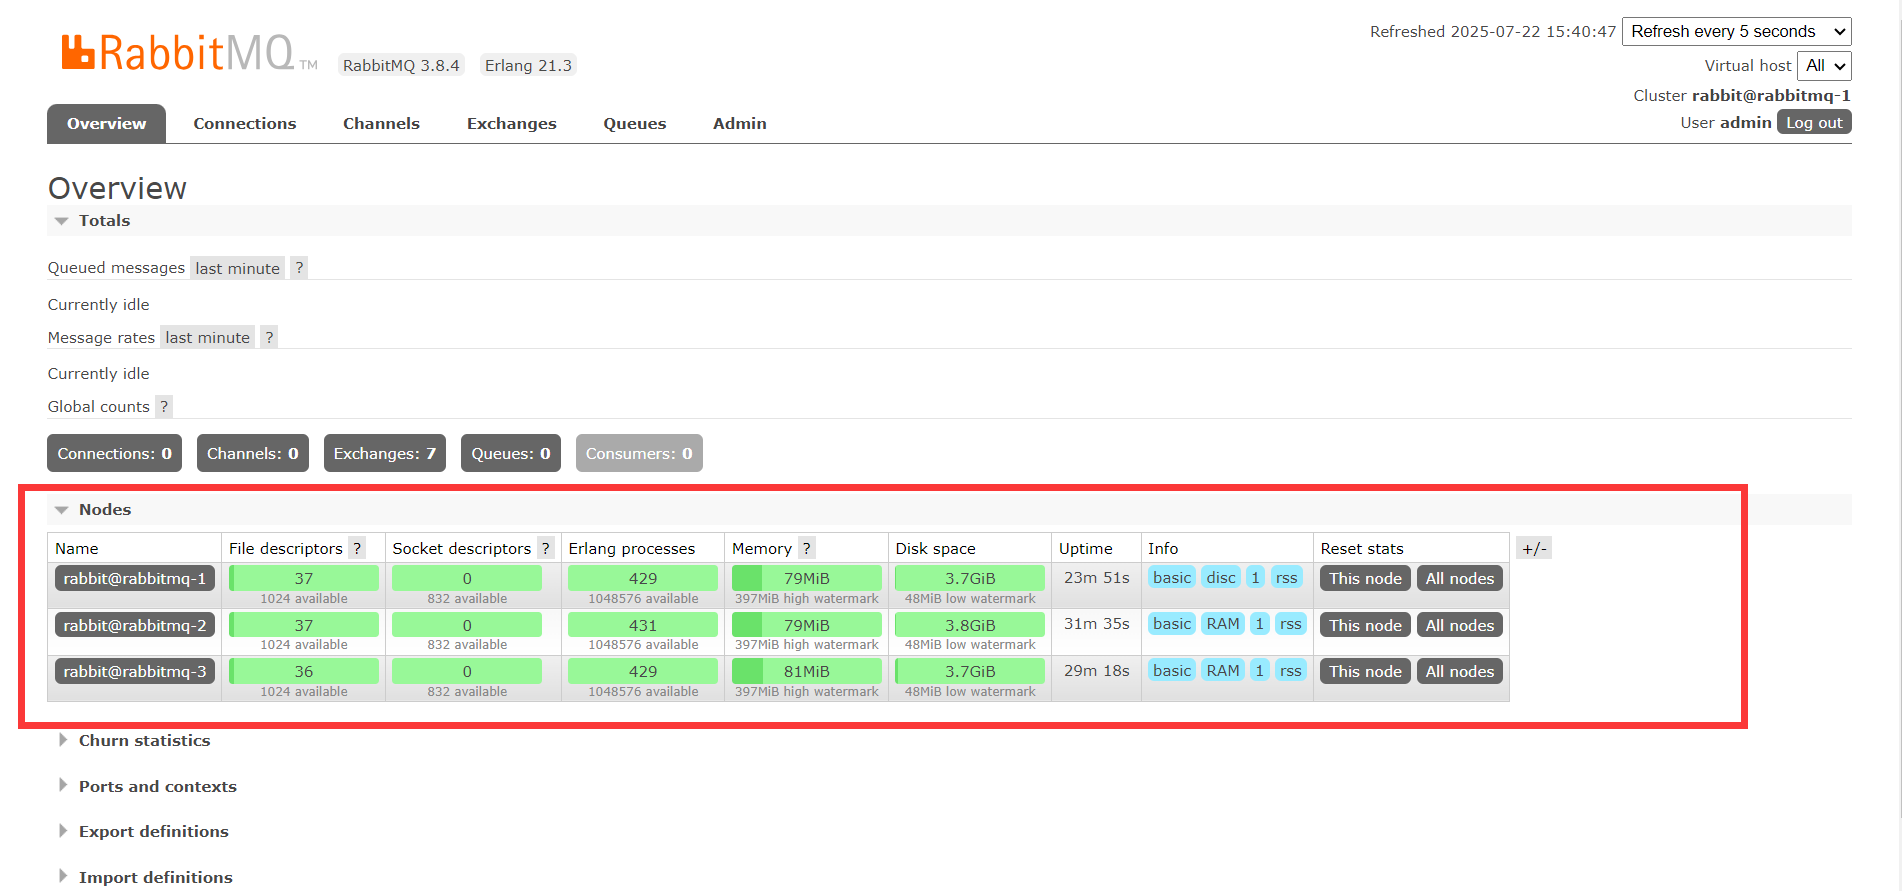
集群加入成功,在每一个节点都可以看到如下所示:
五、HAProxy 配置
5.1 安装 HAProxy
yum install -y haproxy
5.2 配置负载均衡
编辑 /etc/haproxy/haproxy.cfg:
#---------------------------------------------------------------------
# Global settings
#---------------------------------------------------------------------
global
log 127.0.0.1 local2
chroot /var/lib/haproxy # 改变当前工作目录
pidfile /var/run/haproxy.pid # haproxy的pid存放路径,启动进程的用户必须有权限访问此文件
maxconn 4000 # 最大连接数,默认4000
user root # 默认用户
group root # 默认组
daemon # 创建1个进程进入deamon模式运行。此参数要求将运行模式设置为daemon
stats socket /var/lib/haproxy/stats # 创建监控所用的套接字目录
#---------------------------------------------------------------------
# defaults settings
#---------------------------------------------------------------------
# 注意:因为要使用tcp的负载,屏蔽掉与http相关的默认配置
defaults
mode http # 默认的模式mode { tcp|http|health },tcp是4层,http是7层,health只会返回OK
log global
# option httplog # 采用http日志格式
option dontlognull # 启用该项,日志中将不会记录空连接。所谓空连接就是在上游的负载均衡器
# option http-server-close # 每次请求完毕后主动关闭http通道
# option forwardfor except 127.0.0.0/8 # 如果后端服务器需要获得客户端真实ip需要配置的参数,可以从Http Header中获得客户端ip
option redispatch # serverId对应的服务器挂掉后,强制定向到其他健康的服务器
retries 3 # 3次连接失败就认为服务不可用,也可以通过后面设置
# timeout http-request 10s
timeout queue 1m
timeout connect 10s # 连接超时时间
timeout client 1m # 客户端连接超时时间
timeout server 1m # 服务器端连接超时时间
# timeout http-keep-alive 10s
timeout check 10s
maxconn 3000 # 最大连接数
###################### 打开haproxy的监测界面###############################
listen status
bind 0.0.0.0:9188
mode http
stats enable
stats refresh 30s
stats uri /stats #设置haproxy监控地址为http://localhost:9188/stats
stats auth admin:123456 #添加用户名密码认证
stats realm (Haproxy\ statistic)
stats admin if TRUE
######################监听rabbitmq的web操作页面############################
listen rabbitmq_admin
bind 0.0.0.0:15670
server rabbitmq-1 192.168.61.156:15672
server rabbitmq-2 192.168.61.157:15672
#######################监听rabbimq_cluster #################################
listen rabbitmq_cluster
bind 0.0.0.0:5670
mode tcp
#负载均衡算法(#banlance roundrobin 轮询,balance source 保存session值,支持static-rr,leastconn,first,uri等参数)
balance roundrobin#check inter 2000 是检测心跳频率
#rise 2是2次正确认为服务器可用
#fall 2是2次失败认为服务器不可用
server rabbit1 192.168.61.156:5672 check inter 5000 rise 2 fall 2
server rabbit2 192.168.61.157:5672 check inter 5000 rise 2 fall 2
5.3 启动 HAProxy
systemctl start haproxy
systemctl enable haproxy
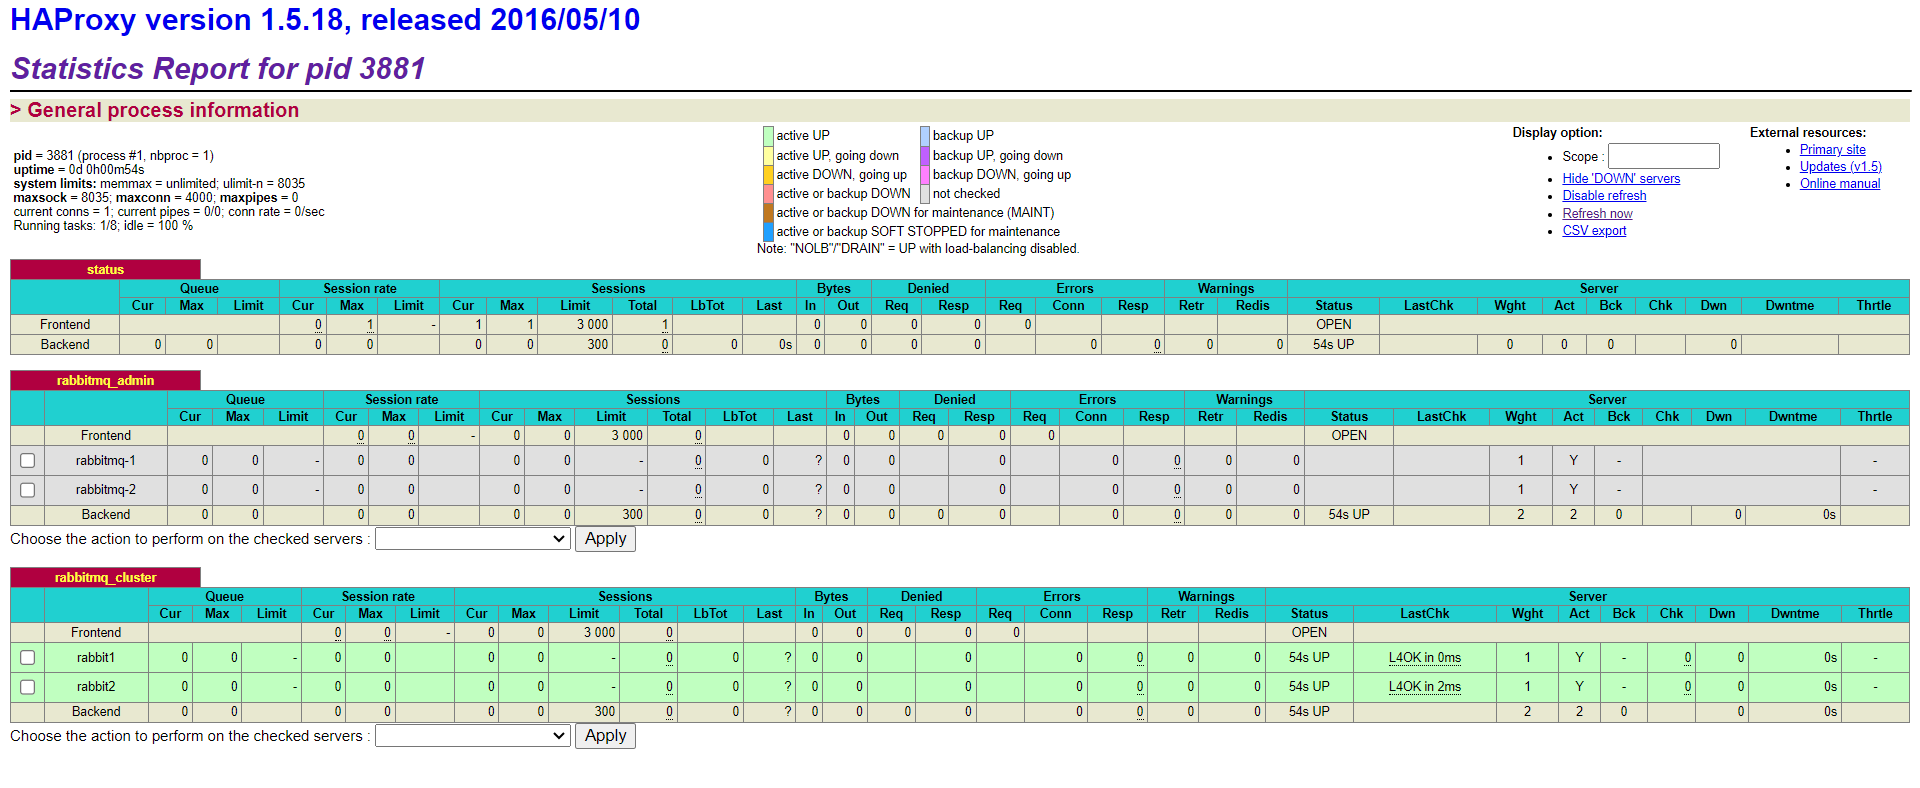
启动成功,访问:http://192.168.61.156:9188/stats
六、KeepAlived 配置
6.1 安装 KeepAlived
yum install -y keepalived
6.2 Master 节点配置 (156)
编辑 /etc/keepalived/keepalived.conf:
global_defs {router_id NodeA      # 起一个唯一的名字,不能与备机相同
}vrrp_script chk_haproxy {script "/etc/keepalived/check_haproxy.sh"interval 5weight 2
}vrrp_instance VI_1 {state MASTER           # 这里标记为主interface enp0s3      # 这里的必须和你的网卡一致,ipconfig获得virtual_router_id 1  # 这里表示路由的唯一标识与备机一致priority 100                 # 配置优先级advert_int 1authentication {auth_type PASSauth_pass root  # 配置认证密码}virtual_ipaddress { # 配置虚拟ip地址,就是开放的地址,与本机ip不同192.168.61.159}track_script {chk_haproxy}
}
6.3 Backup 节点配置 (157)
global_defs {router_id NodeB
}vrrp_script chk_haproxy {
script "/etc/keepalived/check_haproxy.sh"
interval 5
weight 2
}vrrp_instance VI_1 {state BACKUP   # 通过BACKUP表示该机器为备机interface enp0s3       # 与网卡一致,ipconfig获得virtual_router_id 1 # 与主机一致priority 50advert_int 1authentication {auth_type PASSauth_pass root}  virtual_ipaddress { # 开放的虚拟地址192.168.61.159}track_script {chk_haproxy}
}
6.4 健康检查脚本
创建 /etc/keepalived/check_haproxy.sh:
#!/bin/bash
if [ $(ps -C haproxy --no-header | wc -l) -eq 0 ]; thensystemctl restart haproxysleep 2if [ $(ps -C haproxy --no-header | wc -l) -eq 0 ]; thensystemctl stop keepalivedfi
fi
赋予执行权限:
chmod +x /etc/keepalived/check_haproxy.sh
6.5 启动 KeepAlived
systemctl start keepalived
systemctl enable keepalived
七、验证测试
7.1 查看集群状态
# 任意节点执行
rabbitmqctl cluster_status
7.2 访问管理界面
- VIP 管理界面:http://192.168.61.159:15670 (admin/admin)
- HAProxy 监控:http://192.168.61.159:9188/stats (admin/123456)
7.3 故障模拟测试
-
停止 Master 节点的 HAProxy:
systemctl stop haproxy- 观察 VIP 是否漂移至 Backup 节点(通过
ip a查看) - 客户端连接是否仍可用(通过
telnet 192.168.44.159 5670测试)
- 观察 VIP 是否漂移至 Backup 节点(通过
-
停止 RabbitMQ 节点:
systemctl stop rabbitmq-server- 观察 HAProxy 监控界面是否自动剔除故障节点
- 消息收发是否正常(通过管理界面查看队列状态)
八、客户端连接示例
Java 客户端连接
ConnectionFactory factory = new ConnectionFactory();
factory.setHost("192.168.61.159");
factory.setPort(5670);
factory.setUsername("admin");
factory.setPassword("admin");
Connection connection = factory.newConnection();
九、总结
通过 KeepAlived + HAProxy 的组合,我们实现了:
- 高可用性:任何节点故障自动切换
- 负载均衡:客户端请求均匀分发到多个 RabbitMQ 节点
- 易扩展:新增节点只需修改 HAProxy 配置
此架构适用于生产环境,可根据实际业务量调整节点数量和负载均衡策略(如一致性哈希)。