Zabbix安装-Server
Zabbix安装-Server
- Zabbix安装-Server
- 文档参考
- 一、安装步骤
- 1.1、从官网上选择版本
- 1.2、创建虚拟机
- 1.3、安装Zabbix仓库
- 1.4、继续安装 zabbix 存储库
- 1.5、安装Zabbix server,Web前端,agent
- 1.6、创建初始数据库
- 1.6.1、安装数据库
- 1.6.2、启动mariadb
- 1.6.3、初始化mariadb数据库
- 1.6.4、登录数据库配置
- 1.7、导入初始架构和数据,系统将提示您输入新创建的密码
- 二、安装过程出现的问题
- 2.1、没有epel.repo文件,新建的会有什么影响吗?
- 2.2、”导入初始架构和数据,系统将提示您输入新创建的密码“这一步怎么报错了?
- 2.3、用官方镜像下载缓慢,更换为阿里云镜像
- 2.4、repomd.xml文件下载失败
Zabbix安装-Server
文档参考
- Rocky Linux 安装图解(替代centos)服务器+桌面-CSDN博客
- Rocky Linux 9.4 部署Zabbix 7.0_rocky linux9.4部署zabbix-CSDN博客
- 下载 Zabbix 7.4 for Rocky Linux 9 (amd64, arm64), MySQL, Nginx
一、安装步骤
1.1、从官网上选择版本

选择版本
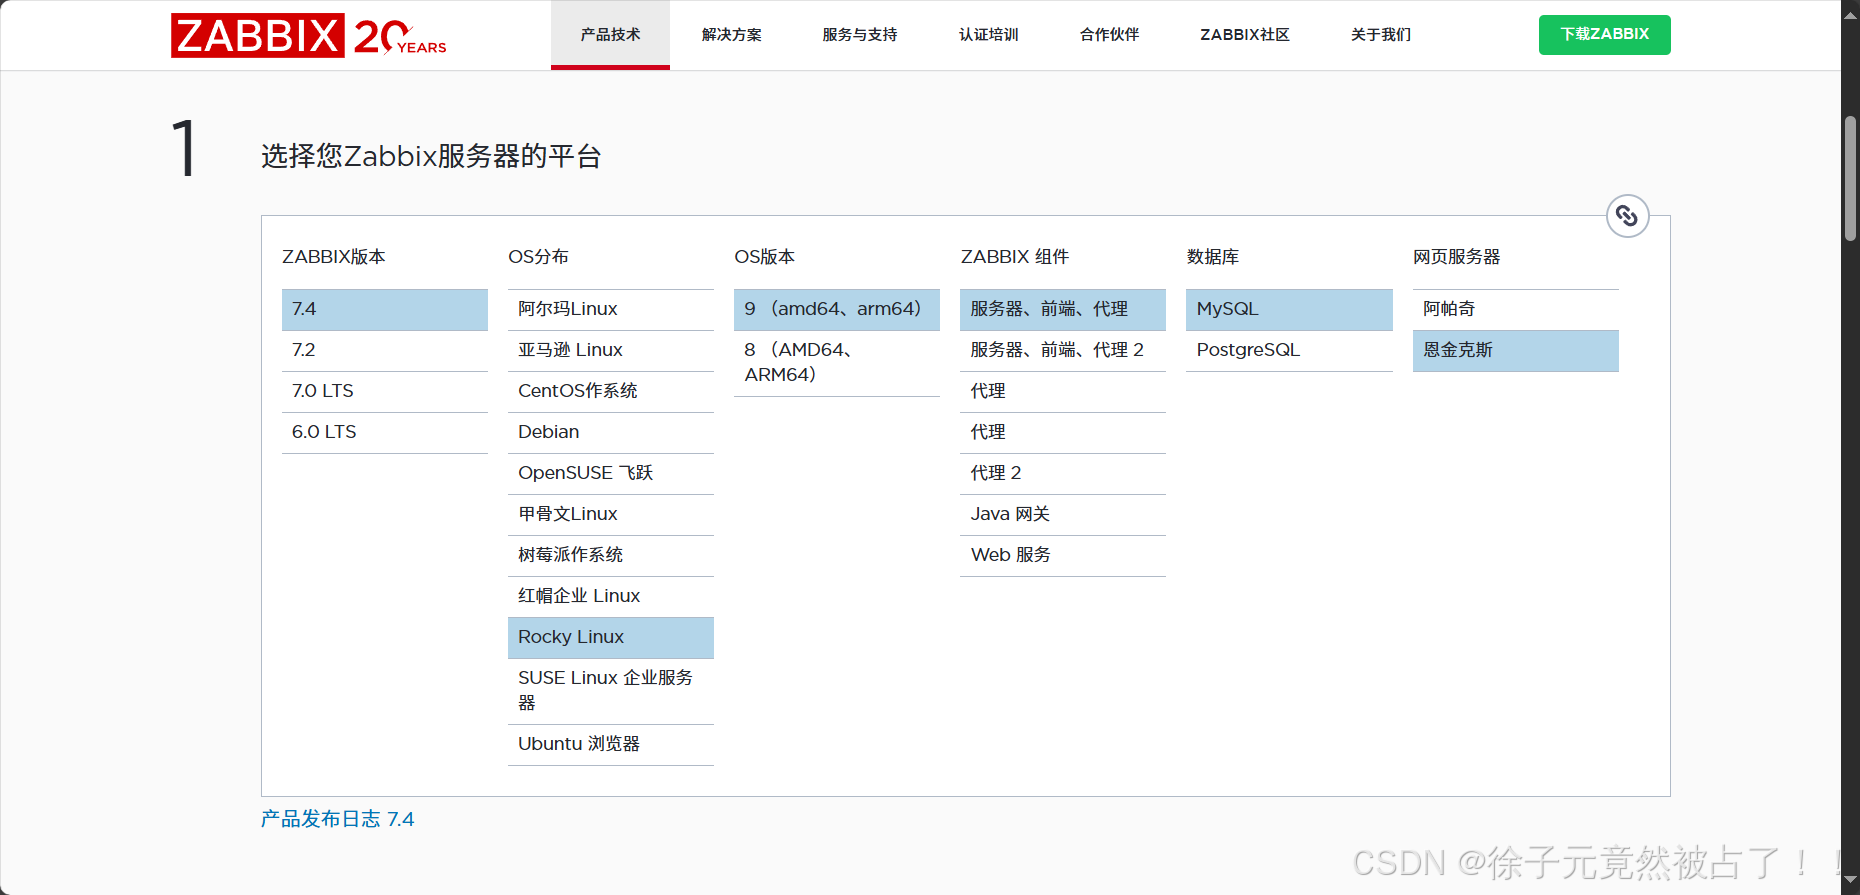
每次选择完版本后,zabbix都会根据你选择的内容自动弹出对应的安装命令
1.2、创建虚拟机
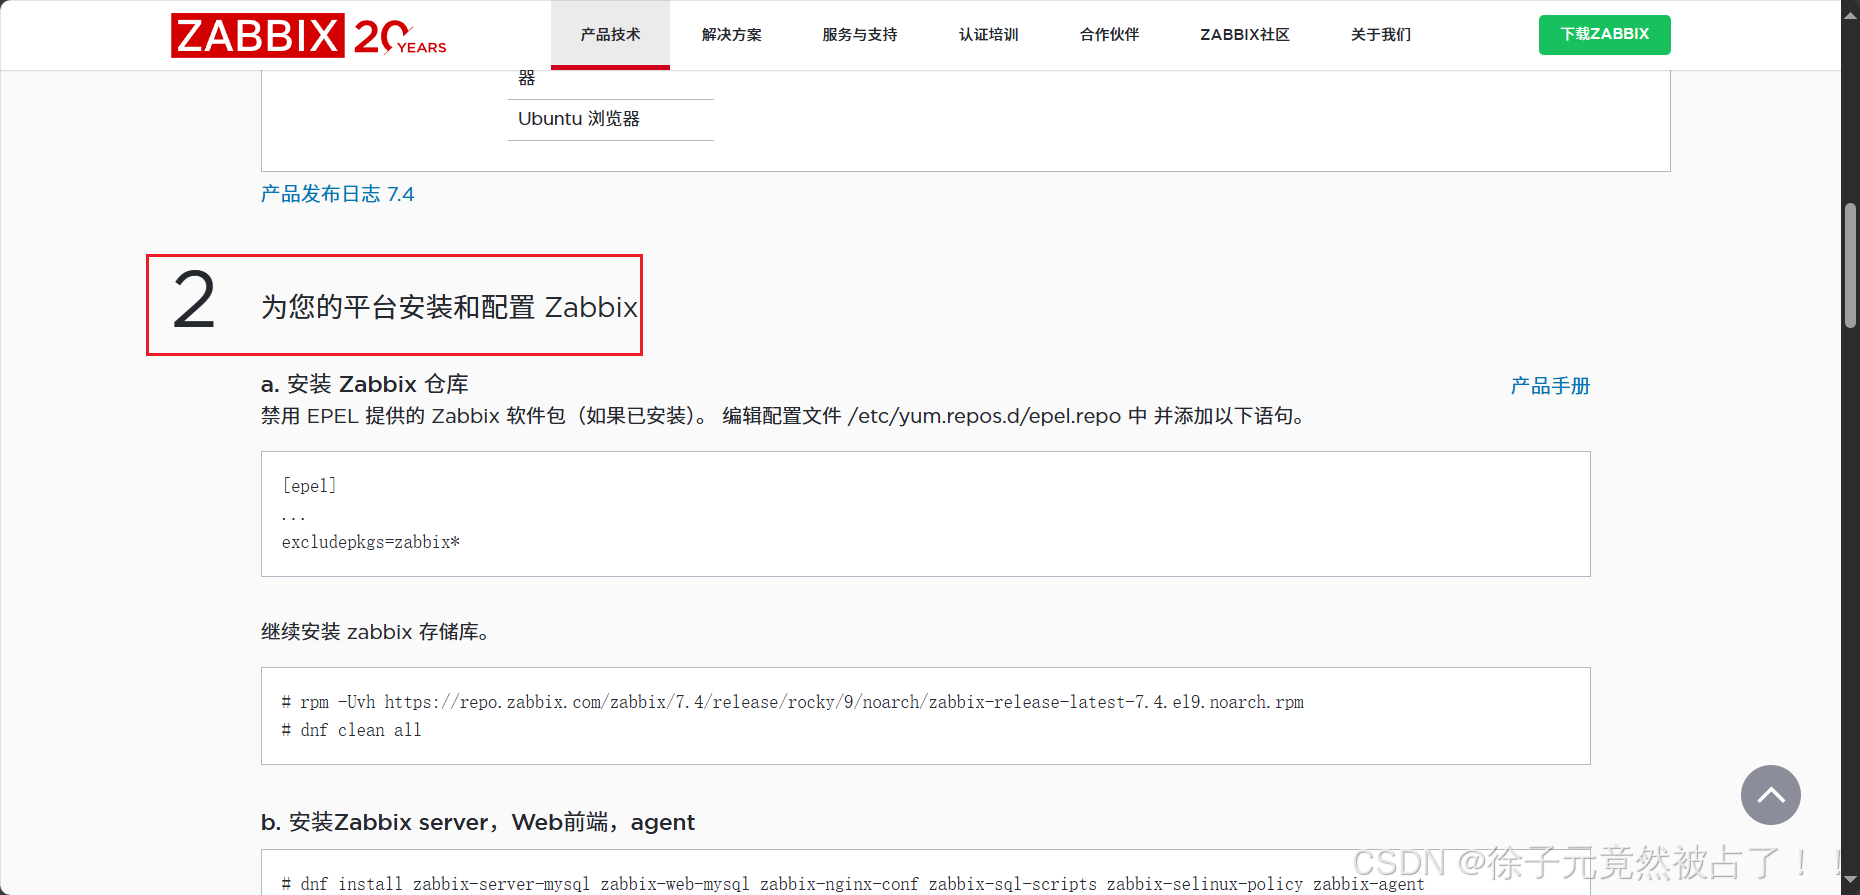
1.3、安装Zabbix仓库
如果没有安装就跳过这一步:即/etc/yum.repos.d/epel.repo不存在
如果已安装,禁用 EPEL 提供的 Zabbix 软件包(没有安装想体验感受一下可以参考问题1)。
编辑配置文件 /etc/yum.repos.d/epel.repo 中 并添加以下语句
vim /etc/yum.repos.d/epel.repo[epel]
...
excludepkgs=zabbix*
1.4、继续安装 zabbix 存储库
跳过安装Zabbix仓库这一步,可以直接执行rpm命令
rpm -Uvh https://repo.zabbix.com/zabbix/7.4/release/rocky/9/noarch/zabbix-release-latest-7.4.el9.noarch.rpm
可能会有点慢,挂后台运行也可以,我40kb/s用了5分
清空缓存
dnf clean all
1.5、安装Zabbix server,Web前端,agent
dnf install zabbix-server-mysql zabbix-web-mysql zabbix-nginx-conf zabbix-sql-scripts zabbix-selinux-policy zabbix-agent
1.6、创建初始数据库
zabbix文档没有写这一步,他只做了简单提醒让启动并运行数据库服务器
1.6.1、安装数据库
yum install -y mariadb mariadb-server
1.6.2、启动mariadb
systemctl enable mariadb --now
1.6.3、初始化mariadb数据库
初始化脚本
mysql_secure_installation
进入选择页面
NOTE: RUNNING ALL PARTS OF THIS SCRIPT IS RECOMMENDED FOR ALL MariaDBSERVERS IN PRODUCTION USE!  PLEASE READ EACH STEP CAREFULLY!In order to log into MariaDB to secure it, we'll need the current
password for the root user. If you've just installed MariaDB, and
haven't set the root password yet, you should just press enter here.# 按回车设置或更改root用户的密码
Enter current password for root (enter for none):
OK, successfully used password, moving on...Setting the root password or using the unix_socket ensures that nobody
can log into the MariaDB root user without the proper authorisation.You already have your root account protected, so you can safely answer 'n'.# 切换到unix_socket身份验证
Switch to unix_socket authentication [Y/n] y
Enabled successfully!
Reloading privilege tables..... Success!You already have your root account protected, so you can safely answer 'n'.# 更改root密码
Change the root password? [Y/n] y
New password:
Re-enter new password:
Password updated successfully!
Reloading privilege tables..... Success!By default, a MariaDB installation has an anonymous user, allowing anyone
to log into MariaDB without having to have a user account created for
them.  This is intended only for testing, and to make the installation
go a bit smoother.  You should remove them before moving into a
production environment.# 删除匿名用户
Remove anonymous users? [Y/n] y ... Success!Normally, root should only be allowed to connect from 'localhost'.  This
ensures that someone cannot guess at the root password from the network.# 限制root远程登录
Disallow root login remotely? [Y/n] n  ... skipping.By default, MariaDB comes with a database named 'test' that anyone can
access.  This is also intended only for testing, and should be removed
before moving into a production environment.# 删除测试数据库和访问权限
Remove test database and access to it? [Y/n] y - Dropping test database...... Success!- Removing privileges on test database...... Success!Reloading the privilege tables will ensure that all changes made so far
will take effect immediately.# 重新加载权限表
Reload privilege tables now? [Y/n] y  ... Success!Cleaning up...All done!  If you've completed all of the above steps, your MariaDB
installation should now be secure.Thanks for using MariaDB!
1.6.4、登录数据库配置
登陆数据库
mysql -uroot -p #密码为上面设置的
配置数据库
# 创建名为zabbix的数据库,并设置字符集为utf8mb4,排序规则为utf8mb4_bin
create database zabbix character set utf8mb4 collate utf8mb4_bin;# 创建名为zabbix的用户,并设置其密码为'000000'
create user zabbix@localhost identified by '000000';# 授予zabbix用户在zabbix数据库上的所有权限
grant all privileges on zabbix.* to zabbix@localhost# 设置全局变量log_bin_trust_function_creators为1
set global log_bin_trust_function_creators = 1;# 退出MariaDB
quit;
1.7、导入初始架构和数据,系统将提示您输入新创建的密码
zcat /usr/share/zabbix/sql-scripts/mysql/server.sql.gz | mysql --default-character-set=utf8mb4 -uzabbix -p zabbix
二、安装过程出现的问题
2.1、没有epel.repo文件,新建的会有什么影响吗?
安装Zabbix仓库时发现没有epel.repo文件,可以通过下面的
默认情况下,CentOS/RHEL 系统可能没有 epel.repo,需要手动安装 EPEL 仓库的 RPM 包来生成该文件:
CentOS/RHEL 7
sudo yum install epel-release
CentOS/RHEL 8 及以上
sudo dnf install epel-release
安装后,/etc/yum.repos.d/epel.repo 会自动生成,同时可能会附带 epel-testing.repo(测试版仓库,通常默认禁用)。
Rocky Linux用的是dnf install epel-release
[epel]
name=Extra Packages for Enterprise Linux $releasever - $basearch
# It is much more secure to use the metalink, but if you wish to use a local mirror
# place its address here.
#baseurl=https://download.example/pub/epel/$releasever/Everything/$basearch/
metalink=https://mirrors.fedoraproject.org/metalink?repo=epel-$releasever&arch=$basearch&infra=$infra&content=$contentdir
enabled=1
gpgcheck=1
countme=1
gpgkey=file:///etc/pki/rpm-gpg/RPM-GPG-KEY-EPEL-$releasever[epel-debuginfo]
name=Extra Packages for Enterprise Linux $releasever - $basearch - Debug
# It is much more secure to use the metalink, but if you wish to use a local mirror
# place its address here.
#baseurl=https://download.example/pub/epel/$releasever/Everything/$basearch/debug/
metalink=https://mirrors.fedoraproject.org/metalink?repo=epel-debug-$releasever&arch=$basearch&infra=$infra&content=$contentdir
enabled=0
gpgkey=file:///etc/pki/rpm-gpg/RPM-GPG-KEY-EPEL-$releasever
gpgcheck=1[epel-source]
name=Extra Packages for Enterprise Linux $releasever - $basearch - Source
# It is much more secure to use the metalink, but if you wish to use a local mirror
# place its address here.
#baseurl=https://download.example/pub/epel/$releasever/Everything/source/tree/
metalink=https://mirrors.fedoraproject.org/metalink?repo=epel-source-$releasever&arch=$basearch&infra=$infra&content=$contentdir
enabled=0
gpgkey=file:///etc/pki/rpm-gpg/RPM-GPG-KEY-EPEL-$releasever
gpgcheck=1
2.2、”导入初始架构和数据,系统将提示您输入新创建的密码“这一步怎么报错了?
[root@localhost software]# zcat /usr/share/zabbix-sql-scripts/mysql/server.sql.gz | mysql --default-character-set=utf8mb4 -uzabbix -p zabbix
gzip: /usr/share/zabbix-sql-scripts/mysql/server.sql.gz: No such file or directory
Enter password:
ERROR 1045 (28000): Access denied for user 'zabbix'@'localhost' (using password: YES)
这通常是由于 Zabbix 相关包未正确安装或路径错误导致的,我选择的是7.4版本
根据官方文档来就可以解决了。
2.3、用官方镜像下载缓慢,更换为阿里云镜像
注意,这里确认用官方提示的镜像下载速度实在慢的,我实测后发现用官方的镜像时好时坏。不知道是否跟我的出口线路有关。
打开配置文件
vim /etc/yum.repos.d/zabbix.repo
初始配置
[zabbix]
name=Zabbix Official Repository - $basearch
baseurl=https://repo.zabbix.com/zabbix/7.4/stable/rocky/9/$basearch/
enabled=1
gpgcheck=1
gpgkey=file:///etc/pki/rpm-gpg/RPM-GPG-KEY-ZABBIX-B5333005[zabbix-debuginfo]
name=Zabbix Official Repository (debuginfo) - $basearch
baseurl=https://repo.zabbix.com/zabbix/7.4/stable/rocky/9/$basearch/debuginfo/
enabled=0
gpgkey=file:///etc/pki/rpm-gpg/RPM-GPG-KEY-ZABBIX-B5333005
gpgcheck=1[zabbix-sources]
name=Zabbix Official Repository (sources) - $basearch
baseurl=https://repo.zabbix.com/zabbix/7.4/stable/rocky/9/SRPMS/
enabled=1
gpgcheck=1
gpgkey=file:///etc/pki/rpm-gpg/RPM-GPG-KEY-ZABBIX-B5333005
修改后
[zabbix]
name=Zabbix Official Repository - $basearch
baseurl=https://mirrors.aliyun.com/zabbix/7.4/stable/rocky/9/$basearch/
enabled=1
gpgcheck=1
gpgkey=file:///etc/pki/rpm-gpg/RPM-GPG-KEY-ZABBIX-B5333005[zabbix-debuginfo]
name=Zabbix Official Repository (debuginfo) - $basearch
baseurl=https://mirrors.aliyun.com/zabbix/7.4/stable/rocky/9/$basearch/debuginfo/
enabled=0
gpgkey=file:///etc/pki/rpm-gpg/RPM-GPG-KEY-ZABBIX-B5333005
gpgcheck=1[zabbix-sources]
name=Zabbix Official Repository (sources) - $basearch
baseurl=https://repo.zabbix.com/zabbix/7.4/stable/rocky/9/SRPMS/
enabled=1
gpgcheck=1
gpgkey=file:///etc/pki/rpm-gpg/RPM-GPG-KEY-ZABBIX-B5333005
2.4、repomd.xml文件下载失败
Errors during downloading metadata for repository 'zabbix':- Status code: 404 for https://mirrors.aliyun.com/zabbix/7.4/stable/rocky/9/x86_64/repodata/repomd.xml (IP: 124.225.96.38)
错误:为仓库 'zabbix' 下载元数据失败 : Cannot download repomd.xml: Cannot download repodata/repomd.xml: All mirrors were tried
替换为阿里云镜像后,下载某个文件失败;后续发现是参考的博客版本不对,后续重新根据官方文档来就好了