kotlin的自学笔记1
数据类型
- 如果您需要更新变量的值,请使用 Kotlin 关键字 var(而不是 val)声明该变量。
- 读取包含字符串的代码时,您可能会遇到转义序列。转义序列是指前面带有反斜杠符号(\,也称为转义反斜杠)的字符。
- 函数 具名实参
- Surface 更改文字背景颜色
- Compose 函数:
- 字体大小
- painterResource() 函数会加载可绘制图片资源
- 更改不透明度并缩放图片
- 抽离字符串
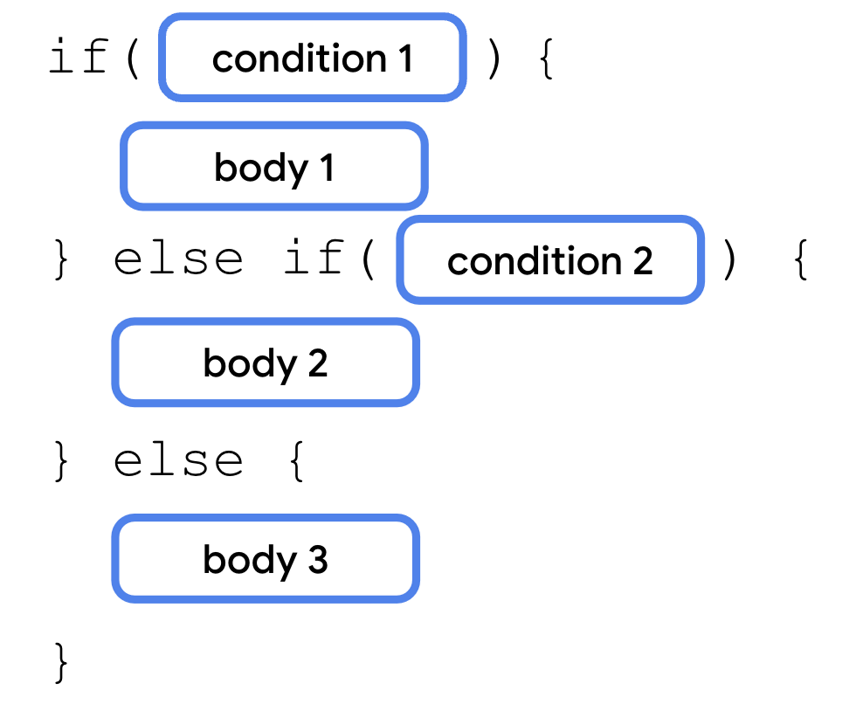
- 使用 if/else 语句来表达条件
- 使用 when 语句处理多个分支
- 使用 in 关键字处理一系列条件
- 使用 is 关键字检查数据类型
- 将 if 语句转换为表达式
- 转换为使用 when 表达式
- 在 Kotlin 中使用可为 null 性
- 使用 ?. 安全调用运算符
- 使用 !! 非 null 断言运算符
- 使用 if/else 条件
- 使用 ?: Elvis 运算符
- 在 Kotlin 中使用类和对象
- 类定义以 class 关键字开头,后面依次跟名称和一对大括号。
- 创建类的实例
- 6. 定义构造函数
- Kotlin 中的构造函数主要有两类:
- 7. 实现类之间的关系
- IS-A 关系
- HAS-A 关系
- 替换子类中的父类方法
- 使用 super 关键字在子类中重复使用父类代码
- 替换子类中的父类属性
- 8. 可见性修饰符
- 9. 定义属性委托
- 在 Kotlin 中使用函数类型和 lambda 表达式
- 将一个函数作为参数传递到另一个函数
- 使用简写语法编写 lambda 表达式
- 省略参数名称使用it
- 将 lambda 表达式直接传入函数
- 使用尾随 lambda 语法
String 文本
Int 整数
Double 小数
Float 小数 不如Double精确,数字末尾大有f或者F
Boolean true或false
如果您需要更新变量的值,请使用 Kotlin 关键字 var(而不是 val)声明该变量。
val 关键字 - 预计变量值不会变化时使用。
var 关键字 - 预计变量值会发生变化时使用。
读取包含字符串的代码时,您可能会遇到转义序列。转义序列是指前面带有反斜杠符号(\,也称为转义反斜杠)的字符。
函数 具名实参
在前面的示例中,调用函数时不需要指定形参名称 name 或 age。不过,您可以选择这么做。例如,您可以调用具有很多形参的函数,也可能希望以不同的顺序传递实参,例如将 age 形参放在 name 形参前面。如果您在调用函数时添加了形参名称,该名称就称为具名实参。尝试结合使用具名实参和 birthdayGreeting() 函数。
修改对 Rex 的调用以使用具名实参,如以下代码段所示。为此,您可以添加形参名称,后跟一个等号,再后跟值(例如 name = “Rex”)。
println(birthdayGreeting(name = “Rex”, age = 2))
运行代码,然后观察输出结果是否保持不变:
Happy Birthday, Rover!
You are now 5 years old!
Happy Birthday, Rex!
You are now 2 years old!
Surface 更改文字背景颜色
@Composable
fun Greeting(name: String, modifier: Modifier = Modifier) {Surface(color = Color.Cyan) {Text(text = "Hi, my name is $name!",modifier = modifier)}
}
Compose 函数:
必须是名词:DoneButton()MUST
不能是动词或动词短语:DrawTextField()
不能是名词性介词:TextFieldWithLink()
不能是形容词:Bright()
不能是副词:Outside()
名词可以添加描述性形容词作为前缀:RoundIcon()
字体大小
可缩放像素 (SP) 是字体大小的度量单位。Android 应用中的界面元素使用两种不同的度量单位:一种是您稍后将为布局使用的密度无关像素 (DP),另一种就是可缩放像素 (SP)。默认情况下,SP 单位与 DP 单位大小相同,但前者的大小会根据用户在手机设置下的首选文本大小进行调整
Text(text = message,fontSize = 100.sp
)
painterResource() 函数会加载可绘制图片资源
val image = painterResource(R.drawable.androidparty)
更改不透明度并缩放图片
Image(painter = image,contentDescription = null,contentScale = ContentScale.Crop
)
抽离字符串
硬编码字符串是直接写在应用代码中的字符串,会使得将应用翻译为其他语言的难度增大,在应用的不同位置重复使用字符串变得更困难。可以通过将字符串提取到资源文件中来解决这类问题。也就是说,您可以不必将字符串硬编码到代码中,而是将字符串放在文件中,并为这些字符串资源命名,然后在想要使用字符串时使用名称进行调用。即使更改了字符串或将其翻译成了其他语言,名称仍将保持不变。
在 MainActivity.kt 文件中,滚动到 onCreate() 函数。选择生日祝福语,不带引号的 Happy Birthday Sam! 字符串。
点击屏幕左侧的灯泡。
选择 Extract string resource。
Android Studio 将打开 Extract Resource 对话框。在此对话框中,您可以自定义字符串资源的名称以及有关如何存储该资源的一些详细信息。Resource name 字段用于输入字符串的名称。Resource value 字段用于输入字符串的实际内容。
在 Extract Resource 对话框中,将 Resource name 更改为 happy_birthday_text。
字符串资源应使用小写名称,并且多个单词之间应使用下划线分隔。将其他设置保留为默认值。
点击确定。
请注意代码的变化。
硬编码字符串现已替换为对 getString() 函数的调用。
使用 if/else 语句来表达条件
使用 when 语句处理多个分支
fun main() {val trafficLightColor = "Black"when (trafficLightColor) {"Red" -> println("Stop")"Yellow" -> println("Slow")"Green" -> println("Go")}
}
fun main() {val trafficLightColor = "Black"when (trafficLightColor) {"Red" -> println("Stop")"Yellow" -> println("Slow")"Green" -> println("Go")else -> println("Invalid traffic-light color")}
}
fun main() {val x = 3when (x) {2, 3, 5, 7 -> println("x is a prime number between 1 and 10.")else -> println("x isn't a prime number between 1 and 10.")}
}
使用 in 关键字处理一系列条件
fun main() {val x = 4when (x) {2, 3, 5, 7 -> println("x is a prime number between 1 and 10.")in 1..10 -> println("x is a number between 1 and 10, but not a prime number.")else -> println("x isn't a prime number between 1 and 10.")}
}
使用 is 关键字检查数据类型
fun main() {val x: Any = 20when (x) {2, 3, 5, 7 -> println("x is a prime number between 1 and 10.")in 1..10 -> println("x is a number between 1 and 10, but not a prime number.")is Int -> println("x is an integer number, but not between 1 and 10.")else -> println("x isn't an integer number.")}
}
将 if 语句转换为表达式
fun main() {val trafficLightColor = "Black"val message = if (trafficLightColor == "Red") "Stop"else if (trafficLightColor == "Yellow") "Slow"else if (trafficLightColor == "Green") "Go"else "Invalid traffic-light color"
}
fun main() {val trafficLightColor = "Black"if (trafficLightColor == "Red") {println("Stop")} else if (trafficLightColor == "Yellow") {println("Slow")} else if (trafficLightColor == "Green") {println("Go")} else {println("Invalid traffic-light color")}}
转换为使用 when 表达式
fun main() {val trafficLightColor = "Amber"val message = when(trafficLightColor) {"Red" -> "Stop""Yellow", "Amber" -> "Slow""Green" -> "Go"else -> "Invalid traffic-light color"}println(message)
}
在 Kotlin 中使用可为 null 性
在 Kotlin 中,有可为 null 类型与不可为 null 类型之分:
可为 null 类型是指可以存储 null 值的变量。
不可为 null 类型是指不能存储 null 值的变量。
类型加?
fun main() {var favoriteActor: String? = "Sandra Oh"favoriteActor = null
}
使用 ?. 安全调用运算符
fun main() {var favoriteActor: String? = "Sandra Oh"println(favoriteActor?.length)
}
使用 !! 非 null 断言运算符
fun main() {var favoriteActor: String? = nullprintln(favoriteActor!!.length)
}
系统会显示 NullPointerException
使用 if/else 条件
您可以在 if/else 条件中使用 if 分支来执行 null 检查
fun main() {var favoriteActor: String? = nullif(favoriteActor != null) {println("The number of characters in your favorite actor's name is ${favoriteActor.length}.")} else {println("You didn't input a name.")}
}
fun main() {var favoriteActor: String? = "Sandra Oh"val lengthOfName = if (favoriteActor != null) {favoriteActor.length} else {0}println("The number of characters in your favorite actor's name is $lengthOfName.")
}
使用 ?: Elvis 运算符
在 Kotlin 中使用类和对象
封装:将相关属性和针对这些属性执行操作的方法封装在类中。
抽象:封装的扩展,其目的是尽可能隐藏内部实现逻辑。
继承:可让您通过建立父子关系来基于其他类的特性和行为构建类。
多态性:Polymorphism(多态性)这个单词是希腊语词根“poly-”(意为许多)和“morphism”(意为形态)的合成词。多态性是指以单一、通用的方式使用不同对象的能力。
类定义以 class 关键字开头,后面依次跟名称和一对大括号。
类由以下三大部分组成:
属性:用于指定类对象属性的变量。
方法:包含类的行为和操作的函数。
构造函数:一种特殊的成员函数,用于在定义类的整个程序中创建类的实例。
了解 Int、Float、String 和 Double 等数据类型。在 Kotlin 中,这些数据类型被定义为类。
class SmartDevice {// empty body
}fun main() {
}
创建类的实例
fun main() {val smartTvDevice = SmartDevice()
}
定义类方法
class SmartDevice {fun turnOn() {}
}
class SmartDevice {fun turnOn() {println("Smart device is turned on.")}fun turnOff() {println("Smart device is turned off.")}
}
对对象调用方法
fun main() {val smartTvDevice = SmartDevice()smartTvDevice.turnOn()
}
定义类属性
class SmartDevice {val name = "Android TV"fun turnOn() {println("Smart device is turned on.")}fun turnOff() {println("Smart device is turned off.")}
}
fun main() {val smartTvDevice = SmartDevice()println("Device name is: ${smartTvDevice.name}")smartTvDevice.turnOn()smartTvDevice.turnOff()
}
警告:请勿使用属性名称来获取或设置值。例如,在 set() 函数中,如果您尝试将 value 形参赋给 speakerVolume 属性本身,代码就会进入无限循环,因为 Kotlin 运行时会尝试更新 speakerVolume 属性的值,而不断触发对 setter 函数的调用。
var speakerVolume = 2set(value) {if (value in 0..100) {field = value}}
6. 定义构造函数
构造函数的主要用途是指定类对象的创建方式。换言之,构造函数用于初始化对象,使其可供使用。您在实例化对象时就已执行此操作。在实例化类的对象时,系统会执行构造函数中的代码。您可以定义包含形参或不含形参的构造函数。
默认构造函数
class SmartDevice constructor() {...
}
Kotlin 旨在简化代码,因此,如果构造函数中没有任何注解或可见性修饰符(您将在稍后学习这部分内容),您可以移除 constructor 关键字。如果构造函数中没有任何形参,您还可以移除圆括号
class SmartDevice {...
}
定义形参化构造函数
SmartDevice("Android TV", "Entertainment")
具名实参
SmartDevice(name = "Android TV", category = "Entertainment")
Kotlin 中的构造函数主要有两类:
主要构造函数:一个类只能有一个主要构造函数(在类标头中定义)
辅助构造函数:一个类可以有多个辅助构造函数。
辅助构造函数包含在类的主体中,其语法包括以下三个部分:
辅助构造函数声明:辅助构造函数定义以 constructor 关键字开头,后跟圆括号。可视情况在圆括号中包含辅助构造函数所需的形参。
主要构造函数初始化:初始化以冒号开头,后面依次跟 this 关键字和一对圆括号。可视情况在圆括号中包含主要构造函数所需的形参。
辅助构造函数主体:在主要构造函数的初始化后跟一对大括号,其中包含辅助构造函数的主体。
class SmartDevice(val name: String, val category: String) {var deviceStatus = "online"constructor(name: String, category: String, statusCode: Int) : this(name, category) {deviceStatus = when (statusCode) {0 -> "offline"1 -> "online"else -> "unknown"}}...
}
7. 实现类之间的关系
定义 SmartDevice 父类及其子类之间的关系:
在 SmartDevice 父类中的 class 关键字前面添加 open 关键字,使其具有扩展性:
open class SmartDevice(val name: String, val category: String) {...
}
创建会扩展 SmartDevice 父类的 SmartTvDevice 子类:
class SmartTvDevice(deviceName: String, deviceCategory: String) :SmartDevice(name = deviceName, category = deviceCategory) {
}
class SmartTvDevice(deviceName: String, deviceCategory: String) :SmartDevice(name = deviceName, category = deviceCategory) {var speakerVolume = 2set(value) {if (value in 0..100) {field = value}}var channelNumber = 1set(value) {if (value in 0..200) {field = value}}
}
class SmartTvDevice(deviceName: String, deviceCategory: String) :SmartDevice(name = deviceName, category = deviceCategory) {var speakerVolume = 2set(value) {if (value in 0..100) {field = value}}var channelNumber = 1set(value) {if (value in 0..200) {field = value}}fun increaseSpeakerVolume() {speakerVolume++println("Speaker volume increased to $speakerVolume.")}fun nextChannel() {channelNumber++println("Channel number increased to $channelNumber.")}
}
IS-A 关系
如果在 SmartDevice 父类和 SmartTvDevice 子类之间指定 IS-A 关系,即表示 SmartDevice 父类可以执行的操作,SmartTvDevice 子类也可执行。这种关系是单向的,因此可以说每个智能电视“都是”智能设备,但不能说每个智能设备“都是”智能电视。
// Smart TV IS-A smart device.
class SmartTvDevice : SmartDevice() {
}
HAS-A 关系
HAS-A 关系是指定两个类之间的关系的另一种方式。例如,您可能要使用住宅中的智能电视。在这种情况下,智能电视和住宅之间存在某种关系。住宅中包含智能设备,即住宅“拥有”智能设备。两个类之间的 HAS-A 关系也称为“组合”。
到目前为止,您已经创建了几个智能设备,现在可以创建包含智能设备的 SmartHome 类了。您可以通过 SmartHome 类与智能设备进行互动。
使用 HAS-A 关系定义 SmartHome 类:
在 SmartLightDevice 类和 main() 函数之间,定义 SmartHome 类:
class SmartLightDevice(deviceName: String, deviceCategory: String) :SmartDevice(name = deviceName, category = deviceCategory) {...}class SmartHome {
}fun main() { ...
}
// The SmartHome class HAS-A smart TV device.
class SmartHome(val smartTvDevice: SmartTvDevice) {}
class SmartHome(val smartTvDevice: SmartTvDevice,val smartLightDevice: SmartLightDevice
) {...fun changeTvChannelToNext() {smartTvDevice.nextChannel()}fun turnOnLight() {smartLightDevice.turnOn()}fun turnOffLight() {smartLightDevice.turnOff()}
}
替换子类中的父类方法
open class SmartDevice(val name: String, val category: String) {var deviceStatus = "online"open fun turnOn() {// function body}open fun turnOff() {// function body}
}class SmartLightDevice(deviceName: String, deviceCategory: String) :SmartDevice(name = deviceName, category = deviceCategory) {var brightnessLevel = 0set(value) {if (value in 0..100) {field = value}}fun increaseBrightness() {brightnessLevel++println("Brightness increased to $brightnessLevel.")}fun turnOn() {deviceStatus = "on"brightnessLevel = 2println("$name turned on. The brightness level is $brightnessLevel.")}fun turnOff() {deviceStatus = "off"brightnessLevel = 0println("Smart Light turned off")}
}
在 SmartLightDevice 子类中,找到 turnOn() 和 turnOff() 方法的 fun 关键字,并在前面添加 override 关键字:
class SmartLightDevice(deviceName: String, deviceCategory: String) :SmartDevice(name = deviceName, category = deviceCategory) {var brightnessLevel = 0set(value) {if (value in 0..100) {field = value}}fun increaseBrightness() {brightnessLevel++println("Brightness increased to $brightnessLevel.")}override fun turnOn() {deviceStatus = "on"brightnessLevel = 2println("$name turned on. The brightness level is $brightnessLevel.")}override fun turnOff() {deviceStatus = "off"brightnessLevel = 0println("Smart Light turned off")}
}
class SmartTvDevice(deviceName: String, deviceCategory: String) :SmartDevice(name = deviceName, category = deviceCategory) {var speakerVolume = 2set(value) {if (value in 0..100) {field = value}}var channelNumber = 1set(value) {if (value in 0..200) {field = value}}fun increaseSpeakerVolume() {speakerVolume++println("Speaker volume increased to $speakerVolume.")}fun nextChannel() {channelNumber++println("Channel number increased to $channelNumber.")}override fun turnOn() {deviceStatus = "on"println("$name is turned on. Speaker volume is set to $speakerVolume and channel number is " +"set to $channelNumber.")}override fun turnOff() {deviceStatus = "off"println("$name turned off")}
}fun main() {var smartDevice: SmartDevice = SmartTvDevice("Android TV", "Entertainment")smartDevice.turnOn()
}
Android TV is turned on. Speaker volume is set to 2 and channel number is set to 1.
使用 super 关键字在子类中重复使用父类代码
若要从子类调用父类中被替换的方法,您需使用 super 关键字。
open class SmartDevice(val name: String, val category: String) {var deviceStatus = "online"open fun turnOn() {deviceStatus = "on"}open fun turnOff() {deviceStatus = "off"}
}
class SmartTvDevice(deviceName: String, deviceCategory: String) :SmartDevice(name = deviceName, category = deviceCategory) {var speakerVolume = 2set(value) {if (value in 0..100) {field = value}}var channelNumber = 1set(value) {if (value in 0..200) {field = value}}fun increaseSpeakerVolume() {speakerVolume++println("Speaker volume increased to $speakerVolume.")}fun nextChannel() {channelNumber++println("Channel number increased to $channelNumber.")}override fun turnOn() {super.turnOn()println("$name is turned on. Speaker volume is set to $speakerVolume and channel number is " +"set to $channelNumber.")}override fun turnOff() {super.turnOff()println("$name turned off")}
}
class SmartLightDevice(deviceName: String, deviceCategory: String) :SmartDevice(name = deviceName, category = deviceCategory) {var brightnessLevel = 0set(value) {if (value in 0..100) {field = value}}fun increaseBrightness() {brightnessLevel++println("Brightness increased to $brightnessLevel.")}override fun turnOn() {super.turnOn()brightnessLevel = 2println("$name turned on. The brightness level is $brightnessLevel.")}override fun turnOff() {super.turnOff()brightnessLevel = 0println("Smart Light turned off")}
}
替换子类中的父类属性
open class SmartDevice(val name: String, val category: String) {var deviceStatus = "online"open val deviceType = "unknown"...
}
class SmartTvDevice(deviceName: String, deviceCategory: String) :SmartDevice(name = deviceName, category = deviceCategory) {override val deviceType = "Smart TV"...
}
class SmartLightDevice(deviceName: String, deviceCategory: String) :SmartDevice(name = deviceName, category = deviceCategory) {override val deviceType = "Smart Light"...}
8. 可见性修饰符
Kotlin 提供了以下四种可见性修饰符:
public:默认的可见性修饰符。可让系统在任何位置访问声明。对于您想在类外部使用的属性和方法,请标记为 public。
private:可让系统在相同类或源文件中访问声明。
某些属性和方法可能仅在类的内部使用,而且您不一定想让其他类使用。您可以使用 private 可见性修饰符标记这些属性和方法,以确保其他类不会意外访问它们。
protected:可让系统在子类中访问声明。对于您想在定义它们的类及其子类中使用的属性和方法,请使用 protected 可见性修饰符进行标记。
internal:可让系统在相同模块中访问声明。internal 修饰符与 private 类似,但您可以从类的外部访问内部属性和方法,只要是在相同模块中进行访问即可。
注意:如果 getter 函数的可见性修饰符与属性的可见性修饰符不匹配,编译器就会报错。
open class SmartDevice(val name: String, val category: String) {...var deviceStatus = "online"protected set(value) {field = value}...
}
您不会在 set() 函数中执行任何操作或检查,只需将 value 形参赋给 field 变量即可。如您之前所学,这与属性 setter 的默认实现类似。在本例中,您可以省略 set() 函数的圆括号和主体:
open class SmartDevice(val name: String, val category: String) {...var deviceStatus = "online"protected set...
}
class SmartHome(val smartTvDevice: SmartTvDevice,val smartLightDevice: SmartLightDevice
) {var deviceTurnOnCount = 0private setfun turnOnTv() {deviceTurnOnCount++smartTvDevice.turnOn()}fun turnOffTv() {deviceTurnOnCount--smartTvDevice.turnOff()}...fun turnOnLight() {deviceTurnOnCount++smartLightDevice.turnOn()}fun turnOffLight() {deviceTurnOnCount--smartLightDevice.turnOff()}...}
为方法指定可见性修饰符
class SmartTvDevice(deviceName: String, deviceCategory: String) :SmartDevice(name = deviceName, category = deviceCategory) {...protected fun nextChannel() {channelNumber++println("Channel number increased to $channelNumber.")}      ...
}
为构造函数指定可见性修饰符
open class SmartDevice protected constructor (val name: String, val category: String) {...}
为类指定可见性修饰符
internal open class SmartDevice(val name: String, val category: String) {...}
| 修饰符 | 可在相同类中访问 | 可在子类中访问 | 可在相同模块中访问 | 可在模块之外访问 |
|---|---|---|---|---|
| private | ✔ | 𝗫 | 𝗫 | 𝗫 |
| protected | ✔ | ✔ | 𝗫 | 𝗫 |
| internal | ✔ | ✔ | ✔ | 𝗫 |
| public | ✔ | ✔ | ✔ | ✔ |
9. 定义属性委托
class RangeRegulator(initialValue: Int,private val minValue: Int,private val maxValue: Int
) : ReadWriteProperty<Any?, Int> {var fieldData = initialValueoverride fun getValue(thisRef: Any?, property: KProperty<*>): Int {return fieldData}override fun setValue(thisRef: Any?, property: KProperty<*>, value: Int) {if (value in minValue..maxValue) {fieldData = value}}
}
在 SmartTvDevice 类中,使用委托类来定义 speakerVolume 和 channelNumber 属性:
class SmartTvDevice(deviceName: String, deviceCategory: String) :SmartDevice(name = deviceName, category = deviceCategory) {override val deviceType = "Smart TV"private var speakerVolume by RangeRegulator(initialValue = 2, minValue = 0, maxValue = 100)private var channelNumber by RangeRegulator(initialValue = 1, minValue = 0, maxValue = 200)...}
- 测试解决方案
import kotlin.properties.ReadWriteProperty
import kotlin.reflect.KPropertyopen class SmartDevice(val name: String, val category: String) {var deviceStatus = "online"protected setopen val deviceType = "unknown"open fun turnOn() {deviceStatus = "on"}open fun turnOff() {deviceStatus = "off"}
}class SmartTvDevice(deviceName: String, deviceCategory: String) :SmartDevice(name = deviceName, category = deviceCategory) {override val deviceType = "Smart TV"private var speakerVolume by RangeRegulator(initialValue = 2, minValue = 0, maxValue = 100)private var channelNumber by RangeRegulator(initialValue = 1, minValue = 0, maxValue = 200)fun increaseSpeakerVolume() {speakerVolume++println("Speaker volume increased to $speakerVolume.")}fun nextChannel() {channelNumber++println("Channel number increased to $channelNumber.")}override fun turnOn() {super.turnOn()println("$name is turned on. Speaker volume is set to $speakerVolume and channel number is " +"set to $channelNumber.")}override fun turnOff() {super.turnOff()println("$name turned off")}
}class SmartLightDevice(deviceName: String, deviceCategory: String) :SmartDevice(name = deviceName, category = deviceCategory) {override val deviceType = "Smart Light"private var brightnessLevel by RangeRegulator(initialValue = 0, minValue = 0, maxValue = 100)fun increaseBrightness() {brightnessLevel++println("Brightness increased to $brightnessLevel.")}override fun turnOn() {super.turnOn()brightnessLevel = 2println("$name turned on. The brightness level is $brightnessLevel.")}override fun turnOff() {super.turnOff()brightnessLevel = 0println("Smart Light turned off")}
}class SmartHome(val smartTvDevice: SmartTvDevice,val smartLightDevice: SmartLightDevice
) {var deviceTurnOnCount = 0private setfun turnOnTv() {deviceTurnOnCount++smartTvDevice.turnOn()}fun turnOffTv() {deviceTurnOnCount--smartTvDevice.turnOff()}fun increaseTvVolume() {smartTvDevice.increaseSpeakerVolume()}fun changeTvChannelToNext() {smartTvDevice.nextChannel()}fun turnOnLight() {deviceTurnOnCount++smartLightDevice.turnOn()}fun turnOffLight() {deviceTurnOnCount--smartLightDevice.turnOff()}fun increaseLightBrightness() {smartLightDevice.increaseBrightness()}fun turnOffAllDevices() {turnOffTv()turnOffLight()}
}class RangeRegulator(initialValue: Int,private val minValue: Int,private val maxValue: Int
) : ReadWriteProperty<Any?, Int> {var fieldData = initialValueoverride fun getValue(thisRef: Any?, property: KProperty<*>): Int {return fieldData}override fun setValue(thisRef: Any?, property: KProperty<*>, value: Int) {if (value in minValue..maxValue) {fieldData = value}}
}fun main() {var smartDevice: SmartDevice = SmartTvDevice("Android TV", "Entertainment")smartDevice.turnOn()smartDevice = SmartLightDevice("Google Light", "Utility")smartDevice.turnOn()
}
在 Kotlin 中使用函数类型和 lambda 表达式
将函数存储在变量中
fun main() {val trickFunction = ::trick
}fun trick() {println("No treats!")
}
fun main() {val trickFunction = tricktrick()trickFunction()
}val trick = {println("No treats!")
}
将 treat 变量的数据类型指定为 () -> Unit。
val treat: () -> Unit = {println("Have a treat!")
}
fun main() {}fun trickOrTreat(isTrick: Boolean): () -> Unit {
}val trick = {println("No treats!")
}val treat = {println("Have a treat!")
}
fun trickOrTreat(isTrick: Boolean): () -> Unit {if (isTrick) {return trick} else {return treat}
}
fun main() {val treatFunction = trickOrTreat(false)val trickFunction = trickOrTreat(true)
}
将一个函数作为参数传递到另一个函数
将 trickOrTreat() 函数更新为接受函数作为参数:
在 isTrick 参数后面,添加类型为 (Int) -> String 的 extraTreat 参数。
fun trickOrTreat(isTrick: Boolean, extraTreat: (Int) -> String): () -> Unit {}
fun main() {val coins: (Int) -> String = { quantity ->"$quantity quarters"}val cupcake: (Int) -> String = { quantity ->"Have a cupcake!"}val treatFunction = trickOrTreat(false)val trickFunction = trickOrTreat(true)treatFunction()trickFunction()在 cupcake() 函数中,移除 quantity 参数和 -> 符号。这里用不到它们,因此您可以将其省略。val cupcake: (Int) -> String = {"Have a cupcake!"
}
}
fun main() {val coins: (Int) -> String = { quantity ->"$quantity quarters"}val cupcake: (Int) -> String = {"Have a cupcake!"}val treatFunction = trickOrTreat(false, coins)val trickFunction = trickOrTreat(true, cupcake)treatFunction()trickFunction()
}
val trick = {println("No treats!")
}val treat = {println("Have a treat!")
}
fun trickOrTreat(isTrick: Boolean, extraTreat: (Int) -> String): () -> Unit {if (isTrick) {return trick} else {println(extraTreat(5))return treat}
}
使用简写语法编写 lambda 表达式
省略参数名称使用it
val coins: (Int) -> String = {"$it quarters"
}
将 lambda 表达式直接传入函数
修改代码,以便您可以移除 coins 变量:
移动 lambda 表达式,使其直接传入对 trickOrTreat() 函数的调用。您还可以将 lambda 表达式压缩为一行代码。
fun main() {val coins: (Int) -> String = {"$it quarters"}val treatFunction = trickOrTreat(false, { "$it quarters" })val trickFunction = trickOrTreat(true, null)treatFunction()trickFunction()
}
使用尾随 lambda 语法
val treatFunction = trickOrTreat(false) { "$it quarters" }
布局会在下个文章出现