Java锁代码解析
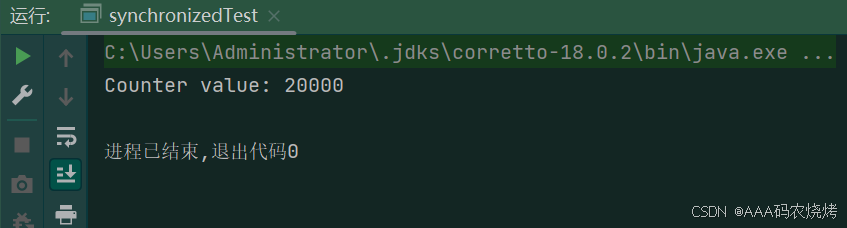
1. 数据竞争导致数据不一致
两个线程分别把一个变量增加10000次,理论上变量最后的值是20000,实际上小于20000

package org.example;

public class synchronizedTest {
    private static int counter = 0;

    public static void main(String[] args) throws InterruptedException {
        // 线程 1:对 counter 进行 10000 次自增操作
        Thread thread1 = new Thread(() -> {
            for (int i = 0; i < 10000; i++) {
                counter++;
            }
        });

        // 线程 2:对 counter 进行 10000 次自增操作
        Thread thread2 = new Thread(() -> {
            for (int i = 0; i < 10000; i++) {
                counter++;
            }
        });

        // 启动两个线程
        thread1.start();
        thread2.start();

        // 等待两个线程执行完毕
        thread1.join();
        thread2.join();

        // 预期结果应该是 20000,但由于数据竞争,实际结果可能小于 20000
        System.out.println("Counter value: " + counter);
    }
}
counter++ 的底层操作
counter++ 这个操作在 Java 代码里看似是一个简单的自增操作,但在计算机底层,它实际上是由多个步骤组成的:
- 读取(Read):从内存中读取
counter的当前值到 CPU 的寄存器中。 - 加 1(Increment):在寄存器中对读取的值进行加 1 操作。
- 写入(Write):将寄存器中加 1 后的值写回到内存中的
counter变量。
执行过程
- 线程 1 读取
counter的值:线程 1 从内存中读取counter的值 0 到它的寄存器中。此时线程 1 的寄存器中的值为 0,内存中counter的值仍为 0。 - 线程调度切换到线程 2:操作系统将 CPU 控制权交给线程 2。
- 线程 2 读取
counter的值:线程 2 从内存中读取counter的值 0 到它的寄存器中。此时线程 2 的寄存器中的值为 0,内存中counter的值还是 0。 - 线程 2 完成自增并写入:线程 2 在寄存器中对值进行加 1 操作,寄存器中的值变为 1,然后将 1 写回到内存中。此时内存中
counter的值变为 1。 - 线程调度切换回线程 1:操作系统将 CPU 控制权交回给线程 1。
- 线程 1 完成自增并写入:线程 1 在它的寄存器中对之前读取的 0 进行加 1 操作,寄存器中的值变为 1,然后将 1 写回到内存中。此时内存中
counter的值还是 1。
在上述过程中,线程 1 和线程 2 都进行了一次自增操作,但由于数据竞争,内存中 counter 的值只增加了 1,而不是预期的 2,这就导致了数据不一致。
修改后,把修改数据的值操作封装为方法用synchronized修饰,或者用synchronized修饰代码块,确保同一时间只有一个线程能够访问方法
package org.example;

public class synchronizedTest {
    private static int counter = 0;
    private static final Object staticLock = new Object();
    public static synchronized void increment() {
        counter++;
    }
    public static void increment() {
        // 对当前对象(this)加锁
        synchronized (staticLock) {
            counter++;
        }
    }


    public static void main(String[] args) throws InterruptedException {
        // 线程 1:对 counter 进行 10000 次自增操作
        Thread thread1 = new Thread(() -> {
            for (int i = 0; i < 10000; i++) {
                increment();
            }
        });

        // 线程 2:对 counter 进行 10000 次自增操作
        Thread thread2 = new Thread(() -> {
            for (int i = 0; i < 10000; i++) {
                increment();
            }
        });

        // 启动两个线程
        thread1.start();
        thread2.start();

        // 等待两个线程执行完毕
        thread1.join();
        thread2.join();

        // 预期结果应该是 20000,但由于数据竞争,实际结果可能小于 20000
        System.out.println("Counter value: " + counter);
    }
}
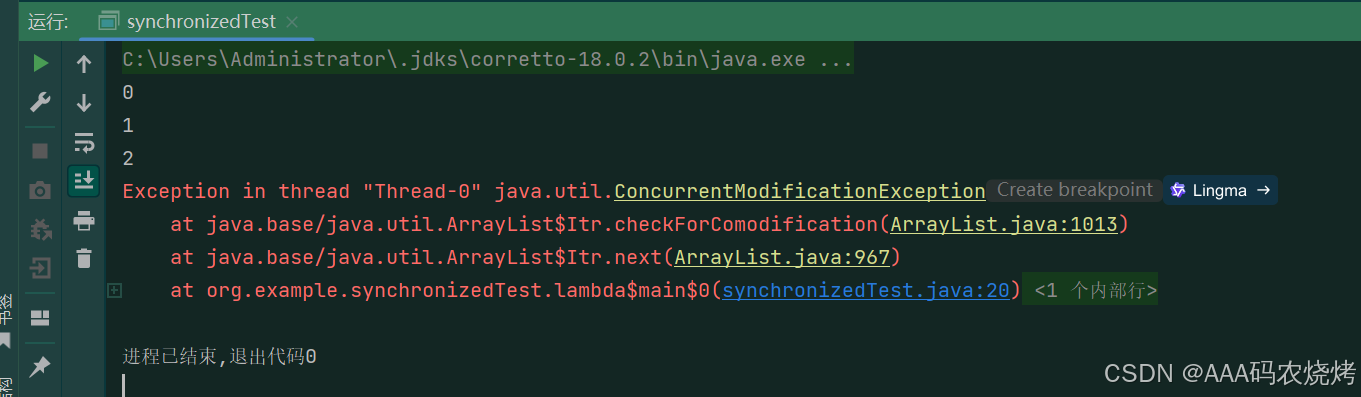
2,并发修改
线程1在迭代List的同时,线程2添加新元素
package org.example;

import java.util.ArrayList;
import java.util.Iterator;
import java.util.List;

public class synchronizedTest {
    public static void main(String[] args) {
        // 创建一个 ArrayList
        List<Integer> list = new ArrayList<>();
        for (int i = 0; i < 10; i++) {
            list.add(i);
        }

        // 线程 1:迭代 List
        Thread thread1 = new Thread(() -> {
            Iterator<Integer> iterator = list.iterator();
            while (iterator.hasNext()) {
                System.out.println(iterator.next());
                try {
                    // 模拟耗时操作
                    Thread.sleep(100);
                } catch (InterruptedException e) {
                    e.printStackTrace();
                }
            }
        });

        // 线程 2:修改 List
        Thread thread2 = new Thread(() -> {
            try {
                // 等待一段时间,确保线程 1 开始迭代
                Thread.sleep(200);
            } catch (InterruptedException e) {
                e.printStackTrace();
            }
            list.add(10);
        });

        // 启动两个线程
        thread1.start();
        thread2.start();
    }
}
解决问题,使用线程安全集合类或者synchronized修饰代码块
package org.example;

import java.util.ArrayList;
import java.util.Iterator;
import java.util.List;
import java.util.concurrent.CopyOnWriteArrayList;

public class synchronizedTest {
    private static final List<Integer> list = new CopyOnWriteArrayList<>();

    public static void main(String[] args) {
        // 初始化列表
        for (int i = 0; i < 10; i++) {
            list.add(i);
        }

        // 线程 1:迭代列表
        Thread thread1 = new Thread(() -> {
            Iterator<Integer> iterator = list.iterator();
            while (iterator.hasNext()) {
                System.out.println(iterator.next());
                try {
                    Thread.sleep(100);
                } catch (InterruptedException e) {
                    e.printStackTrace();
                }
            }
        });

        // 线程 2:修改列表
        Thread thread2 = new Thread(() -> {
            try {
                Thread.sleep(200);
            } catch (InterruptedException e) {
                e.printStackTrace();
            }
            list.add(10);
        });

        thread1.start();
        thread2.start();
    }
}
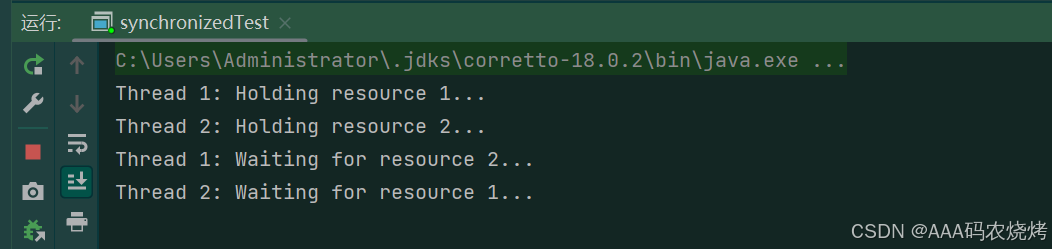
3,死锁问题
两个线程争夺资源造成互相等待现象
package org.example;

public class synchronizedTest {
    private static final Object resource1 = new Object();
    private static final Object resource2 = new Object();

    public static void main(String[] args) {
        // 线程 1:先获取 resource1,再获取 resource2
        Thread thread1 = new Thread(() -> {
            synchronized (resource1) {
                System.out.println("Thread 1: Holding resource 1...");
                try {
                    Thread.sleep(100);
                } catch (InterruptedException e) {
                    e.printStackTrace();
                }
                System.out.println("Thread 1: Waiting for resource 2...");
                //                resource2已经被tread2占有,无法执行下面代码
                synchronized (resource2) {
                    System.out.println("Thread 1: Holding resource 1 and 2...");
                }
            }
        });

        // 线程 2:先获取 resource2,再获取 resource1
        Thread thread2 = new Thread(() -> {
            synchronized (resource2) {
                System.out.println("Thread 2: Holding resource 2...");
                try {
                    Thread.sleep(100);
                } catch (InterruptedException e) {
                    e.printStackTrace();
                }
                System.out.println("Thread 2: Waiting for resource 1...");
                //                resource1已经被tread1占有,无法执行下面代码
                synchronized (resource1) {
                    System.out.println("Thread 2: Holding resource 1 and 2...");
                }
            }
        });

        // 启动两个线程
        thread1.start();
        thread2.start();
    }
}
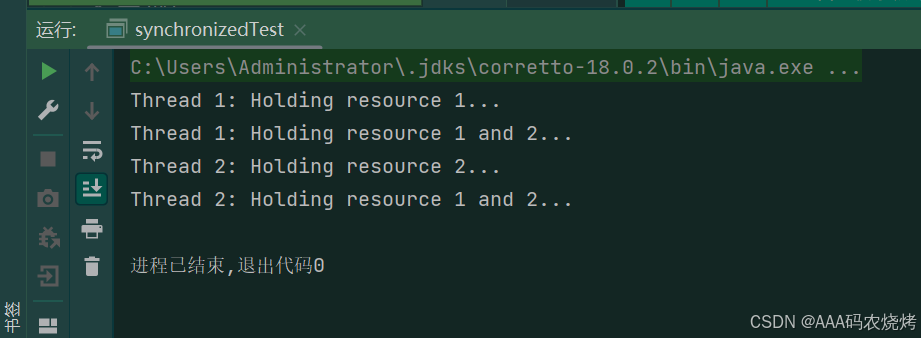
修改,增加信号量,线程1获取resource1和信号量,线程2获取不到信号量,不能获取resource2,线程1接着获取resource2
package org.example;

import java.util.concurrent.Semaphore;

public class synchronizedTest {
    // 定义两个资源
    private static final Object resource1 = new Object();
    private static final Object resource2 = new Object();
    // 定义一个信号量,初始许可证数量为 1
    private static final Semaphore semaphore = new Semaphore(1);

    public static void main(String[] args) {
        // 线程 1
        Thread thread1 = new Thread(() -> {
            try {
                // 获取信号量的许可证
                semaphore.acquire();
                // 访问资源 1
                synchronized (resource1) {
                    System.out.println("Thread 1: Holding resource 1...");
                    Thread.sleep(100);
                    // 访问资源 2
                    synchronized (resource2) {
                        System.out.println("Thread 1: Holding resource 1 and 2...");
                    }
                }
            } catch (InterruptedException e) {
                e.printStackTrace();
            } finally {
                // 释放信号量的许可证
                semaphore.release();
            }
        });

        // 线程 2
        Thread thread2 = new Thread(() -> {
            try {
                // 获取信号量的许可证
                semaphore.acquire();
                // 访问资源 2
                synchronized (resource2) {
                    System.out.println("Thread 2: Holding resource 2...");
                    Thread.sleep(100);
                    // 访问资源 1
                    synchronized (resource1) {
                        System.out.println("Thread 2: Holding resource 1 and 2...");
                    }
                }
            } catch (InterruptedException e) {
                e.printStackTrace();
            } finally {
                // 释放信号量的许可证
                semaphore.release();
            }
        });

        // 启动线程
        thread1.start();
        thread2.start();
    }
}
ReentrantLock使用
private static int counter = 0;
    private static final Lock lock = new ReentrantLock();

    public static void increment() {
        // 获取锁
        lock.lock();
        try {
            // 临界区,对共享资源进行操作
            counter++;
            System.out.println(Thread.currentThread().getName() + " 执行后 counter 的值为: " + counter);
        } finally {
            // 释放锁,确保在任何情况下锁都会被释放
            lock.unlock();
        }
    }

    public static void main(String[] args) {
        // 线程 1
        Thread thread1 = new Thread(() -> {
            for (int i = 0; i < 5; i++) {
                increment();
            }
        });

        // 线程 2
        Thread thread2 = new Thread(() -> {
            for (int i = 0; i < 5; i++) {
                increment();
            }
        });

        thread1.start();
        thread2.start();
    }
package org.example;
import java.util.concurrent.locks.Lock;
import java.util.concurrent.locks.ReentrantLock;
public class TryLockExample {
private static final Lock lock = new ReentrantLock();
public static void performTask() {
if (lock.tryLock()) {
try {
System.out.println(Thread.currentThread().getName() + " 获取到锁,开始执行任务");
// 模拟任务执行
Thread.sleep(1000);
} catch (InterruptedException e) {
e.printStackTrace();
} finally {
lock.unlock();
System.out.println(Thread.currentThread().getName() + " 释放锁");
}
} else {
System.out.println(Thread.currentThread().getName() + " 未能获取到锁,放弃执行任务");
}
}
public static void main(String[] args) {
// 线程 1
Thread thread1 = new Thread(TryLockExample::performTask);
// 线程 2
Thread thread2 = new Thread(TryLockExample::performTask);
thread1.start();
thread2.start();
}
}非公平锁,此处JVM用到了偏向锁优化,线程1第一次获取到锁,此后锁更偏向于这个线程
优点:减少锁开销,简化机制
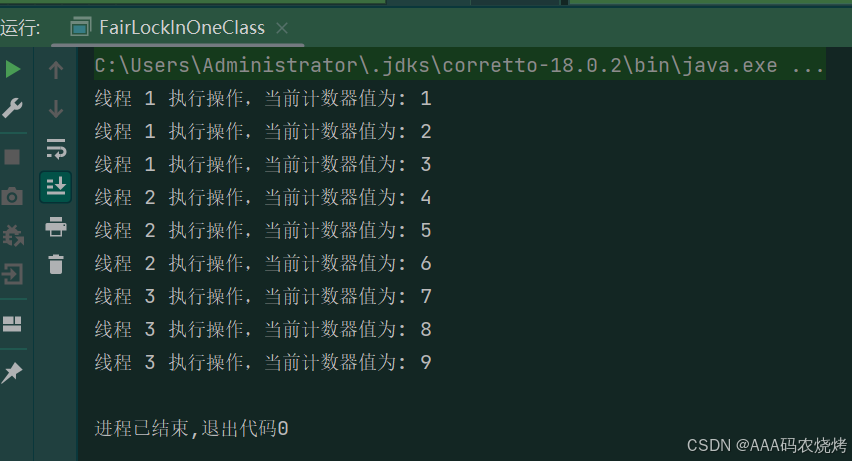
公平锁,先来先得,避免饥饿问题
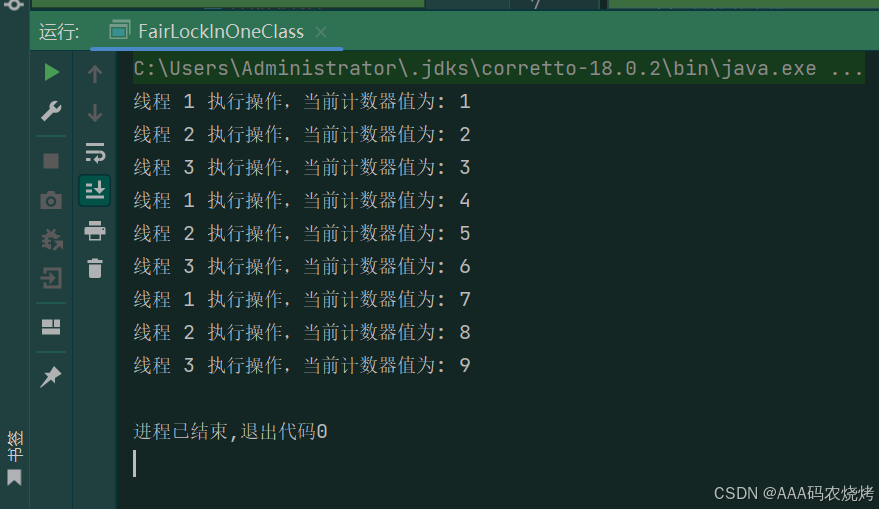
package org.example;

import java.util.concurrent.locks.Lock;
import java.util.concurrent.locks.ReentrantLock;

public class FairLockInOneClass {
    // 创建公平锁
    private final Lock fairLock = new ReentrantLock(true);
    // 共享计数器
    private int counter = 0;

    // 内部类,代表工作线程
    private class Worker extends Thread {
        public Worker(String name) {
            super(name);
        }

        @Override
        public void run() {
            for (int i = 0; i < 3; i++) {
                // 获取锁
                fairLock.lock();
                try {
                    counter++;
                    System.out.println(Thread.currentThread().getName() + " 执行操作,当前计数器值为: " + counter);
                    // 模拟操作耗时
                    Thread.sleep(100);
                } catch (InterruptedException e) {
                    e.printStackTrace();
                } finally {
                    // 释放锁
                    fairLock.unlock();
                }
            }
        }
    }

    // 启动多个工作线程的方法
    public void startThreads() {
        Worker worker1 = new Worker("线程 1");
        Worker worker2 = new Worker("线程 2");
        Worker worker3 = new Worker("线程 3");

        worker1.start();
        worker2.start();
        worker3.start();

        try {
            // 等待所有线程执行完毕
            worker1.join();
            worker2.join();
            worker3.join();
        } catch (InterruptedException e) {
            e.printStackTrace();
        }
    }

    public static void main(String[] args) {
        FairLockInOneClass example = new FairLockInOneClass();
        example.startThreads();
    }
}
volatile关键字
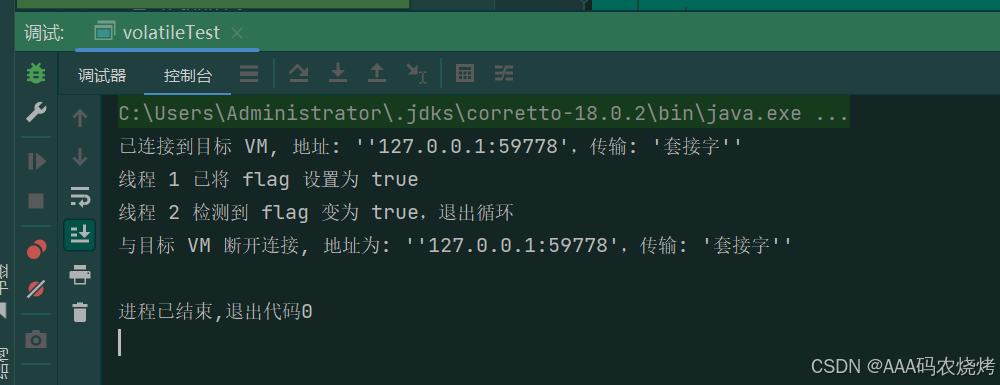
如果flag不用volatile修饰,thread2读到的flag为false,不会重新从内存里面读取,不能结束循环
package org.example;

public class volatileTest {
    // 使用 volatile 关键字修饰变量
    private static volatile boolean flag = false;

    public static void main(String[] args) {
        // 线程 1:修改 flag 的值
        Thread thread1 = new Thread(() -> {
            try {
                // 模拟耗时操作
                Thread.sleep(100);
            } catch (InterruptedException e) {
                e.printStackTrace();
            }
            flag = true;
            System.out.println("线程 1 已将 flag 设置为 true");
        });

        // 线程 2:不断检查 flag 的值
        Thread thread2 = new Thread(() -> {
            while (!flag) {
                // 循环等待
            }
            System.out.println("线程 2 检测到 flag 变为 true,退出循环");
        });

        // 启动线程
        thread2.start();
        thread1.start();

        try {
            // 等待两个线程执行完毕
            thread1.join();
            thread2.join();
        } catch (InterruptedException e) {
            e.printStackTrace();
        }
    }
}
作用保证可见性,禁止指令重排序,但是不能保证线程安全!
volatile 不能保证线程安全的原因
虽然 volatile 能保证变量的可见性和禁止指令重排序,但它不能保证复合操作的原子性。原子操作是指不可分割的操作,要么全部执行,要么全部不执行。像常见的 i++ 操作,它实际上包含了读取、加 1 和写入三个步骤,并非原子操作。
AQS使用
(写锁)独占锁也称为排他锁,是一种一次只能被一个线程持有的锁。当一个线程获取了独占锁后,其他线程若想获取该锁,就必须等待持有锁的线程释放锁,否则会被阻塞。
(读锁)共享锁是一种可以被多个线程同时持有的锁。当一个线程获取了共享锁后,其他线程也可以获取该共享锁,但如果有线程想要获取独占锁,则必须等待所有持有共享锁的线程释放锁。
自定义独占锁
package org.example;

import java.util.concurrent.locks.AbstractQueuedSynchronizer;
import java.util.concurrent.locks.Lock;

// 自定义独占锁类,实现 Lock 接口
class CustomExclusiveLock implements Lock {
    // 内部类 Sync 继承自 AQS
    private static class Sync extends AbstractQueuedSynchronizer {
        // 判断当前是否处于锁定状态,即 state 是否为 1
        @Override
        protected boolean isHeldExclusively() {
            return getState() == 1;
        }

        // 尝试获取锁,使用 CAS 操作将 state 从 0 变为 1
        @Override
        protected boolean tryAcquire(int acquires) {
            assert acquires == 1;
            if (compareAndSetState(0, 1)) {
                setExclusiveOwnerThread(Thread.currentThread());
                return true;
            }
            return false;
        }

        // 尝试释放锁,将 state 置为 0
        @Override
        protected boolean tryRelease(int releases) {
            assert releases == 1;
            if (getState() == 0) {
                throw new IllegalMonitorStateException();
            }
            setExclusiveOwnerThread(null);
            setState(0);
            return true;
        }
    }

    private final Sync sync = new Sync();

    // 加锁操作,调用 AQS 的 acquire 方法
    @Override
    public void lock() {
        sync.acquire(1);
    }

    // 可中断的加锁操作,调用 AQS 的 acquireInterruptibly 方法
    @Override
    public void lockInterruptibly() throws InterruptedException {
        sync.acquireInterruptibly(1);
    }

    // 尝试加锁,调用 AQS 的 tryAcquire 方法
    @Override
    public boolean tryLock() {
        return sync.tryAcquire(1);
    }

    // 在指定时间内尝试加锁,调用 AQS 的 tryAcquireNanos 方法
    @Override
    public boolean tryLock(long time, java.util.concurrent.TimeUnit unit) throws InterruptedException {
        return sync.tryAcquireNanos(1, unit.toNanos(time));
    }

    // 解锁操作,调用 AQS 的 release 方法
    @Override
    public void unlock() {
        sync.release(1);
    }

    // 获取条件对象
    @Override
    public java.util.concurrent.locks.Condition newCondition() {
        return null;
    }
}

// 测试自定义独占锁
public class CustomExclusiveLockTest {
    public static void main(String[] args) {
        CustomExclusiveLock lock = new CustomExclusiveLock();

        // 创建一个线程
        Thread thread = new Thread(() -> {
            lock.lock();
            try {
                System.out.println("Thread acquired the lock.");
                Thread.sleep(2000);
            } catch (InterruptedException e) {
                e.printStackTrace();
            } finally {
                lock.unlock();
                System.out.println("Thread released the lock.");
            }
        });

        thread.start();
    }
}
自定义共享锁
import java.util.concurrent.locks.AbstractQueuedSynchronizer;

// 自定义共享锁类
class CustomSharedLock {
    // 内部类 Sync 继承自 AQS
    private static class Sync extends AbstractQueuedSynchronizer {
        Sync(int permits) {
            setState(permits);
        }

        // 获取共享资源
        @Override
        protected int tryAcquireShared(int acquires) {
            for (; ; ) {
                int current = getState();
                int newState = current - acquires;
                if (newState < 0 || compareAndSetState(current, newState)) {
                    return newState;
                }
            }
        }

        // 释放共享资源
        @Override
        protected boolean tryReleaseShared(int releases) {
            for (; ; ) {
                int current = getState();
                int newState = current + releases;
                if (compareAndSetState(current, newState)) {
                    return true;
                }
            }
        }
    }

    private final Sync sync;

    public CustomSharedLock(int permits) {
        this.sync = new Sync(permits);
    }

    // 获取共享锁
    public void acquireShared() {
        sync.acquireShared(1);
    }

    // 释放共享锁
    public void releaseShared() {
        sync.releaseShared(1);
    }
}

// 测试自定义共享锁
public class CustomSharedLockTest {
    public static void main(String[] args) {
        CustomSharedLock sharedLock = new CustomSharedLock(2);

        // 创建线程 1
        Thread thread1 = new Thread(() -> {
            sharedLock.acquireShared();
            try {
                System.out.println("Thread 1 acquired the shared lock.");
                Thread.sleep(2000);
            } catch (InterruptedException e) {
                e.printStackTrace();
            } finally {
                sharedLock.releaseShared();
                System.out.println("Thread 1 released the shared lock.");
            }
        });

        // 创建线程 2
        Thread thread2 = new Thread(() -> {
            sharedLock.acquireShared();
            try {
                System.out.println("Thread 2 acquired the shared lock.");
                Thread.sleep(2000);
            } catch (InterruptedException e) {
                e.printStackTrace();
            } finally {
                sharedLock.releaseShared();
                System.out.println("Thread 2 released the shared lock.");
            }
        });

        thread1.start();
        thread2.start();
    }
}