Vue3中使用 Vue Flow 流程图方法
效果图:
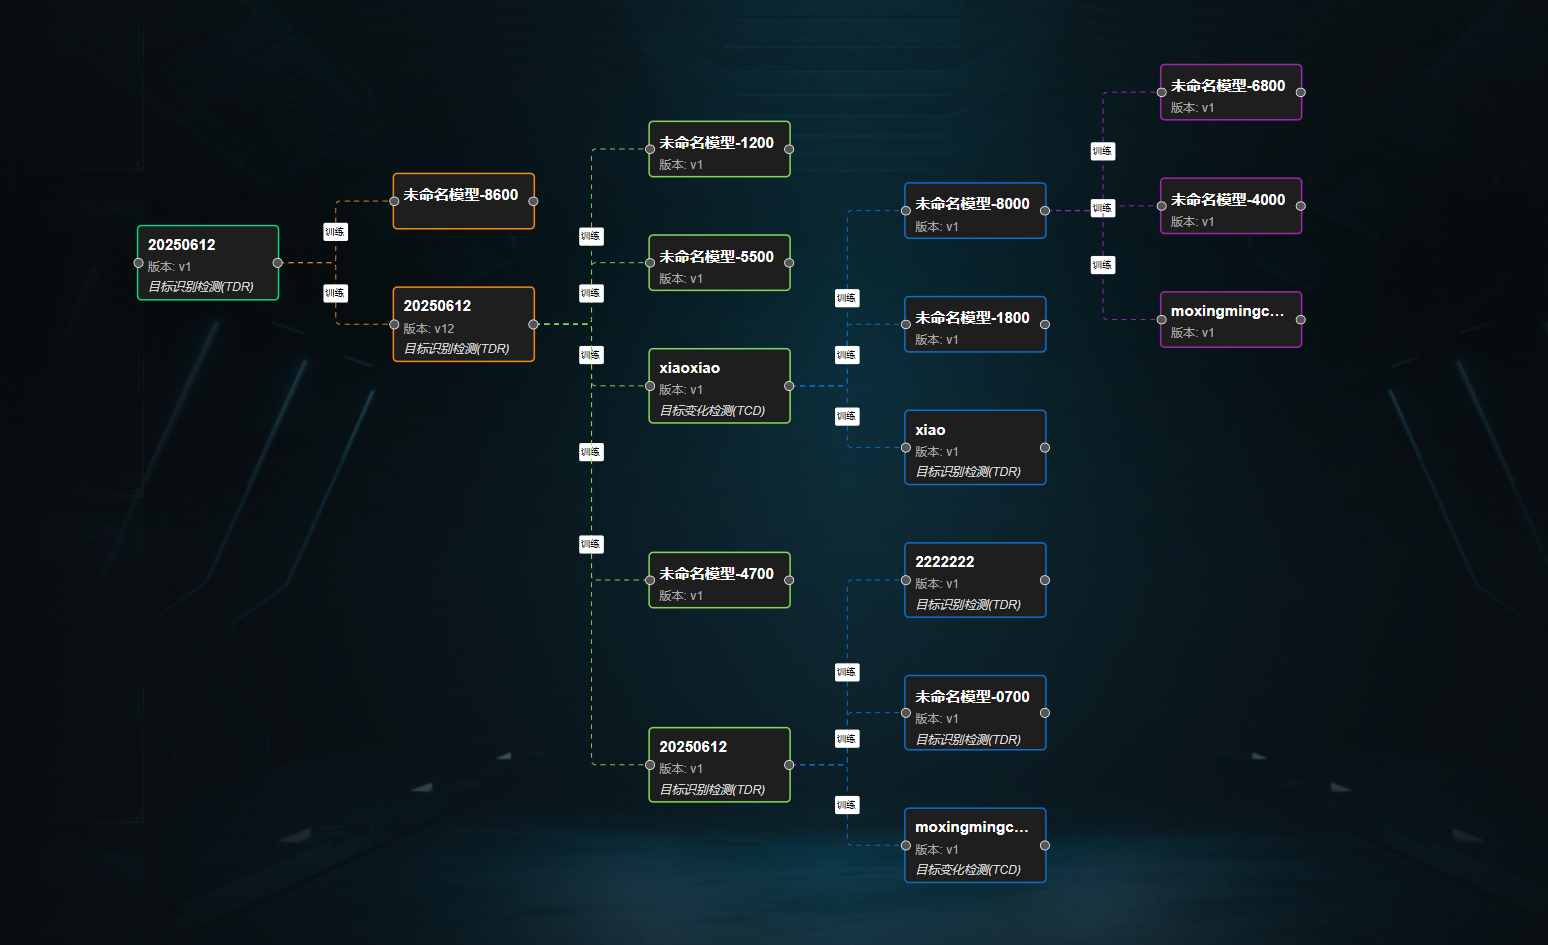
最近项目开发时有一个流程图的功能,需要做流程节点的展示,就搜到了 Vue Flow 这个插件,这个插件总得来说还可以,简单已使用,下边就总结一下使用的方法:
Vue Flow官网:Vue Flow
1、安装插件:
npm i @vue-flow/core
npm i vue-flow/additional-components
npm i dagre
dagre是为了让流程图自动布局的,而不是全部初始化在一条直线上,Vue Flow 本身不包含自动布局功能,但您可以使用第三方库如 dagre 来实现层次化布局.

2、组件全部代码(不联调接口静态渲染):
<template><div style="width: 100%; height: 100%; color: #fff"><VueFlow :nodes="nodes" :edges="edges" @node-click="onNodeClick" :default-edge-options="{ type: 'smoothstep' }"fit-view-on-init><template #node-custom="nodeProps"><!-- 开始节点的位置 --><Handle type="target" position="left" /><div>{{ nodeProps.data.label }}</div><div>{{ nodeProps.data.value }}</div><!-- 结束节点的位置 --><Handle type="source" position="right" /></template></VueFlow></div>
</template><script setup>
import { ref, onMounted } from 'vue'
import { VueFlow, Handle } from '@vue-flow/core'
import dagre from 'dagre'
import { getModelTree } from "@/api/system/algorithmModel";
import { getModelName } from '../../../api/system/algorithmModel';const nodes = ref([{ id: '1', type: 'custom', data: { label: '算法1' }, style: { width: '100px', height: '50px', border: '2px solid #10D27A', padding: '10px' } },{ id: '2', type: 'custom', data: { label: '算法2', value: 'xxxxxxxxxx' }, style: { width: '100px', height: '50px', border: '2px solid #F1881C', padding: '10px' } },{ id: '3', type: 'custom', data: { label: '算法3', value: 'xxxxxxxxxx' }, style: { width: '100px', height: '50px', border: '2px solid #81D85D', padding: '10px' } },{ id: '4', type: 'custom', data: { label: '算法4' }, style: { width: '100px', height: '50px', border: '2px solid #0F6DC6', padding: '10px' } },{ id: '5', type: 'custom', data: { label: '算法5', value: 'xxxxxxxxxx' }, style: { width: '100px', height: '50px', border: '2px solid #0F6DC6', padding: '10px' } },{ id: '6', type: 'custom', data: { label: '算法6' }, style: { width: '100px', height: '50px', border: '2px solid #0F6DC6', padding: '10px' } },{ id: '7', type: 'custom', data: { label: '算法7', value: 'xxxxxxxxxx' }, style: { width: '100px', height: '50px', border: '2px solid #0F6DC6', padding: '10px' } },{ id: '8', type: 'custom', data: { label: '算法8', value: 'xxxxxxxxxx' }, style: { width: '100px', height: '50px', border: '2px solid #0F6DC6', padding: '10px' } },{ id: '9', type: 'custom', data: { label: '算法9', value: 'xxxxxxxxxx' }, style: { width: '100px', height: '50px', border: '2px solid #0F6DC6', padding: '10px' } },{ id: '10', type: 'custom', data: { label: '算法10', value: 'xxxxxxxxxx' }, style: { width: '100px', height: '50px', border: '2px solid #0F6DC6', padding: '10px' } }
])const edges = ref([{ id: 'e1-1', source: '1', target: '2', label: '训练', animated: true },{ id: 'e1-2', source: '1', target: '3', label: '训练', animated: true },{ id: 'e1-3', source: '2', target: '4', label: '训练', animated: true },{ id: 'e1-4', source: '3', target: '5', label: '训练', animated: true },{ id: 'e1-5', source: '5', target: '6', label: '训练', animated: true },{ id: 'e1-6', source: '5', target: '7', label: '训练', animated: true },{ id: 'e1-7', source: '7', target: '8', label: '训练', animated: true },{ id: 'e1-8', source: '7', target: '9', label: '训练', animated: true },{ id: 'e1-9', source: '8', target: '10', label: '训练', animated: true }
])// 使用 dagre 进行自动布局
const layout = () => {const dagreGraph = new dagre.graphlib.Graph()dagreGraph.setDefaultEdgeLabel(() => ({}))dagreGraph.setGraph({ rankdir: 'LR', ranksep: 100, nodesep: 50 })// 设置节点尺寸nodes.value.forEach(node => {dagreGraph.setNode(node.id, {width: 120, // 包括 padding 和 borderheight: 70})})// 添加边edges.value.forEach(edge => {dagreGraph.setEdge(edge.source, edge.target)})// 计算布局dagre.layout(dagreGraph)// 更新节点位置nodes.value = nodes.value.map(node => {const nodeWithPosition = dagreGraph.node(node.id)return {...node,position: {x: nodeWithPosition.x - 60, // 居中y: nodeWithPosition.y - 35}}})// 确保 edges 也更新(Vue Flow 会自动计算路径)edges.value = [...edges.value] // 触发响应式更新
}
const getModelTreeFn = async () => {const res = await getModelTree('1384227702596173824')const ConfigurationFile = typeof res.message === 'string' ? JSON.parse(res.message) : res.message;console.log('res2', ConfigurationFile)}
onMounted(() => {layout()getModelTreeFn()
})const onNodeClick = (node) => {console.log('Node clicked:', node)
}</script><style>
@import "@vue-flow/core/dist/style.css";
@import "@vue-flow/core/dist/theme-default.css";.vue-flow__handle {width: 10px;height: 10px;background: #555;
}
</style>
3、组件全部代码(调接口动态渲染):
<template><div style="width: 100%; height: 100%; color: #fff"><VueFlow :nodes="nodes" :edges="edges" @node-click="onNodeClick" :default-edge-options="{ type: 'smoothstep' }"fit-view-on-init><template #node-custom="nodeProps"><Handle type="target" position="left" /><div class="node-title">{{ nodeProps.data.label }}</div><div v-if="nodeProps.data.version" class="node-version">版本: {{ nodeProps.data.version }}</div><div v-if="nodeProps.data.algorithmType" class="node-type">{{ nodeProps.data.algorithmType }}</div><Handle type="source" position="right" /></template></VueFlow></div>
</template><script setup>
import { ref, onMounted } from 'vue'
import { VueFlow, Handle } from '@vue-flow/core'
import dagre from 'dagre'
import { getModelTree } from "@/api/system/algorithmModel";const nodes = ref([])
const edges = ref([])// 颜色数组,用于不同层级的节点
const COLORS = ['#10D27A', // 第一层'#F1881C', // 第二层'#81D85D', // 第三层'#0F6DC6', // 第四层'#9C27B0', // 第五层'#E91E63', // 第六层'#607D8B'  // 第七层
]// 转换后端数据为流程图节点和边
const transformDataToFlow = (data, parentId = null, level = 0) => {if (!data) returnconst nodeId = data.id ? data.id.toString() : Math.random().toString(36).substr(2, 9)const color = COLORS[level % COLORS.length]// 创建当前节点const newNode = {id: nodeId,type: 'custom',data: { label: data.modelName || `未命名模型-${nodeId.slice(-4)}`,version: data.version,algorithmType: data.algorithmType},style: { width: '150px', height: data.algorithmType ? '80px' : '60px', border: `2px solid ${color}`, padding: '10px',backgroundColor: '#1E1E1E',borderRadius: '5px',color: '#FFF'}}nodes.value.push(newNode)// 如果有父节点,创建边if (parentId) {edges.value.push({id: `e${parentId}-${nodeId}`,source: parentId,target: nodeId,label: '训练',animated: true,style: { stroke: color }})}// 递归处理子节点if (data.childrenTree && data.childrenTree.length > 0) {data.childrenTree.forEach(child => {transformDataToFlow(child, nodeId, level + 1)})}
}// 使用 dagre 进行自动布局(从左到右)
const layout = () => {const dagreGraph = new dagre.graphlib.Graph()dagreGraph.setDefaultEdgeLabel(() => ({}))// 修改为从左到右的布局dagreGraph.setGraph({ rankdir: 'LR',  // LR 表示从左到右ranksep: 100,   // 层级间距nodesep: 50     // 同层级节点间距})// 设置节点尺寸nodes.value.forEach(node => {dagreGraph.setNode(node.id, {width: 170, // 包括 padding 和 borderheight: node.style.height === '80px' ? 90 : 70})})// 添加边edges.value.forEach(edge => {dagreGraph.setEdge(edge.source, edge.target)})// 计算布局dagre.layout(dagreGraph)// 更新节点位置nodes.value = nodes.value.map(node => {const nodeWithPosition = dagreGraph.node(node.id)return {...node,position: {x: nodeWithPosition.x - 85, // 居中y: nodeWithPosition.y - (node.style.height === '80px' ? 45 : 35)}}})// 触发响应式更新edges.value = [...edges.value]
}const getModelTreeFn = async () => {try {const res = await getModelTree('1384227702596173824')const configurationFile = typeof res.message === 'string' ? JSON.parse(res.message) : res.message// 清空现有数据nodes.value = []edges.value = []// 转换数据transformDataToFlow(configurationFile)// 应用布局layout()} catch (error) {console.error('获取模型树失败:', error)}
}onMounted(() => {getModelTreeFn()
})const onNodeClick = (node) => {console.log('Node clicked:', node)
}
</script><style>
@import "@vue-flow/core/dist/style.css";
@import "@vue-flow/core/dist/theme-default.css";.vue-flow__handle {width: 10px;height: 10px;background: #555;
}.node-title {font-weight: bold;margin-bottom: 5px;white-space: nowrap;overflow: hidden;text-overflow: ellipsis;
}.node-version {font-size: 0.8em;color: #aaa;margin-bottom: 5px;
}.node-type {font-size: 0.8em;color: #ddd;font-style: italic;
}
</style>
4、更多配置项:
3.1、节点点击事件
<!--绑定-->
<VueFlow :nodes="nodes" :edges="edges" @node-click="onNodeClick" />// 方法
onNodeClick(node) {console.log('Node clicked:', node);
},
3.2、节点拖拽事件
<!--绑定-->
<VueFlow :nodes="nodes" :edges="edges" @node-drag="onNodeDrag" />// 方法
onNodeDrag({ node, position }) {console.log('Node dragged:', node.id, 'New position:', position);
},
3.3、连接边事件
<!--绑定-->
<VueFlow :nodes="nodes" :edges="edges" @connect="onConnect" />// 方法
onConnect(edge) {console.log('Edge connected:', edge);
},
3.4、节点双击事件
<!--绑定-->
<VueFlow :nodes="nodes" :edges="edges" @node-dblclick="onNodeDoubleClick" />// 方法
onNodeDoubleClick(node) {console.log('Node double clicked:', node);
},
3.5、画布缩放和拖动事件
<!--绑定-->
<VueFlow :nodes="nodes" :edges="edges" @zoom-change="onZoomChange" @canvas-click="onCanvasClick" />// 方法
onZoomChange(event) {console.log('Zoom changed:', event);
},
onCanvasClick(event) {console.log('Canvas clicked:', event);
},
5、常用节点连接线样式示例
5.1、普通直线
const edges = [{ id: 'e1-1', source: '1', target: '2', style: { stroke: '#10D27A', strokeWidth: 2 } },
];
5.2、虚线
const edges = [{ id: 'e1-1', source: '1', target: '2', style: { stroke: '#F1881C', strokeWidth: 2, strokeDasharray: '5,5' } },
];
5.3、带箭头
const edges = [{ id: 'e1-1', source: '1', target: '2',style: { stroke: '#4682b4', strokeWidth: 2, markerEnd: 'url(#arrow)', },},
];
5.4、带圆角
const edges = [{ id: 'e1-1', source: '1', target: '2', style: { stroke: '#FF6347', strokeWidth: 4, strokeLinecap: 'round' } },
];
5.5、自定义边颜色和宽度
const edges = [{ id: 'e1-1', source: '1', target: '2', style: { stroke: '#000', strokeWidth: 6 } },{ id: 'e1-2', source: '2', target: '3', style: { stroke: '#FF0000', strokeWidth: 3 } },
];
5.6、带动效的连接线
const edges = [{ id: 'e1-1', source: '1', target: '2, animated: true,},
];