LangGraph基础知识( Multi-agent)(六)
一、Single-Agent 架构的局限
随着需求越来越复杂,能够预想到的以下几个非常关键的问题是:
- `Agent` 有太多工具可供使用,会导致对下一步调用哪个工具做出了混乱的决定。
- 上下文变得过于复杂,无法清晰的跟踪并传递有效信息。
- 系统中需要多个专业领域(例如规划师、研究人员、数学专家等),单一的角色背景设定没有办法匹配不同的需求。
从而引出多Multi-agent(智能体)。
二、Multi-agent
Multi-agent architectures 架构
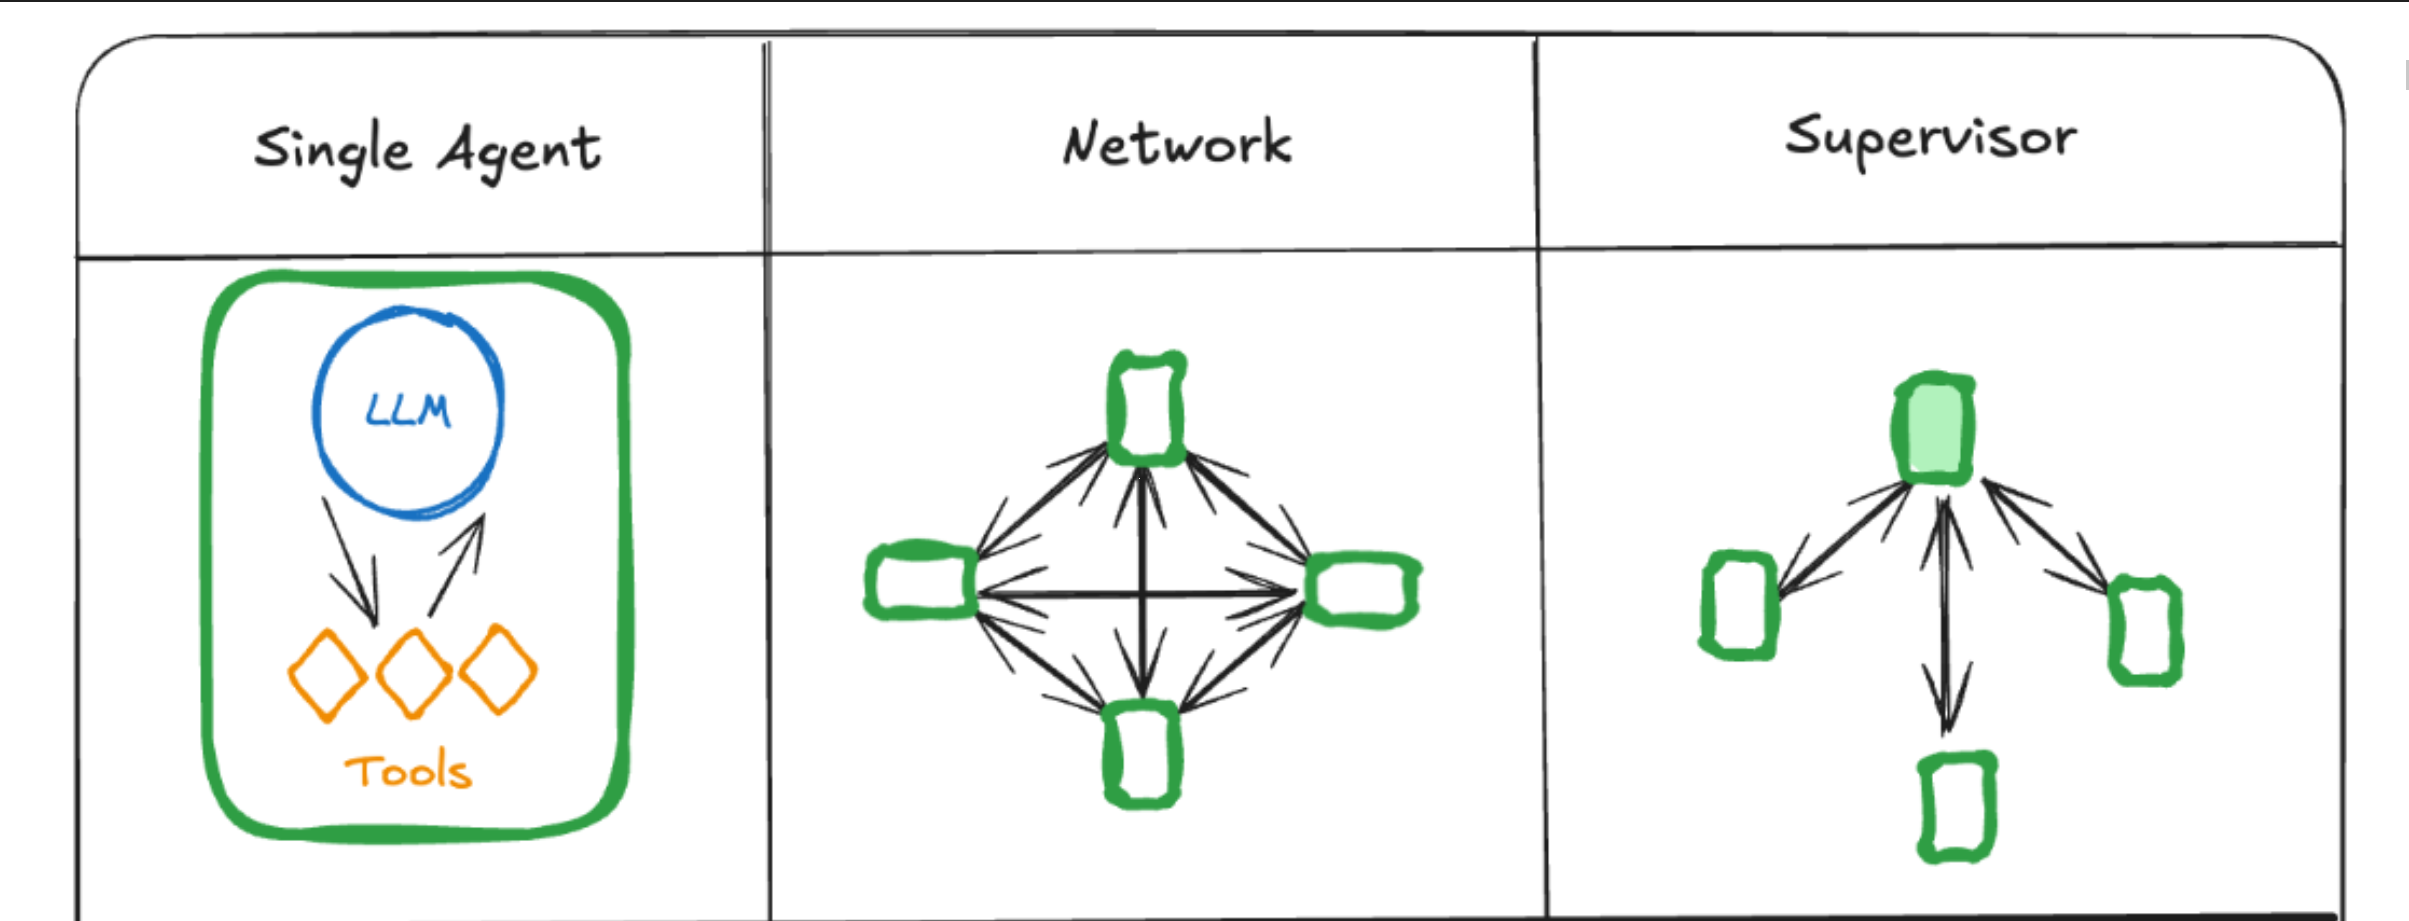
`LangGraph`利用基于图的结构来定义代理并在它们之间建立连接。在此框架中,每个代理都表示为图中的一个节点,并通过边链接到其它代理。每个代理通过接收来自其他代理的输入并将控制权传递给下一个代理来执行其指定的操作。在`LangGraph` 框架的设计中,主要通过如下几种方法来建立各个子代理之间的通信连接:
- NetWork(网络):每个代理都可以与其他每个代理通信。任何代理都可以决定接下来要呼叫哪个其他代理。
- Supervisor(主管):每个代理都与一个 `Supervisor` 代理通信。由 `Supervisor` 代理决定接下来应调用哪个代理。
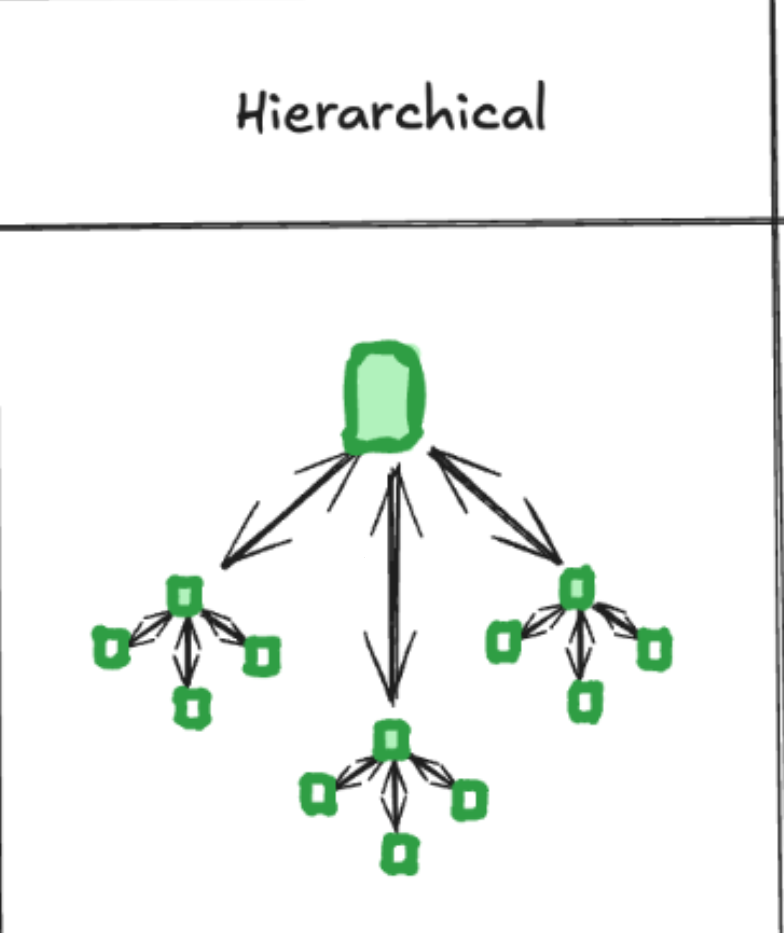
- Hierarchical(分层):定义具有 `supervisor` 嵌套 `supervisor`多代理系统。这是 `Supervisor` 架构的一种泛化,允许更复杂的控制流。
由此引出了一个问题:在具体实践各个不同多代理架构下的具体应用方法之前,我们需要结合`LangGraph`构建图的机制去思考一个问题:通过`State`可以让一个图中的所有节点共享全局的信息,那么在多代理架构中,当每一个图变成了一个节点,那么不同图之间的状态,应该怎么传递?
LangGraph 中引入Subgraphs (子图)处理的。
三、Subgraphs
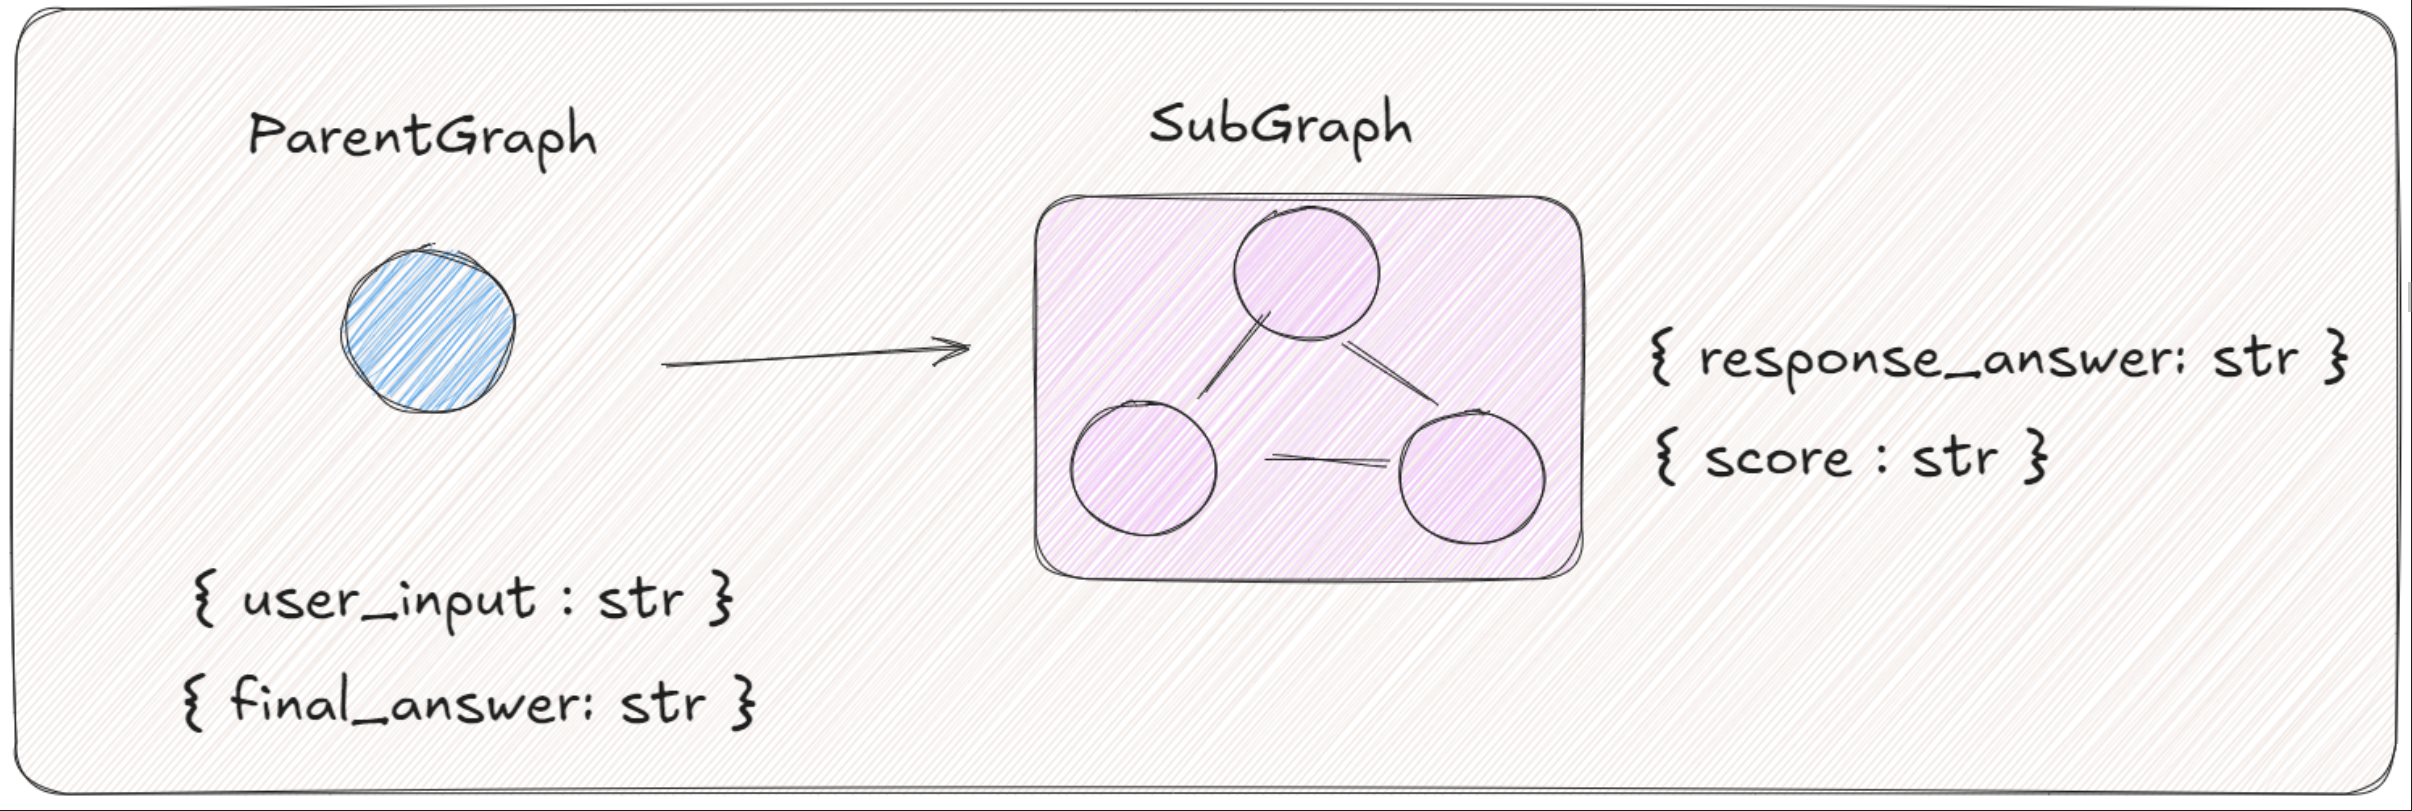
`Subgraphs`(子图)指的是能够用作另一个图中的节点的图。简单理解就是:把一个已经编译好的图,嵌入到另一个已经编译好的图中,并且两个独立图的中的状态可以信息共享。一个典型的应用就是构建多代理系统架构。它所做的事情是:当把每个独立的`Agent`图结构定义为一个子图时,只要遵守子图的接口(输入和输出模式)规范,那么子图中定义的共享状态就可以在父图中进行使用。如下图所示:
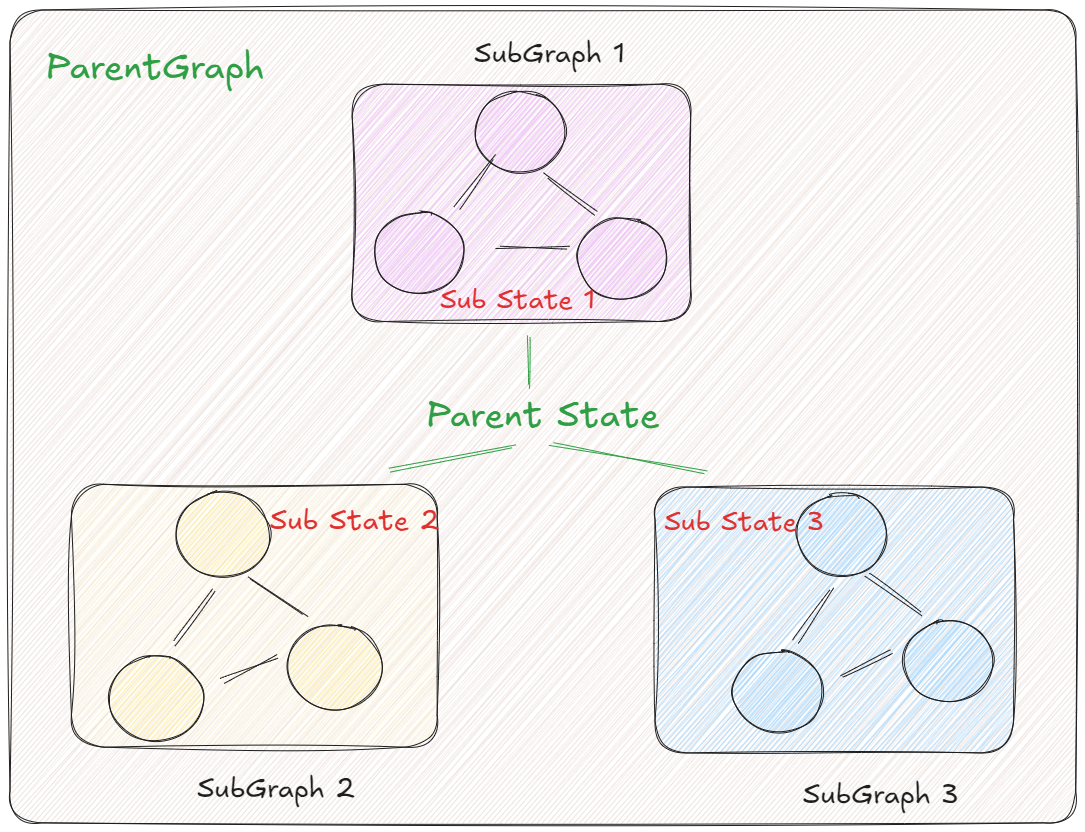
在这个图结构中,`final_answer`作为父图的全局共享状态,被`Sub Graph `子图访问。这个子图通过共享状态键`final_answer`进行交互,同时各自自己独立的内部状态键`summary_answer`。这种设计允许父图与子图之间通过共享状态键`final_answer`进行通信,同时保持各自的状态独立性,实现数据隔离与信息共享的平衡。
第一种情况:父、子图有共同键进行共享信息
代码示例
import getpass
import os
from langchain_openai import ChatOpenAI
from dotenv import load_dotenv
from typing import TypedDict
from langchain_core.messages import AnyMessage, SystemMessage, HumanMessage, AIMessage
load_dotenv()
llm = ChatOpenAI(model="deepseek-chat")# 定义父图中的状态
class ParentState(TypedDict):user_input: str   # 用来接收用户的输入final_answer: str   # 用来存储大模型针对用户输入的响应
def parent_node(state: ParentState):response = llm.invoke(state["user_input"])return {"final_answer": response}# 定义子图中的状态
class SubgraphState(TypedDict):# 这个 key 是和 父图(ParentState)共享的,final_answer: str # 这个key 是 子图 (subgraph) 中独享的summary_answer:strdef subgraph_node_1(state: SubgraphState):system_prompt = """Please summary the content you receive to 50 words or less"""messages = state['final_answer']  # 这里接收父图传递过来的响应messages = [SystemMessage(content=system_prompt)] + [HumanMessage(content=messages.content)]response = llm.invoke(messages)return {"summary_answer": response}def subgraph_node_2(state: SubgraphState):# final_answer 仅能在 子图中使用messages = f"""This is the full content of what you received:{state["final_answer"]} \nThis information is summarized for the full content:{state["summary_answer"]} Please rate the text and summary information, returning a scale of 1 to 10. Note: Only the score value needs to be returned."""response = llm.invoke([HumanMessage(content=messages)])# 发送共享状态密钥('user_input')的更新return {"final_answer": response.content}
定义子图的图结构并且进行编译
from langgraph.graph import START, StateGraphsubgraph_builder = StateGraph(SubgraphState)
subgraph_builder.add_node(subgraph_node_1)
subgraph_builder.add_node(subgraph_node_2)
subgraph_builder.add_edge(START, "subgraph_node_1")
subgraph_builder.add_edge("subgraph_node_1", "subgraph_node_2")
subgraph = subgraph_builder.compile()
定义父图的图结构,并将子图作为节点添加至父图
builder = StateGraph(ParentState)
builder.add_node("node_1", parent_node)# 将编译后的子图作为一个节点添加到父图中
builder.add_node("node_2", subgraph)
builder.add_edge(START, "node_1")
builder.add_edge("node_1", "node_2")
graph = builder.compile()
查看完整的图结构
from IPython.display import Image, displaydisplay(Image(graph.get_graph(xray=True).draw_mermaid_png()))
运行代码
async for chunk in graph.astream({"user_input": "我现在想学习大模型,应该关注哪些技术?"}, stream_mode='values'):print(chunk)运行结果:

第二种情况:父、子图没有共同键进行共享信息
父图的状态和节点的逻辑均布发生变化,如下所示:
from typing import TypedDict# 定义父图中的状态
class ParentState(TypedDict):user_input: str   # 用来接收用户的输入final_answer: str   # 用来存储大模型针对用户输入的响应def parent_node_1(state: ParentState):response = llm.invoke(state["user_input"])return {"final_answer": response}
子图中专注于处理自己内部的逻辑,无需关心父图中的状态中都定义了哪些键,如下代码所示:
from langchain_core.messages import AnyMessage, SystemMessage, HumanMessage, AIMessage# 定义子图中的状态
class SubgraphState(TypedDict):# 以下三个 key 都是 子图 (subgraph) 中独享的response_answer: str summary_answer:strscore: str# 定义第一个节点,用于接收父图中的响应并且做文本摘要
def subgraph_node_1(state: SubgraphState):system_prompt = """Please summary the content you receive to 50 words or less"""messages = state['response_answer']  # 这里接收父图传递过来的响应messages = [SystemMessage(content=system_prompt)] + [HumanMessage(content=messages.content)]response = llm.invoke(messages)return {"summary_answer": response}# 定义第二个节点:
def subgraph_node_2(state: SubgraphState):messages = f"""This is the full content of what you received:{state["response_answer"]} \nThis information is summarized for the full content:{state["summary_answer"]} Please rate the text and summary information, returning a scale of 1 to 10. Note: Only the score value needs to be returned."""response = llm.invoke([HumanMessage(content=messages)])# 发送共享状态密钥('user_input')的更新return {"score": response.content}
正常定义子图并编译
subgraph_builder = StateGraph(SubgraphState)
subgraph_builder.add_node(subgraph_node_1)
subgraph_builder.add_node(subgraph_node_2)
subgraph_builder.add_edge(START, "subgraph_node_1")
subgraph_builder.add_edge("subgraph_node_1", "subgraph_node_2")
subgraph = subgraph_builder.compile()接下来的j这个函数是关键。`parent_node_2`用来连接父图与子图之间的网络通信,它通过将父节点与子节点的状态做转化来达到此目的。代码如下:
def parent_node_2(state: ParentState):# 将父图中的状态转换为子图状态response = subgraph.invoke({"response_answer": state["final_answer"]})# 将子图状态再转换回父状态return {"final_answer": response["score"]}builder = StateGraph(ParentState)
builder.add_node("node_1", parent_node_1)# 注意,我们使用的不是编译后的子图,而是调用子图的‘ node_2 ’函数
builder.add_node("node_2", parent_node_2)
builder.add_edge(START, "node_1")
builder.add_edge("node_1", "node_2")
graph = builder.compile()
查看完整的图结构
from IPython.display import Image, displaydisplay(Image(graph.get_graph(xray=True).draw_mermaid_png()))
运行代码
async for chunk in graph.astream({"user_input": "我现在想学习大模型,应该关注哪些技术?"}, stream_mode='values'):print(chunk)四、 基于 Network (网络)的多代理架构-实战案例
我们选择一个`商业智能(BI)`用于数据分析的落地场景的案例。商业智能(BI)应用于各种行业的数据分析过程,它主要是通过将数据转换为有价值的洞察力,帮助企业做出更好的决策,比如销售和市场分析、客户关系管理(CRM)、库存管理、财务分析等等。这些场景在不同行业的具体应用可能有所差异,但核心都是通过数据分析来提高效率、降低成本、增强客户满意度和优化决策过程。
准备数据
from sqlalchemy import create_engine, Column, Integer, String, Float, ForeignKey
from sqlalchemy.orm import sessionmaker, declarative_base
from faker import Faker
import random# 创建基类
Base = declarative_base()# 定义模型
class SalesData(Base):__tablename__ = 'sales_data'sales_id = Column(Integer, primary_key=True)product_id = Column(Integer, ForeignKey('product_information.product_id'))employee_id = Column(Integer)  # 示例简化,未创建员工表customer_id = Column(Integer, ForeignKey('customer_information.customer_id'))sale_date = Column(String(50))quantity = Column(Integer)amount = Column(Float)discount = Column(Float)class CustomerInformation(Base):__tablename__ = 'customer_information'customer_id = Column(Integer, primary_key=True)customer_name = Column(String(50))contact_info = Column(String(50))region = Column(String(50))customer_type = Column(String(50))class ProductInformation(Base):__tablename__ = 'product_information'product_id = Column(Integer, primary_key=True)product_name = Column(String(50))category = Column(String(50))unit_price = Column(Float)stock_level = Column(Integer)class CompetitorAnalysis(Base):__tablename__ = 'competitor_analysis'competitor_id = Column(Integer, primary_key=True)competitor_name = Column(String(50))region = Column(String(50))market_share = Column(Float)# 数据库连接和表创建
DATABASE_URI = 'mysql+pymysql://root:123456@127.0.0.1/langgraph_agent?charset=utf8mb4'     # 这里要替换成自己的数据库连接串
engine = create_engine(DATABASE_URI)
Base.metadata.create_all(engine)
插入模拟数据
# 插入模拟数据
Session = sessionmaker(bind=engine)
session = Session()fake = Faker()# 生成客户信息
for _ in range(50):  # 生成50个客户customer = CustomerInformation(customer_name=fake.name(),contact_info=fake.phone_number(),region=fake.state(),  # 地区customer_type=random.choice(['Retail', 'Wholesale'])  # 零售、批发)session.add(customer)# 生成产品信息
for _ in range(20):  # 生成20种产品product = ProductInformation(product_name=fake.word(),category=random.choice(['Electronics', 'Clothing', 'Furniture', 'Food', 'Toys']),  # 电子设备,衣服,家具,食品,玩具unit_price=random.uniform(10.0, 1000.0),stock_level=random.randint(10, 100)  # 库存)session.add(product)# 生成竞争对手信息
for _ in range(10):  # 生成10个竞争对手competitor = CompetitorAnalysis(competitor_name=fake.company(),region=fake.state(),market_share=random.uniform(0.01, 0.2)  # 市场占有率)session.add(competitor)# 提交事务
session.commit()# 生成销售数据,假设有100条销售记录
for _ in range(100):sale = SalesData(product_id=random.randint(1, 20),employee_id=random.randint(1, 10),  # 员工ID范围customer_id=random.randint(1, 50),sale_date=fake.date_between(start_date='-1y', end_date='today').strftime('%Y-%m-%d'),quantity=random.randint(1, 10),amount=random.uniform(50.0, 5000.0),discount=random.uniform(0.0, 0.15))session.add(sale)session.commit()# 关闭会话
session.close()
数据库的数据和表都已生成
1. 定义大模型实例
import getpass
import os
from langchain_openai import ChatOpenAI
from dotenv import load_dotenv
load_dotenv()db_llm = ChatOpenAI(model="deepseek-chat")
coder_llm = ChatOpenAI(model="deepseek-chat")
2.`db_agent`配置工具用来执行数据的增删改查操作
from pydantic import BaseModel, Field
from langchain_core.tools import tool
from typing import Union, Optionalclass AddSaleSchema(BaseModel):product_id: intemployee_id: intcustomer_id: intsale_date: strquantity: intamount: floatdiscount: floatclass DeleteSaleSchema(BaseModel):sales_id: intclass UpdateSaleSchema(BaseModel):sales_id: intquantity: intamount: floatclass QuerySalesSchema(BaseModel):sales_id: int# 1. 添加销售数据:
@tool(args_schema=AddSaleSchema)
def add_sale(product_id, employee_id, customer_id, sale_date, quantity, amount, discount):"""Add sale record to the database."""session = Session()try:new_sale = SalesData(product_id=product_id,employee_id=employee_id,customer_id=customer_id,sale_date=sale_date,quantity=quantity,amount=amount,discount=discount)session.add(new_sale)session.commit()return {"messages": ["销售记录添加成功。"]}except Exception as e:return {"messages": [f"添加失败,错误原因:{e}"]}finally:session.close()# 2. 删除销售数据
@tool(args_schema=DeleteSaleSchema)
def delete_sale(sales_id):"""Delete sale record from the database."""session = Session()try:sale_to_delete = session.query(SalesData).filter(SalesData.sales_id == sales_id).first()if sale_to_delete:session.delete(sale_to_delete)session.commit()return {"messages": ["销售记录删除成功。"]}else:return {"messages": [f"未找到销售记录ID:{sales_id}"]}except Exception as e:return {"messages": [f"删除失败,错误原因:{e}"]}finally:session.close()# 3. 修改销售数据
@tool(args_schema=UpdateSaleSchema)
def update_sale(sales_id, quantity, amount):"""Update sale record in the database."""session = Session()try:sale_to_update = session.query(SalesData).filter(SalesData.sales_id == sales_id).first()if sale_to_update:sale_to_update.quantity = quantitysale_to_update.amount = amountsession.commit()return {"messages": ["销售记录更新成功。"]}else:return {"messages": [f"未找到销售记录ID:{sales_id}"]}except Exception as e:return {"messages": [f"更新失败,错误原因:{e}"]}finally:session.close()# 4. 查询销售数据
@tool(args_schema=QuerySalesSchema)
def query_sales(sales_id):"""Query sale record from the database."""session = Session()try:sale_data = session.query(SalesData).filter(SalesData.sales_id == sales_id).first()if sale_data:return {"sales_id": sale_data.sales_id,"product_id": sale_data.product_id,"employee_id": sale_data.employee_id,"customer_id": sale_data.customer_id,"sale_date": sale_data.sale_date,"quantity": sale_data.quantity,"amount": sale_data.amount,"discount": sale_data.discount}else:return {"messages": [f"未找到销售记录ID:{sales_id}。"]}except Exception as e:return {"messages": [f"查询失败,错误原因:{e}"]}finally:session.close()
3.添加python REPL工具
from typing import Annotated
from langchain_core.tools import tool
from langchain_experimental.utilities import PythonREPL
import json
repl = PythonREPL()@tool
def python_repl(code: Annotated[str, "The python code to execute to generate your chart."],
):"""Use this to execute python code. If you want to see the output of a value,you should print it out with `print(...)`. This is visible to the user."""try:result = repl.run(code)except BaseException as e:return f"Failed to execute. Error: {repr(e)}"result_str = f"Successfully executed:\n\`\`\`python\n{code}\n\`\`\`\nStdout: {result}"return (result_str + "\n\nIf you have completed all tasks, respond with FINAL ANSWER.")
4.定义工具列表,并使用`ToolNode`进行构建。
from langgraph.prebuilt import ToolNode# 定义工具列表
tools = [add_sale, delete_sale, update_sale, query_sales, python_repl]
tool_executor = ToolNode(tools)
from langchain_core.messages import BaseMessage, HumanMessage, ToolMessage
from langchain_core.prompts import ChatPromptTemplate, MessagesPlaceholderdef create_agent(llm, tools, system_message: str):"""Create an agent."""prompt = ChatPromptTemplate.from_messages([("system","You are a helpful AI assistant, collaborating with other assistants."" Use the provided tools to progress towards answering the question."" If you are unable to fully answer, that's OK, another assistant with different tools "" will help where you left off. Execute what you can to make progress."" If you or any of the other assistants have the final answer or deliverable,"" prefix your response with FINAL ANSWER so the team knows to stop."" You have access to the following tools: {tool_names}.\n{system_message}",),MessagesPlaceholder(variable_name="messages"),])prompt = prompt.partial(system_message=system_message)prompt = prompt.partial(tool_names=", ".join([tool.name for tool in tools]))return prompt | llm.bind_tools(tools)我们根据`create_agent`辅助函数依次去创建`db_agent`和`code_agent`两个代理,分别赋予它们不同的身份设定、基座模型和所能使用的工具。
# 数据库管理员
db_agent = create_agent(db_llm,[add_sale, delete_sale, update_sale, query_sales],system_message="You should provide accurate data for the code_generator to use.  and source code shouldn't be the final answer",
)# 程序员
code_agent = create_agent(coder_llm,[python_repl],system_message="Run python code to display diagrams or output execution results",
)
5,将Agent定义为节点
import functools
from langchain_core.messages import AIMessagedef agent_node(state, agent, name):result = agent.invoke(state)# 将代理输出转换为适合附加到全局状态的格式if isinstance(result, ToolMessage):passelse:# 创建一个 AIMessage 类的新实例,其中包含 result 对象的所有数据(除了 type 和 name),并且设置新实例的 name 属性为特定的值 name。result = AIMessage(**result.dict(exclude={"type", "name"}), name=name)return {"messages": [result],# 跟踪发件人,这样我们就知道下一个要传给谁。"sender": name,}db_node = functools.partial(agent_node, agent=db_agent, name="db_manager")
code_node = functools.partial(agent_node, agent=code_agent, name="code_generator")
6,定义路由
# 任何一个代理都可以决定结束
from typing import Literaldef router(state):# 这是一个路由messages = state["messages"]last_message = messages[-1]if last_message.tool_calls:# 前一个代理正在调用一个工具return "call_tool"if "FINAL ANSWER" in last_message.content:# 任何Agent都决定工作完成return ENDreturn "continue"
7. 定义状态和图**
import operator
from typing import Annotated, Sequence
from typing_extensions import TypedDictclass AgentState(TypedDict):messages: Annotated[Sequence[BaseMessage], operator.add]sender: str
8. 构建图结构
from langgraph.graph import END, StateGraph# 初始化一个状态图
workflow = StateGraph(AgentState)# 将Agent作为节点进行添加
workflow.add_node("db_manager", db_node)
workflow.add_node("code_generator", code_node)
workflow.add_node("call_tool", tool_executor)# 通过条件边 构建 子代理之间的通信
workflow.add_conditional_edges("db_manager",router,{"continue": "code_generator", "call_tool": "call_tool", END: END},
)workflow.add_conditional_edges("code_generator",router,{"continue": "db_manager", "call_tool": "call_tool",END: END},
)workflow.add_conditional_edges("call_tool",lambda x: x["sender"],{"db_manager": "db_manager","code_generator": "code_generator",},
)# 设置 db_manager 为初始节点
workflow.set_entry_point("db_manager")# 编译图
graph = workflow.compile()
9. 调用测试
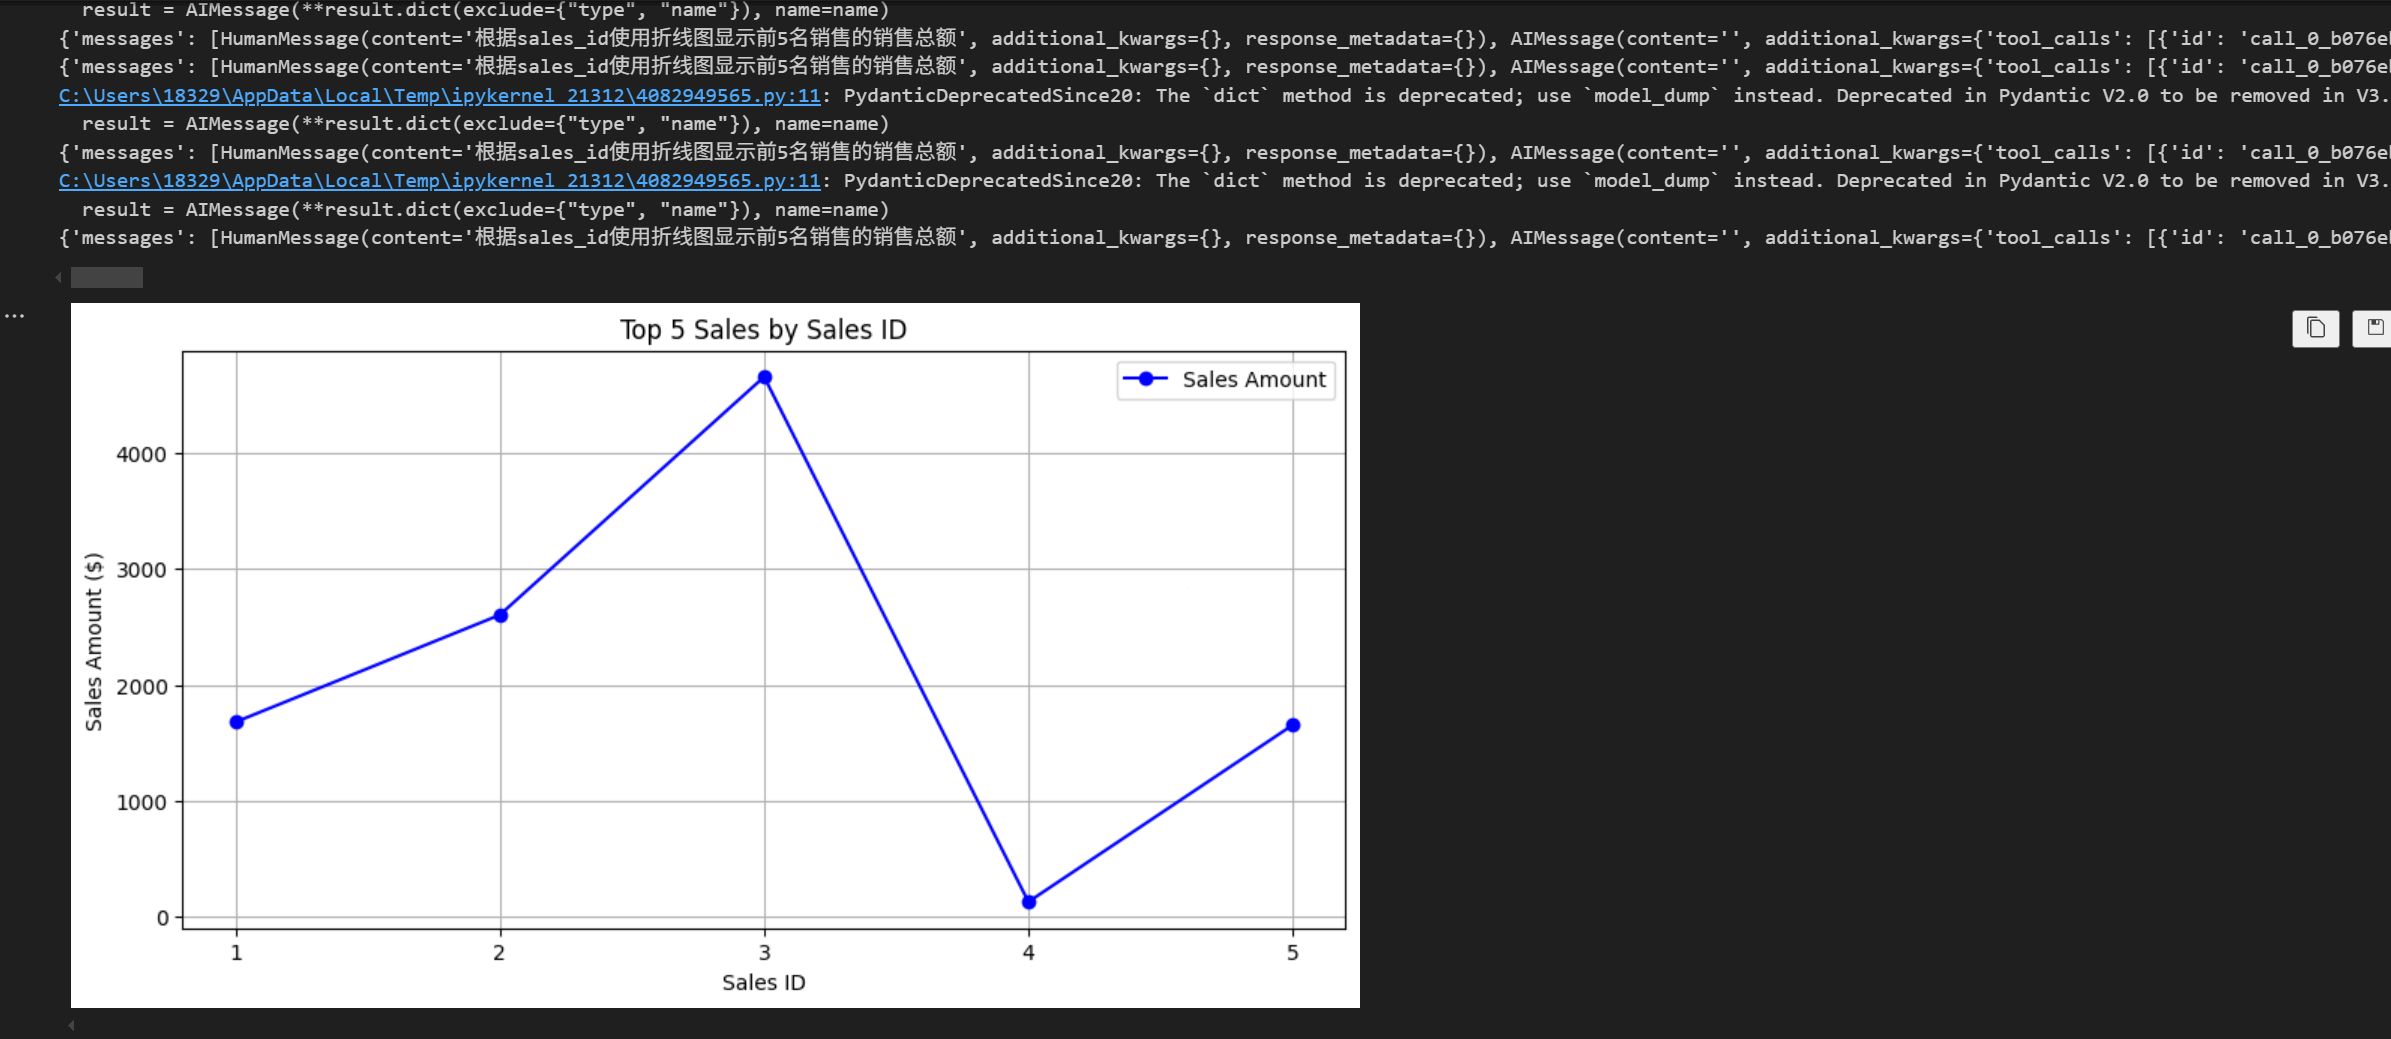
for chunk in graph.stream({"messages": [HumanMessage(content="根据sales_id使用折线图显示前5名销售的销售总额")]}, {"recursion_limit": 50}, stream_mode='values'):print(chunk)10.运行结果