美化显示MSVC调试的数据结构
笔者在前面博文美化显示GDB调试的数据结构中有提到:打算以mupdf库为例,介绍GDB、LLDB和MS Debugger这三个调试器的美化输出,目前已经写了两篇了:美化显示GDB调试的数据结构和美化显示LLDB调试的数据结构。
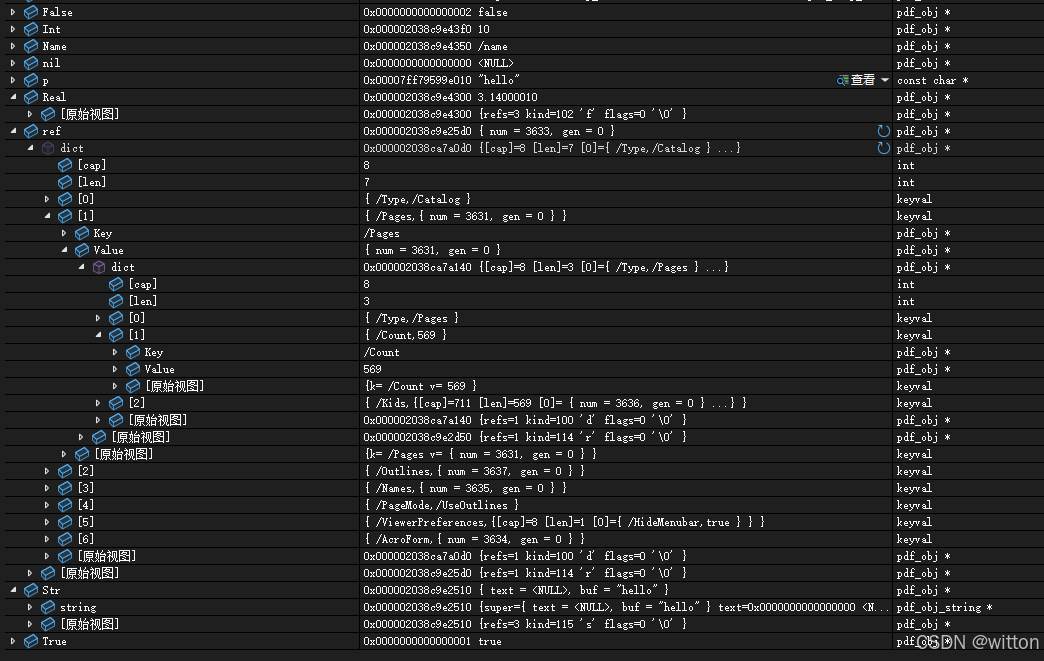
本文将介绍MS调试器的美化显示,还是以mupdf库为例,先看一下效果:
MS调试器不像GDB与LLDB支持Python脚本,它使用的是一种扩展名为.natvis的XML文件格式,规则相对简单,但功能也相对较弱。.natvis的文档参见:使用 Natvis 框架在调试器中创建自定义C++对象的视图
根据规则,.natvis文件可以放在项目的根目录,比如取名为mupdf.natvis。
框架为:
<?xml version="1.0" encoding="utf-8"?>
<AutoVisualizer xmlns="http://schemas.microsoft.com/vstudio/debugger/natvis/2010"><Type Name="pdf_obj"></Type>
</AutoVisualizer>
这里没有如GDB和LLDB中的Python脚本需要自己写正则表达式或者其它代码来匹配类型,直接给出原型类型pdf_obj,调试器的.natvis解析引擎会自动匹配类型。
需要注意的是.natvis虽然可以调用函数,但是调试器不会主动执行有副作用的函数,同时不能像Python一样保存临时变量,所以针对mupdf库,必须要有调试信息,即必须知道完整的数据结构,否则无效。
接下来就是针对pdf_obj封装的各种不同类型(整数(int)、浮点数(real)、字符串(string)、名字(name)、数组(array)、字典(dictinary)、间接引用(indirect reference))进行处理。
一、基本类型
先介绍一个基础类型整数(int)的美化显示方法:
<?xml version="1.0" encoding="utf-8"?>
<AutoVisualizer xmlns="http://schemas.microsoft.com/vstudio/debugger/natvis/2010"><Type Name="pdf_obj"><!--整数--><DisplayString Condition="(kind=='i')">{((pdf_obj_num*)this)->u.i}</DisplayString></Type>
</AutoVisualizer>
在.natvis中使用this来表示调试查看的变量,该this不是C++的this,纯C语言中的数据结构也是使用this来表示调试查看的变量。由于pdf_obj是一个封装类型,实际类型是根据kind来决定的:
typedef enum pdf_objkind_e
{PDF_INT = 'i',PDF_REAL = 'f',PDF_STRING = 's',PDF_NAME = 'n',PDF_ARRAY = 'a',PDF_DICT = 'd',PDF_INDIRECT = 'r'
} pdf_objkind;
上述的.natvis表示类型为pdf_obj的变量,如果kind为i则使用{((pdf_obj_num*)this)->u.i}的值显示,注意一定要加大括号才会计算表达式的值。
二、容器类型
再介绍一个容器类型数组的美化显示方法,容器类是需要展开的,所以需要添加到Expand标签下:
<?xml version="1.0" encoding="utf-8"?>
<AutoVisualizer xmlns="http://schemas.microsoft.com/vstudio/debugger/natvis/2010"><Type Name="pdf_obj"><Expand><!--数组--><Item Name="[cap]" Condition="(kind=='a')">((pdf_obj_array*)this)->cap</Item><Item Name="[len]" Condition="(kind=='a')">((pdf_obj_array*)this)->len</Item><ArrayItems Condition="(kind=='a')"><Size>((pdf_obj_array*)this)->len</Size><!--数组子项不显示地址--><ValuePointer>((pdf_obj_array*)this)->items, na</ValuePointer></ArrayItems></Expand></Type>
</AutoVisualizer>
这里就不一一介绍了标签作用了,以可参考文档,这里的数组显示了一个容量cap和使用长度len,然后就是展开的子项数据,子项数据中需要使用na格式化参数来不显示地址,否则会比较难看。
三、间接引用类型
在mupdf中有间接引用(indirect reference)类型,它指向的是另一个pdf_obj对象,而且这个pdf_obj对象一定是一个字典类型。
由于mupdf中的绝大部分API都需要一个上下文fz_context的指针,而在.natvis中是无法保存临时变量的,所以不能像GDB与LLDB中的Python脚本那样调用fz_new_context_imp来保存一个上下文。这里笔者采用一个变通的方法,即像在GDB与LLDB中的Python脚本中获取mupdf库的版本号一样,自定义一个函数将间接引用的对象转换出来:
#if defined(_MSC_VER) && defined(_DEBUG)
// VC调试器需要ref2dict辅助函数来展开查看间接引用的值
fz_context* mupdf_ctx = nullptr;pdf_obj* ref2dict(pdf_obj* obj) {if (mupdf_ctx == nullptr) {return obj;}if (pdf_is_indirect(mupdf_ctx, obj)) {return pdf_resolve_indirect_chain(mupdf_ctx, obj);}return obj;
}
#endif
这样就可以在.natvis中调用了:
<Expand><!--间接引用展开显示,调用自定义函数ref2dict,调试器会报`此表达式有副作用,将不予计算`,需要手动刷新计算--><Item Name="dict" Condition="(kind=='r')"> ref2dict(this) </Item></Expand>
四、完整版本
重要的技术点前面已经介绍了,下面直接给出完整的mupdf.natvis配置:
<?xml version="1.0" encoding="utf-8"?>
<AutoVisualizer xmlns="http://schemas.microsoft.com/vstudio/debugger/natvis/2010"><Type Name="pdf_obj"><!--整数--><DisplayString Condition="(kind=='i')">{((pdf_obj_num*)this)->u.i}</DisplayString><!--浮点数--><DisplayString Condition="(kind=='f')">{((pdf_obj_num*)this)->u.f}</DisplayString><!--字符串--><DisplayString Condition="(kind=='s')"><!--以UTF8格式显示字符串-->{{ text = {((pdf_obj_string*)this)->text,s8}, buf = {((pdf_obj_string*)this)->buf,s8} }}</DisplayString><!--布尔的false--><!--this == ((pdf_obj*)(intptr_t)PDF_ENUM_FALSE))--><DisplayString Condition="this == ((pdf_obj*)(intptr_t)PDF_ENUM_FALSE)">false</DisplayString><!--布尔的true--><!--this == ((pdf_obj*)(intptr_t)PDF_ENUM_TRUE))--><DisplayString Condition="this == ((pdf_obj*)(intptr_t)PDF_ENUM_TRUE)">true</DisplayString><!--名字--><!--this > ((pdf_obj*)(intptr_t)PDF_ENUM_FALSE) && this < ((pdf_obj*)(intptr_t)PDF_ENUM_LIMIT)--><DisplayString Condition="this > ((pdf_obj*)(intptr_t)PDF_ENUM_FALSE) && this < ((pdf_obj*)(intptr_t)PDF_ENUM_LIMIT)"><!--以UTF8格式显示不带引号的字符串-->/{PDF_NAME_LIST[(intptr_t)this],s8b}</DisplayString><!--名字--><DisplayString Condition="(kind=='n')"><!--以UTF8格式显示不带引号的字符串-->/{((pdf_obj_name*)this)->n,s8b}</DisplayString><!--间接引用--><DisplayString Condition="(kind=='r')">{{ num = {((pdf_obj_ref*)this)->num}, gen = {((pdf_obj_ref*)this)->gen} }}</DisplayString><Expand><!--数组--><Item Name="[cap]" Condition="(kind=='a')">((pdf_obj_array*)this)->cap</Item><Item Name="[len]" Condition="(kind=='a')">((pdf_obj_array*)this)->len</Item><ArrayItems Condition="(kind=='a')"><Size>((pdf_obj_array*)this)->len</Size><!--数组子项不显示地址--><ValuePointer>((pdf_obj_array*)this)->items, na</ValuePointer></ArrayItems><!--字典--><Item Name="[cap]" Condition="(kind=='d')">((pdf_obj_dict*)this)->cap</Item><Item Name="[len]" Condition="(kind=='d')">((pdf_obj_dict*)this)->len</Item><ArrayItems Condition="(kind=='d')"><Size>((pdf_obj_dict*)this)->len</Size><!--字典子项不显示地址--><ValuePointer>((pdf_obj_dict*)this)->items, na</ValuePointer></ArrayItems><!--字符串展开显示--><Item Name="string" Condition="(kind=='s')">(pdf_obj_string*)this</Item><!--间接引用展开显示,调用自定义函数ref2dict,调试器会报`此表达式有副作用,将不予计算`,需要手动刷新计算--><Item Name="dict" Condition="(kind=='r')"> ref2dict(this) </Item></Expand></Type><!--keyval结构--><Type Name="keyval"><!--使用na参数不显示地址--><DisplayString>{{ {k,na},{v,na} }} </DisplayString><Expand><Item Name="Key"> k </Item><Item Name="Value"> v </Item></Expand></Type><!--fz_buffer结构--><Type Name="fz_buffer"><DisplayString>{data,[len]s8}</DisplayString><Expand><Item Name="[cap]">cap</Item><Item Name="[len]">len</Item><!--按指定长度显示文本--><Item Name="text">data,[len]s8</Item></Expand></Type>
</AutoVisualizer>
测试代码t.c:
#include <mupdf/fitz.h>
#include <mupdf/pdf.h>
#include <stdbool.h>#ifndef __cplusplus
#if __STDC_VERSION__ < 202311L
#ifdef nullptr
#undef nullptr
#endif#define nullptr NULL
#endif
#endif// 为GDB调试器使用,不能设置为static
// 这将使得GDB可以在运行时获取mupdf的版本信息
const char* mupdf_version = FZ_VERSION;#if defined(_MSC_VER) && defined(_DEBUG)
// VC调试器需要ref2dict辅助函数来展开查看间接引用的值
fz_context* mupdf_ctx = nullptr;pdf_obj* ref2dict(pdf_obj* obj) {if (mupdf_ctx == nullptr) {return obj;}if (pdf_is_indirect(mupdf_ctx, obj)) {return pdf_resolve_indirect_chain(mupdf_ctx, obj);}return obj;
}
#endifint main(int argc, char* argv[]) {const char* p = "hello";bool b = true;pdf_obj* nil = nullptr;fz_context* ctx = fz_new_context(nullptr, nullptr, FZ_STORE_UNLIMITED);
#if defined(_MSC_VER) && defined(_DEBUG)mupdf_ctx = ctx;
#endifpdf_document* doc = nullptr;fz_try(ctx) {// 由于目前的VS2022 CMake项目即使配置了"cwd": "${workspaceRoot}"也不会是项目根目录,// 所以文件路径根据情况自行设定。doc = pdf_open_document(ctx, "../../../t.pdf");}fz_catch(ctx) {fz_report_error(ctx);printf("cannot open document\n");fz_drop_context(ctx);return EXIT_FAILURE;}pdf_obj* Int = pdf_new_int(ctx, 10);pdf_obj* Real = pdf_new_real(ctx, 3.14F);pdf_obj* Str = pdf_new_text_string(ctx, "hello");pdf_obj* Name = pdf_new_name(ctx, "name");pdf_obj* True = PDF_TRUE;pdf_obj* False = PDF_FALSE;pdf_obj* ar = pdf_new_array(ctx, doc, 10);pdf_array_put(ctx, ar, 0, Int);pdf_array_put(ctx, ar, 1, Real);pdf_array_put(ctx, ar, 2, Str);pdf_array_push_bool(ctx, ar, 1);pdf_array_push_bool(ctx, ar, 0);pdf_array_push(ctx, ar, PDF_NULL);pdf_obj* dict = pdf_new_dict(ctx, doc, 10);pdf_dict_puts(ctx, dict, "int", Int);pdf_dict_puts(ctx, dict, "real", Real);pdf_dict_puts(ctx, dict, "str", Str);pdf_dict_puts(ctx, dict, "name", Name);pdf_dict_puts(ctx, dict, "array", ar);pdf_obj* ref = pdf_new_indirect(ctx, doc, 3633, 0);pdf_drop_obj(ctx, Int);pdf_drop_obj(ctx, Real);pdf_drop_obj(ctx, Str);pdf_drop_obj(ctx, Name);pdf_drop_obj(ctx, ar);pdf_drop_obj(ctx, dict);pdf_drop_obj(ctx, ref);pdf_drop_document(ctx, doc);fz_drop_context(ctx);
}
笔者可能会持续改进与补充,欲知后续版本,请移步:
https://github.com/WittonBell/demo/blob/main/mupdf/mupdf.natvis
整个测试项目地址:https://github.com/WittonBell/demo/blob/main/mupdf
如果本文对你有帮助,欢迎点赞收藏!