PyTorch终极实战:从自定义层到模型部署全流程拆解
本文较长,建议点赞收藏,以免遗失。更多AI大模型应用开发学习视频及资料,尽在聚客AI学院。
本文深入讲解PyTorch高级开发技巧,涵盖自定义层/损失函数实现、模型保存加载策略以及TensorBoard可视化监控,提供工业级最佳实践和完整代码示例。
一、自定义神经网络层
1.1 基础自定义层实现
import torch
import torch.nn as nn
import torch.nn.functional as F
class CustomLinear(nn.Module):"""带权重归一化的全连接层"""def __init__(self, in_features, out_features):super().__init__()# 初始化参数self.weight = nn.Parameter(torch.randn(out_features, in_features))self.bias = nn.Parameter(torch.zeros(out_features))# 权重归一化因子self.scale = nn.Parameter(torch.ones(1))def forward(self, x):# 权重归一化norm_weight = self.scale * F.normalize(self.weight, p=2, dim=1)# 矩阵乘法return F.linear(x, norm_weight, self.bias)
# 测试自定义层
custom_layer = CustomLinear(10, 5)
input_data = torch.randn(3, 10)  # 批量大小3, 特征10
output = custom_layer(input_data)
print("自定义层输出形状:", output.shape)
1.2 带参数的自定义层
class LearnableDropout(nn.Module):"""可学习的Dropout层"""def __init__(self, init_drop_rate=0.5):super().__init__()# 使用sigmoid确保drop_rate在0-1之间self.drop_rate = nn.Parameter(torch.tensor(init_drop_rate))def forward(self, x):if not self.training:return x# 生成与x形状相同的随机掩码mask = torch.rand_like(x) > torch.sigmoid(self.drop_rate)return x * mask.float()# 测试可学习Dropout
drop_layer = LearnableDropout(0.3)
input_data = torch.randn(5, 10)
print("训练模式输出:", drop_layer(input_data)[0])
drop_layer.eval()
print("评估模式输出:", drop_layer(input_data)[0])
1.3 复合自定义层
class ConvBlock(nn.Module):"""卷积+BN+激活的标准块"""def __init__(self, in_ch, out_ch, kernel_size=3, stride=1, padding=1):super().__init__()self.conv = nn.Conv2d(in_ch, out_ch, kernel_size, stride, padding, bias=False)self.bn = nn.BatchNorm2d(out_ch)self.act = nn.ReLU(inplace=True)def forward(self, x):return self.act(self.bn(self.conv(x)))# 构建测试网络
class CustomNet(nn.Module):def __init__(self):super().__init__()self.block1 = ConvBlock(3, 32)self.pool = nn.MaxPool2d(2)self.block2 = ConvBlock(32, 64)self.fc = nn.Linear(64*8*8, 10)  # 假设输入32x32图像def forward(self, x):x = self.pool(self.block1(x))  # 32x32 -> 16x16x = self.pool(self.block2(x))  # 16x16 -> 8x8x = torch.flatten(x, 1)return self.fc(x)
# 测试网络
model = CustomNet()
test_input = torch.randn(4, 3, 32, 32)  # 批量4, 3通道, 32x32
print("模型输出形状:", model(test_input).shape)
二、自定义损失函数
2.1 基础损失函数实现
class FocalLoss(nn.Module):"""Focal Loss用于类别不平衡问题"""def __init__(self, alpha=1, gamma=2, reduction='mean'):super().__init__()self.alpha = alphaself.gamma = gammaself.reduction = reductiondef forward(self, inputs, targets):# 计算交叉熵ce_loss = F.cross_entropy(inputs, targets, reduction='none')# 计算概率p = torch.exp(-ce_loss)# 计算focal lossfocal_loss = self.alpha * (1 - p) ** self.gamma * ce_loss# 归约方式if self.reduction == 'mean':return focal_loss.mean()elif self.reduction == 'sum':return focal_loss.sum()else:return focal_loss
# 测试Focal Loss
criterion = FocalLoss(gamma=2)
logits = torch.randn(8, 5)  # 8个样本, 5分类
targets = torch.randint(0, 5, (8,))
loss = criterion(logits, targets)
print("Focal Loss:", loss.item())
2.2 多任务损失函数
class MultiTaskLoss(nn.Module):"""多任务学习损失组合"""def __init__(self, task_losses, weights=None):"""task_losses: 各任务损失函数列表weights: 各损失权重"""super().__init__()self.task_losses = nn.ModuleList(task_losses)self.weights = weights or [1.0] * len(task_losses)def forward(self, outputs, targets):"""outputs: 各任务输出列表targets: 各任务目标列表"""total_loss = 0loss_details = {}for i, (output, target, loss_fn, weight) in enumerate(zip(outputs, targets, self.task_losses, self.weights)):loss_val = loss_fn(output, target)total_loss += weight * loss_valloss_details[f'task_{i}_loss'] = loss_val.item()loss_details['total_loss'] = total_loss.item()return total_loss, loss_details
# 测试多任务损失
# 假设有两个任务: 分类和回归
task1_criterion = nn.CrossEntropyLoss()  # 分类任务
task2_criterion = nn.MSELoss()           # 回归任务
multi_loss = MultiTaskLoss([task1_criterion, task2_criterion], weights=[1.0, 0.5])
# 模拟输出和目标
task1_out = torch.randn(4, 5)  # 分类输出 (4样本, 5类)
task1_target = torch.randint(0, 5, (4,))
task2_out = torch.randn(4, 1)  # 回归输出
task2_target = torch.randn(4, 1)
total_loss, loss_details = multi_loss(outputs=[task1_out, task2_out],targets=[task1_target, task2_target]
)
print("总损失:", total_loss.item())
print("损失详情:", loss_details)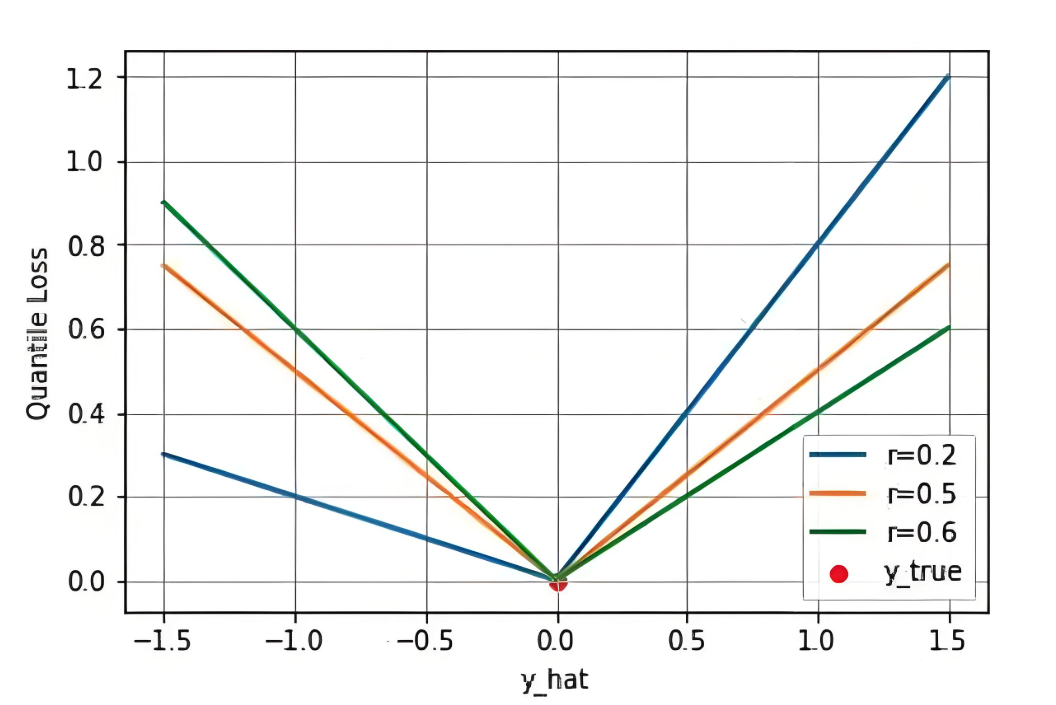
三、模型保存与加载
3.1 基础保存与加载
# 保存整个模型
torch.save(model, 'full_model.pth')
# 加载整个模型
loaded_model = torch.load('full_model.pth')
# 仅保存模型参数
torch.save(model.state_dict(), 'model_params.pth')
# 从参数加载模型
new_model = CustomNet()
new_model.load_state_dict(torch.load('model_params.pth'))
3.2 训练检查点系统
import os
import shutil
def save_checkpoint(state, is_best, filename='checkpoint.pth', best_name='model_best.pth'):"""保存训练检查点"""torch.save(state, filename)if is_best:shutil.copyfile(filename, best_name)
def load_checkpoint(model, optimizer, checkpoint_path):"""加载检查点恢复训练"""if os.path.isfile(checkpoint_path):checkpoint = torch.load(checkpoint_path)model.load_state_dict(checkpoint['state_dict'])optimizer.load_state_dict(checkpoint['optimizer'])start_epoch = checkpoint['epoch']best_acc = checkpoint['best_acc']print(f"加载检查点 '{checkpoint_path}' (epoch {checkpoint['epoch']})")return model, optimizer, start_epoch, best_accelse:print(f"未找到检查点 '{checkpoint_path}'")return model, optimizer, 0, 0
# 训练中使用检查点
model = CustomNet()
optimizer = torch.optim.Adam(model.parameters(), lr=0.001)
best_acc = 0
for epoch in range(100):# 训练过程...train_loss = 0.0current_acc = 0.85  # 模拟准确率# 保存检查点is_best = current_acc > best_accbest_acc = max(current_acc, best_acc)save_checkpoint({'epoch': epoch + 1,'state_dict': model.state_dict(),'best_acc': best_acc,'optimizer': optimizer.state_dict(),}, is_best)# 恢复训练示例
resume_model = CustomNet()
resume_optimizer = torch.optim.Adam(resume_model.parameters(), lr=0.001)
resume_model, resume_optimizer, start_epoch, best_acc = load_checkpoint(resume_model, resume_optimizer, 'model_best.pth'
)
print(f"从epoch {start_epoch}恢复训练,最佳准确率: {best_acc:.4f}")
3.3 ONNX模型导出
import torch.onnx
# 创建示例输入
dummy_input = torch.randn(1, 3, 32, 32)
# 导出ONNX模型
torch.onnx.export(model,                   # 要导出的模型dummy_input,             # 模型输入"custom_model.onnx",     # 保存路径export_params=True,      # 导出训练参数opset_version=11,        # ONNX算子集版本input_names=['input'],   # 输入名称output_names=['output'], # 输出名称dynamic_axes={           # 动态维度支持'input': {0: 'batch_size'}, 'output': {0: 'batch_size'}}
)
print("ONNX模型导出成功")
四、TensorBoard可视化
4.1 基础配置与训练监控
from torch.utils.tensorboard import SummaryWriter
import numpy as np
# 创建SummaryWriter
writer = SummaryWriter('runs/experiment1')
# 模拟训练过程
for epoch in range(100):# 模拟训练数据train_loss = 0.8 * np.exp(-0.05 * epoch) + 0.1 * np.random.rand()train_acc = 1.0 - 0.8 * np.exp(-0.03 * epoch) + 0.05 * np.random.rand()val_loss = 0.7 * np.exp(-0.04 * epoch) + 0.15 * np.random.rand()val_acc = 1.0 - 0.7 * np.exp(-0.025 * epoch) + 0.04 * np.random.rand()# 记录标量writer.add_scalar('Loss/train', train_loss, epoch)writer.add_scalar('Accuracy/train', train_acc, epoch)writer.add_scalar('Loss/val', val_loss, epoch)writer.add_scalar('Accuracy/val', val_acc, epoch)# 记录直方图if epoch % 10 == 0:weights = model.fc.weight.data.flatten().numpy()writer.add_histogram('FC Weights', weights, epoch)# 记录图像if epoch % 20 == 0:# 生成示例图像output = model(dummy_input)writer.add_image('Model Output', output[0].detach(), epoch, dataformats='HW')# 记录PR曲线if epoch == 50:all_preds = []all_labels = []# 模拟预测数据for _ in range(100):pred = torch.randn(10)label = torch.randint(0, 10, (1,))all_preds.append(pred)all_labels.append(label)all_preds = torch.stack(all_preds)all_labels = torch.cat(all_labels)writer.add_pr_curve('PR Curve', all_labels, all_preds.softmax(dim=1)[:, 1], epoch)
# 关闭writer
writer.close()
4.2 模型结构可视化
# 添加模型图
dummy_input = torch.randn(1, 3, 32, 32)
writer.add_graph(model, dummy_input)
# 添加嵌入可视化
# 模拟特征向量和标签
features = torch.randn(100, 256)
labels = torch.randint(0, 10, (100,))
writer.add_embedding(features,metadata=labels,label_img=torch.randn(100, 3, 32, 32)
)
print("在终端运行: tensorboard --logdir=runs/")
print("然后在浏览器中访问 http://localhost:6006/")
4.3 TensorBoard效果展示
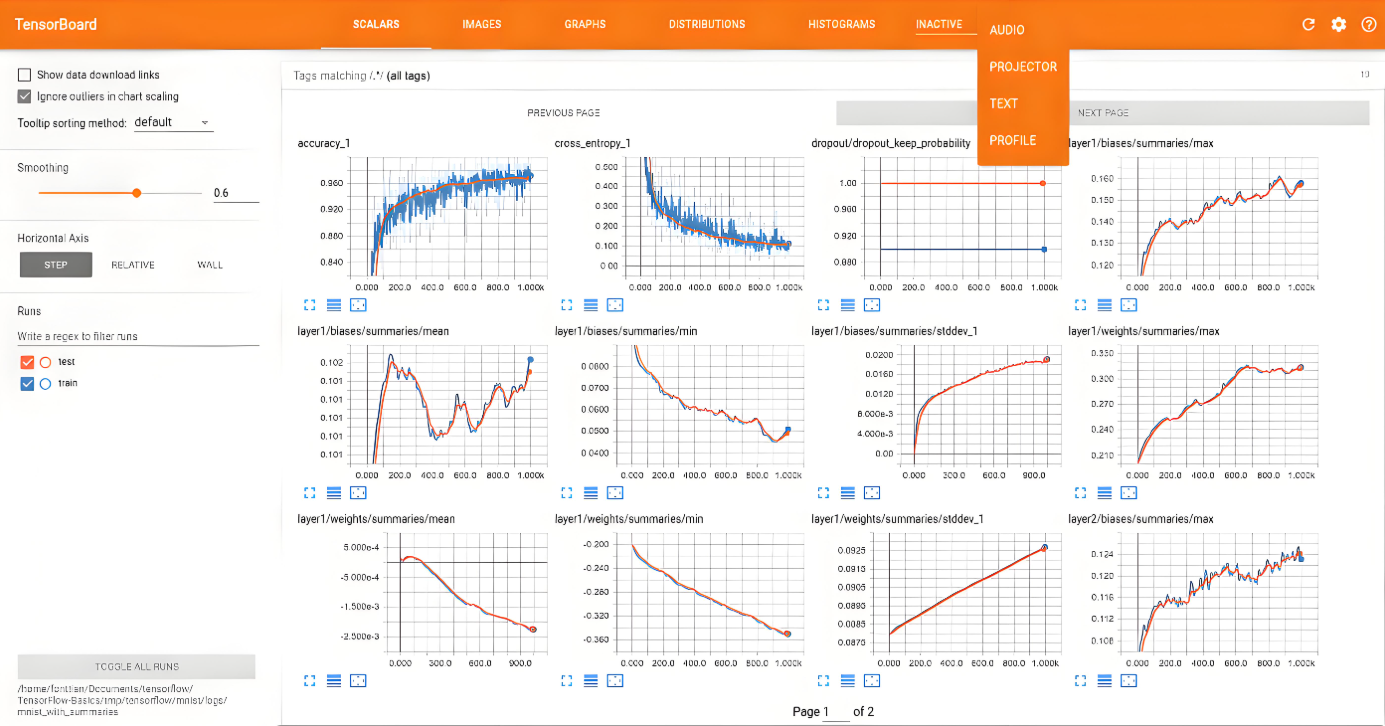
TensorBoard核心功能:
标量可视化:损失/准确率曲线
模型结构:计算图可视化
直方图:权重/梯度分布
PR曲线:分类性能评估
嵌入投影:高维特征可视化
图像记录:输入/输出可视化
五、综合实战:自定义模型训练全流程
5.1 完整训练系统实现
import time
from torch.utils.data import DataLoader, TensorDataset
# 创建模拟数据集
X_train = torch.randn(1000, 10)
y_train = torch.randint(0, 3, (1000,))
train_dataset = TensorDataset(X_train, y_train)
train_loader = DataLoader(train_dataset, batch_size=32, shuffle=True)
# 自定义模型
class AdvancedModel(nn.Module):def __init__(self):super().__init__()self.layer1 = CustomLinear(10, 64)self.drop = LearnableDropout(0.3)self.layer2 = nn.Linear(64, 3)def forward(self, x):x = F.relu(self.layer1(x))x = self.drop(x)return self.layer2(x)
# 初始化组件
model = AdvancedModel()
criterion = FocalLoss(gamma=2)
optimizer = torch.optim.Adam(model.parameters(), lr=0.01)
writer = SummaryWriter('runs/full_experiment')
# 训练函数
def train_model(epochs):best_acc = 0start_epoch = 0# 尝试加载检查点checkpoint_path = 'checkpoint.pth'if os.path.exists(checkpoint_path):checkpoint = torch.load(checkpoint_path)model.load_state_dict(checkpoint['model'])optimizer.load_state_dict(checkpoint['optimizer'])start_epoch = checkpoint['epoch'] + 1best_acc = checkpoint['best_acc']print(f"从epoch {start_epoch}恢复训练,最佳准确率: {best_acc:.4f}")for epoch in range(start_epoch, epochs):model.train()total_loss = 0correct = 0total = 0start_time = time.time()for batch_idx, (data, target) in enumerate(train_loader):optimizer.zero_grad()output = model(data)loss = criterion(output, target)loss.backward()optimizer.step()total_loss += loss.item()_, predicted = output.max(1)total += target.size(0)correct += predicted.eq(target).sum().item()# 记录每批数据if batch_idx % 10 == 0:writer.add_scalar('Batch Loss/train', loss.item(), epoch * len(train_loader) + batch_idx)# 计算指标epoch_loss = total_loss / len(train_loader)epoch_acc = 100. * correct / totalepoch_time = time.time() - start_time# 记录指标writer.add_scalar('Loss/train', epoch_loss, epoch)writer.add_scalar('Accuracy/train', epoch_acc, epoch)# 保存检查点is_best = epoch_acc > best_accbest_acc = max(epoch_acc, best_acc)save_checkpoint({'epoch': epoch,'model': model.state_dict(),'optimizer': optimizer.state_dict(),'best_acc': best_acc,'loss': epoch_loss,}, is_best)# 打印日志print(f"Epoch [{epoch+1}/{epochs}] "f"Loss: {epoch_loss:.4f} Acc: {epoch_acc:.2f}% "f"Time: {epoch_time:.2f}s")writer.close()print(f"训练完成,最佳准确率: {best_acc:.2f}%")# 导出ONNX模型dummy_input = torch.randn(1, 10)torch.onnx.export(model, dummy_input, "final_model.onnx", input_names=['input'], output_names=['output'])
# 启动训练
train_model(50)
5.2 模型部署推理
# 加载训练好的模型
deploy_model = AdvancedModel()
deploy_model.load_state_dict(torch.load('model_best.pth')['model'])
deploy_model.eval()  # 切换到评估模式
# 推理函数
def inference(input_data):with torch.no_grad():output = deploy_model(input_data)probabilities = F.softmax(output, dim=1)_, predicted_class = output.max(1)return predicted_class.item(), probabilities.squeeze().tolist()
# 测试推理
test_input = torch.randn(1, 10)
class_idx, probs = inference(test_input)
print(f"预测类别: {class_idx}, 各类别概率: {probs}")
# 使用ONNX模型推理
import onnxruntime as ort
ort_session = ort.InferenceSession("final_model.onnx")
input_name = ort_session.get_inputs()[0].name
output_name = ort_session.get_outputs()[0].name
# ONNX推理
onnx_input = test_input.numpy()
onnx_output = ort_session.run([output_name], {input_name: onnx_input})[0]
onnx_class = onnx_output.argmax()
print(f"ONNX模型预测类别: {onnx_class}")
六、PyTorch进阶最佳实践
自定义组件设计原则:
graph TD
A[需求分析] --> B[继承nn.Module]
B --> C[定义__init__参数]
C --> D[注册可学习参数]
D --> E[实现forward逻辑]
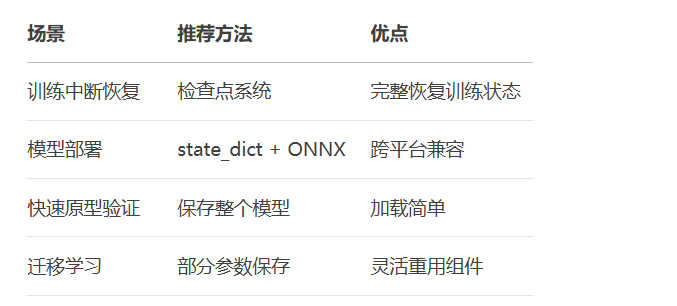
E --> F[单元测试验证]模型保存策略选择:
TensorBoard监控要点:
-
关键指标:损失/准确率/学习率
-
权重分布:各层权重/梯度直方图
-
模型结构:计算图可视化
-
数据样本:输入/输出可化
-
超参数:记录实验配置
-
生产部署建议:
-
使用
torch.jit.script优化模型 -
启用半精度推理加速(FP16)
-
实现批处理优化
-
添加API服务层(Flask/FastAPI)
-
实施模型监控和日志系统
关键要点总结
自定义层开发模式:
class CustomLayer(nn.Module):def __init__(self, params):super().__init__()# 1. 定义可学习参数 (nn.Parameter)# 2. 注册子模块 (nn.Module)def forward(self, x):# 实现前向传播逻辑return transformed_x损失函数设计原则:
继承nn.Module实现
-
前向传播中计算损失
-
支持多种归约方式
-
确保数值稳定性
模型保存检查点结构:
checkpoint = {'epoch': current_epoch,'state_dict': model.state_dict(),'optimizer': optimizer.state_dict(),'best_acc': best_accuracy,'loss': current_loss,# 可添加其他元数据
}
TensorBoard核心API:
writer.add_scalar('Tag', value, step)       # 标量
writer.add_histogram('Tag', values, step)   # 直方图
writer.add_image('Tag', image, step)        # 图像
writer.add_graph(model, input_data)         # 模型图
writer.add_embedding(features, metadata)    # 嵌入可视化
部署优化技巧:
使用model.eval()固定模型
-
启用
torch.no_grad()减少内存 -
应用半精度推理
model.half() -
使用ONNX/TensorRT加速
掌握这些PyTorch进阶技能后,你将能够高效开发复杂模型、优化训练过程并实现生产级部署,为实际AI应用开发打下坚实基础!更多AI大模型应用开发学习视频内容和资料,尽在聚客AI学院。