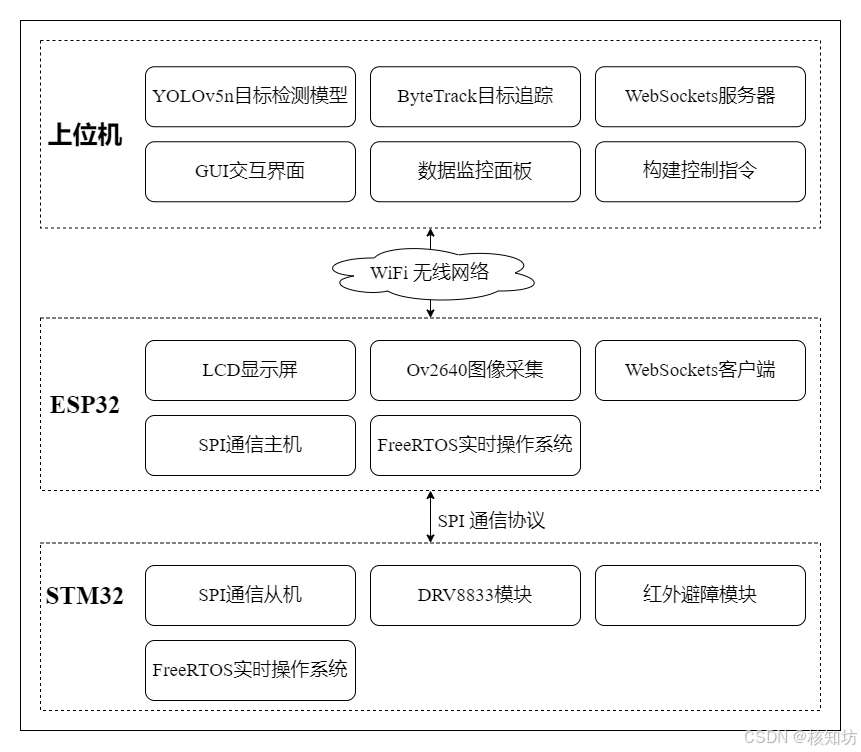
Yolov5.6增加注意力机制+ByterTrack:目标检测与跟踪
简介:本项目使用ESP32-CAM采集图像上传至上位机进行手部目标检测与追踪,使用了YOLOv5.6(注意力机制ECA,CBAM)+ByteTrack
博主同款迅雷链接:
链接:https://pan.xunlei.com/s/VOSO1EIzmXhBb_BIKM58cM5cA1#
提取码:8ms6
需要付费指导的查看简介联系我!
项目拉取:
git clone https://github.com/ultralytics/yolov5.git
环境准备:
Python3.10:https://mirrors.aliyun.com/python-release/windows/python-3.10.8.exe
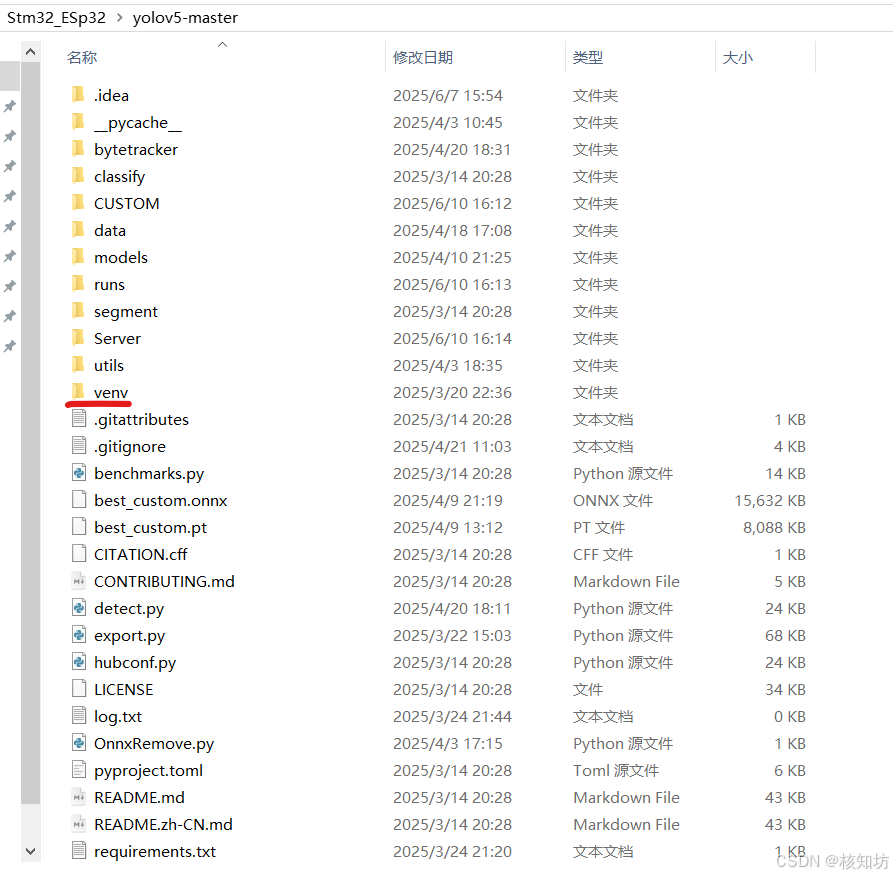
进入Yolov5根目录创建虚拟环境:
python -m venv venv
venv\Scripts\activate #激活虚拟环境
pip install -e .      #编辑式安装,之后修改Yolov5源码直接运行
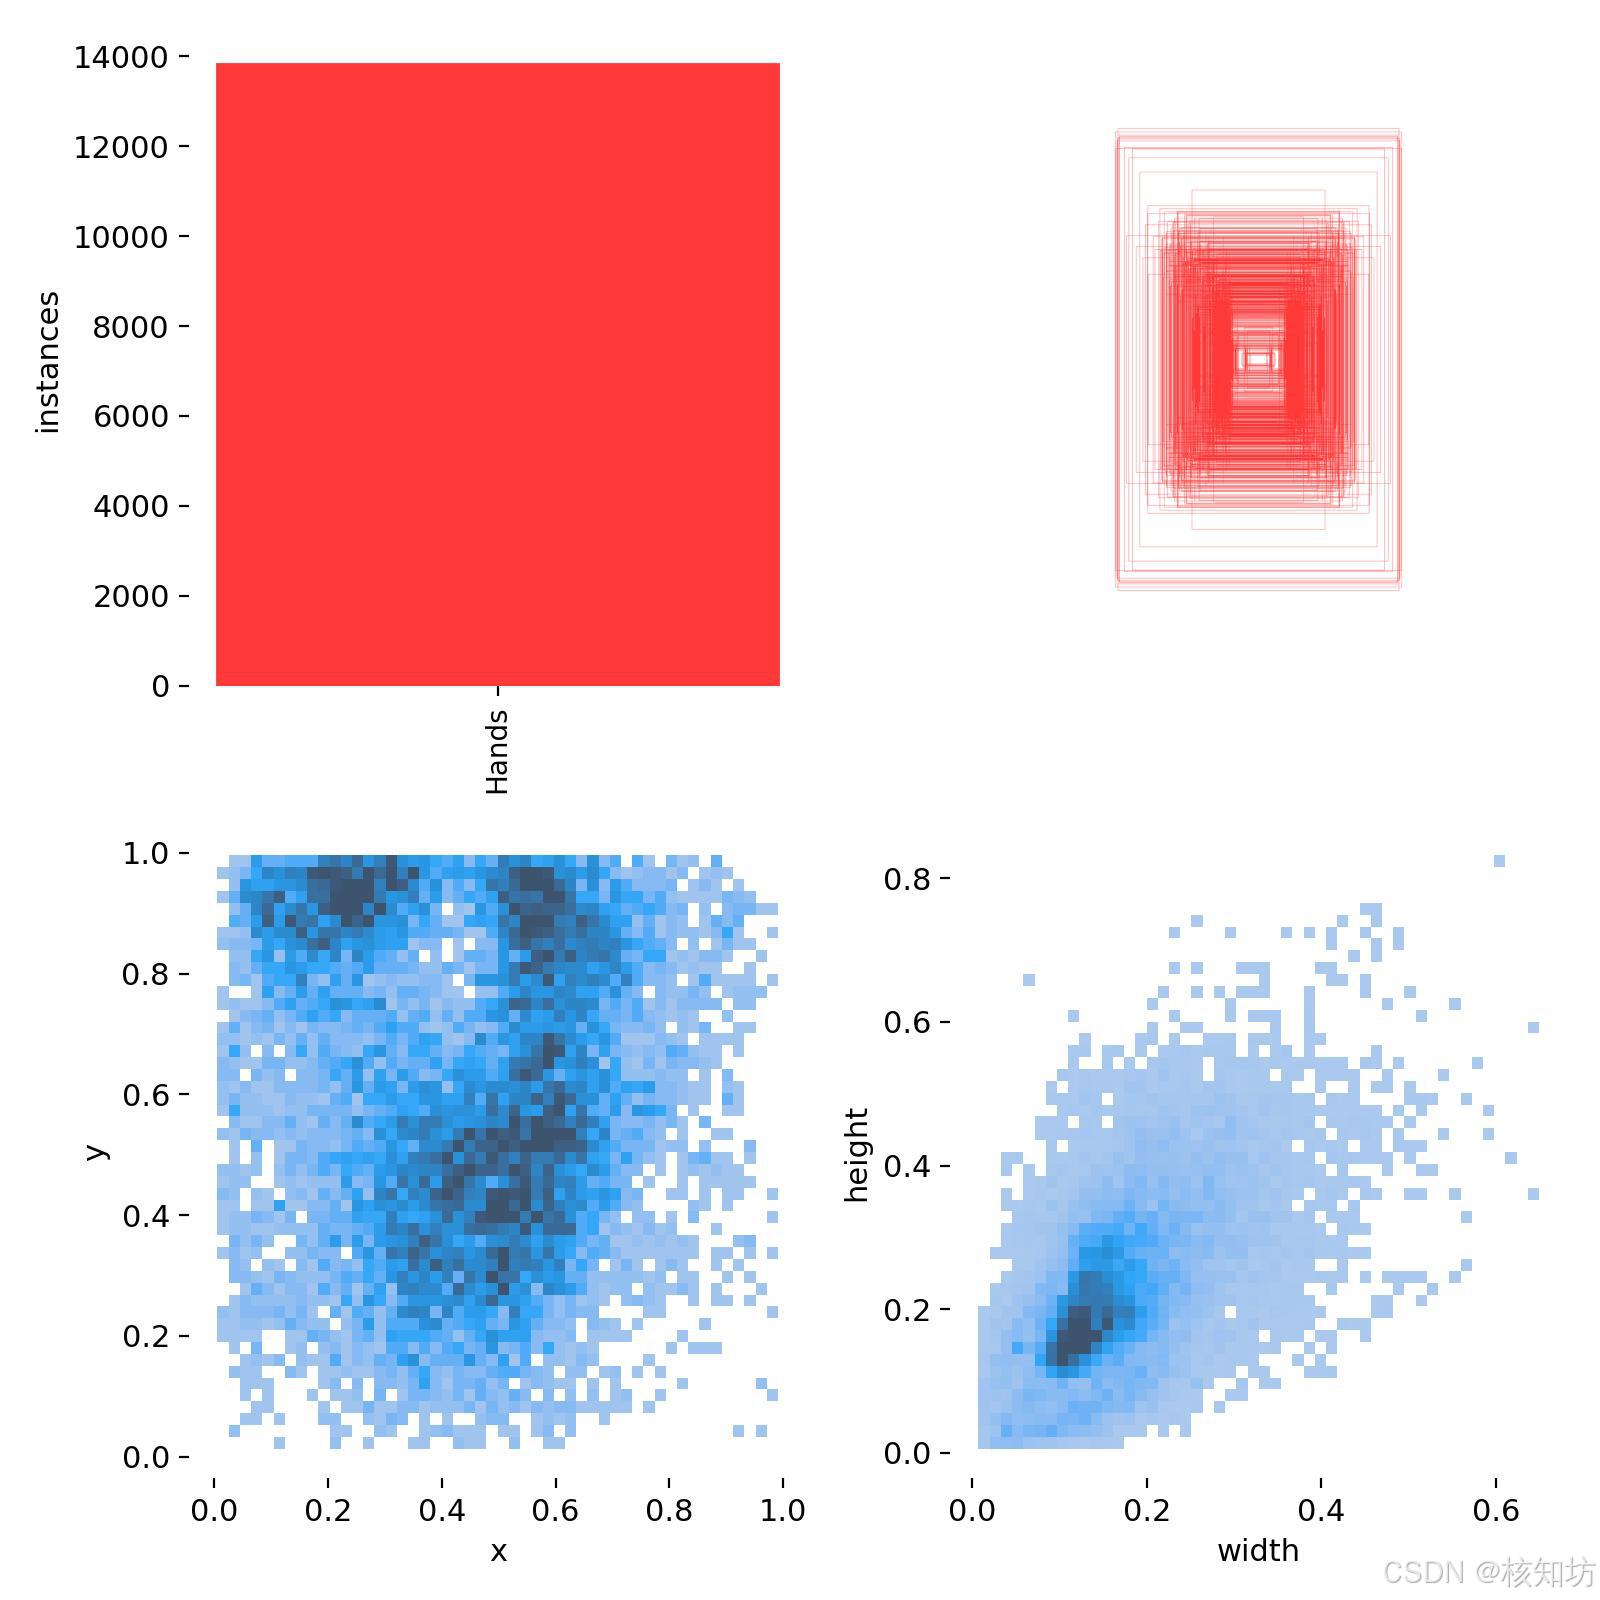
数据集准备:
手部数据egohands_data:http://vision.soic.indiana.edu/egohands_files/egohands_data.zip
数据格式转换:https://blog.csdn.net/wukong168/article/details/122783179
需要添加自定义数据集的可以录制视频,使用脚本提取帧,使用Labelme标注图像。
数据集文件夹目录必须符合一下结构,且图像与标注文件名必须一致:
-images-train #训练集图片-val   #验证集图片
-labels-train #训练集标注文件-val   #验证集图片文件
coco128.yaml配置是数据集路径:
path: D:/VUE/ModelData/egohands_data/data
train: images/train
val: images/val
test: # test images (optional)# Classes
names:0: Hand
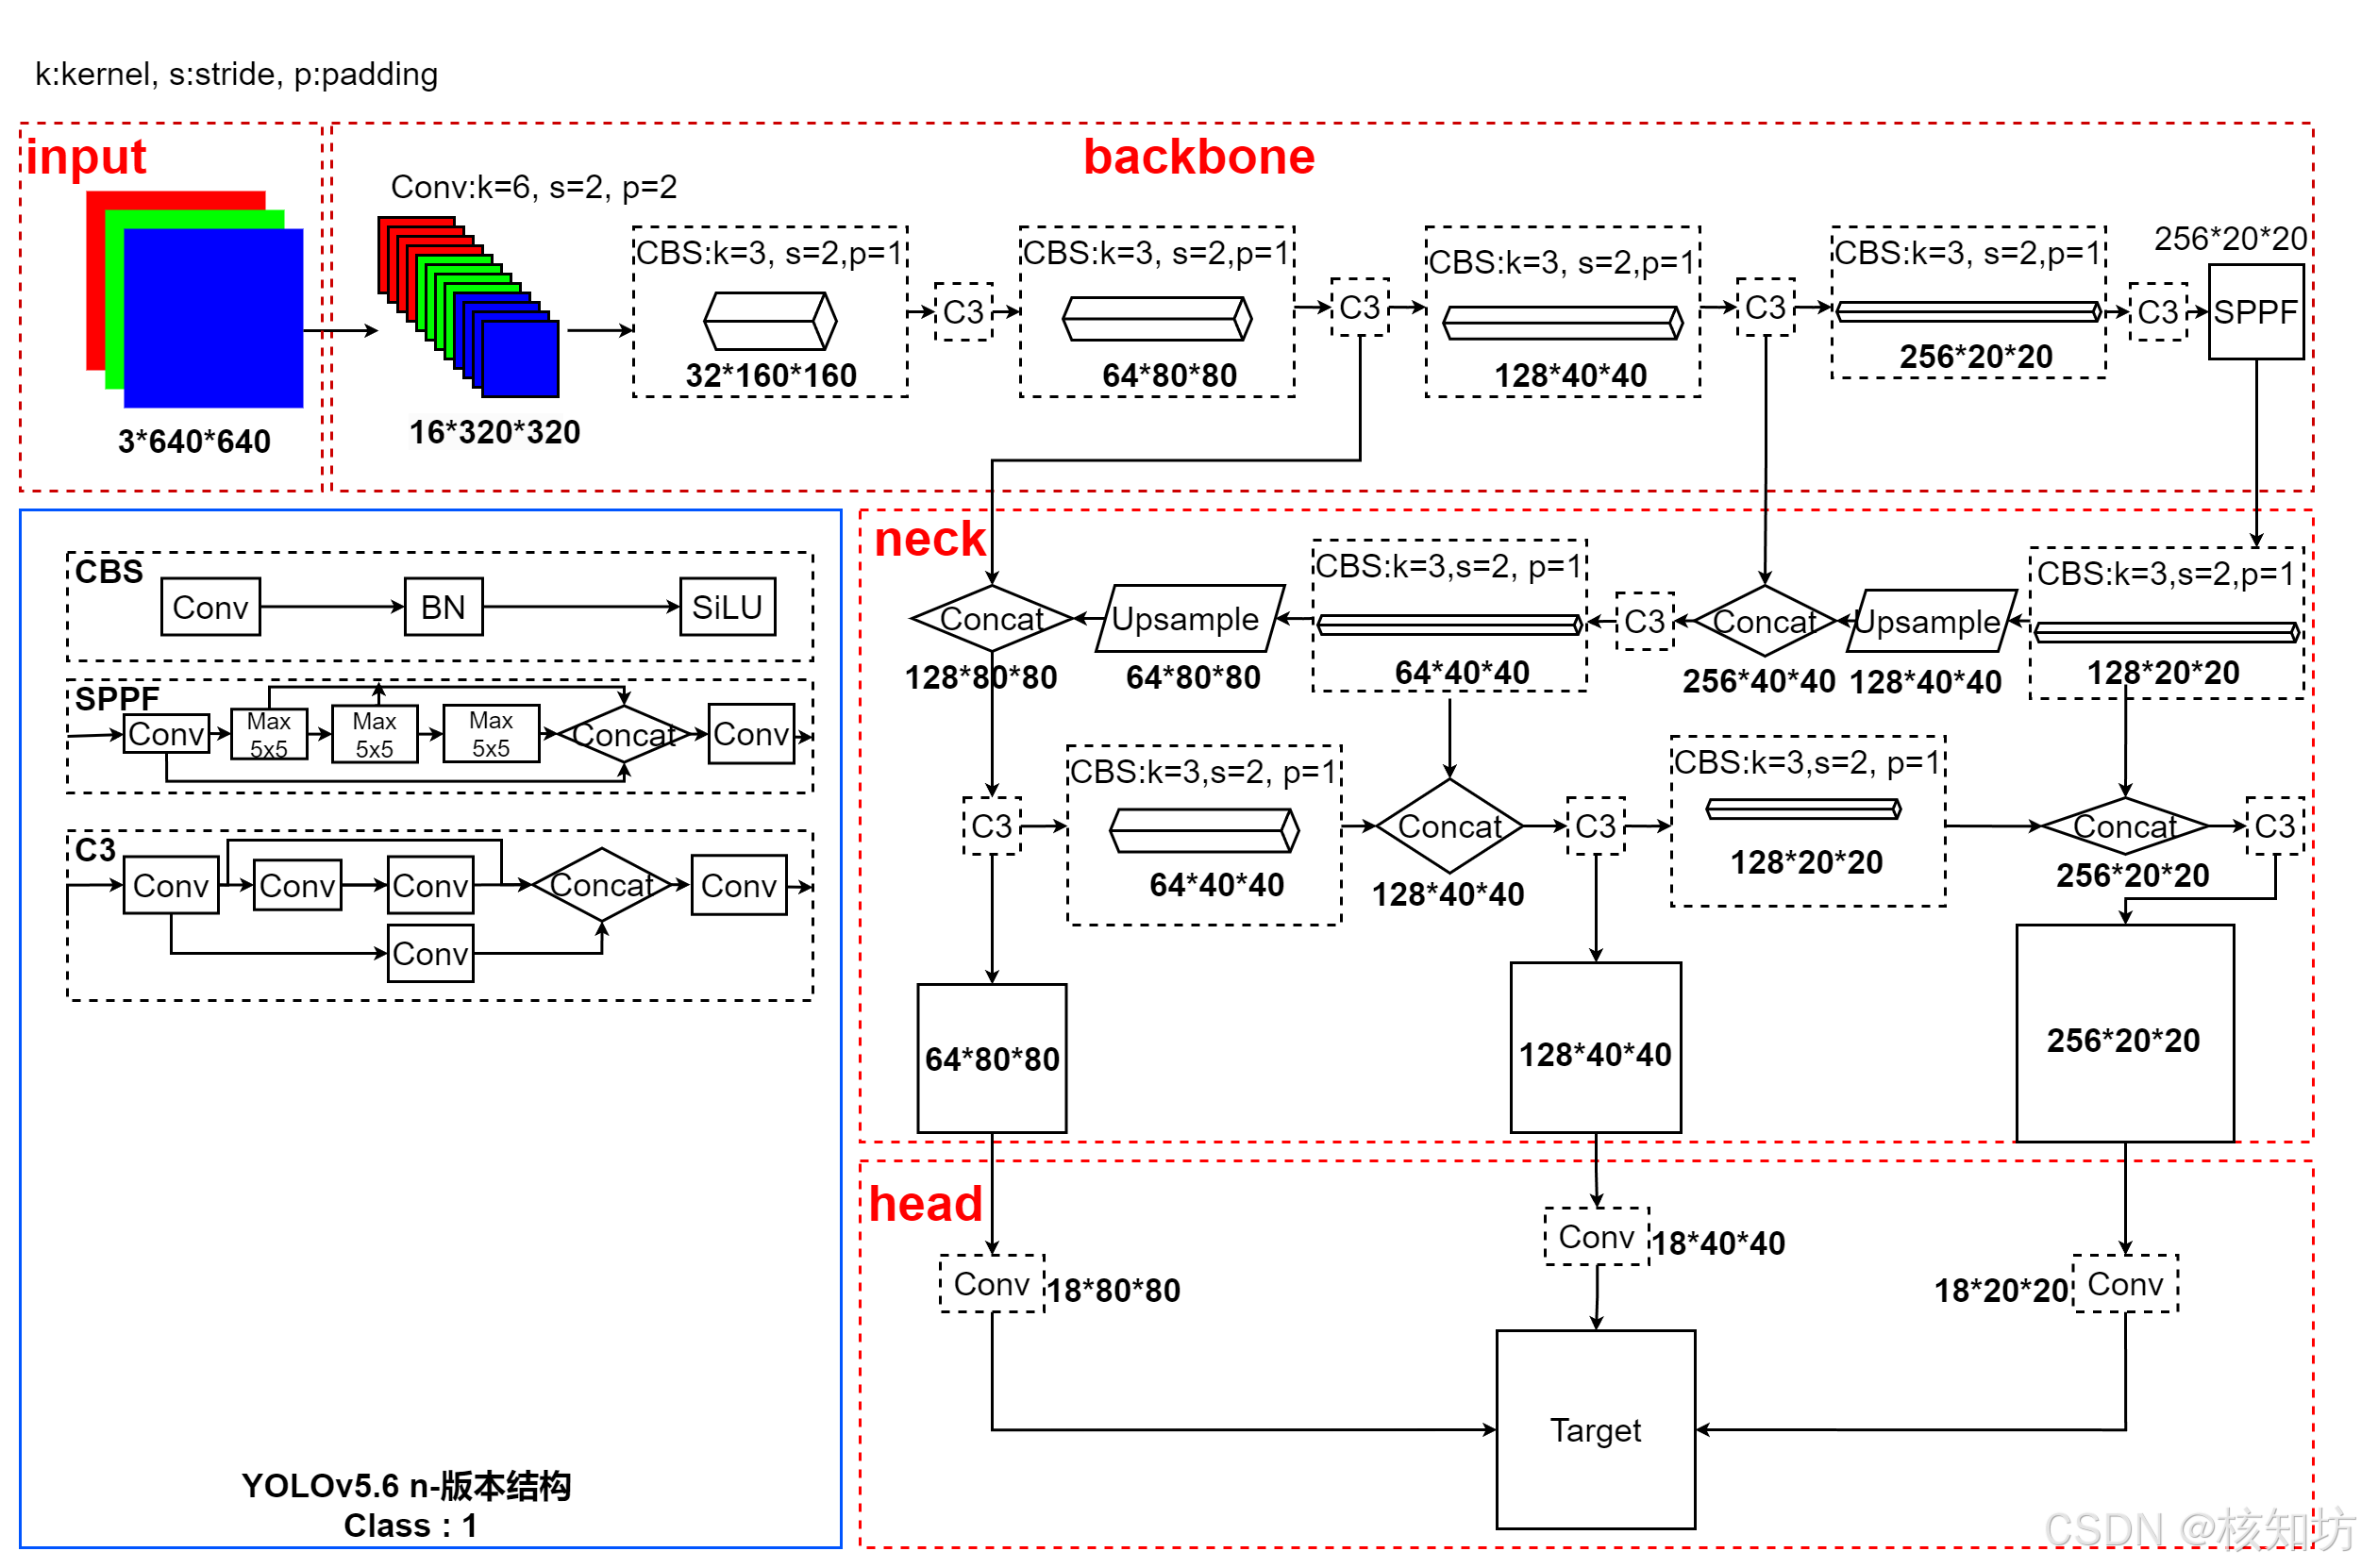
YOLOv5结构:
使用AI简单了解即可。
注意力机制添加:
在Yolov5根目录下的models/common.py文件末尾添加自定义模块,也可以创建一个独立的文件表示一个模块:
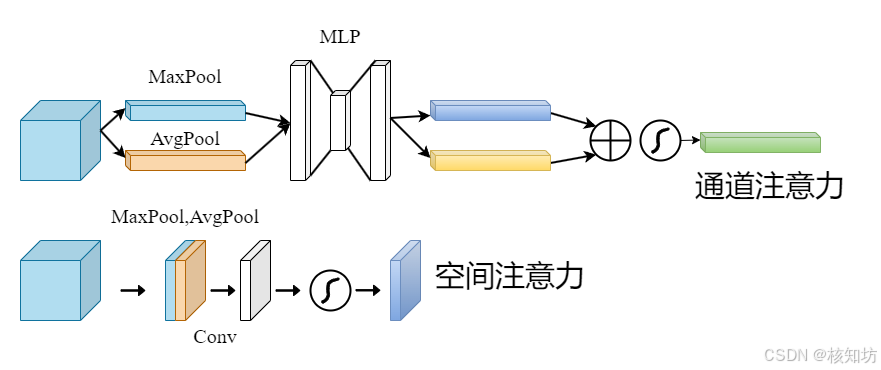
CBAM:
import torch
import math
import torch.nn as nn
import torch.nn.functional as Fclass BasicConv(nn.Module):def __init__(self, in_planes, out_planes, kernel_size, stride=1, padding=0, dilation=1, groups=1, relu=True, bn=True, bias=False):super(BasicConv, self).__init__()self.out_channels = out_planesself.conv = nn.Conv2d(in_planes, out_planes, kernel_size=kernel_size, stride=stride, padding=padding, dilation=dilation, groups=groups, bias=bias)self.bn = nn.BatchNorm2d(out_planes,eps=1e-5, momentum=0.01, affine=True) if bn else Noneself.relu = nn.ReLU() if relu else Nonedef forward(self, x):x = self.conv(x)if self.bn is not None:x = self.bn(x)if self.relu is not None:x = self.relu(x)return xclass Flatten(nn.Module):def forward(self, x):return x.view(x.size(0), -1)class ChannelGate(nn.Module):def __init__(self, gate_channels, reduction_ratio=16, pool_types=['avg', 'max']):super(ChannelGate, self).__init__()self.gate_channels = gate_channelsself.mlp = nn.Sequential(Flatten(),nn.Linear(gate_channels, gate_channels // reduction_ratio),nn.ReLU(),nn.Linear(gate_channels // reduction_ratio, gate_channels))self.pool_types = pool_typesdef forward(self, x):channel_att_sum = Nonefor pool_type in self.pool_types:if pool_type=='avg':avg_pool = F.avg_pool2d( x, (x.size(2), x.size(3)), stride=(x.size(2), x.size(3)))channel_att_raw = self.mlp( avg_pool )elif pool_type=='max':max_pool = F.max_pool2d( x, (x.size(2), x.size(3)), stride=(x.size(2), x.size(3)))channel_att_raw = self.mlp( max_pool )elif pool_type=='lp':lp_pool = F.lp_pool2d( x, 2, (x.size(2), x.size(3)), stride=(x.size(2), x.size(3)))channel_att_raw = self.mlp( lp_pool )elif pool_type=='lse':# LSE pool onlylse_pool = logsumexp_2d(x)channel_att_raw = self.mlp( lse_pool )if channel_att_sum is None:channel_att_sum = channel_att_rawelse:channel_att_sum = channel_att_sum + channel_att_rawscale = F.sigmoid( channel_att_sum ).unsqueeze(2).unsqueeze(3).expand_as(x)return x * scaledef logsumexp_2d(tensor):tensor_flatten = tensor.view(tensor.size(0), tensor.size(1), -1)s, _ = torch.max(tensor_flatten, dim=2, keepdim=True)outputs = s + (tensor_flatten - s).exp().sum(dim=2, keepdim=True).log()return outputsclass ChannelPool(nn.Module):def forward(self, x):return torch.cat( (torch.max(x,1)[0].unsqueeze(1), torch.mean(x,1).unsqueeze(1)), dim=1 )class SpatialGate(nn.Module):def __init__(self):super(SpatialGate, self).__init__()kernel_size = 7self.compress = ChannelPool()self.spatial = BasicConv(2, 1, kernel_size, stride=1, padding=(kernel_size-1) // 2, relu=False)def forward(self, x):x_compress = self.compress(x)x_out = self.spatial(x_compress)scale = F.sigmoid(x_out) # broadcastingreturn x * scaleclass CBAM(nn.Module):def __init__(self, gate_channels, reduction_ratio=16, pool_types=['avg', 'max'], no_spatial=False):super(CBAM, self).__init__()self.ChannelGate = ChannelGate(gate_channels, reduction_ratio, pool_types)self.no_spatial=no_spatialif not no_spatial:self.SpatialGate = SpatialGate()def forward(self, x):x_out = self.ChannelGate(x)if not self.no_spatial:x_out = self.SpatialGate(x_out)return x_out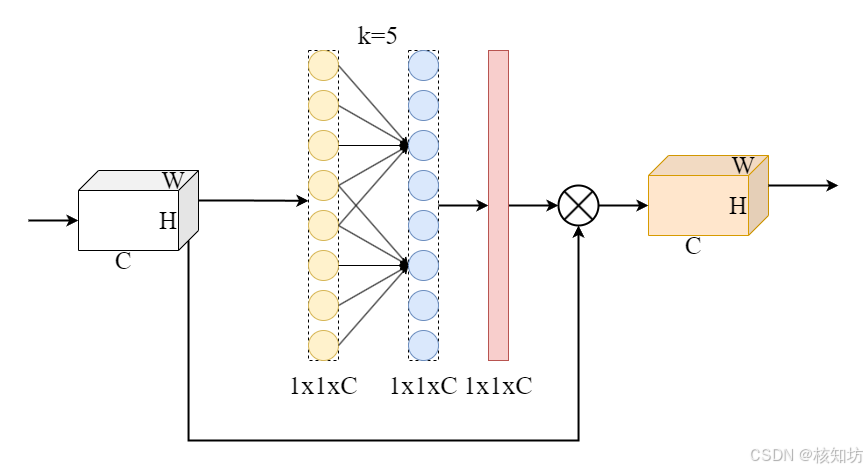
class ECA(nn.Module):"""Constructs a ECA module.Args:channel: Number of channels of the input feature mapk_size: Adaptive selection of kernel size"""def __init__(self, c1, c2, k_size=3):super(ECA, self).__init__()self.avg_pool = nn.AdaptiveAvgPool2d(1)self.conv = nn.Conv1d(1, 1, kernel_size=k_size, padding=(k_size - 1) // 2, bias=False)self.sigmoid = nn.Sigmoid()def forward(self, x):# feature descriptor on the global spatial informationy = self.avg_pool(x)y = self.conv(y.squeeze(-1).transpose(-1, -2)).transpose(-1, -2).unsqueeze(-1)# Multi-scale information fusiony = self.sigmoid(y)return x * y.expand_as(x)
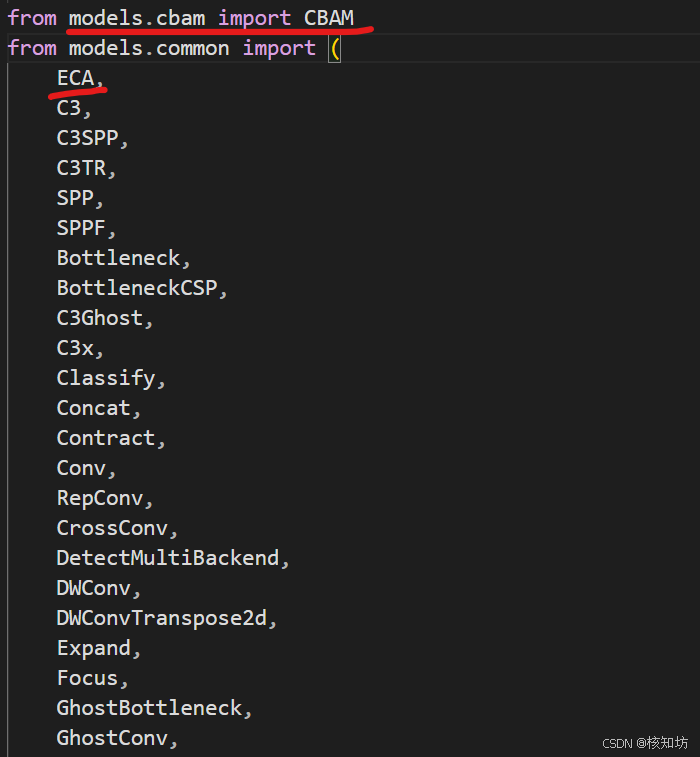
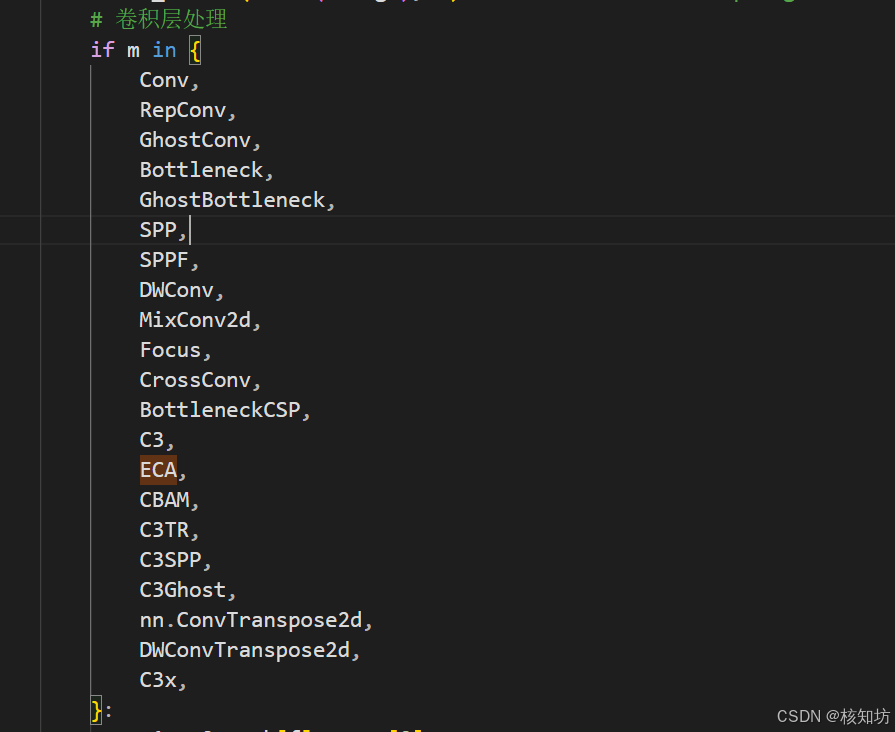
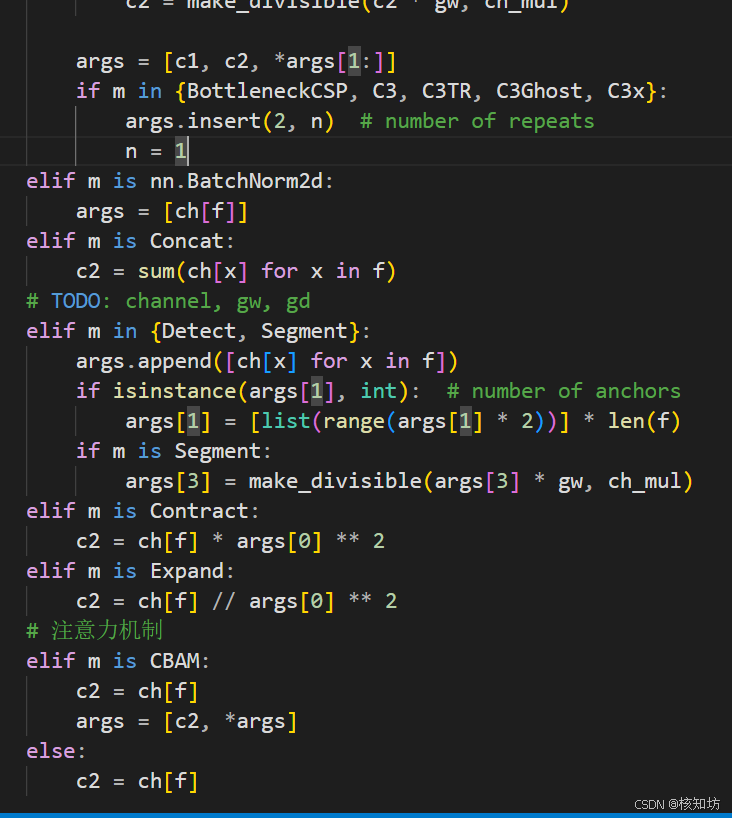
添加到YOLO系统配置输入参数:
在Yolov5根目录下的models/yolo.py文件导入自定义模块:
输入参数配置,此处有大量if语句用于个性化输入通道配置:
修改YOLOv5结构文件:
在Yolov5根目录下的models/yolov5s.yaml文件定义模型结构:
#YOLOv5s_custom summary: 320 layers, 1046153 parameters, 1046153 gradients, 2.5 GFLOPs
#YOLOv5s summary:        214 layers, 7022326 parameters, 7022326 gradients, 15.9 GFLOPs
nc: 1 # number of classes
depth_multiple: 0.33 # model depth multiple
width_multiple: 0.25 # layer channel multiple
anchors:- [10, 13, 16, 30, 33, 23] # P3/8- [30, 61, 62, 45, 59, 119] # P4/16- [116, 90, 156, 198, 373, 326] # P5/32activation: nn.RReLU() # 激活函数可以自定义# YOLOv5 v6.0 backbone
backbone:# [from, number, module, args][[-1, 1, Conv, [64, 3, 2, 1]], # 0-P1/2[-1, 1, Conv, [128, 3, 2]], # 1-P2/4[-1, 3, C3, [128]], # 2[-1, 1, Conv, [256, 3, 2]], # 3-P3/8[-1, 6, C3, [256]],[-1, 1, Conv, [512, 3, 2]], # 5-P4/16[-1, 4, C3, [512]],[-1, 1, Conv, [1024, 3, 2]], # 7-P5/32[-1, 1, C3, [1024]],[-1, 1, ECA, [1024]],  # 添加 ECA 提高小目标检测效果[-1, 1, SPPF, [1024, 5]], # 10]# YOLOv5 v6.0 head
head: [# [from, number, module, args][-1, 1, GhostConv, [512, 1, 1]], # 11[-1, 1, nn.Upsample, [None, 2, "nearest"]],[[-1, 6], 1, Concat, [1]], #13 cat backbone P4[-1, 3, C3, [512, False]], # 14[-1, 1, GhostConv, [256, 1, 1]],[-1, 1, nn.Upsample, [None, 2, "nearest"]],[[-1, 4], 1, Concat, [1]], # 17 cat backbone P3[-1, 3, C3, [256, False]], # 18 (P3/8-small)[-1, 1, ECA, [256]],  # 在检测头中添加 ECA[-1, 1, GhostConv, [256, 3, 2]],[[-1, 14], 1, Concat, [1]], # 21 cat head P4[-1, 3, C3, [512, False]], # 22 (P4/16-medium)[-1, 1, GhostConv, [512, 3, 2]],[[-1, 10], 1, Concat, [1]], # cat head P5[-1, 3, C3, [128, False]], # 25 (P5/32-large)[[18, 22, 25], 1, Detect, [nc, anchors]], # Detect(P3, P4, P5)]
训练:
由于修改了模型结构,建议不加载官方预训练权重yolov5s.pt从0训练,当然可以提前使用遗传算法获取合适的超参数加快收敛速度。
python train.py --data coco128.yaml --weights '' --cfg yolov5s.yaml --img 640
ByteTrack引入:
原理:Yolov5模型输出检测框列表,ByteTrack接收预测跟踪目标,最重要的是ID参数。
具体查看博主重新编写的检测函数:
# -*- coding: utf-8 -*-
"""
@FileName:YoloModelRun.py
@Description:
@Author: 核知坊,一个激发创造力的网站:http://wwww.CoreKSets.cn
@Time:2025/3/23 20:02
"""
import pathlib
import time
import numpy as np
from PIL import Image
import torch
from models.common import DetectMultiBackend
from utils.augmentations import letterbox
from utils.general import non_max_suppression
from ultralytics.utils.plotting import Annotator
from utils.dataloaders import LoadImages
from utils.general import (LOGGER,Profile,check_img_size,scale_boxes,)
from bytetracker import BYTETracker# 兼容 Windows 下的路径问题
temp = pathlib.PosixPath
pathlib.PosixPath = pathlib.WindowsPathclass YoloModelRun():"""@ClassName:YoloModelRun@Description:@Author:锦沐Python"""def __init__(self, weights="best.onnx", imgsz = (640, 640), conf_thres=0.2, iou_thres=0.45, save_result = False, half=False):self.weights = weightsself.conf_thres = conf_thresself.iou_thres = iou_thresself.save_result = save_resultself.device = torch.device("cpu")# Load modelLOGGER.info("模型加载中")self.Model = DetectMultiBackend(weights, device=self.device, dnn=False, fp16=half)self.Model.eval()# 追踪系统self.Tracker = BYTETracker(track_thresh=0.25, track_buffer=10, match_thresh=0.7, frame_rate=8)self.stride=self.Model.strideself.names=self.Model.namesself.pt = self.Model.ptself.imgsz = check_img_size(imgsz, s=self.stride)  # check image sizeself.Model.warmup(imgsz=(1 , 3, *self.imgsz))  # warmup# [[x1, y1, x2, y2, conf, cls], [x1, y1, x2, y2, conf, cls],....]self.detect_results = []LOGGER.info("模型准备就绪")def detect_image(self,source)->(list[[float,float,float,float,float,int,int]],Image.Image):self.detect_results.clear()# 处理不同类型的输入if isinstance(source, str):# 如果输入是图片路径,使用 LoadImages 进行加载dataset = LoadImages(source, img_size=self.imgsz, stride=self.stride, auto=self.pt, vid_stride=1)path, im, im0s, vid_cap, s = next(iter(dataset))  # 读取一张图片elif isinstance(source, Image.Image):im0s = np.array(source)  # 原始图像 (RGB)im0s = im0s[..., ::-1]  # 转换为 BGR 格式(因为 OpenCV 使用 BGR)# **使用与 LoadImages 类似的预处理**im = letterbox(im0s, self.imgsz, stride=self.stride, auto=self.pt)[0]  # 调整大小im = im.transpose((2, 0, 1))[::-1]  # HWC -> CHW, BGR -> RGBim = np.ascontiguousarray(im)  # 确保数据连续else:raise ValueError("输入必须是图片路径 (str) 或 PIL.Image 对象!")# Run inferencedetect_time_tuble = (Profile(device=self.device), Profile(device=self.device), Profile(device=self.device), Profile(device=self.device))# 图像预处理with detect_time_tuble[0]:im = torch.from_numpy(im).to(self.Model.device)im = im.half() if self.Model.fp16 else im.float()  # uint8 to fp16/32im /= 255  # 0 - 255 to 0.0 - 1.0if len(im.shape) == 3:im = im[None]  # expand for batch dim# Inference 预测with detect_time_tuble[1]:pred = self.Model(im, augment=False, visualize=False)# NMSwith detect_time_tuble[2]:pred = non_max_suppression(pred, self.conf_thres, self.iou_thres, None, False, max_det=10)# 目标绘制im0 = im0s.copy()annotator = Annotator(im0, line_width=3, example=str(self.names[0]))# Process predictionswith detect_time_tuble[3]:det = pred[0]# print(det)s = ""if len(det):det = self.Tracker.update(det)# 没有跟踪到物体直接返回if not det:return  [], Nonedet = torch.tensor(det, dtype=torch.float32)# print(det)# Rescale boxes from img_size to im0 sizedet[:, :4] = scale_boxes(im.shape[2:], det[:, :4], im0.shape).round()# Print resultsfor c in det[:, 5].unique():n = (det[:, 5] == c).sum()  # detections per classs += f"{n} {self.names[int(c)]}{'s' * (n > 1)}, "  # add to stringfor *xyxy, conf, cls, id in reversed(det):x1,y1,x2,y2 = xyxyc = int(cls)  # integer classlabel = f"{self.names[c]} {conf:.2f}"annotator.box_label(xyxy, label, color= (255, 36, 125))# 添加检测结果w = 640h = 480self.detect_results.append([round(x1.item() / w, 6),  # 归一化 x1,保留6位小数round(y1.item() / h, 6),  # 归一化 y1,保留6位小数round(x2.item() / w, 6),  # 归一化 x2,保留6位小数round(y2.item() / h, 6),  # 归一化 y2,保留6位小数round(conf.item(), 6),  # 置信度,保留6位小数self.names[c],  # 类别名称int(id)])# Stream resultsif self.save_result:timestamp = int(time.time())annotator.save(f"{timestamp}_result.jpg")show_img = Image.fromarray(np.asarray(annotator.im)[..., ::-1])# Print time (inference-only)LOGGER.info(f"{s}{'' if len(det) else '(没有检测到目标), '}{detect_time_tuble[1].dt * 1e3:.1f}ms")# Print resultsLOGGER.info(f"Speed: %.1fms 预处理, %.1fms 识别, %.1fms NMS ,%d.1ms ByteTrack 每张图像 {(1, 3, *self.imgsz)}" %(detect_time_tuble[0].dt * 1e3,detect_time_tuble[1].dt * 1e3,detect_time_tuble[2].dt * 1e3,detect_time_tuble[3].dt * 1e3))return self.detect_results, show_img
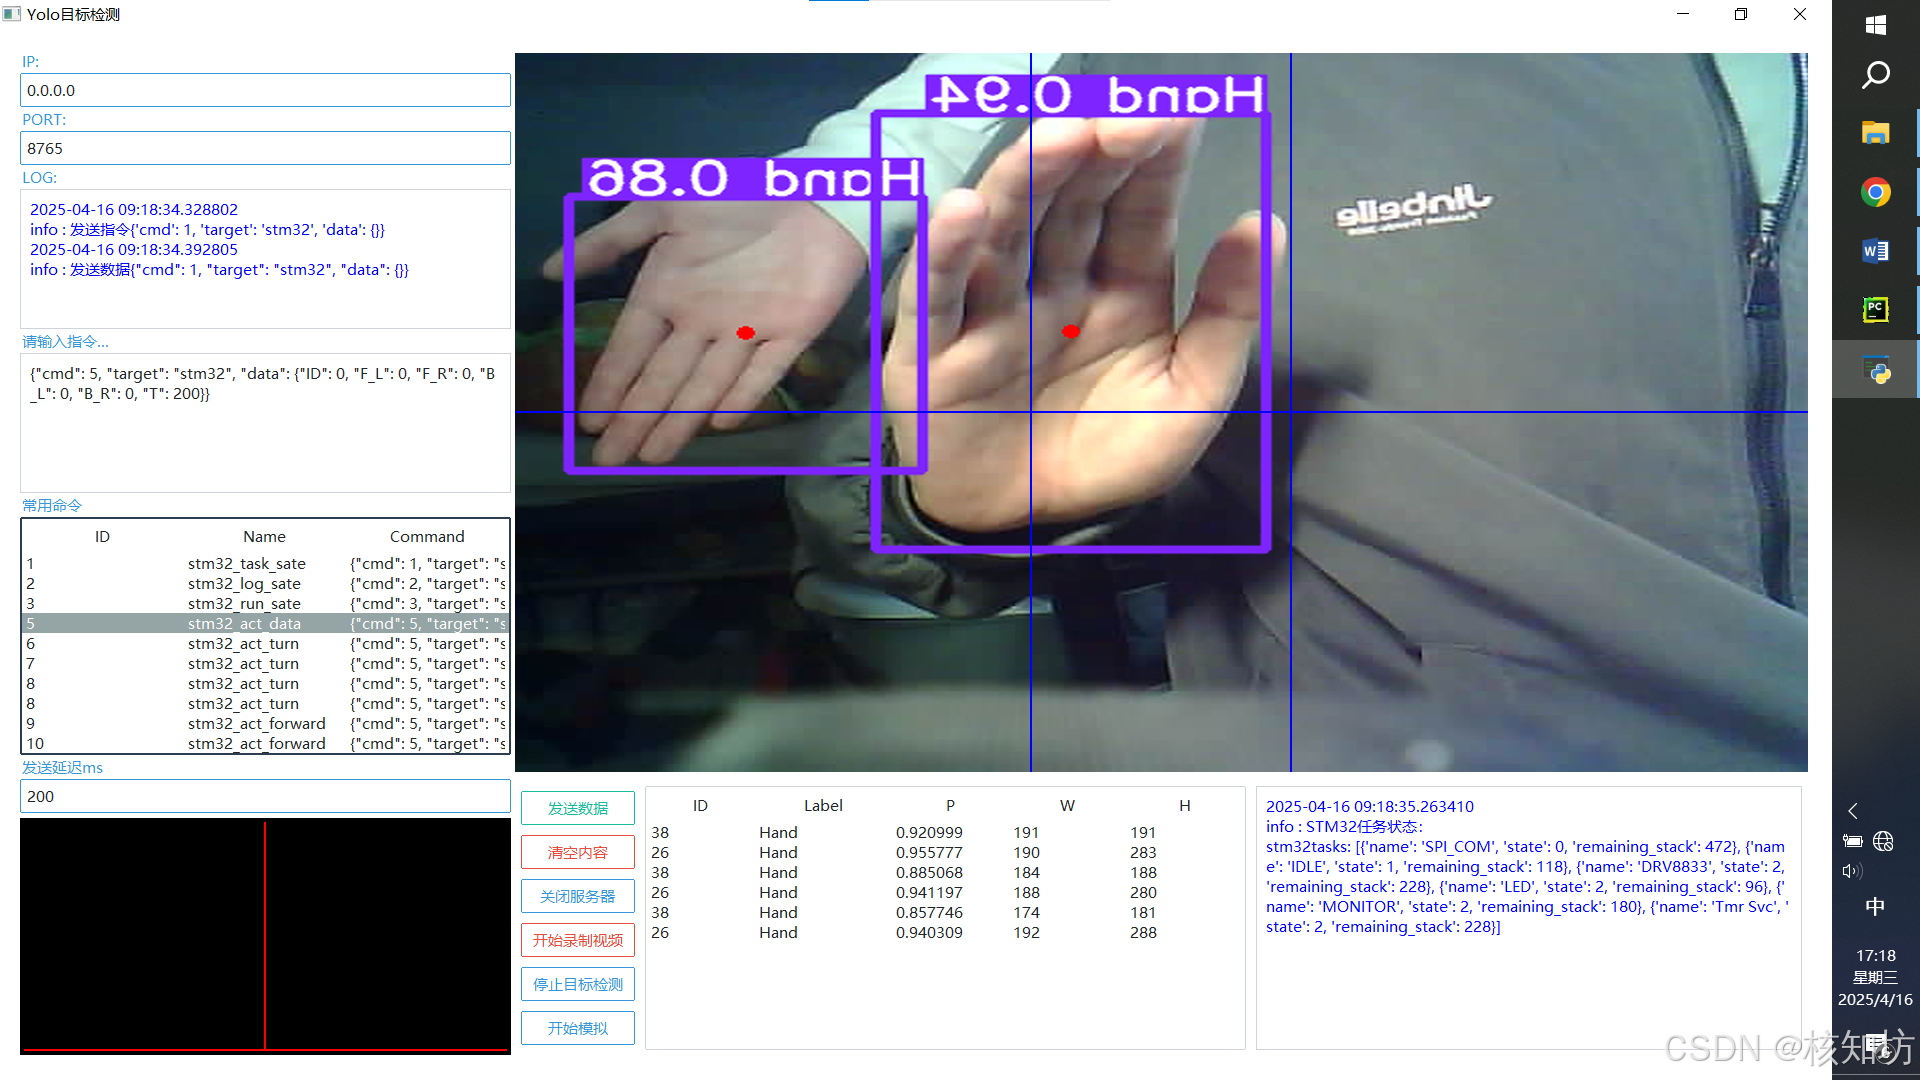
结果: