label-studio的使用教程(导入本地路径)
文章目录
- 1. 准备环境
- 2. 脚本启动
- 2.1 Windows
- 2.2 Linux
- 3. 安装label-studio机器学习后端
- 3.1 pip安装(推荐)
- 3.2 GitHub仓库安装
- 4. 后端配置
- 4.1 yolo环境
- 4.2 引入后端模型
- 4.3 修改脚本
- 4.4 启动后端
- 5. 标注工程
- 5.1 创建工程
- 5.2 配置图片路径
- 5.3 配置工程类型标签
- 5.4 配置模型
- 5.5 标注
- 5.6 批注
- 5.7 导出
- 6. 重命名文件
1. 准备环境
首先创建一个虚拟环境:
conda create -n label_studio python=3.12
conda activate label_studio
然后使用pip安装label-studio:
pip install label-studio
然后可以打开label-studio了:
label-studio start
终端中应该能看到如下的内容:

并且会自动打开浏览器,并进入到如下的页面(如果没有自动打开,可以自己打开浏览器,然后输入http://localhost:8080进行访问):

2. 脚本启动
为了每次都能够一键启动,而不是在终端内输入很多条命令,可以将相关的命令封装成脚本。
2.1 Windows
新建一个bat脚本,比如命名为load_label_studio.bat,然后复制一下的一下的内容,并且,必须确保这个脚本中的编码是GB2312!否则将无法启动。
@echo off:: 打印信息
echo 开始启动 label-studio :: 配置区域
set CONDA_ENV=label_studio
set ROOT_DIR=C:\\dl\\datasets:: 激活conda环境
echo.
echo [1/3] 正在激活 Conda 环境 %CONDA_ENV%
call conda activate %CONDA_ENV%:: 检查激活是否成功
if %errorlevel% neq 0 (echo.echo 激活 Conda 环境 %CONDA_ENV% 失败!echo 请检查是否没有创建这个环境pauseexit /b
):: 配置环境变量
echo.
echo [2/3] 配置 label-studio 的环境变量
set LABEL_STUDIO_LOCAL_FILES_SERVING_ENABLED=true
set LABEL_STUDIO_LOCAL_FILES_DOCUMENT_ROOT=%ROOT_DIR%
set DATA_UPLOAD_MAX_NUMBER_FILES=2000:: 启动 label-studio
echo.
echo [3/3] 启动 label-studio
label-studio start:: 检查是否成功启动
if %errorlevel% neq 0 (echo.echo 启动 label-studio 失败!echo 请检查安装情况,或者是否调用错误!
) else (echo.echo label-studio 运行成功echo 可通过地址直接访问: http://localhost:8080
):: 保持命令行窗口打开
pause
脚本的一些说明:
- 脚本中默认你已经在系统设置中配置了conda的环境变量!
- 配置区域中的
CONDA_ENV是使用label-studio的python环境- 配置区域中的
ROOT_DIR是本地文件的默认文件夹- 这里启动的label-studio都是按照默认参数进行启动,如果需要绑定某个ip,指定某个端口,需要修改一下
label-studio start行
2.2 Linux
暂无待补充
3. 安装label-studio机器学习后端
有两种安装方法,推荐使用第一种。
3.1 pip安装(推荐)
pip install label-studio-ml
3.2 GitHub仓库安装
在合适的目录下打开终端:
conda activate label_studio
git clone https://github.com/heartexlabs/label-studio-ml-backend
cd label-studio-ml-backend
pip install -U -e .
但是有可能会出现如下的报错:
Installing collected packages: label-studio-sdk, label-studio-ml━━━━━━━━━━━━━━━━━━━━━━━━━━━━━━━━━━━━━━━━ 0/2 [label-studio-sdk]  DEPRECATION: Legacy editable install of label-studio-ml==2.0.1.dev0 from file:///E:/Code/VsCode/python/label-studio-ml-backend-master (setup.py develop) is deprecated. pip 25.3 will enforce this behaviour change. A possible replacement is to add a pyproject.toml or enable --use-pep517, and use setuptools >= 64. If the resulting installation is not behaving as expected, try using --config-settings editable_mode=compat. Please consult the setuptools documentation for more information. Discussion can be found at https://github.com/pypa/pip/issues/11457Running setup.py develop for label-studio-ml
ERROR: pip's dependency resolver does not currently take into account all the packages that are installed. This behaviour is the source of the following dependency conflicts.
label-studio 1.18.0 requires label-studio-sdk==1.0.12, but you have label-studio-sdk 1.0.18.dev0 which is incompatible.
这里我们只需要关注这里要求什么版本的label-studio-sdk,然后再使用pip命令装一下就可以了:
pip install label-studio-sdk==1.0.12
当然,为了使用自己的pt模型,还是需要安装torch和onnx等这些,这里以cpu的为例:
conda activate label_studio
pip3 install torch torchvision torchaudio  # https://pytorch.org/get-started/locally/ 直接参考官网的安装方法pip install onnx
4. 后端配置
这里我们需要使用自己已经训练好的yolo模型,所以还需要额外的配置。
4.1 yolo环境
首先需要安装yolo的环境,需要安装ultralytics:
conda activate label_studio
pip install ultralytics
4.2 引入后端模型
首先在合适的位置创建一个目录,专门用来存放backend的相关东西,比如c:\dl\label_studio_backend,那么在这里打开终端,开始进行操作。
conda activate label_studio
label-studio-ml create ml_backend_test1

发现这里就创建了一个ml_backend_test1的目录,然后我们需要进入这个目录下进行文件的修改。

将我们的训练好的模型best.pt放到目录中,然后需要对这个model.py进行修改。
4.3 修改脚本
对于model.py进行修改,参考:
from typing import List, Dict, Optional
from label_studio_ml.model import LabelStudioMLBase
from label_studio_ml.response import ModelResponse################## 修改 ##################
# 添加需要的函数
from label_studio_ml.utils import get_image_local_path# 添加yolo需要的依赖
from ultralytics import YOLO# 添加额外处理需要的依赖
import re
import os
from urllib.parse import unquote
from PIL import Imagedef custom_get_local_path(url):"""自定义路径解析函数,兼容Windows特殊格式"""# 1. 尝试官方方法try:from label_studio_ml.utils import get_image_local_pathreturn get_image_local_path(url)except:pass# 2. 手动解析本地文件URLif url.startswith('/data/local-files'):# 提取相对路径部分match = re.search(r'd=(.*?)(?:&|$)', url)if match:relative_path = unquote(match.group(1))base_dir = os.environ.get('LABEL_STUDIO_LOCAL_FILES_DOCUMENT_ROOT', 'c:\\dl\\datasets')# 处理Windows路径分隔符relative_path = relative_path.replace('/', '\\')return os.path.join(base_dir, relative_path)# 3. 处理上传文件路径if url.startswith('/data/upload'):relative_path = url.replace('/data/upload/', '').lstrip('/')base_dir = os.environ.get('LABEL_STUDIO_LOCAL_FILES_DOCUMENT_ROOT', 'c:\\dl\\datasets')return os.path.join(base_dir, relative_path.replace('/', '\\'))return url  # 退回原始URLclass NewModel(LabelStudioMLBase):"""Custom ML Backend model"""def setup(self):"""Configure any parameters of your model here"""self.set("model_version", "0.0.1")################## 修改 ################### 加载我们自己训练好的模型# 注意这里的路径,是要带上文件夹目录的,因为后续python脚本执行的环境将在更上一层目录上!self._model = YOLO('./ml_backend_test1/best.pt')# 使用模型中的标签self._labels = self._model.namesdef predict(self,tasks: List[Dict],context: Optional[Dict] = None,**kwargs) -> ModelResponse:""" Write your inference logic here:param tasks: [Label Studio tasks in JSON format](https://labelstud.io/guide/task_format.html):param context: [Label Studio context in JSON format](https://labelstud.io/guide/ml_create#Implement-prediction-logic):return model_responseModelResponse(predictions=predictions) withpredictions: [Predictions array in JSON format](https://labelstud.io/guide/export.html#Label-Studio-JSON-format-of-annotated-tasks)"""print(f'''\Run prediction on {tasks}Received context: {context}Project ID: {self.project_id}Label config: {self.label_config}Parsed JSON Label config: {self.parsed_label_config}Extra params: {self.extra_params}''')################## 修改 ##################results = []for task in tasks:# 获取图片的本地路径image_path = custom_get_local_path(task['data']['image'])image = Image.open(image_path)img_width, img_height = image.size# 使用YOLO进行推理pred = self._model(image)predictions = []# 解析检测结果for box in pred[0].boxes:x_min, y_min, x_max, y_max = map(float, box.xyxy[0].tolist())label = self._labels[int(box.cls.item())]predictions.append({"from_name": "label","to_name": "image","type": "rectanglelabels","value": {"x": x_min / img_width * 100,"y": y_min / img_height * 100,"width": (x_max - x_min) / img_width * 100,"height": (y_max - y_min) / img_height * 100,"rectanglelabels": [label]},"score": float(box.conf.item())})results.append({"result": predictions})return results# return ModelResponse(predictions=[])def fit(self, event, data, **kwargs):"""This method is called each time an annotation is created or updatedYou can run your logic here to update the model and persist it to the cacheIt is not recommended to perform long-running operations here, as it will block the main threadInstead, consider running a separate process or a thread (like RQ worker) to perform the training:param event: event type can be ('ANNOTATION_CREATED', 'ANNOTATION_UPDATED', 'START_TRAINING'):param data: the payload received from the event (check [Webhook event reference](https://labelstud.io/guide/webhook_reference.html))"""# use cache to retrieve the data from the previous fit() runsold_data = self.get('my_data')old_model_version = self.get('model_version')print(f'Old data: {old_data}')print(f'Old model version: {old_model_version}')# store new data to the cacheself.set('my_data', 'my_new_data_value')self.set('model_version', 'my_new_model_version')print(f'New data: {self.get("my_data")}')print(f'New model version: {self.get("model_version")}')print('fit() completed successfully.')
注意
这个脚本里面写了读取环境变量:
base_dir = os.environ.get('LABEL_STUDIO_LOCAL_FILES_DOCUMENT_ROOT', 'c:\\dl\\datasets')所以,要么将这个环境变量直接写入系统,要么就记得对应修改路径……
4.4 启动后端
完成上述工作之后,就可以启动后端了。
还是需要进入到前面创建的backend的目录中去,比如本文中的c:\dl\label_studio_backend,然后在这里打开终端,然后操作:
conda activate label_studio
label-studio-ml start ml_backend_test1 -p 9090
启动成功的画面如下:

后面就可以在label-studio上创建工程进行标注了。
5. 标注工程
初始时候没有账号,可以在上述的页面下创建一个账号,就是需要一个邮箱和一个密码,也不需要做什么验证什么的,创建成功后会自动登录,然后就能进入到页面了。

如果需要进行一些账号上的配置,可以点击右上角的头像,然后进行配置。
5.1 创建工程
这里直接点击中间的Create Project来创建一个标注的工程,打开后开始填写:

其余的配置暂时不用管,后续再进入到工程中进行配置。
创建完成之后我们就可以点击进入到test1的工程中去了,显示如下的画面:

5.2 配置图片路径
上述图片中,点击右上角的Settings进入到如下的配置页面:

首先我们配置本地的图片位置,左侧的tab页选择Cloud Storage,然后进入到Add Source Storage。

按照如下的示例进行配置:

说明:
Storage Type要选择Local filesStorage Title要和后面的path对应的名字要相同Absolute local path必须是一个绝对路径,并且要到图片的根目录上,并且要和前面脚本中配置set ROOT_DIR=C:\\dl\\datasets对应上,必须是这个目录下的子目录File Filter Regex来进行正则化过滤,有啥类型就按照正则化的方式写好- 必须打开
Treat every bucket object as a source file- 然后点击
Check Connection来验证一下填写有没有问题,如果出现了Successfully connected!就说明可以了,然后点击Add Storage来完成即可
然后需要在如下的页面上点击Sync Storage ,然后看到Status的状态是Conpleted,如果状态不是这个,那么一定是有什么步骤错了,需要再检查一下!

5.3 配置工程类型标签
然后来配置工程的类型和标签。
进入到Labeling Interface中的Browser Templates。

进入之后选择Object Detection with Boarding Boxes

通过在红色框中填写对应的标签,然后点击下方的Add,就可以添加一个label了,全部填写完成之后,点击下方的Save即可。

5.4 配置模型
点击左侧tab的Model进行模型的相关配置。

然后填写:

- 这里的
Name随便写,随便取个名字Backend URL就是填写前面我们4.4 启动后端最终打印的地址,如果你的后端和label-studio是放在不同的机器上,就得注意ip了!- 然后点击
Validate and Save就可以完成。如果有报错,需要检查一下model.py是不是写错了……
然后就可以看到:

5.5 标注
回到工程的首页,我们现在就可以看到类似如下的显示了:

这个时候我们选择需要进行标注的文件,可以一个个勾选自己需要进行标注的文件,也可以直接全选,然后可以看到你现在有多少个任务了。

然后我们就可以点击点击进行处理了。

如果运行成功,则可以看到:

5.6 批注
导出之前必须Annotate才行,所以随便找一行,然后点击对应Annotated by列的空白处。(不得不说,真的是神奇的操作逻辑,非常的反人类反直觉)
或者,直接点击上面的Label All Tasks也能进入批注页面,然后两个稍微有一些不同。

然后得到如下的画面:

可以直接点击右下角的Submit直接确认批注当前图片。如果要修改,点击图片中的框图进行操作。
非常难用的是 无法全选然后Submit,非常反人类反直觉
5.7 导出
导出之前必须确认你想要导出的图片已经被标注了!!!!否则导出的文件都是空的……
点击右上角的Export进行导出。

然后选择需要的格式:

最后到最下方,进行导出:

选择只导出标签的那个,会很快,如果图片和标签一起导出,等待的时间还是漫长的,尤其是数据越多越长……
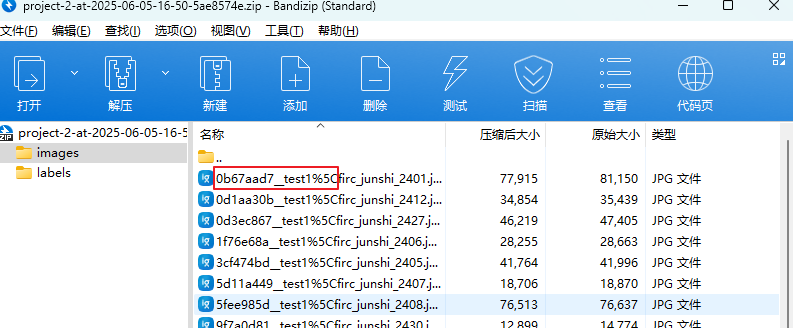
导出之后的图片名称还会被修改……类似:

6. 重命名文件
像我这样特别方案改的乱七八糟的名字,就直接使用一个脚本全部重命名了。
from pathlib import Path
import shutil# 指定图片目录
img_path = Path("image/")
lab_old = Path("old/")
lab_path = Path("label")# 定义支持的图片扩展名(可扩展)
image_extensions = {".jpg", ".jpeg", ".png", ".bmp", ".gif"}# 计数器,用于生成新文件名
counter = 10000001# 遍历目录下的所有文件(不递归子目录)
for file in img_path.iterdir():if file.is_file() and file.suffix.lower() in image_extensions:# 构建新文件名new_file = img_path / f"image_{counter:08d}{file.suffix}"old_label = lab_old / f"{file.stem}.txt"new_label = lab_path / f"image_{counter:08d}.txt"# 防止文件已存在if new_file.exists():print(f"⚠️ 跳过:文件 {new_file.name} 已存在")continue# 重命名文件try:file.rename(new_file)shutil.copy(old_label, new_label)print(f"✅ 重命名:{file.name} -> {new_file.name}")counter += 1except Exception as e:print(f"❌ 重命名失败:{file.name} -> {new_file.name},错误:{e}")
调整一下目录的名字即可。
