项目开发:【悟空博客】基于SSM框架的博客平台
目录
一.导入
1.Spirng框架
2.SpirngMVC
二.项目介绍
(一)项目功能
(二)页面展示
1.注册页面
2.登录页面
3.列表页面
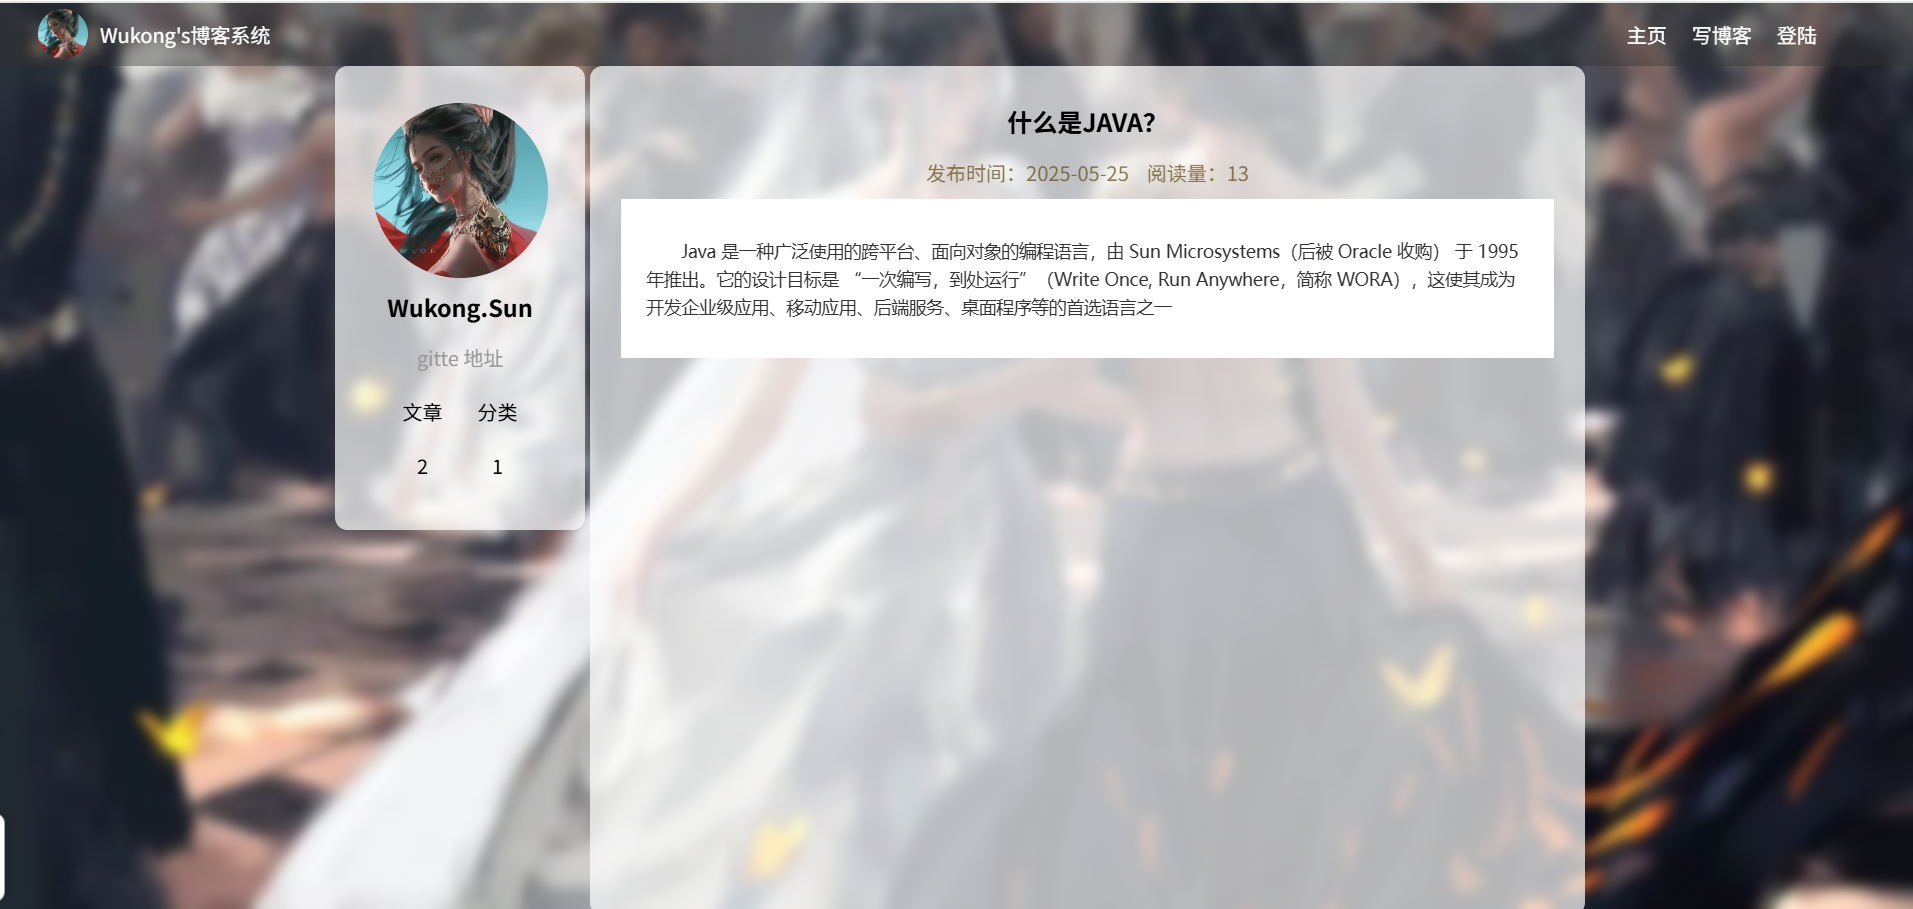
4.详情页面
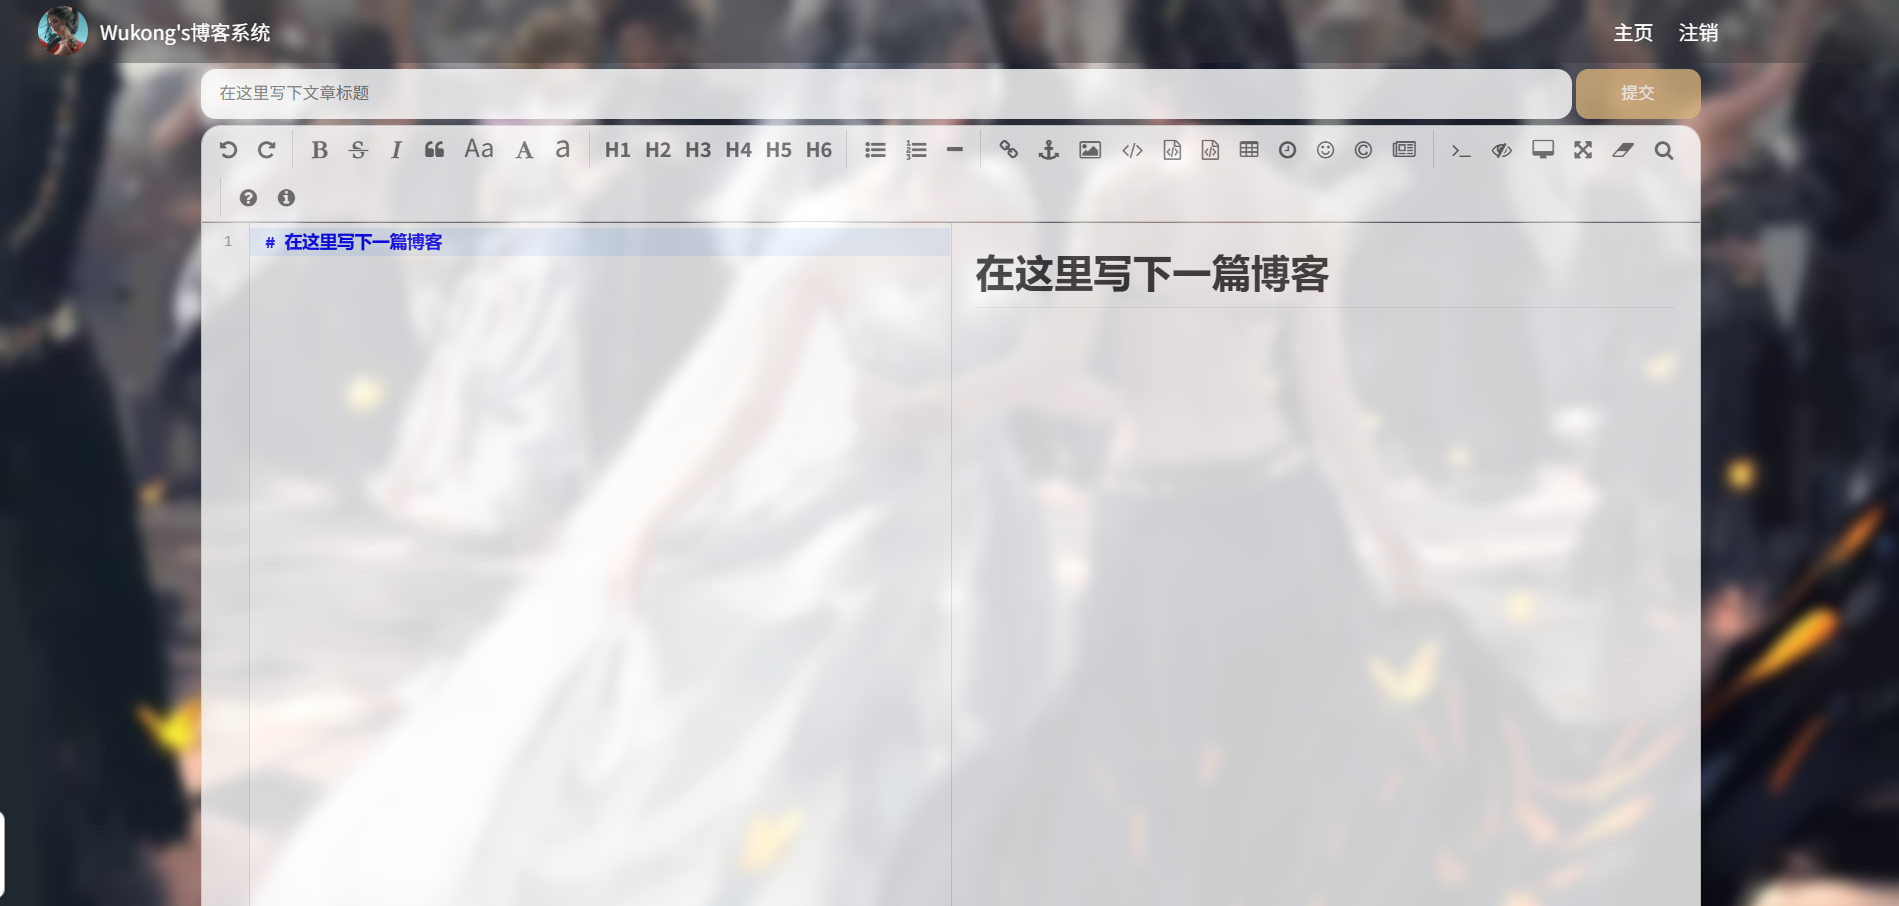
5.编辑页面
三.准备工作
1.用户表——userinfo
2.文章表——articleinfo
3.插入数据
四.创建项目
1.创建SpringBoot项目
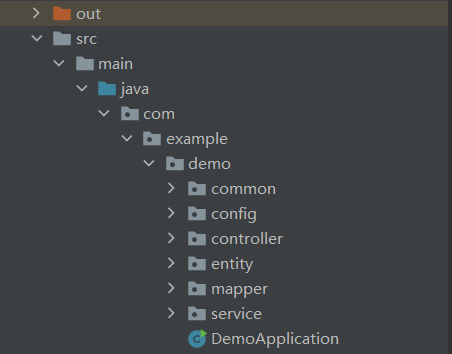
2.创建对应目录
3.准备前端页面
4.配置配置文件
五.项目公共模块
公共层——common 包
1.AjaxResult类
2.PasswordUtils类
3.UserSessionUtils类
4.AppVariable类
六.业务代码
(一)实体类——entity包
1.Userinfo类
2.Articleinfo类
3.UserinfoVO类
(二)持久层——mapper包
MyBatis
1.UserMapper接口
2.AriticleMapper接口
3.实现xml映射文件
(三)服务层——service包
1.UserService类
2.ArticleService类
(四)控制层——controller
SpringMVC中的核心组件:
关键注解:
1.UserController类
2.ArticleController类
(六)配置类——config包
拦截器
全局响应增强器
一.导入
什么是SSM框架?
1.Spirng框架
Spring 是一个轻量级的 Java 开发框架
核心特性:
IoC(控制反转)
通过 XML 配置或注解,将对象的创建和依赖关系管理交给 Spring 容器,减少代码耦合示例:
@Service
public class UserServiceImpl implements UserService {@Autowired  // 自动注入依赖private UserDao userDao;
}
AOP(面向切面编程)
通过代理模式实现横切关注点(如日志、事务)的统一管理,避免代码重复。
2.SpirngMVC
Spring MVC 是 Java 企业级开发中最流行的 Web 框架之一,它基于 MVC(Model-View-Controller)架构模式
二.项目介绍
项目源码:blog-system: 我的博客系统
“悟空博客” 是一款基于 SSM(Spring + Spring MVC + MyBatis)框架开发的博客平台,旨在为用户提供便捷的内容创作与分享空间
(一)项目功能
本项目围绕博客系统展开,涉及注册、登录、博客列表展示、博客详情查看、博客编写等功能:
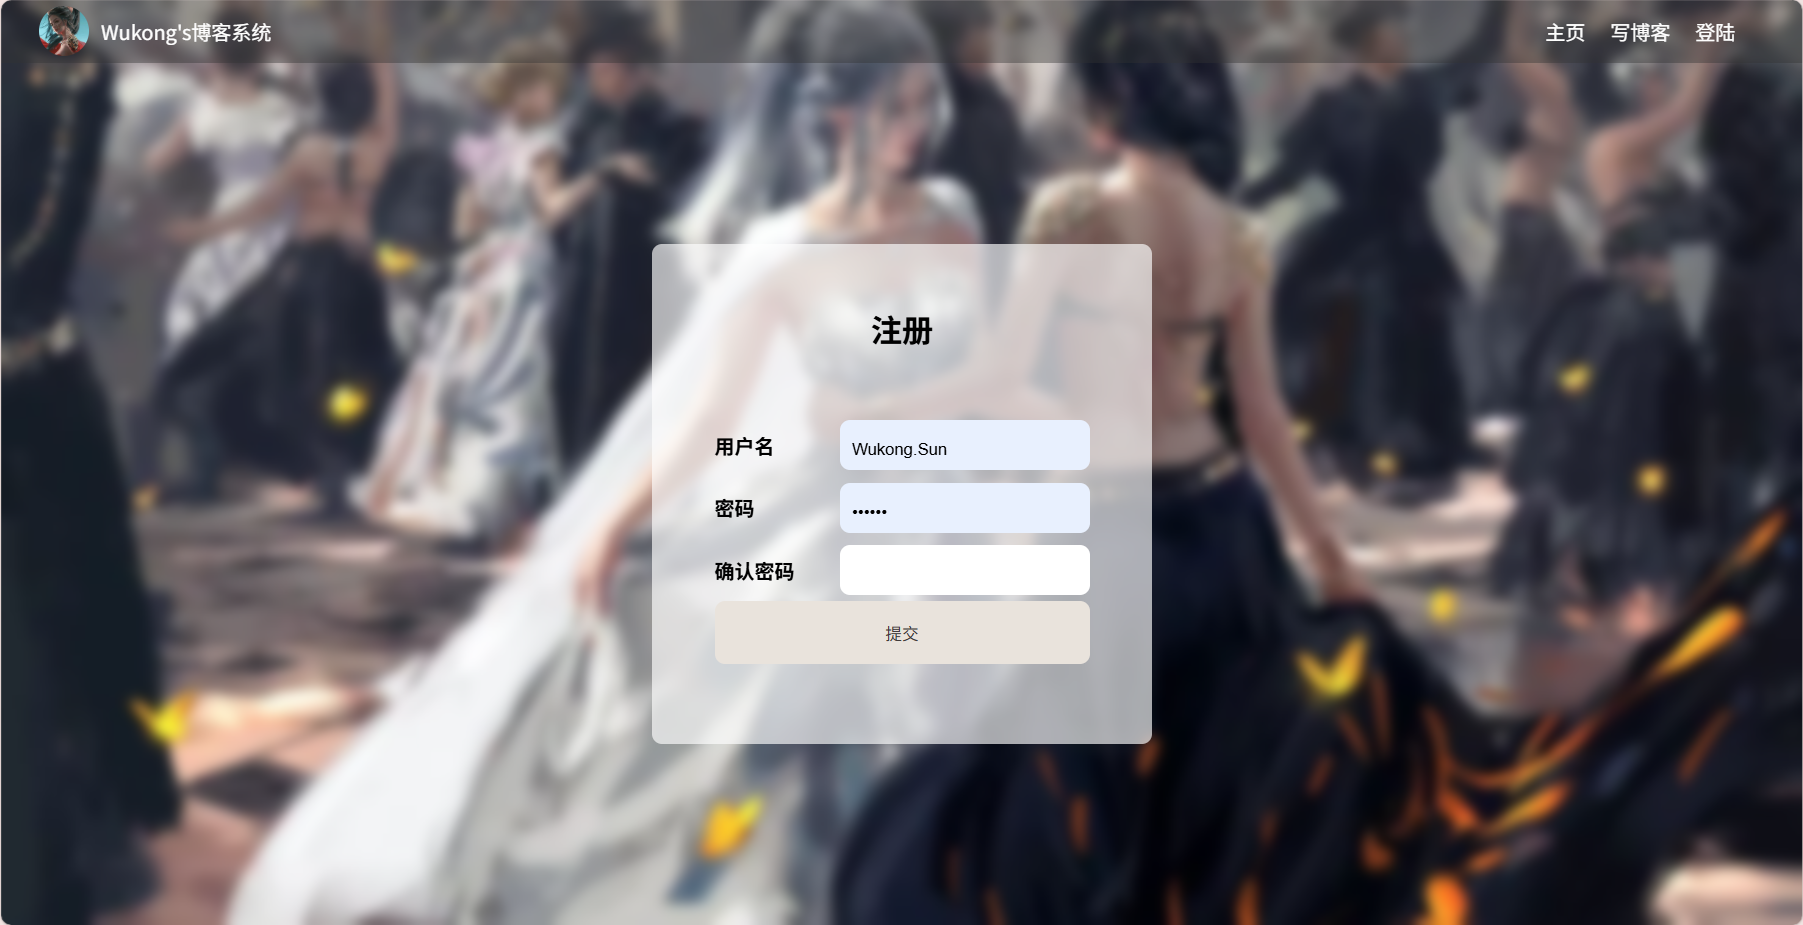
- 注册页面:提供用户名、密码及确认密码输入框,用户可在此完成注册操作,点击提交后跳转至登录页面。
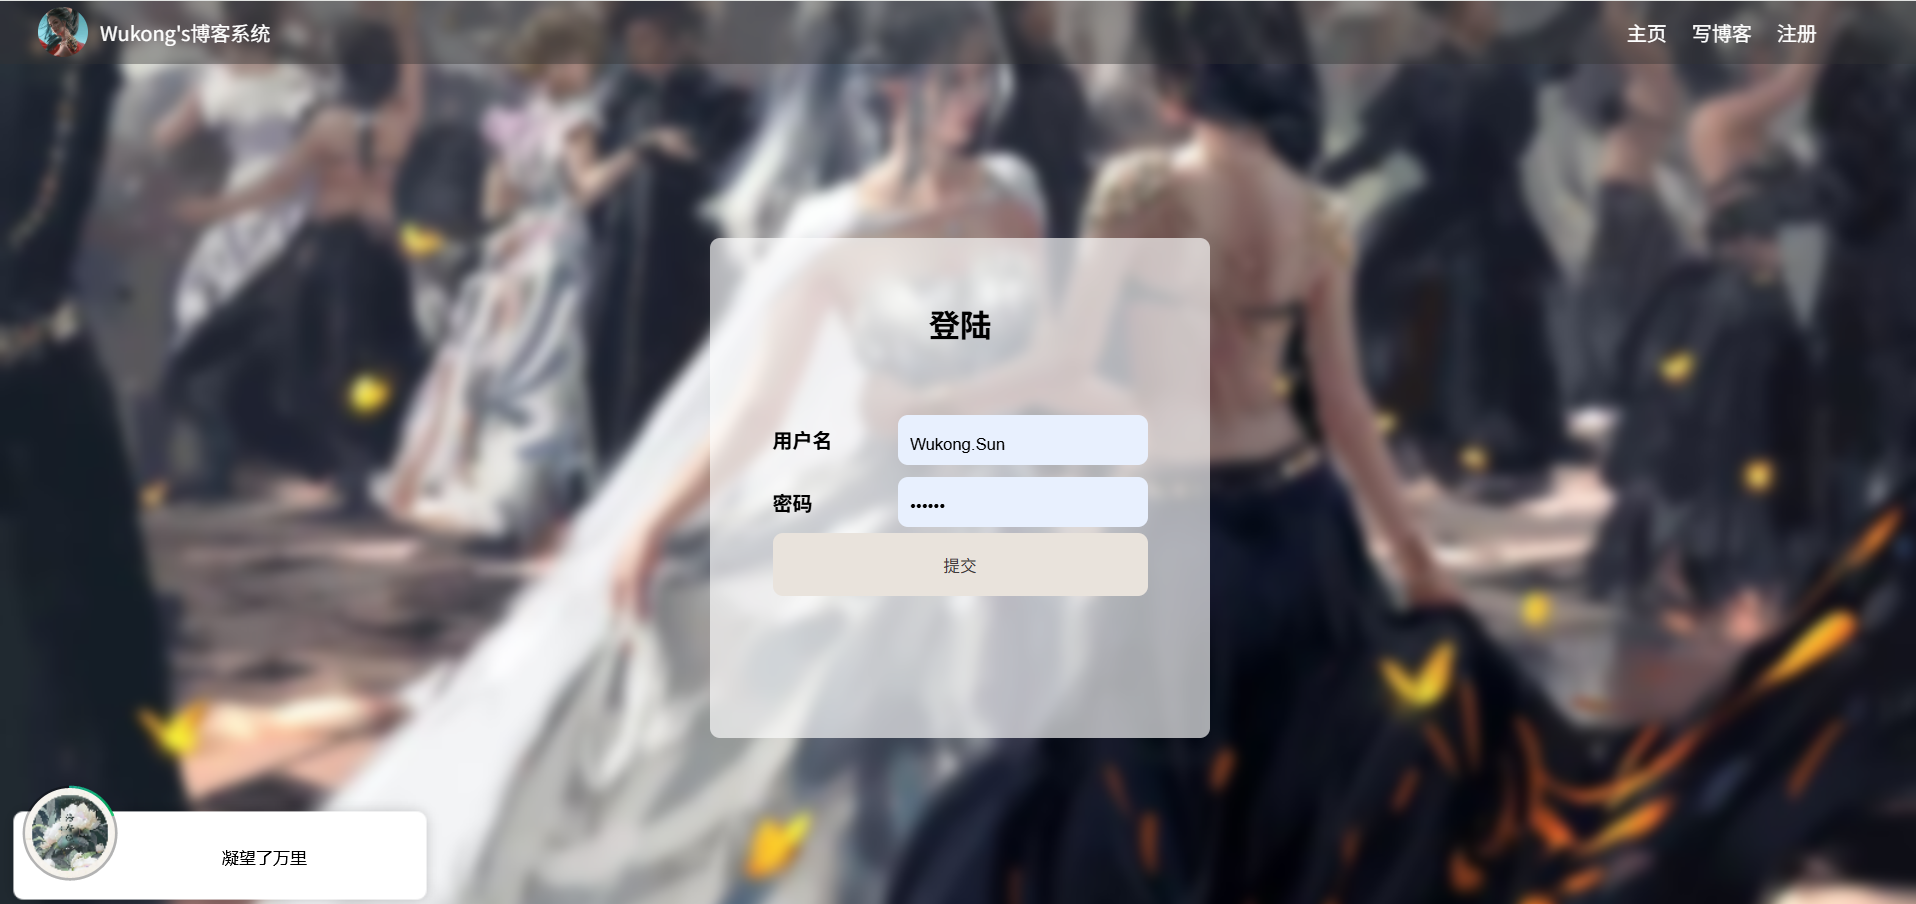
- 登录页面:设有用户名和密码输入框,用户输入已在后端数据库存储的账号信息,点击提交后,若验证通过,将跳转至列表页面。
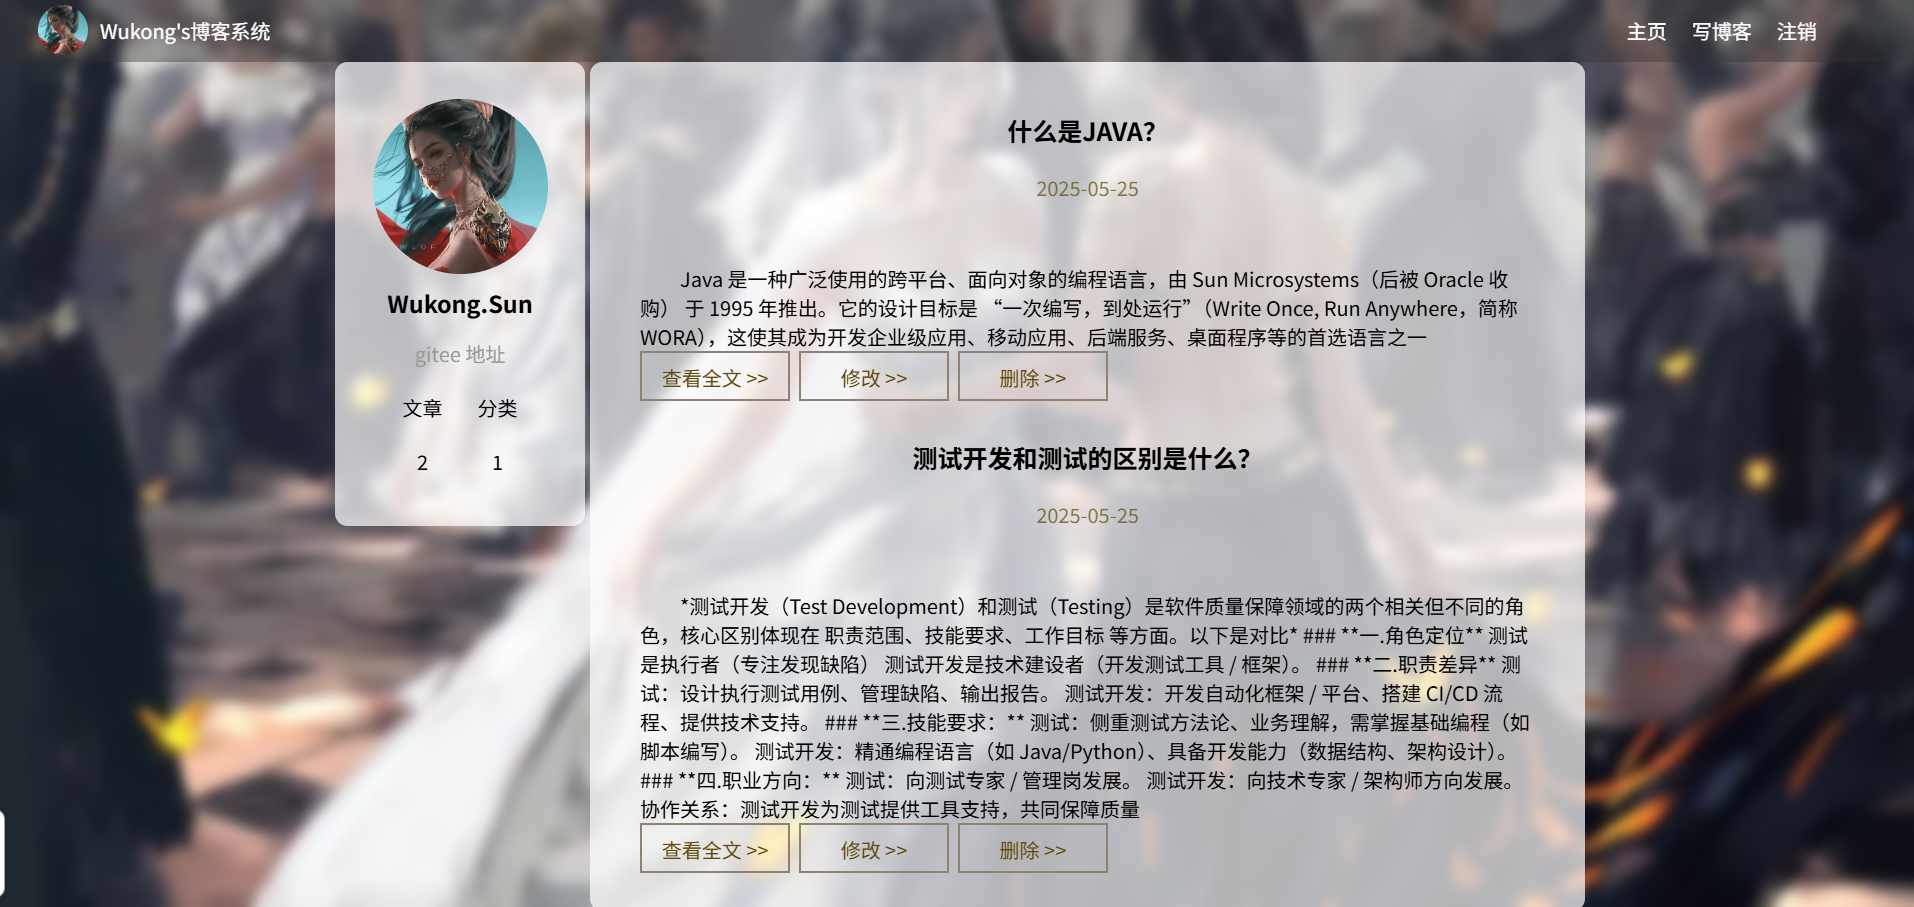
- 博客列表页面:展示已发布博客的标题、发布时间和内容概要,每篇博客旁有查看全文、修改、删除操作按钮。左侧呈现登录用户信息及文章数、分类数。右上角有主页(即当前列表页)、写博客、注销功能,可进行相应页面跳转。
- 博客详情页面:显示单篇博客完整内容,以及发布时间、阅读量等信息。
- 博客编辑页面:具备富文本编辑功能,用户可输入文章标题,在编辑区域撰写博客内容,完成后点击提交可发布博客,发布成功后跳转至列表页面
(二)页面展示
1.注册页面
2.登录页面
3.列表页面
4.详情页面
5.编辑页面
三.准备工作
数据库表
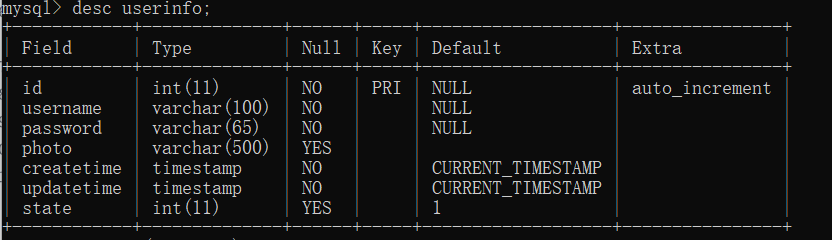
1.用户表——userinfo
CREATE TABLE userinfo (id int(11) NOT NULL AUTO_INCREMENT PRIMARY KEY,username varchar(100) NOT NULL,password varchar(65) NOT NULL,photo varchar(500),createtime timestamp NOT NULL DEFAULT CURRENT_TIMESTAMP,updatetime timestamp NOT NULL DEFAULT CURRENT_TIMESTAMP ON UPDATE CURRENT_TIMESTAMP,state int(11) DEFAULT 1
);
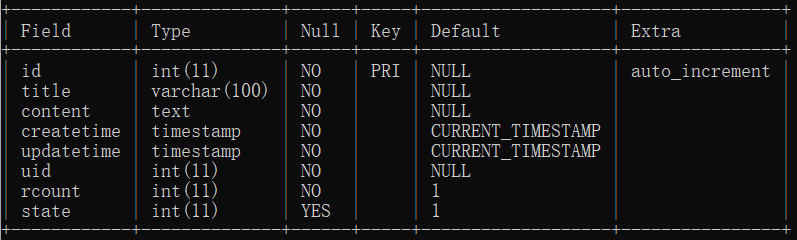
2.文章表——articleinfo
CREATE TABLE articleinfo (id int(11) NOT NULL AUTO_INCREMENT PRIMARY KEY,title varchar(100) NOT NULL,content text NOT NULL,createtime timestamp NOT NULL DEFAULT CURRENT_TIMESTAMP,updatetime timestamp NOT NULL DEFAULT CURRENT_TIMESTAMP ON UPDATE CURRENT_TIMESTAMP,uid int(11) NOT NULL,rcount int(11) DEFAULT 1,state int(11) DEFAULT 1
);
3.插入数据
INSERT INTO userinfo (username, password)
VALUES
("Wukong.Sun", "111111"),
("w_o.ogason", "123456");
四.创建项目
1.创建SpringBoot项目
添加Spring MVC 和MyBatis对应依赖
2.创建对应目录
3.准备前端页面
把博客系统静态⻚⾯拷⻉到static⽬录下
4.配置配置文件
server:port: 7070
spring:jackson:date-format: 'yyyy-MM-dd HH:mm:ss'time-zone: 'GMT+8'datasource:url: jdbc:mysql://127.0.0.1:3306/mycnblog?characterEncoding=utf8username: rootpassword: 111111driver-class-name: com.mysql.cj.jdbc.Driver
# 开启 MyBatis SQL 打印
mybatis:mapper-locations: classpath:mapper/*Mapper.xmlconfiguration:log-impl: org.apache.ibatis.logging.stdout.StdOutImpl
# 设置日志级别
logging:level:com:example:demo: debug# 对具体类机型日志级别设定
五.项目公共模块
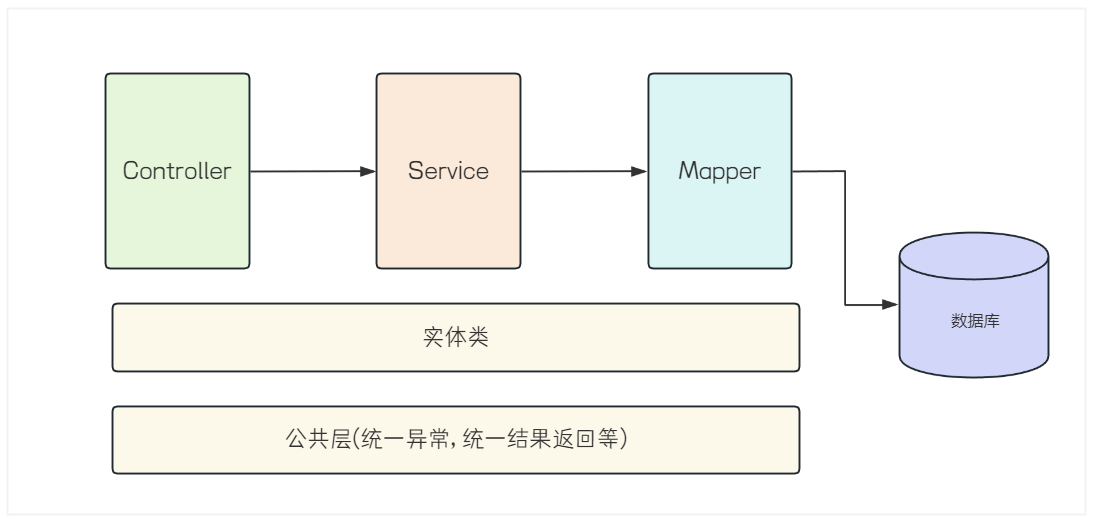
项⽬分为控制层(Controller), 服务层(Service), 持久层(Mapper). 各层之间的调⽤关系如下
公共层——common 包
我们先根据需求完成公共层代码的编写
1.AjaxResult类
前后端交互 响应结果类,用于封装 HTTP 请求的返回数据
返回统一格式的响应数据
@Data(来自 Lombok):自动生成getter、setter、toString等方法,简化代码。implements Serializable:实现序列化接口,确保该类实例可在网络传输或存储中使用
/*** 前后端交互响应结果类,用于封装 HTTP 请求的返回数据* 返回统一格式的响应数据* 在控制层(Controller)中使用*/
@Data
public class AjaxResult implements Serializable {// 状态码(如 200 成功,500 服务器错误)private Integer code;// 状态码的描述信息(如 "操作成功"、"参数错误")private String msg;// 返回的具体数据(如用户信息、列表数据等,可为 null)private Object data;/*** 成功响应方法* 接口处理请求成功时调用*/// 方法 1:默认状态码 200,无描述信息,带数据public static AjaxResult success(Object data) {AjaxResult result = new AjaxResult();result.setCode(200);result.setMsg("");result.setData(data);return result;}// 方法 2:自定义状态码,无描述信息,带数据public static AjaxResult success(int code, Object data) {AjaxResult result = new AjaxResult();result.setCode(code);result.setMsg("");result.setData(data);return result;}// 方法 3:自定义状态码、描述信息和数据public static AjaxResult success(int code, String msg, Object data) {AjaxResult result = new AjaxResult();result.setCode(code);result.setMsg(msg);result.setData(data);return result;}/*** 失败响应方法* 返回失败结果* 接口处理请求失败时调用*/// 方法 1:自定义状态码、描述信息,无数据(推荐)public static AjaxResult fail(int code, String msg) {AjaxResult result = new AjaxResult();result.setCode(code);result.setMsg(msg);result.setData(null);return result;}// 方法 2:自定义状态码、描述信息和数据(较少用)public static AjaxResult fail(int code, String msg, Object data) {AjaxResult result = new AjaxResult();result.setCode(code);result.setMsg(msg);result.setData(data);return result;}}
2.PasswordUtils类
用于:对密码进行加密、验证
目的:通过 加盐(Salt)+ 哈希(MD5) 的方式增强密码安全
public class PasswordUtils {/*** 1.加盐并生成密码** @param password 明文密码* @return 保存到数据库中的密码*/public static String encrypt(String password) {// 1.产生盐值(32位)String salt = UUID.randomUUID().toString().replace("-", "");// 2.生成加盐之后的密码String saltPassword = DigestUtils.md5DigestAsHex((salt + password).getBytes());// 3.生成最终密码(保存到数据库中的密码)【约定格式:32位盐值+$+32位加盐之后的密码】String finalPassword = salt + "$" + saltPassword;return finalPassword;}/*** 2.生成加盐的密码(方法1的重载)** @param password 明文* @param salt     固定的盐值* @return 最终密码*/public static String encrypt(String password, String salt) {// 1.生成一个加盐之后的密码String saltPassword = DigestUtils.md5DigestAsHex((salt + password).getBytes());// 2.生成最终的密码【约定格式:32位盐值+$+32位加盐之后的密码】String finalPassword = salt + "$" + saltPassword;return finalPassword;}/*** 3.验证密码** @param inputPassword 用户输入的明文密码* @param finalPassword 数据库保存的最终密码* @return*/public static boolean check(String inputPassword, String finalPassword) {if (StringUtils.hasLength(inputPassword) && StringUtils.hasLength(finalPassword) &&finalPassword.length() == 65) {// 1.得到盐值String salt = finalPassword.split("\\$")[0];// 2.使用之前加密的步骤,将明文密码和已经得到的盐值进行加密,生成最终的密码String confirmPassword = PasswordUtils.encrypt(inputPassword, salt);// 3.对比两个最终密码是否相同return confirmPassword.equals(finalPassword);}return false;}
}
3.UserSessionUtils类
用于:从 HTTP 请求中获取当前登录用户的信息。用户登录后通常会将用户信息存储在 HTTP Session(会话) 中
/*** 从 HTTP 请求中获取当前登录用户的信息*/
public class UserSessionUtils {/*** 通过静态方法直接获取当前登录用户,避免在代码中重复编写 Session 操作代码*/public static Userinfo getUser(HttpServletRequest request) {HttpSession session = request.getSession(false);if (session != null &&session.getAttribute(AppVariable.USER_SESSION_KEY) != null) {// 说明用户已经正常登录return (Userinfo) session.getAttribute(AppVariable.USER_SESSION_KEY);}return null;}
}
4.AppVariable类
常量类:AppVariable.USER_SESSION_KEY:一个常量字符串
作为:用户信息在 Session 中的唯一标识。
/*** 常量类,用于集中管理应用程序中的全局常量* 将常用的字符串、配置项等定义为静态常量*/
public class AppVariable {// 用户 session keypublic static final String USER_SESSION_KEY = "USER_SESSION_KEY";
}
六.业务代码
(一)实体类——entity包
配合 MyBatis 等持久层框架,实现 Java 对象与数据库表的字段映射
1.Userinfo类
用于:封装用户信息 为一个对象
@Data
public class Userinfo {private Integer id;private String username;private String password;private String photo;private LocalDateTime createtime;private LocalDateTime updatetime;private Integer state;
}
2.Articleinfo类
用于:封装文章信息
@Data
public class Articleinfo {private Integer id;//文章ID 主键private String title;private String content;@JsonFormat(pattern = "yyyy-MM-dd", timezone = "GMT+8")private LocalDateTime createtime;@JsonFormat(pattern = "yyyy-MM-dd", timezone = "GMT+8")private LocalDateTime updatetime;private Integer uid; //用户 ID(外键,关联作者)private Integer rcount;private Integer state;
}
3.UserinfoVO类
值对象,继承自 Userinfo 并增加“文章总数”字段
@Data
public class UserinfoVO extends Userinfo {private Integer artCount; // 此人发表的文章总数
}
(二)持久层——mapper包
MyBatis
- 简介:Java 持久层框架,用于灵活操作数据库
- 应用场景:例如本次项目—在用户/文章管理模块中,使用 MyBatis 可以方便地实现用户/文章信息的增删改查

1.UserMapper接口
是一个基于 MyBatis 的用户数据访问接口,用于操作 userinfo 表
接口:实现userinfo对象与数据库userinfo表的字段映射,用于操作userinfo表
@Mapper
public interface UserMapper {// 注册int reg(Userinfo userinfo);// 根据用户查询 userinfo 对象Userinfo getUserByName(@Param("username") String username);Userinfo getUserById(@Param("id") Integer id);}
2.AriticleMapper接口
是一个基于 MyBatis 的 文章数据访问接口,用于操作 articleinfo 表
@Mapper
public interface ArticleMapper {int getArtCountByUid(@Param("uid") Integer uid);List<Articleinfo> getMyList(@Param("uid") Integer uid);int del(@Param("id") Integer id, @Param("uid") Integer uid);Articleinfo getDetail(@Param("id") Integer id);int incrRCount(@Param("id") Integer id);int add(Articleinfo articleinfo);int update(Articleinfo articleinfo);List<Articleinfo> getListByPage(@Param("psize") Integer psize,@Param("offsize") Integer offsize);int getCount();}
3.实现xml映射文件
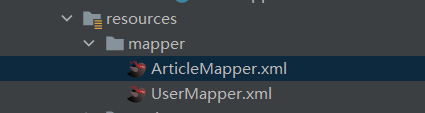
用于实现 ArticleMapper/ UserMapper接口中定义的方法
<?xml version="1.0" encoding="UTF-8"?>
<!DOCTYPE mapper PUBLIC "-//mybatis.org//DTD Mapper 3.0//EN" "http://mybatis.org/dtd/mybatis-3-mapper.dtd">
<mapper namespace="com.example.demo.mapper.ArticleMapper"><select id="getArtCountByUid" resultType="Integer">select count(*) from articleinfo where uid=#{uid}</select><select id="getMyList" resultType="com.example.demo.entity.Articleinfo">select * from articleinfo where uid=#{uid}</select><delete id="del">delete from articleinfo where id=#{id} and uid=#{uid}</delete><select id="getDetail" resultType="com.example.demo.entity.Articleinfo">select * from articleinfo where id=#{id}</select><update id="incrRCount">update articleinfo set rcount=rcount+1 where id=#{id}</update><insert id="add">insert into articleinfo(title,content,uid) values(#{title},#{content},#{uid})</insert><update id="update">update articleinfo set title=#{title},content=#{content},updatetime=#{updatetime}where id=#{id} and uid=#{uid}</update><select id="getListByPage" resultType="com.example.demo.entity.Articleinfo">select * from articleinfo limit #{psize} offset #{offsize}</select><select id="getCount" resultType="Integer">select count(*) from articleinfo</select></mapper>
<?xml version="1.0" encoding="UTF-8"?>
<!DOCTYPE mapper PUBLIC "-//mybatis.org//DTD Mapper 3.0//EN" "http://mybatis.org/dtd/mybatis-3-mapper.dtd">
<mapper namespace="com.example.demo.mapper.UserMapper"><insert id="reg">insert into userinfo(username,password) values(#{username},#{password})</insert><select id="getUserByName" resultType="com.example.demo.entity.Userinfo">select * from userinfo where username=#{username}</select><select id="getUserById" resultType="com.example.demo.entity.Userinfo">select * from userinfo where id=#{id}</select></mapper>(三)服务层——service包
负责处理用户相关的业务逻辑
关键注解:
1. @Service
2. @Resource

1.UserService类
负责处理用户相关的业务逻辑
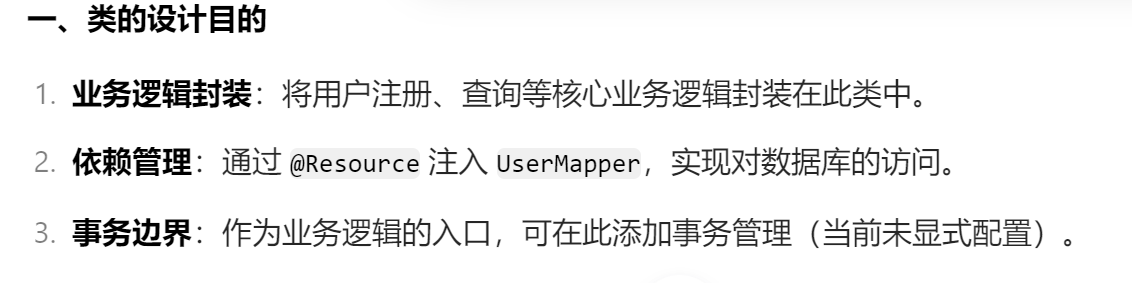
@Service
public class UserService {@Resourceprivate UserMapper userMapper;public int reg(Userinfo userinfo) {return userMapper.reg(userinfo);}public Userinfo getUserByName(String username) {return userMapper.getUserByName(username);}public Userinfo getUserById(Integer id) {return userMapper.getUserById(id);}
}
2.ArticleService类
负责处理文章相关的业务逻辑

@Service
public class ArticleService {@Resourceprivate ArticleMapper articleMapper;public int getArtCountByUid(Integer uid) {return articleMapper.getArtCountByUid(uid);}public List<Articleinfo> getMyList(Integer uid) {return articleMapper.getMyList(uid);}public int del(Integer id, Integer uid) {return articleMapper.del(id, uid);}public Articleinfo getDetail(Integer id) {return articleMapper.getDetail(id);}public int incrRCount(Integer id) {return articleMapper.incrRCount(id);}public int add(Articleinfo articleinfo) {return articleMapper.add(articleinfo);}public int update(Articleinfo articleinfo) {return articleMapper.update(articleinfo);}public List<Articleinfo> getListByPage(Integer psize, Integer offsize) {return articleMapper.getListByPage(psize, offsize);}public int getCount() {return articleMapper.getCount();}}
(四)控制层——controller
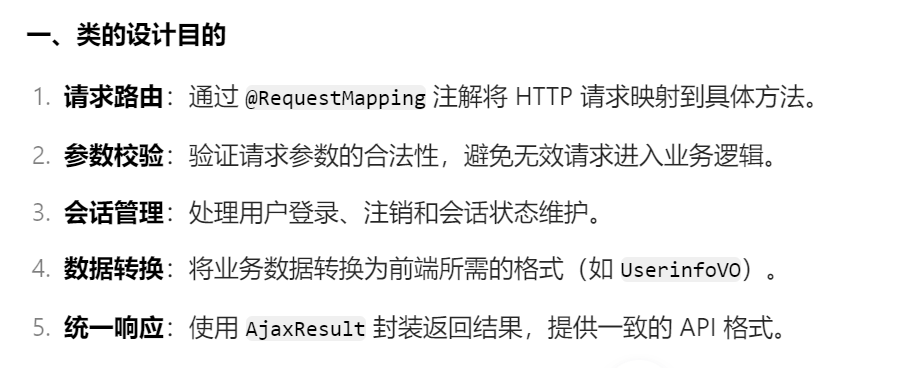
负责处理HTTP请求
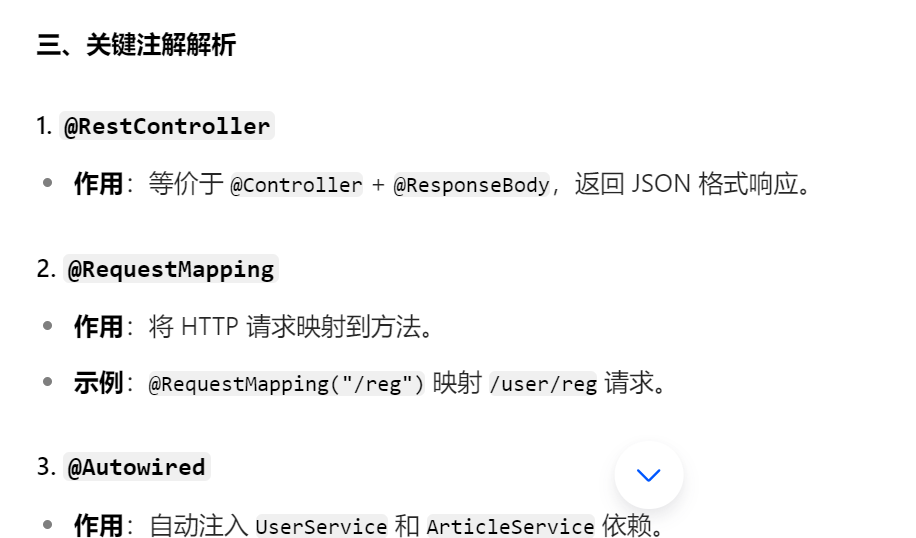
SpringMVC中的核心组件:

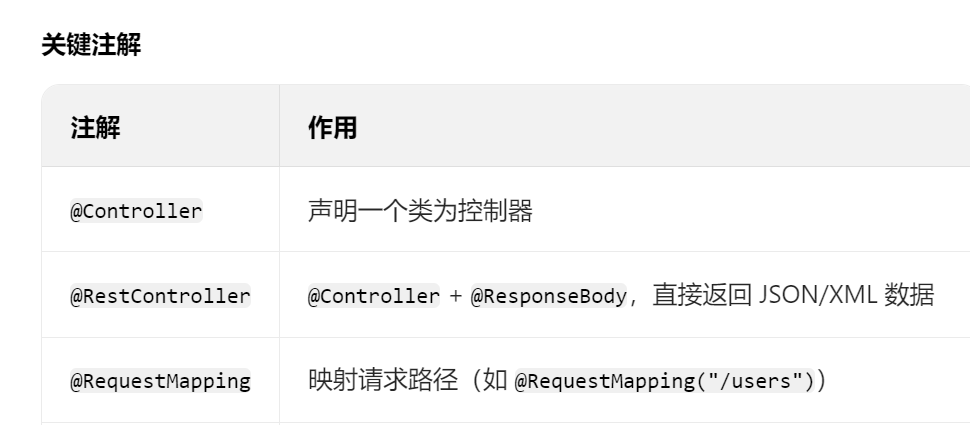
关键注解:
1.@RestControlelr
2.@RequestMapping
3.@AutoWired
1.UserController类
负责处理用户相关的HTTP请求
@RestController
@RequestMapping("/user")
public class UserController {@Autowiredprivate UserService userService;@Autowiredprivate ArticleService articleService;@RequestMapping("/reg")public AjaxResult reg(Userinfo userinfo) {// 非空效验和参数有效性效验if (userinfo == null || !StringUtils.hasLength(userinfo.getUsername()) ||!StringUtils.hasLength(userinfo.getPassword())) {return AjaxResult.fail(-1, "非法参数");}// 密码加盐处理userinfo.setPassword(PasswordUtils.encrypt(userinfo.getPassword()));return AjaxResult.success(userService.reg(userinfo));}@RequestMapping("/login")public AjaxResult login(HttpServletRequest request, String username, String password) {// 1.非空效验if (!StringUtils.hasLength(username) || !StringUtils.hasLength(password)) {return AjaxResult.fail(-1, "非法请求");}// 2.查询数据库Userinfo userinfo = userService.getUserByName(username);if (userinfo != null && userinfo.getId() > 0) {   // 有效的用户// 两个密码是否相同if (PasswordUtils.check(password, userinfo.getPassword())) {// 登录成功// 将用户存储到 sessionHttpSession session = request.getSession();session.setAttribute(AppVariable.USER_SESSION_KEY, userinfo);userinfo.setPassword(""); // 返回前端之前,隐藏敏感(密码)信息return AjaxResult.success(userinfo);}}return AjaxResult.success(0, null);}@RequestMapping("/showinfo")public AjaxResult showInfo(HttpServletRequest request) {UserinfoVO userinfoVO = new UserinfoVO();// 1.得到当前登录用户(从 session 中获取)Userinfo userinfo = UserSessionUtils.getUser(request);if (userinfo == null) {return AjaxResult.fail(-1, "非法请求");}// Spring 提供的深克隆方法BeanUtils.copyProperties(userinfo, userinfoVO);// 2.得到用户发表文章的总数userinfoVO.setArtCount(articleService.getArtCountByUid(userinfo.getId()));return AjaxResult.success(userinfoVO);}/*** 注销(退出登录)** @param session* @return*/@RequestMapping("/logout")public AjaxResult logout(HttpSession session) {session.removeAttribute(AppVariable.USER_SESSION_KEY);return AjaxResult.success(1);}/*** 根据ID查询用户** */@RequestMapping("/getuserbyid")public AjaxResult getUserById(Integer id) {if (id == null || id <= 0) {// 无效参数return AjaxResult.fail(-1, "非法参数");}Userinfo userinfo = userService.getUserById(id);if (userinfo == null || userinfo.getId() <= 0) {// 无效参数return AjaxResult.fail(-1, "非法参数");}// 去除 userinfo 中的敏感数据,ex:密码userinfo.setPassword("");UserinfoVO userinfoVO = new UserinfoVO();BeanUtils.copyProperties(userinfo, userinfoVO);// 查询当前用户发表的文章数userinfoVO.setArtCount(articleService.getArtCountByUid(id));return AjaxResult.success(userinfoVO);}}
2.ArticleController类
负责处理文章相关的HTTP请求
@RestController
@RequestMapping("/art")
public class ArticleController {@Autowiredprivate ArticleService articleService;/*** 获取当前用户的文章列表* */@RequestMapping("/mylist")public AjaxResult getMyList(HttpServletRequest request) {//从 Session 中获取当前用户信息Userinfo userinfo = UserSessionUtils.getUser(request);//校验用户是否登录if (userinfo == null) {return AjaxResult.fail(-1, "非法请求");}//调用 Service层方法查询文章列表List<Articleinfo> list = articleService.getMyList(userinfo.getId());//返回响应数据return AjaxResult.success(list);}/*** 删除文章* */@RequestMapping("/del")public AjaxResult del(HttpServletRequest request, Integer id) {//参数校验:检查id是否合法(非空且大于 0)if (id == null || id <= 0) {return AjaxResult.fail(-1, "参数异常");}//从session中获取当前用户信息Userinfo user = UserSessionUtils.getUser(request);//检验用户是否登录if (user == null) {return AjaxResult.fail(-2, "用户未登录");}//调用service层方法删除文章return AjaxResult.success(articleService.del(id, user.getId()));}/*** 获取文章详情* */@RequestMapping("/detail")public AjaxResult getDetail(Integer id) {//检验文章idif (id == null || id <= 0) {return AjaxResult.fail(-1, "非法参数");}//调用service层方法获取文章详情//将结果封装到AjaxResult中返回 成功的响应数据return AjaxResult.success(articleService.getDetail(id));}/*** 增加文章阅读量* */@RequestMapping("/incr-rcount")public AjaxResult incrRCount(Integer id) {if (id != null && id > 0) {return AjaxResult.success(articleService.incrRCount(id));}return AjaxResult.fail(-1, "未知错误");}/*** 增加文章* */@RequestMapping("/add")public AjaxResult add(HttpServletRequest request, Articleinfo articleinfo) {// 参数校验:articleinfo对象不能为空,title字段,content字段不能为空或仅含空格if (articleinfo == null || !StringUtils.hasLength(articleinfo.getTitle()) ||!StringUtils.hasLength(articleinfo.getContent())) {// 返回失败响应return AjaxResult.fail(-1, "非法参数");}//从session中获取当前用户信息Userinfo userinfo = UserSessionUtils.getUser(request);//检验用户是否登录:用户必须存在且id合法if (userinfo == null || userinfo.getId() <= 0) {return AjaxResult.fail(-2, "无效的登录用户");}// 将当前用户 ID(userinfo.getId())设置到文章对象中// 确保文章与用户关联articleinfo.setUid(userinfo.getId());// 调用 Service 层方法保存文章,将结果封装到AjaxResult中 并返回成功的响应结果return AjaxResult.success(articleService.add(articleinfo));}/*** 更新文章* */@RequestMapping("/update")public AjaxResult update(HttpServletRequest request, Articleinfo articleinfo) {//参数校验if (articleinfo == null || !StringUtils.hasLength(articleinfo.getTitle()) ||!StringUtils.hasLength(articleinfo.getContent()) ||articleinfo.getId() == null) {return AjaxResult.fail(-1, "非法参数");}// 从session中获取当前用户信息Userinfo userinfo = UserSessionUtils.getUser(request);//if (userinfo == null && userinfo.getId() == null) {return AjaxResult.fail(-2, "无效用户");}//设置文章的uid为当前登录用户 ID(确保文章归属于正确用户)//设置文章的updatetime为当前时间(记录更新时间)articleinfo.setUid(userinfo.getId());articleinfo.setUpdatetime(LocalDateTime.now());return AjaxResult.success(articleService.update(articleinfo));}/*** 查询列表根据分页** @param pindex 当前页码(从1开始)* @param psize  每页显示条数* @return*/@RequestMapping("/listbypage")public AjaxResult getListByPage(Integer pindex, Integer psize) {// 1.参数校正if (pindex == null || pindex <= 1) {pindex = 1;}if (psize == null || psize <= 1) {psize = 2;}// 分页公式的值 = (当前页码-1)*每页显示条数int offset = (pindex - 1) * psize;// 文章列表数据List<Articleinfo> list = articleService.getListByPage(psize, offset);// 当前列表总共有多少页// a.总共有多少条数据int totalCount = articleService.getCount();// b.总条数/psize(每页显示条数)double pcountdb = totalCount / (psize * 1.0);// c.使用进一法得到总页数int pcount = (int) Math.ceil(pcountdb);HashMap<String, Object> result = new HashMap<>();result.put("list", list);result.put("pcount", pcount);return AjaxResult.success(result);}}
(六)配置类——config包
拦截器
是spirng mvc中的核心组件之一

@Configuration:声明这是一个配置类
@Configuration
public class AppConfig implements WebMvcConfigurer {//拦截器注册方法@Override//InterceptorRegistry:Spring 提供的拦截器注册器,用于注册拦截器并配置拦截规则public void addInterceptors(InterceptorRegistry registry) {//. 添加登录拦截器registry.addInterceptor(new LoginInterceptor())//配置拦截路径.addPathPatterns("/**").excludePathPatterns("/css/**").excludePathPatterns("/editor.md/**").excludePathPatterns("/img/**").excludePathPatterns("/js/**").excludePathPatterns("/login.html").excludePathPatterns("/reg.html").excludePathPatterns("/blog_list.html").excludePathPatterns("/blog_content.html").excludePathPatterns("/art/detail").excludePathPatterns("/art/incr-rcount").excludePathPatterns("/user/getuserbyid").excludePathPatterns("/art/listbypage").excludePathPatterns("/user/login").excludePathPatterns("/user/reg");}
}
/*** 登录拦截器,实现HandlerInterceptor接口*/
public class LoginInterceptor implements HandlerInterceptor {/*** true -> 用户已登录* false -> 用户未登录*.* @param request* @param response* @param handler* @return* @throws Exception*/@Overridepublic boolean preHandle(HttpServletRequest request, HttpServletResponse response, Object handler) throws Exception {//获取Session对象HttpSession session = request.getSession(false);//检验登录状态:Session存在,Session中存在用户信息if (session != null && session.getAttribute(AppVariable.USER_SESSION_KEY) != null) {// 登录成功时,将用户信息存入 Session:System.out.println("当前登录用户为:" +((Userinfo) session.getAttribute(AppVariable.USER_SESSION_KEY)).getUsername());return true;}// 未登录:重定向到登录页面response.sendRedirect("/login.html");return false;}
}
全局响应增强器
用于:统一 API 接口的返回(响应)格式,确保所有 Controller 方法的返回值都符合预定义的结构
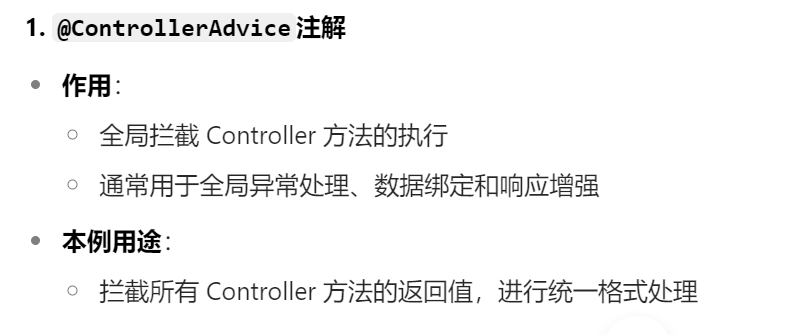
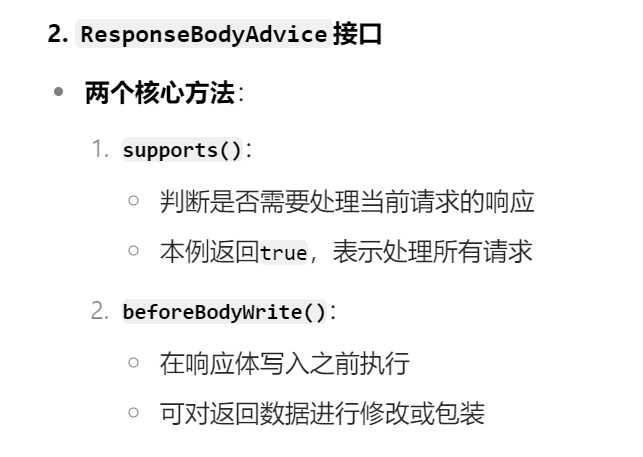
/*** 实现统一数据返回的保底类* 说明:在返回数据之前,检测数据的类型是否为统一的对象,如果不是,封装成统一的对象*/
@ControllerAdvice
public class ResponseAdvice implements ResponseBodyAdvice {@Autowiredprivate ObjectMapper objectMapper;/*** 开关,如果是true才会调用beforeBodyWrite*/@Overridepublic boolean supports(MethodParameter returnType, Class converterType) {return true;}/*** 对数据格式进行效验和封装*/@SneakyThrows@Overridepublic Object beforeBodyWrite(Object body, MethodParameter returnType, MediaType selectedContentType, Class selectedConverterType, ServerHttpRequest request, ServerHttpResponse response) {1. 如果已经是AjaxResult类型,直接返回if (body instanceof AjaxResult) return body;/// 2. 处理String类型(特殊情况)if (body instanceof String) {return objectMapper.writeValueAsString(AjaxResult.success(body));}//3. 其他类型统一包装return AjaxResult.success(body);}
}