05 APP 自动化- Appium 单点触控 多点触控
文章目录
- 一、单点触控
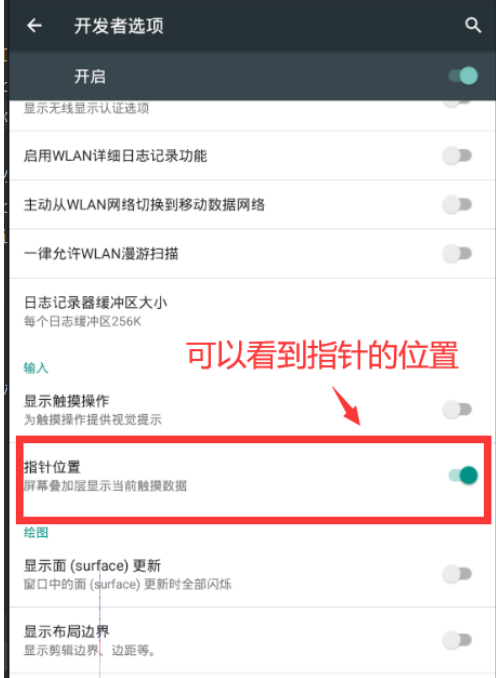
- 查看指针的指针位置
- 实现手势密码:
- 二、多点触控
一、单点触控
查看指针的指针位置
方便查看手势密码-九宫格每个点的坐标
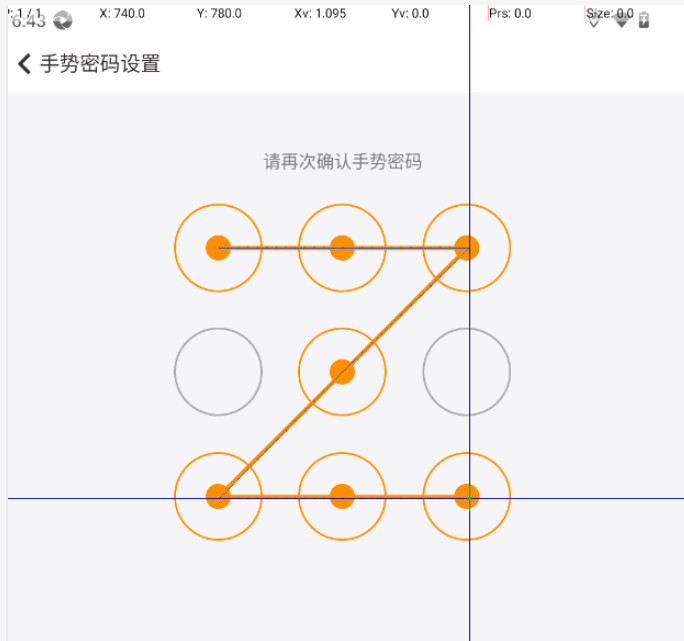
实现手势密码:
- 执行手势操作: 按压起点 -> 移动到下一点 -> 依次移动 -> 释放,最后调用perform()
- 实现的效果如下图:
- 代码实现:
# -*- coding=utf-8 -*-
from appium import webdriver
from appium.options.android import UiAutomator2Options
from appium.webdriver.common.appiumby import AppiumBy
# 旧方法(TouchAction,已弃用)
# 新方法(W3C Actions API)
from selenium.webdriver.common.action_chains import ActionChains
from selenium.webdriver.common.actions import interaction
from selenium.webdriver.common.actions.action_builder import ActionBuilder
from selenium.webdriver.common.actions.pointer_input import PointerInput# 设置操作终端的配置参数
desired_caps = dict(platformName='Android', # 指定操作系统platformVersion='12',# 指定操作系统版本automationName='Uiautomator2',# 默认框架deviceName='127.0.0.1:62001',# 指定设备名称appPackage='com.mymoney',# 被操作的应用程序包名appActivity='com.mymoney.biz.splash.SplashScreenActivity',# 启动页面noReset='true',# true--不重置  false--重置app='F:\Pycharm\AppAuto\Mymoney_v13.2.18.apk'  # apk文件所在路径
)
# 发送命令给 appium server
driver = webdriver.Remote('http://127.0.0.1:4723', options=UiAutomator2Options().load_capabilities(desired_caps))
# 打开随手记app->进入我的页面->点击设置一栏->点击密码保护一栏->开启密码保护->点击手势密码->进入手势密码设置页面
# 1. 初始化 ActionChains 和触摸输入源
actions = ActionChains(driver)
actions.w3c_actions = ActionBuilder(driver, mouse=PointerInput(interaction.POINTER_TOUCH, "touch"))# 2. 定义手势轨迹的坐标点(假设已确定坐标,或从 bounds 解析计算 )
# 示例坐标,需根据实际应用调整
point_1 = (345, 384)
point_2 = (540, 384)
point_3 = (740, 384)
point_5 = (540, 580)
point_7 = (345, 780)
point_8 = (540, 780)
point_9 = (740, 780)# 3. 执行手势操作:按压起点 -> 移动到下一点 -> 依次移动 -> 释放
actions.w3c_actions.pointer_action.move_to_location(*point_1)  # 移动到起点(不按压时,可先移动调整位置)
actions.w3c_actions.pointer_action.pointer_down()  # 按压起点
actions.w3c_actions.pointer_action.pause(0.5)  # 暂停 0.5 秒,模拟真实触摸停顿actions.w3c_actions.pointer_action.move_to_location(*point_2)  # 移动到点 2
actions.w3c_actions.pointer_action.pause(0.5)actions.w3c_actions.pointer_action.move_to_location(*point_3)  # 移动到点 3
actions.w3c_actions.pointer_action.pause(0.5)actions.w3c_actions.pointer_action.move_to_location(*point_5)  # 移动到点 5
actions.w3c_actions.pointer_action.pause(0.5)actions.w3c_actions.pointer_action.move_to_location(*point_7)  # 移动到点 7
actions.w3c_actions.pointer_action.pause(0.5)actions.w3c_actions.pointer_action.move_to_location(*point_8)  # 移动到点 8
actions.w3c_actions.pointer_action.pause(0.5)actions.w3c_actions.pointer_action.move_to_location(*point_9)  # 移动到点 9
actions.w3c_actions.pointer_action.pause(0.5)actions.w3c_actions.pointer_action.release()  # 释放触摸# 4. 执行动作链
actions.perform()
二、多点触控
以放大缩小图片为例:
# -*- coding=utf-8 -*-
from time import sleepfrom appium import webdriver
from appium.options.android import UiAutomator2Options
# 旧方法(TouchAction,已弃用)
# 新方法(W3C Actions API)
from selenium.webdriver.common.actions import interaction
from selenium.webdriver.common.actions.action_builder import ActionBuilder
from appium.webdriver.common.appiumby import AppiumBy# 设置操作终端的配置参数
desired_caps = dict(platformName='Android', # 指定操作系统platformVersion='12',# 指定操作系统版本automationName='Uiautomator2',# 默认框架deviceName='127.0.0.1:62001',# 指定设备名称appPackage='com.android.browser',# 被操作的应用程序包名noReset='true',# true--不重置  false--重置
)
# 发送命令给 appium server
driver = webdriver.Remote('http://127.0.0.1:4723', options=UiAutomator2Options().load_capabilities(desired_caps))
# 打开系统自带浏览器->进入百度搜索页面->任意搜索一张图片->进入图片页面
# 定位到需要缩放的元素(如图片)
element = driver.find_element(AppiumBy.ID,"com.android.browser:id/main_content")
element_location = element.location  # 获取元素位置
element_size = element.size          # 获取元素尺寸# 计算缩放中心点
center_x = element_location['x'] + element_size['width'] / 2
center_y = element_location['y'] + element_size['height'] / 2# 定义双指初始位置和目标位置(根据缩放方向调整)
# 示例:双指从中心向两侧张开(放大)
start_x1 = center_x - 50  # 左手指起始位置
start_y1 = center_y
end_x1 = center_x - 150   # 左手指终点位置
end_y1 = center_ystart_x2 = center_x + 50  # 右手指起始位置
start_y2 = center_y
end_x2 = center_x + 150   # 右手指终点位置
end_y2 = center_y# 创建 ActionBuilder 并添加两个触摸输入源(手指)
actions = ActionBuilder(driver)#---------------------放大图片---------------------------
# 第一根手指(左手)的操作
finger1 = actions.add_pointer_input(interaction.POINTER_TOUCH, "finger1")
finger1.create_pointer_move(duration=0, x=start_x1, y=start_y1)  # 移动到起始位置
finger1.create_pointer_down()  # 按下
finger1.create_pointer_move(duration=500, x=end_x1, y=end_y1)  # 移动到终点(模拟张开)
finger1.create_pointer_up(button=0)    # 抬起# 第二根手指(右手)的操作(与第一根手指同时进行)
finger2 = actions.add_pointer_input(interaction.POINTER_TOUCH, "finger2")
finger2.create_pointer_move(duration=0, x=start_x2, y=start_y2)  # 移动到起始位置
finger2.create_pointer_down()  # 按下(与第一根手指同步)
finger2.create_pointer_move(duration=500, x=end_x2, y=end_y2)  # 移动到终点(模拟张开)
finger2.create_pointer_up(button=0)    # 抬起# 执行多点触控操作
actions.perform()sleep(3)#---------------------缩小图片---------------------------
# 第一根手指(左手)的操作
finger3 = actions.add_pointer_input(interaction.POINTER_TOUCH, "finger3")
finger3.create_pointer_move(duration=0, x=end_x1, y=end_y1)  # 移动到起始位置
finger3.create_pointer_down()  # 按下
finger3.create_pointer_move(duration=500, x=start_x1, y=start_y1)  # 移动到终点(模拟张开)
finger3.create_pointer_up(button=0)    # 抬起# 第二根手指(右手)的操作(与第一根手指同时进行)
finger4 = actions.add_pointer_input(interaction.POINTER_TOUCH, "finger4")
finger4.create_pointer_move(duration=0, x=end_x2, y=end_y2)  # 移动到起始位置
finger4.create_pointer_down()  # 按下(与第一根手指同步)
finger4.create_pointer_move(duration=500, x=start_x2, y=start_y2)  # 移动到终点(模拟张开)
finger4.create_pointer_up(button=0)    # 抬起# 执行多点触控操作
actions.perform()