《仿盒马》app开发技术分享-- 订单列表页(端云一体)
开发准备
上一节我们实现了订单详情的展示,但是我们的确认订单页面只在下单成功后才会出现供用户查看,现在我们要有一个常驻的入口让用户去随时查看自己的订单以及订单状态,订单状态分为多个,还需要给用户提供切换的功能
功能分析
要实现这么一个功能我们首先就需要实现页面的切换功能,这里我们使用tabs组件,之后我们在tabcontent中添加对应的页面组件,对应当前展示的订单状态,分别有待发货、待收货、已完成这些状态,我们需要在切换到对应页面的时候进行订单的查询,注意tabcontent加载后再次切换时不会再执行生命周期方法,我们还需要进行切换时的请求处理,保证订单列表的实时性。同时要注意查询出的订单要是当前用户对应的订单,在列表展示的时候因为我们还需要展示订单的部分内容,所以还需要根据对应的product_id 查询出订单商品列表的图片,让我们的数据更丰富
代码实现
首先实现一个切换的页面,并且添加对应的组件,这里我们暂时实现一个,其他的我们如法炮制即可,我们来实现待发货页面
首先创建tabs以及对应的内容
import { OrderOver } from '../component/OrderOver';
import { OrderWaitingGetShop } from '../component/OrderWaitingGetShop';
import {  OrderWaitingShop } from '../component/OrderWaitingShop';
import { CommonTopBar } from '../widget/CommonTopBar';@Entry
@Component
struct MyOrderListPage {@State currentIndex: number = 0@State fontColor: string = '#182431';@State selectedFontColor: string = '#007DFF';@State selectedIndex: number = 0;private controller: TabsController = new TabsController();@Builder tabBuilder(index: number, name: string) {Column() {Text(name).fontColor(this.selectedIndex === index ? this.selectedFontColor : this.fontColor).fontSize(16).fontWeight(this.selectedIndex === index ? 500 : 400).lineHeight(22).margin({ top: 17, bottom: 7 })Divider().strokeWidth(2).width(40).color('#007DFF').opacity(this.selectedIndex === index ? 1 : 0)}.width('100%')}build() {Column() {CommonTopBar({ title: "我的订单", alpha: 0, titleAlignment: TextAlign.Center ,backButton:true})Tabs({ barPosition: BarPosition.Start, index: this.currentIndex, controller: this.controller }) {TabContent() {Column(){OrderWaitingShop({currentIndex:this.currentIndex})}.width('100%').height('100%')}.tabBar(this.tabBuilder(0, '待发货'))TabContent() {Column(){}.width('100%').height('100%')}.tabBar(this.tabBuilder(1, '待收货'))TabContent() {Column(){}.width('100%').height('100%')}.tabBar(this.tabBuilder(2, '已完成'))}.vertical(false).barMode(BarMode.Fixed).barWidth('100%').barHeight(56).animationDuration(0).onChange((index: number) => {this.currentIndex = index;this.selectedIndex = index;}).onAnimationStart((index: number, targetIndex: number, event: TabsAnimationEvent) => {if (index === targetIndex) {return;}this.selectedIndex = targetIndex;}).width('100%').height('100%').backgroundColor('#F1F3F5')}.width('100%')}
}
之后我们来到对应的待发货组件页面内,实现数据的请求,因为tabs我们默认选中了第一个,这时候并不会触发切换的方法,第一次因为触发了生命周期方法我们在aboutToAppear中先执行查询
async aboutToAppear(): Promise<void> {const value = await StorageUtils.getAll('user');if (value != "") {this.user = JSON.parse(value)}if (this.currentIndexCheck==this.currentIndex) {let databaseZone = cloudDatabase.zone('default');let condition = new cloudDatabase.DatabaseQuery(order_list);condition.equalTo("user_id",this.user?.user_id)let listData = await databaseZone.query(condition);let json = JSON.stringify(listData)let data1:OrderList[]= JSON.parse(json)this.orderInfo=data1let condition1 = new cloudDatabase.DatabaseQuery(order_product_list);condition1.equalTo("order_product_id",data1[0].order_product_id)let listData1 = await databaseZone.query(condition1);let json1 = JSON.stringify(listData1)this.productList=JSON.parse(json1)this.flag=true}}然后实现切换后的查询代码
async onRefresh(): Promise<void> {if (this.currentIndexCheck==this.currentIndex) {let databaseZone = cloudDatabase.zone('default');let condition = new cloudDatabase.DatabaseQuery(order_list);condition.equalTo("user_id",this.user?.user_id)let listData = await databaseZone.query(condition);let json = JSON.stringify(listData)let data1:OrderList[]= JSON.parse(json)this.orderInfo=data1let condition1 = new cloudDatabase.DatabaseQuery(order_product_list);condition1.equalTo("order_product_id",data1[0].order_product_id)let listData1 = await databaseZone.query(condition1);let json1 = JSON.stringify(listData1)this.productList=JSON.parse(json1)this.flag=true}}
之后我们进行数据的填充和展示即可,我们订单展示列表页面是一个垂直的列表,列表内部又是一个图片的展示列表,所以我们在list中嵌套list即可实现想要的效果
Column() {List(){ForEach(this.orderInfo,(item:OrderList,index:number)=>{ListItem(){Column(){Row(){Text(item.order_create_time).fontSize(14).fontColor(Color.Black)Text("买家已付款").fontSize(14).fontColor(Color.Black)}.padding(10).width('100%').justifyContent(FlexAlign.SpaceBetween)Divider().width('100%').height(0.8).color("#e6e6e6")List({space:10}){ForEach(this.productList,(item:OrderProductList,pos:number)=>{ListItem(){Column(){Image(item.img).height(60).width(60).borderRadius(5)}}})}.padding({left:10}).width('100%').listDirection(Axis.Horizontal).height(80)Row(){Text()Blank()Text() {Span("合计:").fontSize(16).fontColor(Color.Black)Span("¥ ").fontSize(10).fontColor(Color.Red)Span(this.price()+"").fontSize(16).fontColor(Color.Red)}}.padding(10).width('100%').justifyContent(FlexAlign.SpaceBetween)}.margin({top:15}).backgroundColor(Color.White).borderRadius(10).padding(10).width('100%')}})}}.padding(10).width('100%').height('100%').backgroundColor('#F1F3F5')price():number{let number=0for (let i = 0; i <this.productList.length ; i++) {number+=this.productList[i].buyAmount*this.productList[i].price}return number}
我们来执行代码看一下效果
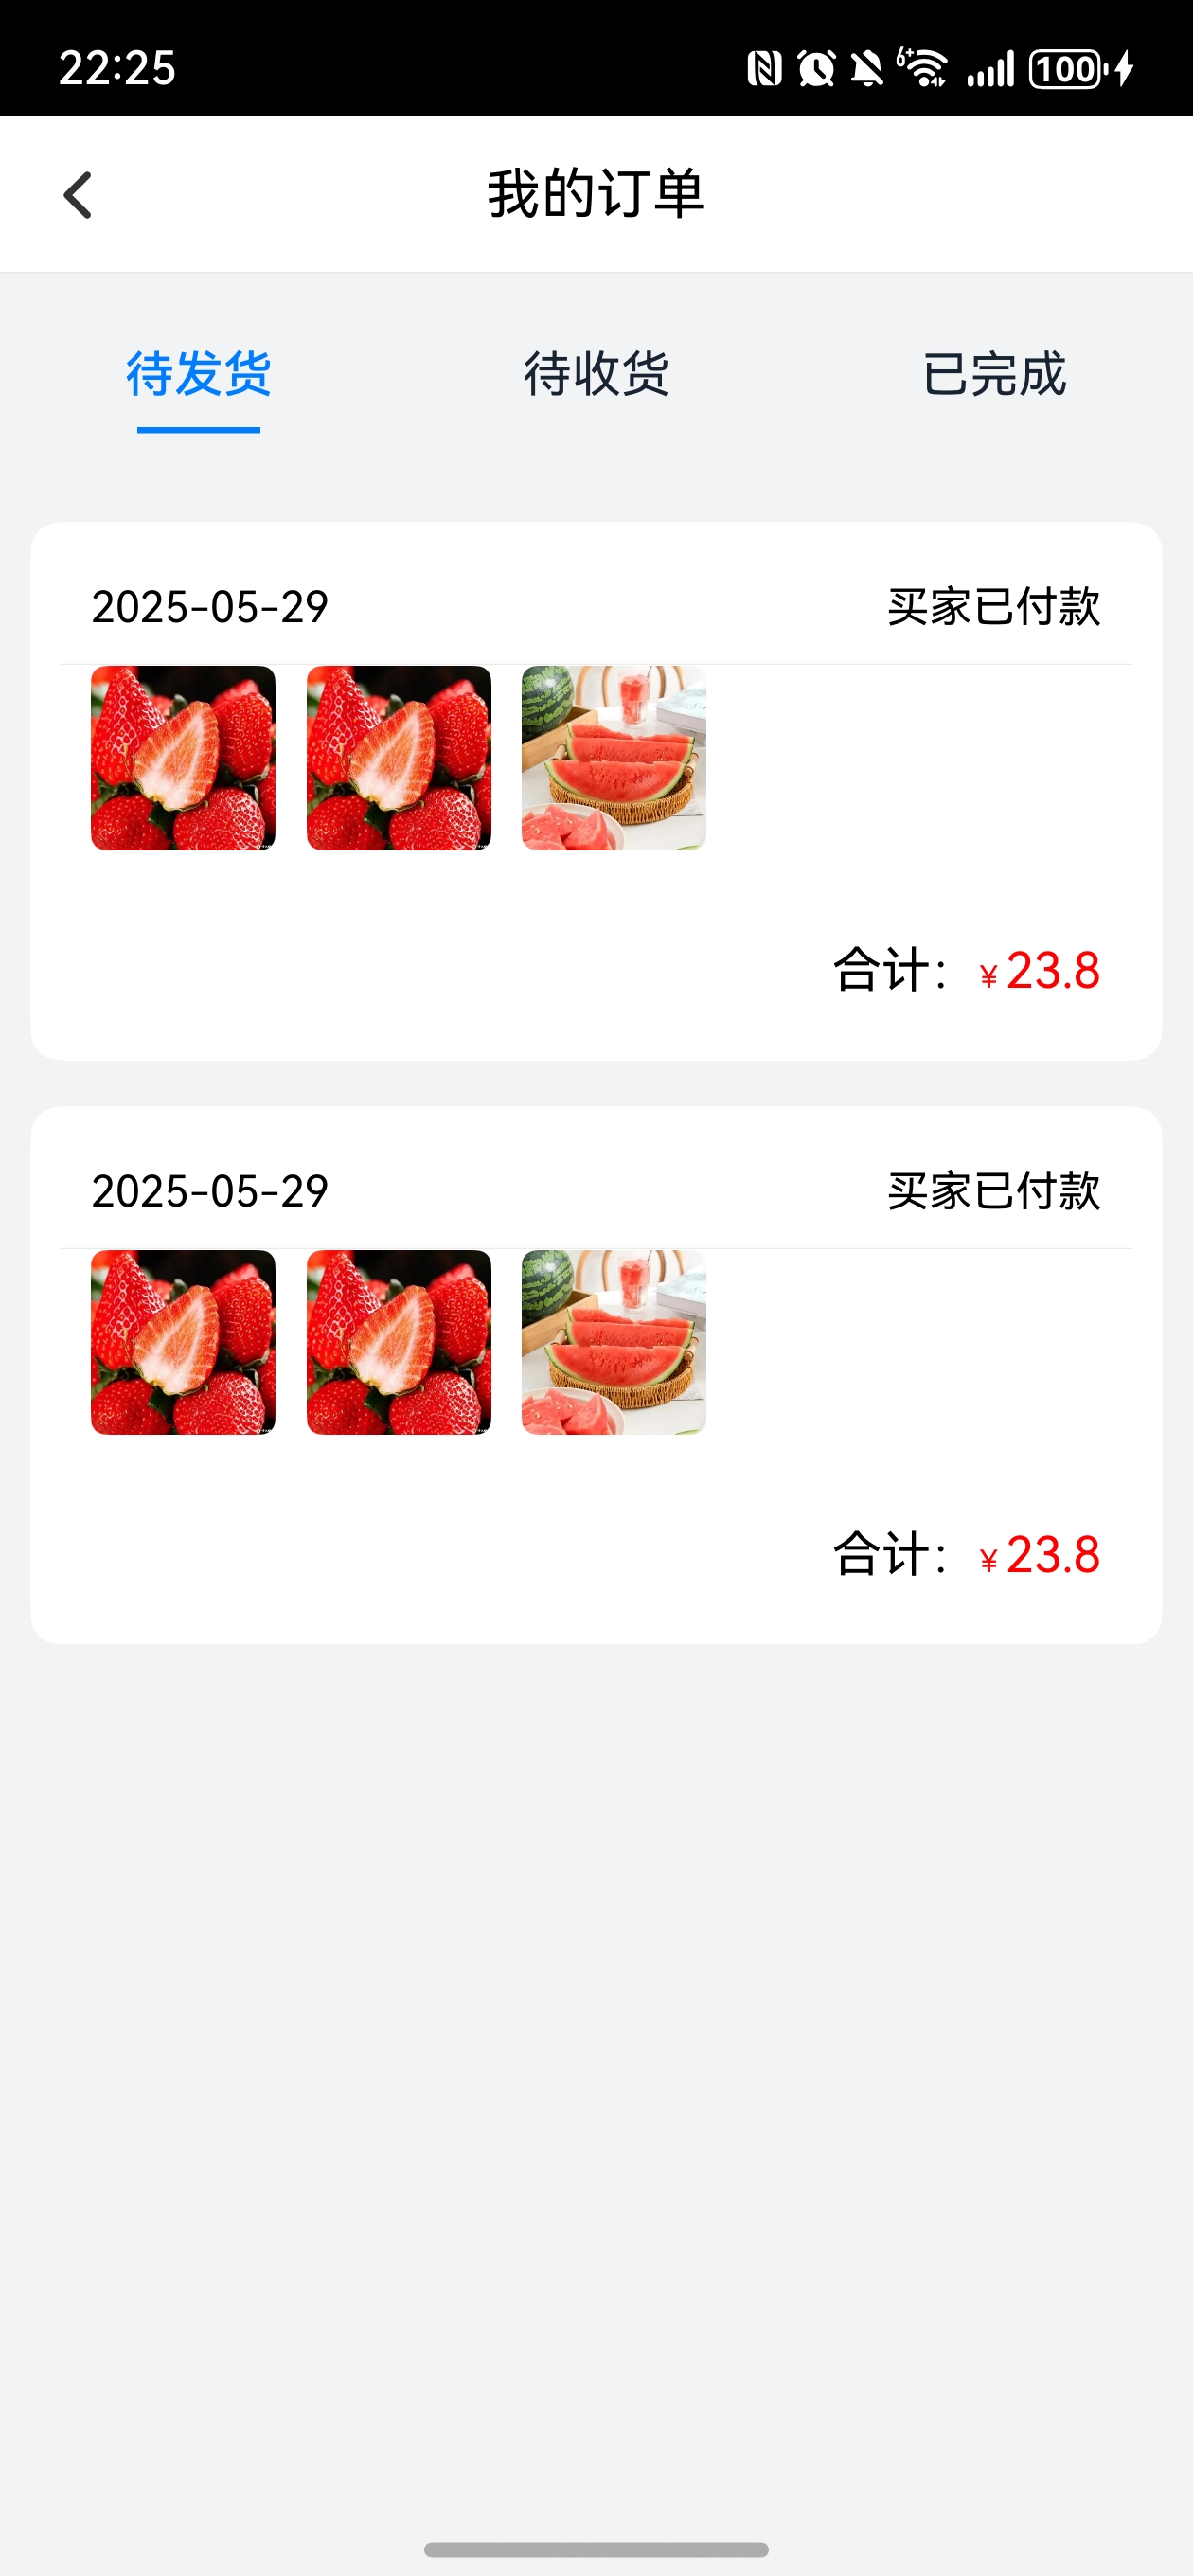
可以看到我们的待发货页面已经实现了想要的效果,剩下两个页面根据order_status 以及user_id 去做对应数据的查询即可