【教学类-36-09】20250526动物面具描边(通义万相)对称图40张,根据图片长宽,自动旋转图片,最大化图片
背景需求
夏天块来了,想做把动物扇。
【教学类-36-08】20240612动物面具(通义万相)-A4大小2图扇子_通义万象公开课-CSDN博客文章浏览阅读845次,点赞23次,收藏7次。【教学类-36-08】20240612动物面具(通义万相)-A4大小2图扇子_通义万象公开课https://blog.csdn.net/reasonsummer/article/details/139682837?spm=1011.2415.3001.5331
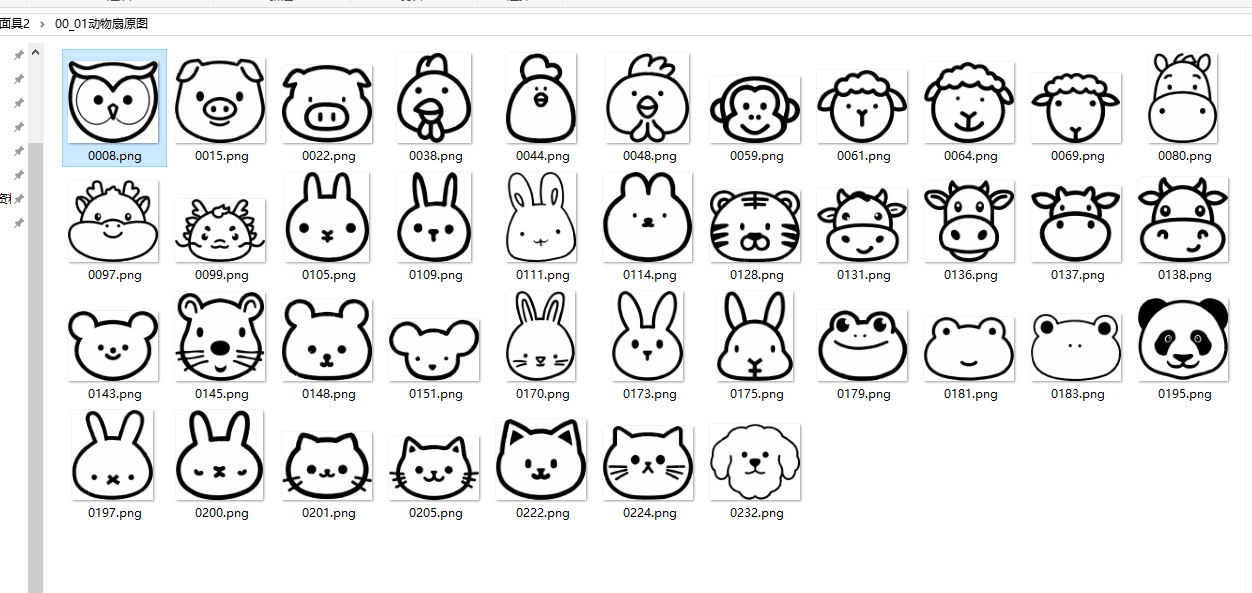
从动物时钟里面选图(已经填充白色,并去白边)
【教学类-84-01】时钟动物——动物头像01(动物头像+钟表盘+活动扣+纸质指针)_动物钟表盘-CSDN博客文章浏览阅读2.1k次,点赞93次,收藏17次。【教学类-84-01】时钟动物——动物头像01(动物头像+钟表盘+活动扣+纸质指针)_动物钟表盘https://blog.csdn.net/reasonsummer/article/details/144636000?spm=1011.2415.3001.5331
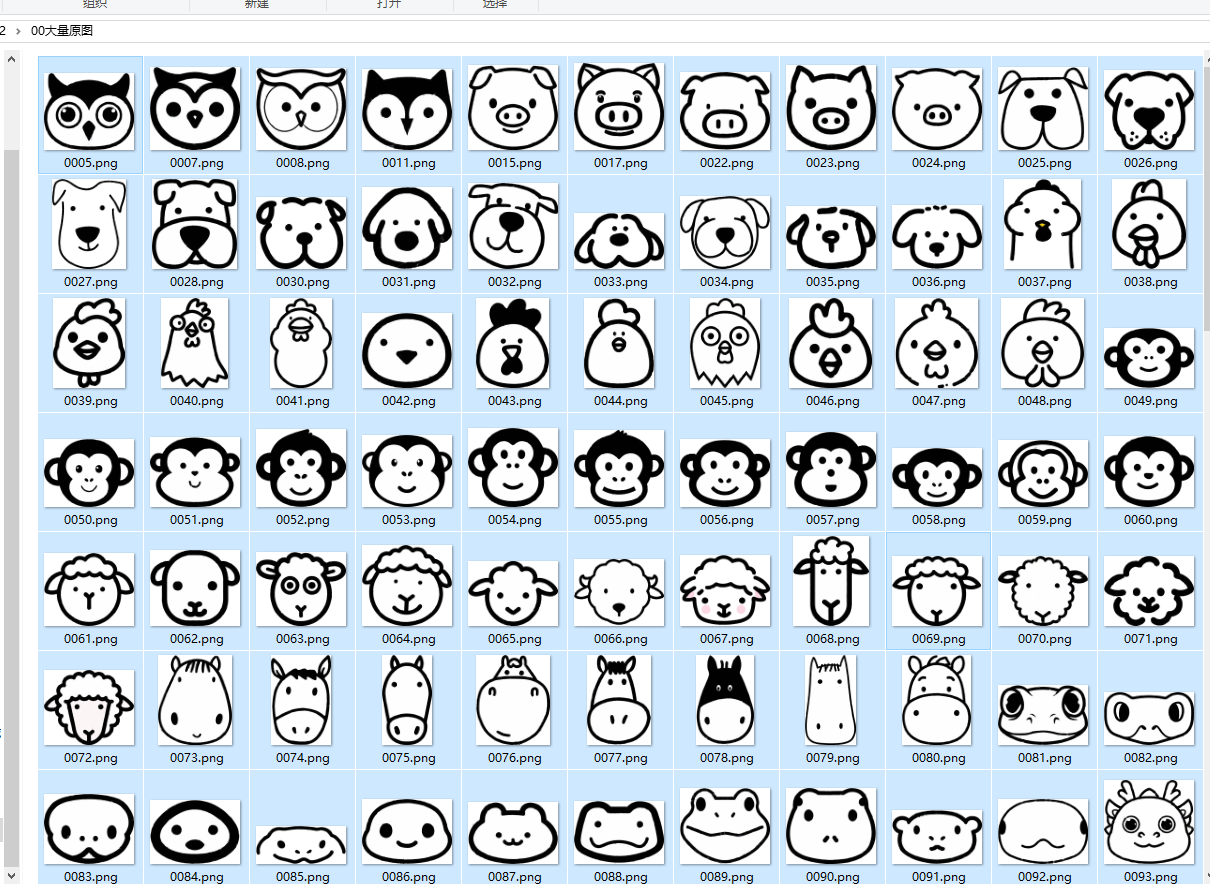
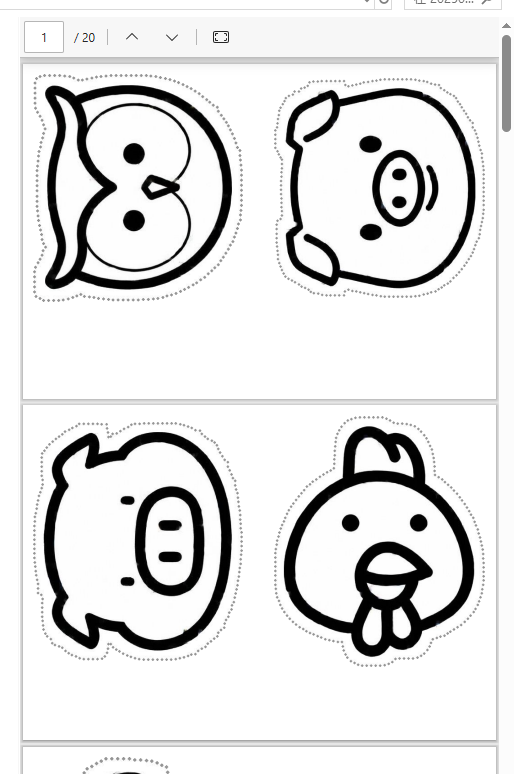
描边费时,所以挑选了40张
素材内容
描边代码
'''
动物扇子2.0,头像描边 20,60,100
deepseek,阿夏
20250525
'''
from PIL import Image, ImageDraw
import os
import math# 放大和透明室共有
print('------0、基本信息-----')
# 主路径
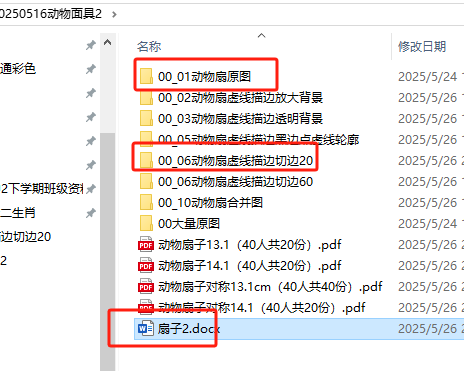
path = r'C:\Users\jg2yXRZ\OneDrive\桌面\20250516动物面具2'
# path=r'D:\图片\20240614蛋筒彩蛋# 图片夹名称
a='00'
b='动物扇'
c='虚线描边'# 保存
all = path + fr'\{a}_10{b}合并图'# 参数设置# 1、内部花纹框
# 花纹边框颜色((内部)
cchw = 0
# 调整蓝色区域边框宽度(像素)
blue_width = 0# 2、轮廓线
# 轮廓线黑线边框颜色(中间150,150,150)
ccn = 0
# 轮廓线的宽度
mb_border_width = 1 # 黑边宽度(像素)
w = int(mb_border_width / 2) # 内5外5# 5、画布尺寸放大
target_width = 2000 # 统一宽度
target_height = target_width # 统一高度
background_expand = 1000 # 白色背景放大尺寸# 6、添加中线虚线(折痕)# Parameters for center line# 中线参数
xxx = 0 # 颜色
total_line_width = 10 # 总宽度10磅
left_width = int(total_line_width) / 2 # 左边5磅
right_width = left_width # 右边5磅
# line_width = 10 # 线条粗细
dash_length = 30 # 黑线段
gap_length = 30 # 白线段# 定义文件夹路径
in_folder = os.path.join(path, f'{a}_01{b}原图') # 原始图片(白背景)
big_folder = os.path.join(path, f'{a}_02{b}{c}放大背景') # 放大背景输出
transparent_folder = os.path.join(path, f'{a}_03{b}{c}透明背景') # 透明背景输出
# output_folder = os.path.join(path, f'{a}_04{b}{c}黑边轮廓') # 最终输出
dotput_folder = os.path.join(path, f'{a}_05{b}{c}黑边点虚线轮廓') # 最终输出
# input_folder = output_folder # 原始图片文件夹# 创建输出文件夹
os.makedirs(all, exist_ok=True)
# os.makedirs(output_folder,exist_ok=True)
os.makedirs(dotput_folder, exist_ok=True)
os.makedirs(big_folder, exist_ok=True)
os.makedirs(transparent_folder, exist_ok=True)rrh, ggh, bbh = cchw, cchw, cchw# print('------1、白色PNG背景放大一点-----')
# # 遍历输入文件夹中的所有PNG文件
# for filename in os.listdir(in_folder):
# if filename.lower().endswith('.png'):
# # 打开原始图片
# input_path = os.path.join(in_folder, filename)
# with Image.open(input_path) as img:
# original_width, original_height = img.size# # 创建新画布(长宽各+200,白色背景)
# new_width = original_width + background_expand
# new_height = original_height + background_expand
# new_image = Image.new('RGB', (new_width, new_height), (255, 255, 255))# # 计算粘贴位置(居中)
# paste_x = (new_width - original_width) // 2
# paste_y = (new_height - original_height) // 2# # 将原始图片粘贴到新画布上
# new_image.paste(img, (paste_x, paste_y), img if img.mode == 'RGBA' else None)# # 保存结果
# big_path = os.path.join(big_folder, filename)
# new_image.save(big_path)# print('------2、白色PNG背景变成透明-----')
# def process_image_to_transparent(file_path):
# img = Image.open(file_path)
# img = img.convert("RGBA")
# datas = img.getdata()# new_data = []
# for item in datas:
# if item[0] == 255 and item[1] == 255 and item[2] == 255:
# new_data.append((255, 255, 255, 0))
# else:
# new_data.append(item)# img.putdata(new_data)
# return img# print("正在转换白背景为透明背景...")
# for file_name in os.listdir(big_folder):
# if file_name.lower().endswith((".png", ".jpg", ".jpeg")):
# input_file_path = os.path.join(big_folder, file_name)
# output_file_path = os.path.join(transparent_folder, file_name)
# processed_image = process_image_to_transparent(input_file_path)
# processed_image.save(output_file_path)
# print(f"已处理: {file_name}")# 描边为20、50、80
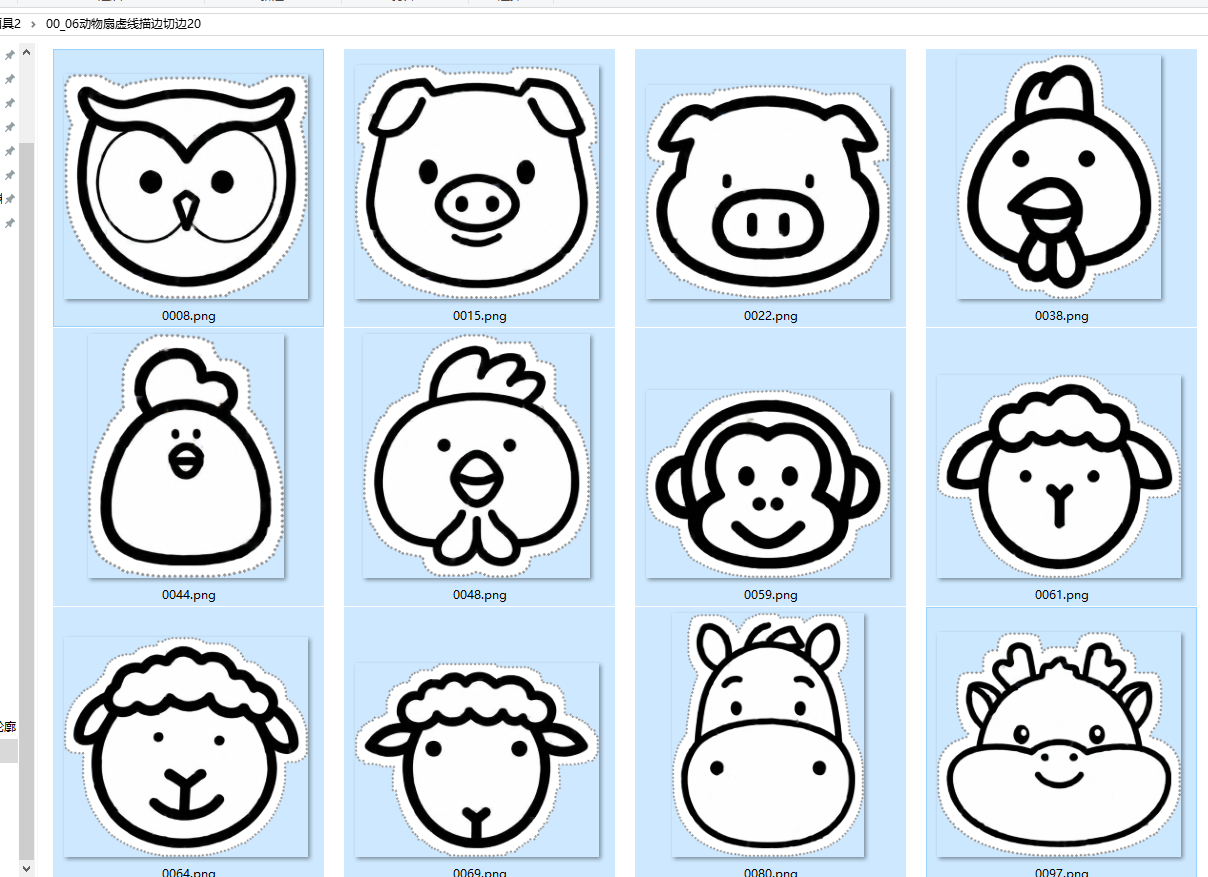
for x in [60, 100]:cropped_folder = os.path.join(path, f'{a}_06{b}{c}切边{x}') # 裁剪后的透明图片os.makedirs(cropped_folder, exist_ok=True)# 3、点状虚线裁剪边# 点状虚线边框颜色(外边)ccw = 150# 白色描边宽度(像素)轮廓线外层white_border_width = x# 黑点直径(像素)dot_size = 5# # 黑点间距(像素)增加间距确保均匀分布 dot_spacing = dot_size * 2# 4、裁剪时不保留额外透明边距transparent_edge = 0 # 裁剪时不保留额外透明边距# 灰线深浅测试# for cr3 in range(cchw,cchw+10,10):# 黑色边框颜色# 灰色# if x==1:# 中线(内) rrw = ggw = bbw = ccwrrn = ggn = bbn = ccnrrh = ggh = bbh = cchwrrx = ggx = bbx = xxxprint('------3、添加点状虚线轮廓-----')def get_edge_pixels(image):"""获取图像中不透明像素与透明像素交界的边缘像素坐标"""edge_pixels = []pixels = image.load()width, height = image.sizefor y in range(height):for x in range(width):if pixels[x, y][3] > 0: # 不透明像素# 检查4邻域for dx, dy in [(-1, 0), (1, 0), (0, -1), (0, 1)]:nx, ny = x + dx, y + dyif 0 <= nx < width and 0 <= ny < height:if pixels[nx, ny][3] == 0: # 邻域透明edge_pixels.append((x, y))breakreturn edge_pixelsdef expand_edge_pixels(edge_pixels, distance, width, height):"""扩展边缘像素坐标到指定距离"""expanded_pixels = set()for x, y in edge_pixels:for dy in range(-distance, distance + 1):for dx in range(-distance, distance + 1):nx, ny = x + dx, y + dyif 0 <= nx < width and 0 <= ny < height:expanded_pixels.add((nx, ny))return expanded_pixelsdef get_contour_pixels(border_pixels, width, height):"""获取白边区域的外轮廓像素(使用边缘追踪算法)"""# 找到起始点(最左上角的边界像素)start_point = Nonefor y in range(height):for x in range(width):if (x, y) in border_pixels:start_point = (x, y)breakif start_point:breakif not start_point:return []# 使用Moore-Neighbor追踪算法获取轮廓contour = []current = start_pointprevious = (current[0] - 1, current[1]) # 假设从左侧开始directions = [(0, -1), (1, -1), (1, 0), (1, 1),(0, 1), (-1, 1), (-1, 0), (-1, -1)]while True:contour.append(current)# 找到下一个边界点found = Falsestart_dir = (directions.index((previous[0] - current[0], previous[1] - current[1])) + 1) % 8for i in range(8):dir_idx = (start_dir + i) % 8dx, dy = directions[dir_idx]neighbor = (current[0] + dx, current[1] + dy)if 0 <= neighbor[0] < width and 0 <= neighbor[1] < height:if neighbor in border_pixels:previous = currentcurrent = neighborfound = Truebreakif not found or current == start_point:breakreturn contourdef draw_uniform_dots(image, contour, dot_size, dot_spacing):"""在轮廓上均匀绘制黑点"""dot_layer = Image.new('RGBA', image.size, (0, 0, 0, 0))draw = ImageDraw.Draw(dot_layer)if not contour:return dot_layer# 计算轮廓总长度total_length = 0segments = []for i in range(len(contour)):p1 = contour[i]p2 = contour[(i + 1) % len(contour)]dx = p2[0] - p1[0]dy = p2[1] - p1[1]length = math.sqrt(dx * dx + dy * dy)segments.append((p1, p2, length))total_length += length# 计算需要绘制的点数num_dots = int(total_length / dot_spacing)if num_dots == 0:num_dots = 1# 均匀分布点step = total_length / num_dotscurrent_dist = 0segment_idx = 0remaining_seg = segments[0][2]for _ in range(num_dots):# 找到当前点所在线段while current_dist > remaining_seg and segment_idx < len(segments) - 1:current_dist -= remaining_segsegment_idx += 1remaining_seg = segments[segment_idx][2]p1, p2, seg_len = segments[segment_idx]ratio = current_dist / seg_lenx = p1[0] + ratio * (p2[0] - p1[0])y = p1[1] + ratio * (p2[1] - p1[1])# 绘制黑点和颜色 - 修正了ellipse坐标draw.ellipse([(x - dot_size / 2, y - dot_size / 2),(x + dot_size / 2, y + dot_size / 2) # 添加了缺失的第二个坐标], fill=(rrw, ggw, bbw, 255))current_dist += stepreturn dot_layerdef add_dotted_border(output_path, dotput_path):"""处理单个图像,添加虚线边框"""original = Image.open(output_path).convert('RGBA')original_copy = original.copy()width, height = original.size# 获取边缘并扩展白边edge_pixels = get_edge_pixels(original)border_pixels = expand_edge_pixels(edge_pixels, white_border_width, width, height)# 获取精确的外轮廓contour = get_contour_pixels(border_pixels, width, height)# 创建白边图层white_border = Image.new('RGBA', (width, height), (255, 255, 255, 255))mask = Image.new('L', (width, height), 0)mask_pixels = mask.load()for x, y in border_pixels:mask_pixels[x, y] = 255white_border.putalpha(mask)# 合成白边result = Image.alpha_composite(original, white_border)# 绘制均匀分布的黑点dot_layer = draw_uniform_dots(original, contour, dot_size, dot_spacing)result = Image.alpha_composite(result, dot_layer)# 覆盖原始图像result = Image.alpha_composite(result, original_copy)result.save(dotput_path, format='PNG')print(f"已添加{c}虚线轮廓: {os.path.basename(dotput_path)}")# 处理所有透明背景图片,添加虚线轮廓for file_name in os.listdir(transparent_folder):if file_name.lower().endswith('.png'):output_path = os.path.join(transparent_folder, file_name)dotput_path = os.path.join(dotput_folder, file_name)add_dotted_border(output_path, dotput_path)print('------4、裁剪透明白边,保存透明PNG---------')import osfrom PIL import Imagedef find_content_boundary(image):"""找到图像中非透明内容的精确边界:param image: PIL Image对象(RGBA模式):return: (left, top, right, bottom) 内容边界坐标"""if image.mode != 'RGBA':image = image.convert('RGBA')width, height = image.sizepixels = image.load()left, right = width, 0top, bottom = height, 0for y in range(height):for x in range(width):if pixels[x, y][3] > 0: # 非透明像素if x < left:left = xif x > right:right = xif y < top:top = yif y > bottom:bottom = yreturn left, top, right + 1, bottom + 1 # +1确保包含边界像素def crop_to_content(image):"""精确裁剪到非透明内容边界,并保留额外透明边距"""boundary = find_content_boundary(image)left, top, right, bottom = boundary# 添加额外的透明边距left = max(0, left - transparent_edge)top = max(0, top - transparent_edge)right = min(image.width, right + transparent_edge)bottom = min(image.height, bottom + transparent_edge)return image.crop((left, top, right, bottom))def get_max_dimensions(folder):"""获取文件夹中所有图片的最大宽度和高度"""max_width = 0max_height = 0for filename in os.listdir(folder):if filename.lower().endswith('.png'):try:with Image.open(os.path.join(folder, filename)) as img:width, height = img.sizeif width > max_width:max_width = widthif height > max_height:max_height = heightexcept Exception as e:print(f"读取尺寸失败 {filename}: {str(e)}")return max_width, max_heightdef resize_with_transparency(image, target_size):"""保持透明背景调整图像尺寸"""width_ratio = target_size[0] / image.widthheight_ratio = target_size[1] / image.heightscale_ratio = min(width_ratio, height_ratio)new_width = int(image.width * scale_ratio)new_height = int(image.height * scale_ratio)resized = image.resize((new_width, new_height), Image.LANCZOS)new_image = Image.new('RGBA', target_size, (0, 0, 0, 0))x_offset = (target_size[0] - new_width) // 2y_offset = (target_size[1] - new_height) // 2new_image.paste(resized, (x_offset, y_offset), resized)return new_imagedef process_images():"""完整的图片处理流程"""print("=== 开始裁剪透明白边 ===")# 修改这里:使用dotput_folder而不是dtransparent_folderfor filename in os.listdir(dotput_folder):if filename.lower().endswith('.png'):dotput_path = os.path.join(dotput_folder, filename)croput_path = os.path.join(cropped_folder, filename)try:img = Image.open(dotput_path).convert('RGBA')cropped = crop_to_content(img)cropped.save(croput_path, format='PNG')print(f"裁剪完成: {filename}")except Exception as e:print(f"裁剪失败 {filename}: {str(e)}")if __name__ == '__main__':process_images()print("\n=== 处理完成 ===")print(f"裁剪后的图片保存在: {cropped_folder}")因为这次我用了5磅的圆点,所以点状描边的速度非常慢一张就要5分钟,因此我只用了20磅描边。60描边,一张就要10分钟
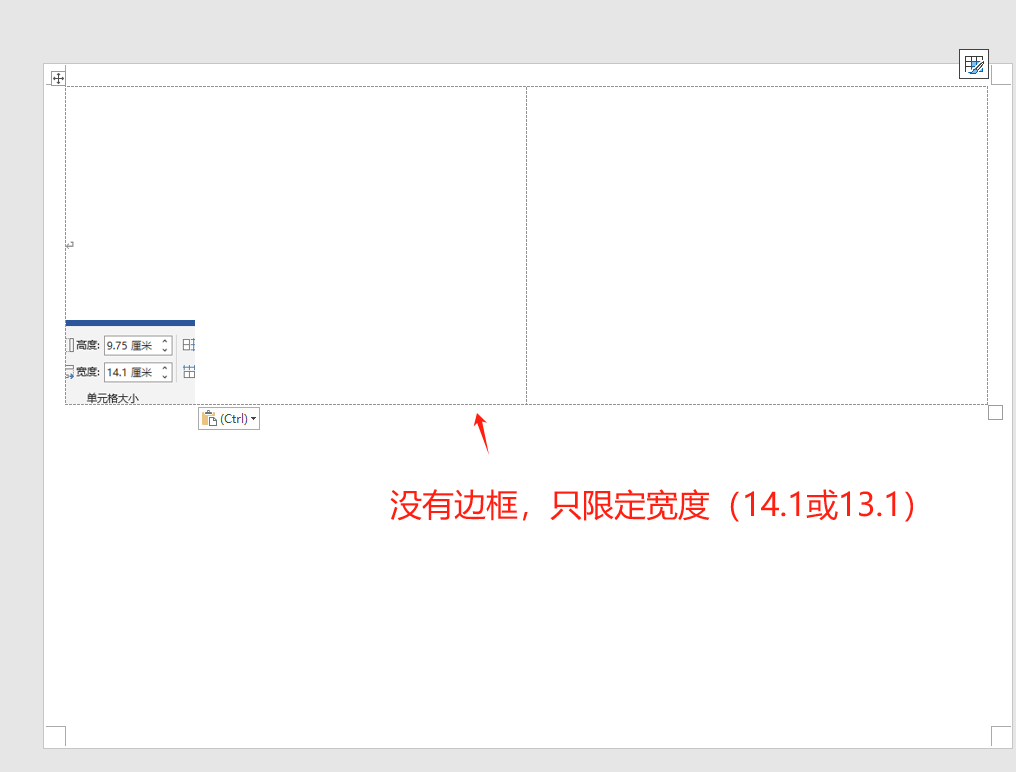
word样式(只考虑宽度,一页两个
代码展示

'''
动物扇子2.0,头像图片根据高宽,最适合大小插入,高小于宽,图片转90,撑满最大
deepseek,阿夏
20250525
'''import os
import shutil
from PIL import Image, ImageOps
from docx import Document
from docx.shared import Cm
from docx.enum.table import WD_CELL_VERTICAL_ALIGNMENT
from docx.enum.text import WD_ALIGN_PARAGRAPH
from docx2pdf import convert
from PyPDF2 import PdfMergerdef process_and_flip_image(image_path):"""处理图片并返回原始图和翻转图"""try:with Image.open(image_path) as img:# 移除EXIF信息并自动旋转img = ImageOps.exif_transpose(img)original_width, original_height = img.size# 判断是否需要旋转(高>宽时旋转90度)needs_rotate = original_height < original_widthif needs_rotate:img = img.rotate(90, expand=True)width, height = original_height, original_widthelse:width, height = original_width, original_height# 创建翻转版本flipped_img = img.transpose(Image.FLIP_LEFT_RIGHT)return img, flipped_img, width, heightexcept Exception as e:print(f"处理图片 {image_path} 时出错: {str(e)}")return None, None, 0, 0def insert_images_to_cells(cell_left, cell_right, original_img, flipped_img, width, height, max_width_cm):"""将原始图和翻转图插入到单元格"""try:# 计算新尺寸(宽度固定为max_width_cm)new_width = Cm(max_width_cm)new_height = Cm(max_width_cm * height / width)# 保存临时图片temp_paths = []for i, img in enumerate([original_img, flipped_img]):temp_path = f"temp_img_{i}.png"img.save(temp_path)temp_paths.append(temp_path)# 插入原始图到左单元格(左对齐)paragraph = cell_left.paragraphs[0] if cell_left.paragraphs else cell_left.add_paragraph()paragraph.alignment = WD_ALIGN_PARAGRAPH.LEFTrun = paragraph.add_run()run.add_picture(temp_paths[0], width=new_width, height=new_height)# 插入翻转图到右单元格(右对齐)paragraph = cell_right.paragraphs[0] if cell_right.paragraphs else cell_right.add_paragraph()paragraph.alignment = WD_ALIGN_PARAGRAPH.RIGHTrun = paragraph.add_run()run.add_picture(temp_paths[1], width=new_width, height=new_height)# 删除临时文件for path in temp_paths:if os.path.exists(path):os.remove(path)except Exception as e:print(f"插入图片到单元格时出错: {str(e)}")def process_images_to_separate_docs(template_path, image_folder, output_folder, max_width_cm=13.1):"""处理图片并将每张图片生成一个对称文档"""# 确保输出文件夹存在os.makedirs(output_folder, exist_ok=True)# 获取所有PNG图片并按名称排序image_files = sorted([f for f in os.listdir(image_folder) if f.lower().endswith('.png')])total_images = len(image_files)for doc_num, image_file in enumerate(image_files, start=1):# 每次处理都从原始模板重新加载doc = Document(template_path)# 获取第一个表格if not doc.tables:print(f"文档模板中没有表格!")continuetable = doc.tables[0]cell_00 = table.cell(0, 0)cell_01 = table.cell(0, 1)# 清除单元格原有内容for cell in [cell_00, cell_01]:for paragraph in cell.paragraphs:for run in paragraph.runs:run.clear()cell.vertical_alignment = WD_CELL_VERTICAL_ALIGNMENT.CENTER# 处理图片img_path = os.path.join(image_folder, image_file)original_img, flipped_img, width, height = process_and_flip_image(img_path)if original_img and flipped_img:# 插入图片到单元格insert_images_to_cells(cell_00, cell_01, original_img, flipped_img, width, height, max_width_cm)# 生成输出文件名(01.docx, 02.docx,...)output_filename = f"{doc_num:02d}.docx"output_path = os.path.join(output_folder, output_filename)# 保存文档doc.save(output_path)print(f"已创建: {output_path}")def merge_pdfs(output_folder, base_folder, max_width_cm, image_count):"""合并所有PDF文件为一个单一的PDF"""pdf_output_filename = f"动物扇子对称{max_width_cm}cm({image_count}人共{image_count}份).pdf"pdf_output_path = os.path.join(base_folder, pdf_output_filename)# 将所有DOCX文件转换为PDFfor docx_file in os.listdir(output_folder):if docx_file.lower().endswith('.docx'):docx_path = os.path.join(output_folder, docx_file)pdf_path = docx_path.replace('.docx', '.pdf')try:convert(docx_path, pdf_path)print(f"已转换: {docx_path} -> {pdf_path}")except Exception as e:print(f"转换失败: {docx_path} -> {pdf_path}, 错误: {str(e)}")# 合并所有PDF文件merger = PdfMerger()pdf_files = sorted([f for f in os.listdir(output_folder) if f.lower().endswith('.pdf')])for pdf_file in pdf_files:pdf_path = os.path.join(output_folder, pdf_file)try:merger.append(pdf_path)print(f"已添加: {pdf_path}")except Exception as e:print(f"添加失败: {pdf_path}, 错误: {str(e)}")# 保存合并后的PDF文件merger.write(pdf_output_path)merger.close()print(f"合并后的PDF已保存: {pdf_output_path}")# 删除输出文件夹中的PDF和DOCX文件shutil.rmtree(output_folder)print(f"已删除临时文件夹: {output_folder}")return pdf_output_pathif __name__ == "__main__":# 设置路径base_folder = r'C:\Users\jg2yXRZ\OneDrive\桌面\20250516动物面具2'template_path = os.path.join(base_folder, "扇子2.docx")image_folder = os.path.join(base_folder, "00_06动物扇虚线描边切边20")output_folder = os.path.join(base_folder, "零时")# 检查路径是否存在if not all(os.path.exists(p) for p in [template_path, image_folder]):print("错误: 模板文件或图片文件夹不存在!")exit()# 执行处理print("开始处理图片...")max_width_cm = 13.1  # 图片最大宽度process_images_to_separate_docs(template_path, image_folder, output_folder, max_width_cm)print('----------第4步:把都有PDF合并为一个打印用PDF------------')image_files = [f for f in os.listdir(image_folder) if f.lower().endswith('.png')]image_count = len(image_files)final_pdf = merge_pdfs(output_folder, base_folder, max_width_cm, image_count)print(f"最终PDF文件已生成: {final_pdf}")
结果对比
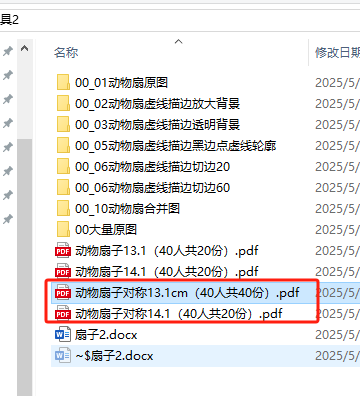
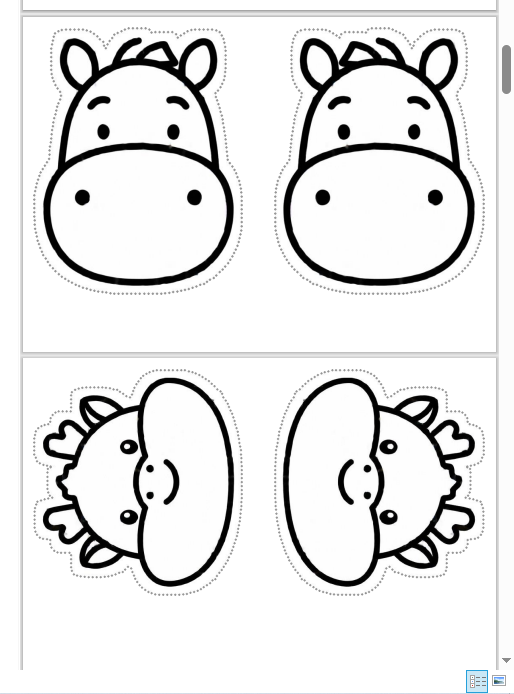
14.1CM是撑满最大格子的样式
根据原图的高、宽,自动让图片旋转,最大化(有白边,可以剪成一条
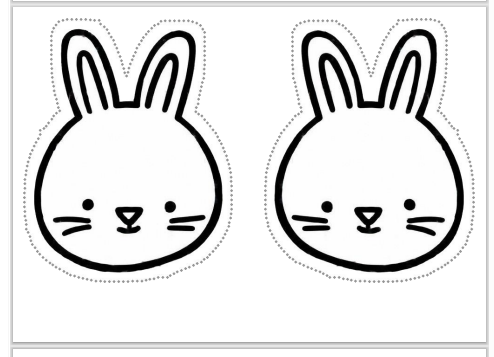
13.1CM我想做双面扇子,图案需要对称(水平翻转)