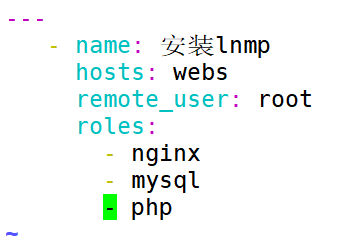
ansible剧本和角色的使用,部署lnmp
剧本角色实现步骤和实例
要求:制作一个lnmp 的剧本
1、创建以roles 命名的目录
cd /etc/ansible/
mkdir roles 【mkdir /etc/ansible/roles -p】
2、创建全局变量目录
mkdir group_vars
touch group_vars/lnmp
3、在roles文件夹里创建三个服务的文件夹
cd roles
mkdir nginx mysql php
4、在三个服务下创建固定文件夹
mkdir mysql/{files,templates,tasks,handlers,vars,defaults,meta}
mkdir nginx/{files,templates,tasks,handlers,vars,defaults,meta}
mkdir php/{files,templates,tasks,handlers,vars,defaults,meta}
5、在固定文件夹下都创建main.yaml文件
touch mysql/{defaults,vars,tasks,meta,handlers}/main.yaml
touch nginx/{defaults,vars,tasks,meta,handlers}/main.yaml
touch php/{defaults,vars,tasks,meta,handlers}/main.yaml
cd /etc/ansible/
vim lnmp.yaml
ansible-playbook lnmp.yaml --syntax-check //检查语法
一、nginx
cd /etc/ansible/roles/nginx/tasks
vim main.yaml
| --- - name: nginx安装 hosts: webs become: yes remote_user: root tasks: - name: 挂载 shell: "mount /dev/cdrom /media" ignore_errors: yes - name: 安装依赖包 yum: name: ['vim','net-tools','yum-utils','wget'] state: present - name: 安装网络yum源 shell: "wget -O /etc/yum.repos.d/CentOS-Base.repo https://mirrors.aliyun.com/repo/Centos-7.repo" - name: 添加nginx网络yum源文件 copy: src: /etc/ansible/roles/nginx/files/nginx.repo dest: /etc/yum.repos.d/nginx.repo - name: yum安装nginx shell: | yum clean all && \ yum makecache fast && \ yum install -y nginx - name: 拷贝default.conf文件 copy: src: /etc/ansible/roles/nginx/files/default.conf dest: /etc/nginx/conf.d/default.conf - name: 启动并设置开机自启 systemd: name: nginx state: started enabled: yes |
ansible-playbook main.yaml --syntax-check //检测语法
cd ../
cd /etc/ansible/roles/nginx/files //添加需要修改的文件
vim default.conf
| server { listen 80; server_name 192.168.38.3; #access_log /var/log/nginx/host.access.log main; location / { root /usr/share/nginx/html; index index.php index.html index.htm; } #error_page 404 /404.html; # redirect server error pages to the static page /50x.html # error_page 500 502 503 504 /50x.html; location = /50x.html { root /usr/share/nginx/html; } # proxy the PHP scripts to Apache listening on 127.0.0.1:80 # #location ~ \.php$ { # proxy_pass http://127.0.0.1; #} # pass the PHP scripts to FastCGI server listening on 127.0.0.1:9000 # location ~ \.php$ { root html; fastcgi_pass 127.0.0.1:9000; fastcgi_index index.php; fastcgi_param SCRIPT_FILENAME /usr/share/nginx/html$fastcgi_script_name; include fastcgi_params; } # deny access to .htaccess files, if Apache's document root # concurs with nginx's one # #location ~ /\.ht { # deny all; #} } |
vim nginx.repo
| [nginx] name = nginx repo baseurl = https://nginx.org/packages/mainline/centos/7/$basearch/ gpgcheck = 0 enabled = 1 |
cd /etc/ansible/roles/mysql/tasks
ansible-playbook main.yaml
二、数据库
cd /etc/ansible/roles/mysql/tasks
| --- - name: 安装mariadb10.11 hosts: webs become: yes remote_user: root tasks: - name: 添加mariadb yum源文件 copy: src: /etc/ansible/roles/mysql/files/MariaDB.repo dest: /etc/yum.repos.d/MariaDB.repo - name: yum安装数据库 shell: | yum -y update && \ yum install -y epel-release && \ yum install -y pv && \ yum -y install MariaDB-client MariaDB-server - name: 修改配置文件 copy: src: /etc/ansible/roles/mysql/files/my.cnf dest: /etc/my.cnf - name: 启动数据库 systemd: name: mariadb state: started |
ansible-playbook main.yaml --syntax-check //检测语法
cd ../
cd files
vim MariaDB.repo
| #MariaDB 10.11 Stable Repository [稳定版] [mariadb] name = MariaDB baseurl = mariadb-yum-10.11-centos7-amd64安装包下载_开源镜像站-阿里云 # baseurl=https://ftp.osuosl.org/pub/mariadb/yum/10.11/centos7-amd64/ # baseurl=https://mirrors.tuna.tsinghua.edu.cn/mariadb/yum/10.11/centos7-amd64/ gpgkey = https://mirrors.aliyun.com/mariadb/yum/RPM-GPG-KEY-MariaDB gpgcheck = 1 enabled = 1 |
vim my.cnf
| # [mysqld] skip-networking=1 socket=/var/lib/mysql/mysql.sock #This group is read both by the client and the server # use it for options that affect everything # [client-server] # # include *.cnf from the config directory # !includedir /etc/my.cnf.d |
cd /etc/ansible/roles/mysql/tasks
ansible-playbook main.yaml
完成后进入安装数据库的主机修改数据库密码
mysql -uroot
set password=password('123456');
flush privileges
exit
三、php
cd /etc/ansible/roles/php/tasks
vim main.yaml
| --- - name: 安装php hosts: webs become: yes remote_user: root tasks: - name: 添加 epel-release 和php高版本 shell: "yum -y install http://rpms.remirepo.net/enterprise/remi-release-7.rpm" ignore_errors: yes - name: 安装yum-utils yum: name: yum-utils state: present - name: 启动php7.2 shell: "yum-config-manager --enable remi-php72" - name: yum安装依赖 yum: name: ['php',' php-cli', 'php-fpm', 'php-mysql', 'php-json', 'php-opcache', 'php-mbstring', 'php-xml', 'php-gd', 'php-curl'] state: present ignore_errors: yes - name: 启动php开机自启 systemd: name: php-fpm state: started enabled: yes - name: 复制info.php文件 copy: src=/etc/ansible/roles/php/files/info.php dest=/usr/share/nginx/html/info.php - name: 复制test.php文件 copy: src=/etc/ansible/roles/php/files/test.php dest=/usr/share/nginx/html/test.php - name: 重启Nginx服务 service: name: nginx state: restarted |
ansible-playbook main.yaml --syntax-check //检测语法
cd ../
cd files
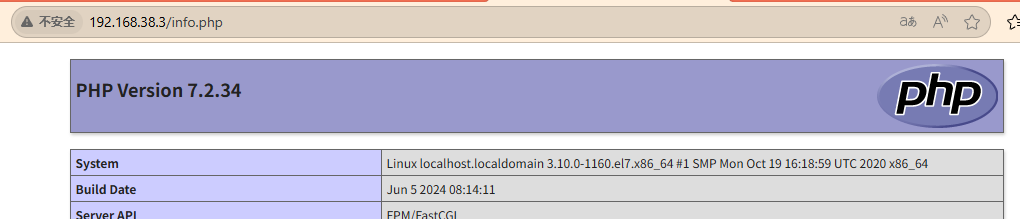
vim info.php
| <?php phpinfo(); ?> |
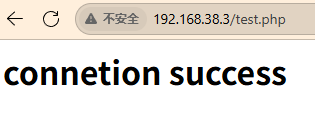
vim test.php
| <?php $link=mysqli_connect('localhost','root','123456'); if($link) echo "<h1>connetion success</h1>"; else echo "Fail"; ?> |
cd /etc/ansible/roles/php/tasks
ansible-playbook main.yaml
最后做验证