Rstudio换皮:自定义彩虹括号与缩进线
更换主题
Rstudio还是R语言最好用的IDE,默认的Rstudio已经自带了很多主题,可以自由选择。
更换内置主题
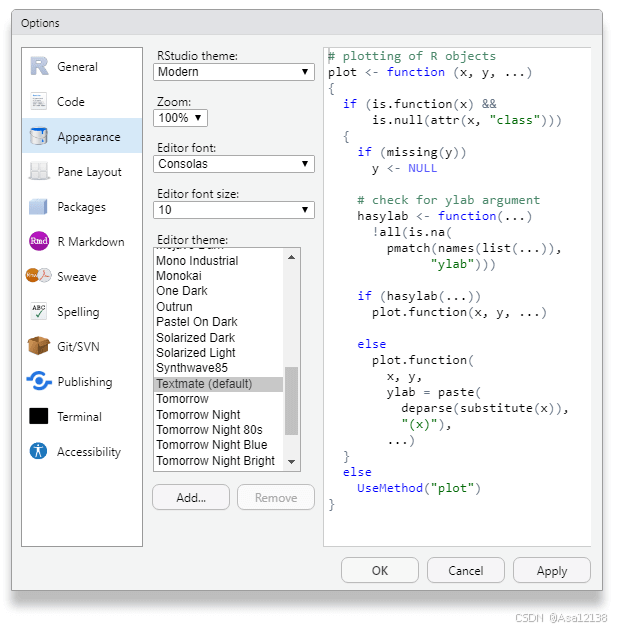
• 操作路径:Tools → Global Options → Appearance
在Editor Theme选项中切换主题,默认使用Textmate主题。RStudio提供多种内置浅色/深色主题,还支持切换界面风格(Modern/Sky/Classic)。
rstudio-themes
主页:https://github.com/max-alletsee/rstudio-themes
这是一个自定义Rstudio主题的集合,可为默认内置主题提供替代方案。在里面可以找到一个由用户创建的309个RSTUDIO主题的列表(251个黑暗主题,58个亮色主题)。
RStudio(1.20 及以上版本)支持自定义主题,可以通过以下方法安装并应用它们:
方法 1:手动安装(图形界面)
- 进入设置:
工具(Tools) → 全局选项(Global Options) → 外观(Appearance) - 点击
添加(Add...),选择下载好的.rstheme主题文件。 - 应用主题: 在主题列表中选中新安装的主题,点击
确定(OK)即可生效。
方法 2:使用 rstudioapi 包(代码安装)
通过 rstudioapi::addTheme() 直接安装在线主题(需管理员权限):
# 安装 rstudioapi(如果未安装)
install.packages("rstudioapi")# 从 URL 安装主题(例如 Night Owlish 深色主题)
rstudioapi::addTheme("https://raw.githubusercontent.com/batpigandme/night-owlish/master/rstheme/night-owlish.rstheme",apply = TRUE  # 立即应用
)
方法 3:批量安装(使用 rstudio-themes 包)
通过 GitHub 仓库 max-alletsee/rstudio-themes 快速安装多个主题:
# 安装包
devtools::install_github("max-alletsee/rstudio-themes")
library(rstudiothemes)# 示例 1:批量安装所有浅色主题
install_rstudio_themes(theme = "all_light")# 示例 2:安装指定主题(如 Ayu Light 和 Github)
install_rstudio_themes(theme = c("Ayu Light", "Github {rsthemes}"))
自定义主题
RStudio从1.2版本开始支持用户自定义主题,提供了两种格式选择:tmTheme和rstheme。
-
tmTheme格式
tmTheme是一种基于XML的主题描述格式,最初由TextMate文本编辑器引入。在RStudio中,当添加tmTheme文件时,系统会先将其转换为rstheme格式再保存到本地。 -
rstheme格式
rstheme是基于CSS的主题格式,专为RStudio设计。虽然可以直接从头编写rstheme,但由于包含大量生成值,建议通过修改现有rstheme或从tmTheme转换而来。
创建tmTheme主题
创建新的tmTheme主题有两种方法:
- 使用专门的tmTheme编辑器(如https://tmtheme-editor.glitch.me/)
- 手动编写XML文件
RStudio仅支持特定的作用域(scope),以下是支持的作用域及其影响:
| 作用域 | 描述 |
|---|---|
| comment | 修改注释的颜色和样式 |
| constant | 修改常量(如TRUE、FALSE和数字字面量)的颜色和样式 |
| constant.language | 修改语言常量(如TRUE和FALSE)的颜色和样式,会覆盖"constant"作用域中的设置。在RMarkdown中,修改包围的内容 |
| constant.numeric | 修改数字字面量的颜色和样式,会覆盖"constant"作用域中的设置。在RMarkdown中,修改包围的内容 |
| keyword | 修改关键字(如function、if、else、stop和运算符)的颜色和样式 |
| keyword.operator | 修改运算符(如(、)、=、+、-)的颜色和样式,会覆盖"keyword"作用域中的设置 |
| marker-layer.active_debug_line | 修改当前调试代码行的高亮颜色和样式 |
| markup.heading | 修改RMarkdown文档中标题起始字符的颜色和样式 |
| meta.tag | 修改RMarkdown文档中元数据标签(如title)的颜色和样式 |
| string | 修改字符串字面量的颜色和样式 |
| support.function | 修改RMarkdown文档中代码块的颜色和样式 |
创建rstheme主题
创建rstheme主题的推荐方法:
- 先编写tmTheme并导入RStudio,然后修改生成的rstheme文件
- 复制现有rstheme并修改值
以下是rstheme中最相关的CSS选择器及其对应作用域:
| 选择器 | 对应作用域 | 描述 |
|---|---|---|
| .ace_bracket | - | 覆盖Ace提供的匹配括号高亮的默认样式 |
| .ace_comment | comment | 修改注释的颜色和样式 |
| .ace_constant | constant | 修改常量的颜色和样式 |
| .ace_constant.ace_language | constant.language | 修改语言常量的颜色和样式 |
| .ace_constant.ace_numeric | constant.numeric | 修改数字字面量的颜色和样式 |
| .ace_cusor | - | 修改编辑器窗口中文本光标的颜色和样式 |
| .ace_editor | - | 修改RStudio编辑器窗口的默认颜色和背景 |
| .ace_gutter | - | 修改左侧装订线(显示行号、断点和折叠控件)的颜色和样式 |
| .ace_gutter-active_line | - | 修改编辑器中活动行的装订线颜色和样式 |
| .ace_heading | - | 修改RMarkdown文档中标题的颜色和样式 |
| .ace_indent-guide | - | 修改缩进参考线的颜色和样式,可通过"全局选项 > 代码 > 显示 > 显示缩进参考线"启用/禁用 |
| .ace_invisible | - | 修改不可见字符的颜色和样式,可通过"全局选项 > 代码显示 > 显示空白字符"启用/禁用 |
| .ace_keyword | keyword | 修改关键字的颜色和样式 |
| .ace_keyword.ace_operator | keyword.operator | 修改运算符的颜色和样式,会覆盖".ace_keyword"中的设置 |
| .ace_meta.ace_tag | meta.tag | 修改RMarkdown文档中元数据标签(如title和output)的颜色和样式 |
| .ace_marker-layer .ace_active-debug_line | marker-layer.active_debug_line | 修改当前调试代码行的高亮颜色和样式 |
| .ace_marker-layer .ace_bracket | - | 修改匹配括号的高亮颜色和样式 |
| .ace_marker-layer .ace_selection | - | 修改当前选中行或代码块的高亮颜色和样式 |
| .ace_markup.ace_heading | markup.heading | 修改RMarkdown文档中标题起始字符的颜色和样式 |
| .ace_paren_color_0到.ace_paren_color_6 | - | 修改彩虹括号的颜色和样式 |
| .ace_print-margin | - | 修改行宽边距的颜色和样式,可通过"全局选项 > 代码 > 显示 > 显示边距"启用/禁用 |
| .ace_selection.ace_start | - | 修改当前选中代码块起始处的高亮颜色和样式 |
| .ace_string | string | 修改字符串字面量的颜色和样式 |
| .ace_support.ace_function | support.function | 修改RMarkdown文档中代码块的颜色和样式 |
此外,还可以修改终端面板的样式(选择器包含.terminal或.xterm开头的),以及RStudio中与编辑器无关的部分(类名以rstheme_开头,除了dataGridHeader和themedPopupPanel)。
修改彩虹括号和缩进线
大概是从22年的版本开始Rstudio支持了彩虹括号和缩进线,可以帮助我们更清晰的看到代码结构。
- 彩虹括号:
Tools → Global Options → Code → Display → Use rainbow parentheses - 缩进指示:
Tools → Global Options → Code → Display → indent guides
在活动文件中显示指示当前缩进列的元素
None: 不显示缩进参考元素
Gray lines: 以灰色线指示缩进
Rainbow lines: 以彩虹色线指示缩进
Rainbow fills: 以彩虹色填充指示缩进
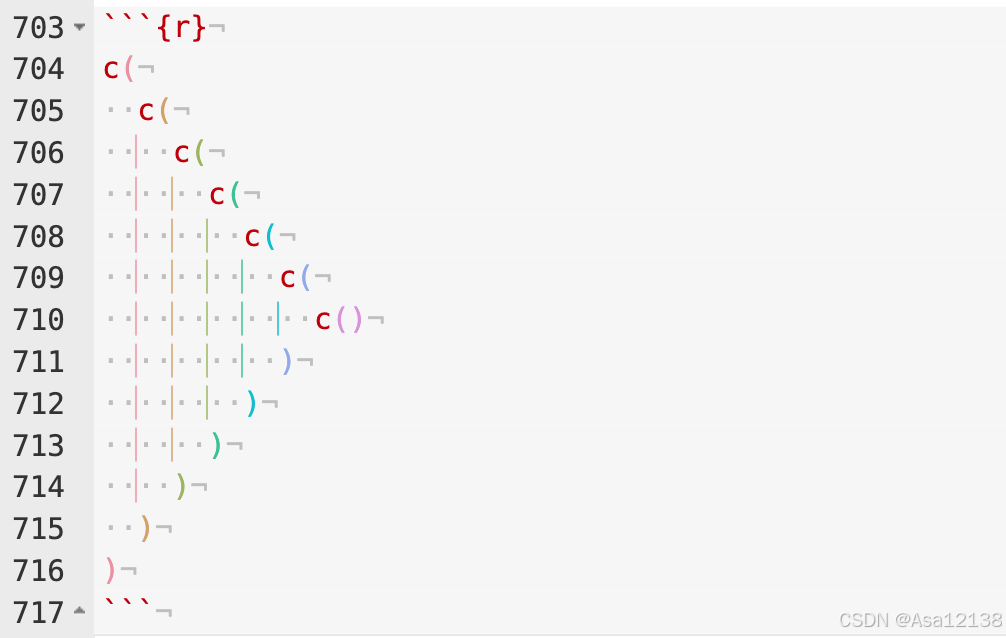
都开启后如下图所示,但颜色可能不是特别明显:
如果我们想自行修改的话,最方便的方法还是基于一个已有的rstheme文件来修改,比如https://github.com/rstudio/rstudio/tree/main/src/cpp/session/resources/themes下面可以下载到Rstudio默认的所有theme文件,我一般用的是crimson_editor.rstheme 文件。
我们下载下来用文本编辑器打开,先修改第一行‘rs-theme-name: Crimson Editor’,改成其他名称如‘rs-theme-name: Crimson Editor2’,防止导入时覆盖错乱。然后可以根据上表的提示来修改对应的颜色,粗细,透明度等。
我想使用的是D3系列配色,彩虹括号颜色比较好修改,在文件中加入以下内容(注意如果已经定义了下列变量就进行替换)
/* 彩虹括号颜色 */
.ace_paren_color_0 { color: #1F77B4; }
.ace_paren_color_1 { color: #FF7F0E; }
.ace_paren_color_2 { color: #2CA02C; }
.ace_paren_color_3 { color: #D62728; }
.ace_paren_color_4 { color: #9467BD; }
.ace_paren_color_5 { color: #8C564B; }
.ace_paren_color_6 { color: #E377C2; }
改完后会发现缩进线的颜色会消失,我们需要再添加以下内容:
/* 彩虹缩进线(D3颜色) */
.rstudio_rainbow_indent_guides .ace_line .ace_indent-guide:nth-child(7n+1) {background: linear-gradient(to left, #1F77B4bb 1px, transparent 1px, transparent);
}
.rstudio_rainbow_indent_guides .ace_line .ace_indent-guide:nth-child(7n+2) {background: linear-gradient(to left, #FF7F0Ebb 1px, transparent 1px, transparent);
}
.rstudio_rainbow_indent_guides .ace_line .ace_indent-guide:nth-child(7n+3) {background: linear-gradient(to left, #2CA02Cbb 1px, transparent 1px, transparent);
}
.rstudio_rainbow_indent_guides .ace_line .ace_indent-guide:nth-child(7n+4) {background: linear-gradient(to left, #D62728bb 1px, transparent 1px, transparent);
}
.rstudio_rainbow_indent_guides .ace_line .ace_indent-guide:nth-child(7n+5) {background: linear-gradient(to left, #9467BDbb 1px, transparent 1px, transparent);
}
.rstudio_rainbow_indent_guides .ace_line .ace_indent-guide:nth-child(7n+6) {background: linear-gradient(to left, #8C564Bbb 1px, transparent 1px, transparent);
}
.rstudio_rainbow_indent_guides .ace_line .ace_indent-guide:nth-child(7n+7) {background: linear-gradient(to left, #E377C2bb 1px, transparent 1px, transparent);
}
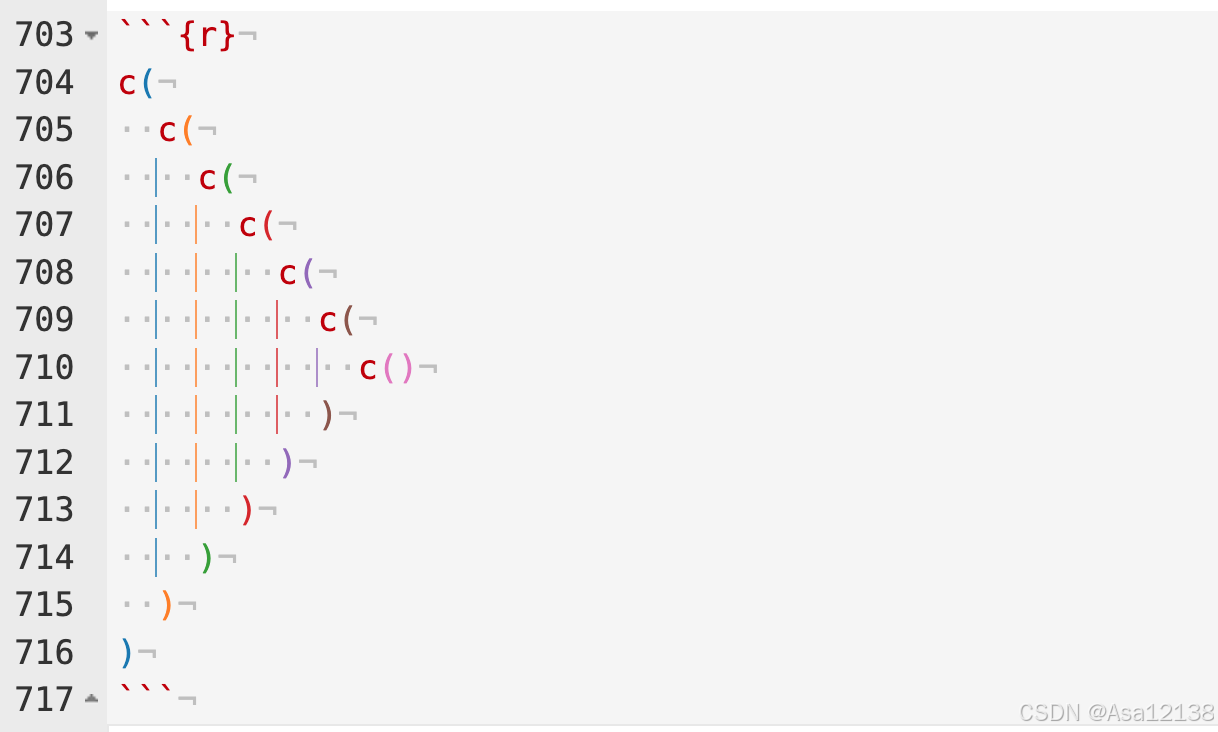
随后将修改后的rstheme文件Add进去,点击Apply之后最终效果如下:
References
- https://r-coder.com/rstudio-themes/
- https://rstudio.github.io/rstudio-extensions/rstudio-theme-creation.html