Linux编译rpm包与deb包
注意: 本文内容于 2025-05-14 23:55:53 创建,可能不会在此平台上进行更新。如果您希望查看最新版本或更多相关内容,请访问原文地址:编译rpm包与deb包。感谢您的关注与支持!
近期在通过源码编译安装一些软件包时,发现一些问题。
- 很多工具只在编译期需要,运行时不需要。
- 编译安装存在难以卸载干净的问题。
在生产环境中直接进行编译安装虽然可行,但是不方便进行维护,因此还是尽量少用。像容器化,比如docker镜像,就是只打包进去最终编译后的成果。而某些场景下,我们是不建议使用容器的。此时就需要通过rpm或者deb来解决该问题。
.rpm全名为RedHat Package Manager,适用于RedHat系列系统(RHEL/RockyLinux/CentOS/Fedora/openSUSE 等)。
.deb全名为Debian Package,适用于Debian系列系统(Debian/Ubuntu/Kali等)。
deb包跟rpm包其实解决的场景问题都是一样的,只是适用于不同系统而已。那么如何理解deb包和rpm包的场景?
以rpm包为例,即在特定环境中(如 CentOS 7/RHEL 7)将程序编译好,并打包成一个可安装的二进制包,方便其他相同系统直接安装使用。
- 不用在每台机器上重新编译,节省时间和资源
- 解决难以卸载干净问题,并支持安装、升级、回滚、查询、卸载等
它可以包含如下内容
- 可执行文件
- 动态链接库
- 配置文件
- 文档文件
rpm包的名称遵循以下格式
<name>-<version>-<release>.<arch>.rpm
一、rpm
本章节所有示例步骤,均是基于RockyLinux9.5完成。
Linux rocky-vm 5.14.0-503.14.1.el9_5.aarch64 #1 SMP PREEMPT_DYNAMIC Fri Nov 15 07:14:03 EST 2024 aarch64 aarch64 aarch64 GNU/Linux
本章节参考文章
- RPM 打包︰由一竅不通到動手濫用 (一). 現在就動手打包你第一個 rpm 檔 | by Koala Yeung | Linux 入門筆記 | Medium
- How to create a Linux RPM package
1.1 rpm命令基础
下面简单记录常见的rpm命令使用方式
# 安装rpm包。初次安装,若已安装则报错
rpm -ivh rpmbuild/RPMS/noarch/hello-0.0.1-1.el9.noarch.rpm# 更新rpm包。本地已安装
rpm -Uvh rpmbuild/RPMS/noarch/hello-0.0.1-1.el9.noarch.rpm# 查看rpm包信息
rpm -qi hello# 查看rpm包安装的清单
rpm -ql hello# 查看某个文件依赖的rpm包
rpm -qf /usr/local/bin/hello# 卸载rpm包
rpm -ev hello# 查看已经安装的rpm包
rpm -qa# 查看rpm包依赖的其他内容
rpm -qR hello
1.2 编译入门
准备一个完全初始化的RedHat系统,执行如下命令,安装rpm构建工具
yum -y install rpm-build rpmlint rpmdevtools
初始化rpm构建目录
rpmdev-setuptree
目录结构说明
[root@rocky-vm ~]# tree /root/rpmbuild
/root/rpmbuild
├── BUILD:存放解压后的源代码包,是实际编译发生的地方。
├── RPMS:包含为不同架构构建的 RPM 包
├── SOURCES:存放原始源代码压缩包和相关的补丁文件。通常为.tar.gz或者.tgz文件
├── SPECS:存放 .spec 文件,即 RPM 构建规范文件。
└── SRPMS:存放构建完成的源码 RPM 包(Source RPM)。
创建脚本,并将其压缩为.tgz
cat>hello<< EOF
#!/usr/bin/env bash
echo "Hello world"
EOF
chmod +x hello
mkdir hello-0.0.1
mv hello.sh hello-0.0.1
tar -zcvf hello-0.0.1.tar.gz hello-0.0.1
mv hello-0.0.1.tar.gz rpmbuild/SOURCES
创建.spec文件
rpmdev-newspec hello
此处直接放置hello.spec源码,并将其放置在rpmbuild/SPECS
Name:           hello
Version:        0.0.1
Release:        1%{?dist}
Summary:        A simple hello world script
BuildArch:      noarchLicense:        GPL
Source0:        %{name}-%{version}.tar.gzRequires:       bash%description
A demo RPM build%prep
%setup -q%install
rm -rf $RPM_BUILD_ROOT
mkdir -p $RPM_BUILD_ROOT/%{_bindir}
cp %{name} $RPM_BUILD_ROOT/%{_bindir}%clean
rm -rf $RPM_BUILD_ROOT%files
%{_bindir}/%{name}%changelog
* Wed May 14 2025 Valentin Bajrami <valentin.bajrami@slimmer.ai> - 0.0.1
- First version being packaged
像%{_bindir}是rpm中定义的变量名,变量值为/usr/bin。可以通过如下命令查看变量值。
rpm --eval %{_bindir}
常见变量名如下
| 变量名 | 变量值 |
|---|---|
| %{_bindir} | /usr/bin |
| %{_datadir} | /usr/share |
| %{_sysconfdir} | /etc |
编译相关的命令如下
# 测试`.spec`文件
rpmlint rpmbuild/SPECS/hello.spec# 构建`.src.rpm`源码包 build source
rpmbuild -bs rpmbuild/SPECS/hello.spec# 构建`.rpm`二进制包 build binary
rpmbuild -bb rpmbuild/SPECS/hello.spec# 如果两个包都要构建,则使用build all
rpmbuild -ba rpmbuild/SPECS/hello.spec
构建完成后的目录结构如下
[root@rocky-vm ~]# tree rpmbuild
rpmbuild
├── BUILD
│   └── hello-0.0.1
│       └── hello.sh
├── BUILDROOT
├── RPMS
│   └── noarch
│       └── hello-0.0.1-1.el9.noarch.rpm
├── SOURCES
│   └── hello-0.0.1.tar.gz
├── SPECS
│   └── hello.spec
└── SRPMS└── hello-0.0.1-1.el9.src.rpm8 directories, 5 files
1.3 实践-编译
meethigher/rpm-build-examples: 基于rocky9.5构建rpm的脚本示例
1.3.1 编译postgresql12.9
rpm目录结构如下
[root@rocky-vm ~]# tree rpmbuild/
rpmbuild/
├── BUILD
├── RPMS
├── SOURCES
│   └── postgresql-12.9.tar.gz
├── SPECS
│   └── postgresql.spec
└── SRPMS5 directories, 2 files
postgresql.spec内容
Name:           postgresqlVersion:        12.9Release:        1%{?dist}Summary:        PostgreSQL 12.9 database server (custom compiled)License:        PostgreSQLURL:            https://www.postgresql.org/Source0:        postgresql-12.9.tar.gzBuildRequires:  gcc,readline,readline-devel,zlib,zlib-devel%description
PostgreSQL is a powerful, open source object-relational database system.%prep
%setup -q -n postgresql-12.9%build
./configure --prefix=/usr/local/postgresqlmake -j$(nproc)%install
rm -rf $RPM_BUILD_ROOTmake install DESTDIR=%{buildroot}%files
/usr/local/postgresql%changelog
* Thu May 15 2025 YourName <you@example.com> - 12.9-1
- Custom built PostgreSQL 12.9首先,需要先将BuildRequires里面要求的内容,进行安装
yum -y install gcc readline readline-devel zlib zlib-devel
验证并编译二进制rpm
# 验证spec
rpmlint rpmbuild/SPECS/postgresql.spec
# 编译二进制rpm
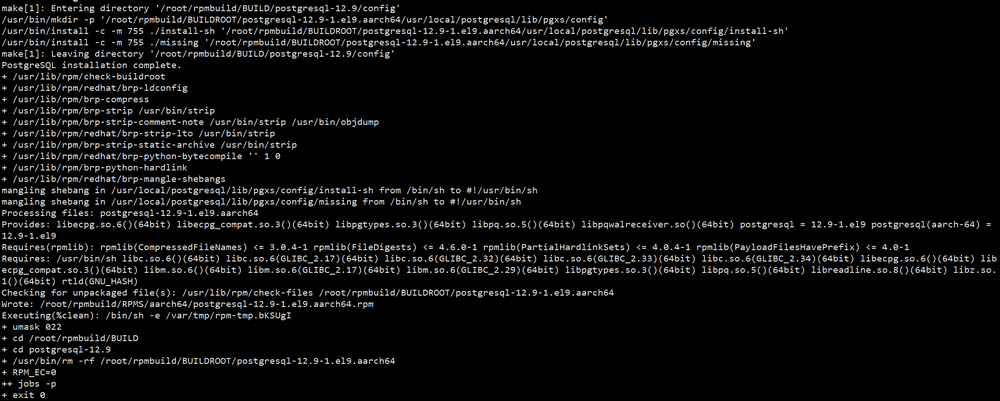
rpmbuild -bb --nodebuginfo rpmbuild/SPECS/postgresql.spec
如果不带
--nodebuginfo,编译时会出现error: Empty %files file /root/rpmbuild/BUILD/postgresql-12.9/debugsourcefiles.lis参考error: Empty %files file /xxxx/rpmbuild/BUILD/xxxx/debugsourcefiles.list-CSDN博客
这个过程,只将编译成果输出成rpm。后续还需要自己在rpm安装后,创建用户和配置,具体细节可以参照PostgreSQL在线安装与编译安装 - 言成言成啊
不过rpm的.spec文件也支持在安装(或卸载)时执行自定义脚本操作,包括:
- 安装前执行(
%pre) - 安装后执行(
%post) - 卸载前执行(
%preun) - 卸载后执行(
%postun)
此处不展开记录了。
1.3.2 编译geos3.9.4
geos.spec
Name:           geosVersion:        3.9.4Release:        1%{?dist}Summary:        geos-3.9.4.tar.gz (custom compiled)License:        GPL-2.0URL:            http://example.comSource0:        geos-3.9.4.tar.gzBuildRequires:  gcc,gcc-c++%description
PostGIS extends the capabilities of the PostgreSQL relational database by adding support for storing, indexing, and querying geospatial data.%prep
%setup -q -n geos-3.9.4%build
./configure%install
rm -rf $RPM_BUILD_ROOTmake install DESTDIR=%{buildroot}%files
/usr/local%changelog
* Fri May 16 2025 root
- Custom built from geos-3.9.4.tar.gz

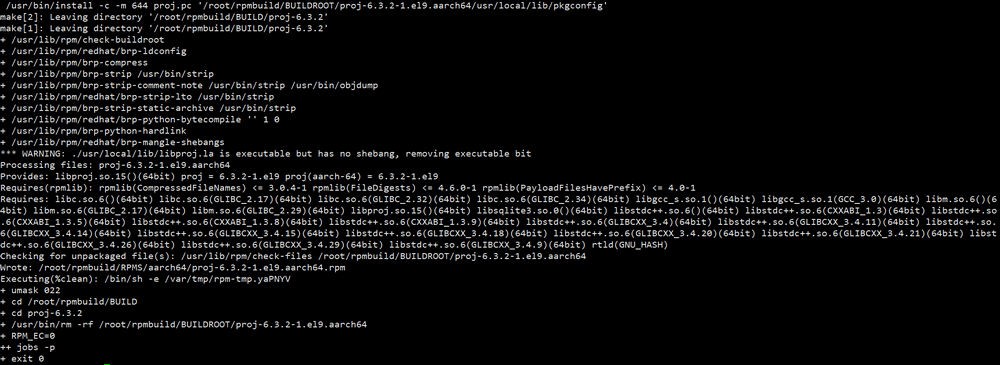
1.3.3 编译proj6.3.2
proj.spec
Name:           projVersion:        6.3.2Release:        1%{?dist}Summary:        proj-6.3.2.tar.gz (custom compiled)License:        GPL-2.0URL:            http://example.comSource0:        proj-6.3.2.tar.gzBuildRequires:  gcc,gcc-c++,sqlite,sqlite-devel%description
PostGIS extends the capabilities of the PostgreSQL relational database by adding support for storing, indexing, and querying geospatial data.%prep
%setup -q -n proj-6.3.2%build
./configure%install
rm -rf $RPM_BUILD_ROOTmake install DESTDIR=%{buildroot}%files
/usr/local%changelog
* Fri May 16 2025 root
- Custom built from proj-6.3.2.tar.gz
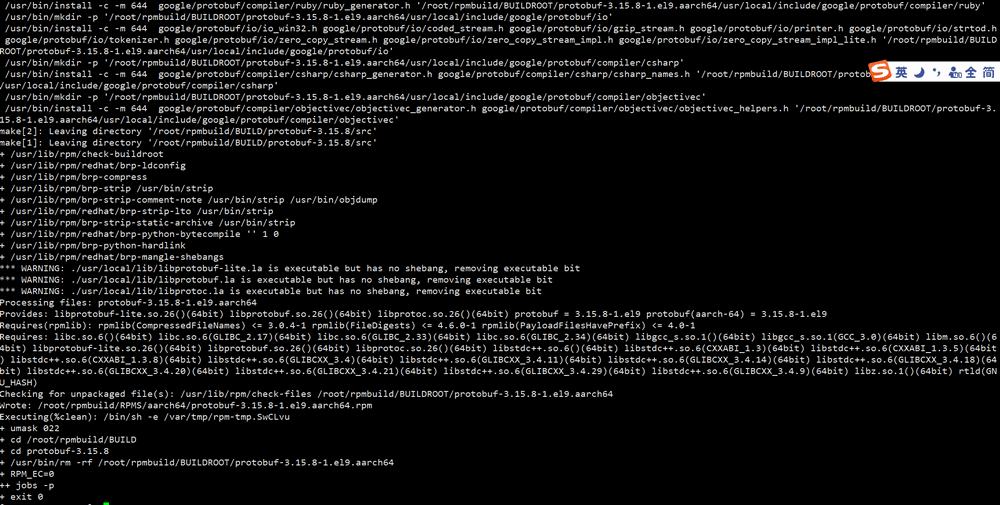
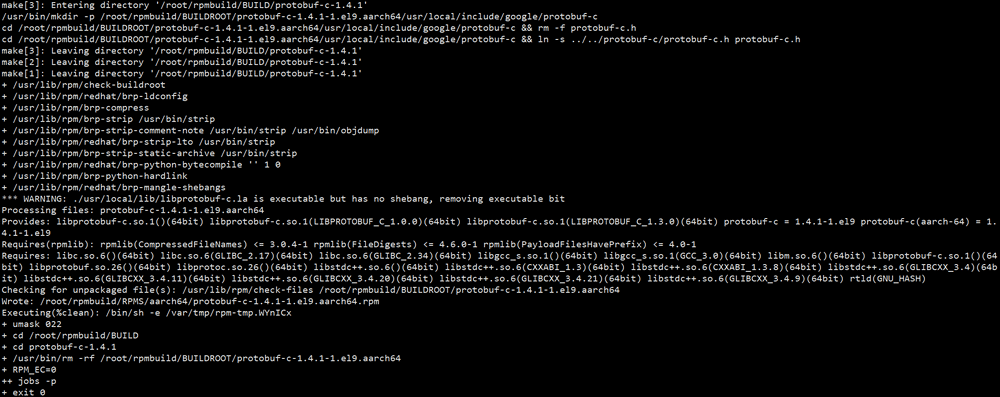
1.3.4 编译protobuf3.15.8
protobuf.spec
Name:           protobufVersion:        3.15.8Release:        1%{?dist}Summary:        protobuf (custom compiled)License:        GPL-2.0URL:            http://example.comSource0:        protobuf-3.15.8.tar.gzBuildRequires:  gcc,gcc-c++%description
PostGIS extends the capabilities of the PostgreSQL relational database by adding support for storing, indexing, and querying geospatial data.%prep
%setup -q -n protobuf-3.15.8%build
./configure%install
rm -rf $RPM_BUILD_ROOTmake install DESTDIR=%{buildroot}%files
/usr/local%changelog
* Fri May 16 2025 root
- Custom built protobuf-3.15.8
1.3.5 编译protobuf-c1.4.1
protobuf-c.spec
Name:           protobuf-cVersion:        1.4.1Release:        1%{?dist}Summary:        protobuf-c-1.4.1.tar.gz (custom compiled)License:        GPL-2.0URL:            http://example.comSource0:        protobuf-c-1.4.1.tar.gzBuildRequires:  gcc,gcc-c++,protobuf%description
PostGIS extends the capabilities of the PostgreSQL relational database by adding support for storing, indexing, and querying geospatial data.%prep
%setup -q -n protobuf-c-1.4.1%build
export PKG_CONFIG_PATH=/usr/local/lib/pkgconfig
./configure%install
rm -rf $RPM_BUILD_ROOTmake install DESTDIR=%{buildroot}%files
/usr/local%changelog
* Fri May 16 2025 root
- Custom built from protobuf-c-1.4.1.tar.gz
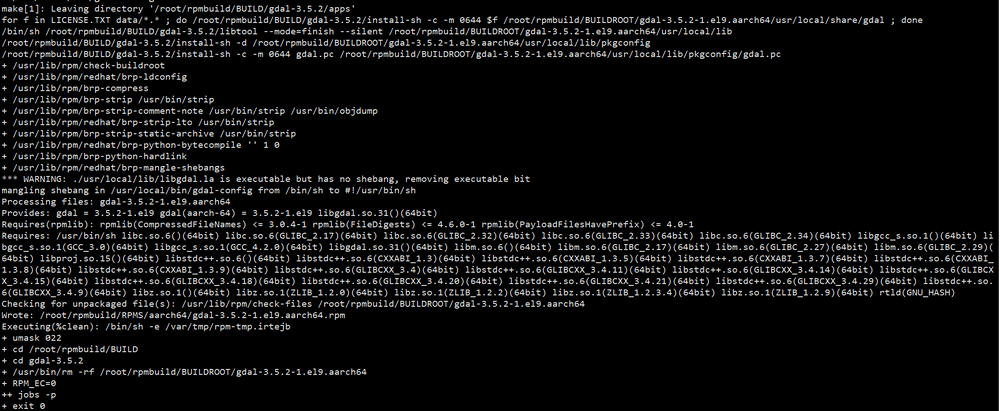
1.3.6 编译gdal3.5.2
gdal.spec
Name:           gdalVersion:        3.5.2Release:        1%{?dist}Summary:        gdal-3.5.2.tar.gz (custom compiled)License:        GPL-2.0URL:            http://example.comSource0:        gdal-3.5.2.tar.gzBuildRequires:  gcc,gcc-c++,proj%description
PostGIS extends the capabilities of the PostgreSQL relational database by adding support for storing, indexing, and querying geospatial data.%prep
%setup -q -n gdal-3.5.2%build
./configure%install
rm -rf $RPM_BUILD_ROOTmake install DESTDIR=%{buildroot}%files
/usr/local%changelog
* Sat May 17 2025 root
- Custom built from gdal-3.5.2.tar.gz
1.3.7 编译postgis3.3.2
postgis.spec
Name:           postgisVersion:        3.3.2Release:        1%{?dist}Summary:        postgis-3.3.2.tar.gz (custom compiled)License:        GPL-2.0URL:            https://postgis.net/Source0:        postgis-3.3.2.tar.gzBuildRequires:  gcc,gcc-c++,sqlite,sqlite-devel,libxml2,libxml2-devel,postgresql,geos,proj,protobuf,protobuf-c,gdal%description
PostGIS extends the capabilities of the PostgreSQL relational database by adding support for storing, indexing, and querying geospatial data.%prep
%setup -q -n postgis-3.3.2%build
echo -e "/usr/local/lib">/etc/ld.so.conf.d/locallib.conf
sudo ldconfig
./configure --with-pgconfig=/usr/local/postgresql/bin/pg_config%install
rm -rf $RPM_BUILD_ROOTmake install DESTDIR=%{buildroot}%files
/usr/local%changelog
* Fri May 16 2025 root
- Custom built from postgis-3.3.2.tar.gz

1.4 实践-安装
现在需要安装postgresql12.9与postgis3.3.2。首先,准备编译后的rpm包目录如下
[root@rocky-vm aarch64]# tree
.
├── gdal-3.5.2-1.el9.aarch64.rpm
├── geos-3.9.4-1.el9.aarch64.rpm
├── postgis-3.3.2-1.el9.aarch64.rpm
├── postgresql-12.9-1.el9.aarch64.rpm
└── proj-6.3.2-1.el9.aarch64.rpm0 directories, 5 files
之后,执行命令,进行安装
rpm -ivh postgresql-12.9-1.el9.aarch64.rpm postgis-3.3.2-1.el9.aarch64.rpm gdal-3.5.2-1.el9.aarch64.rpm geos-3.9.4-1.el9.aarch64.rpm proj-6.3.2-1.el9.aarch64.rpm

然后,进行数据库相关配置。
useradd postgres
mkdir -p /usr/local/postgresql/data
chown -R postgres:postgres /usr/local/postgresql
sudo -u postgres /usr/local/postgresql/bin/initdb -D /usr/local/postgresql/data
sudo -u postgres /usr/local/postgresql/bin/pg_ctl start -D /usr/local/postgresql/data
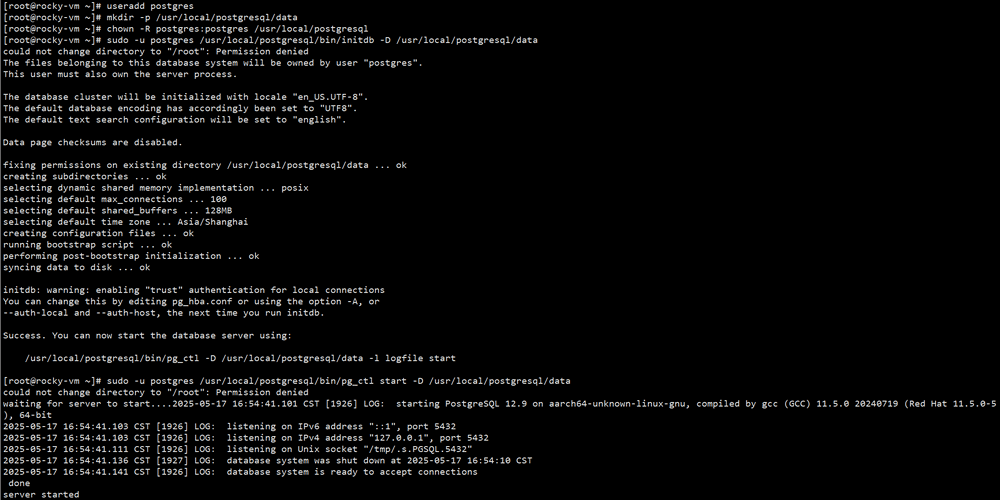
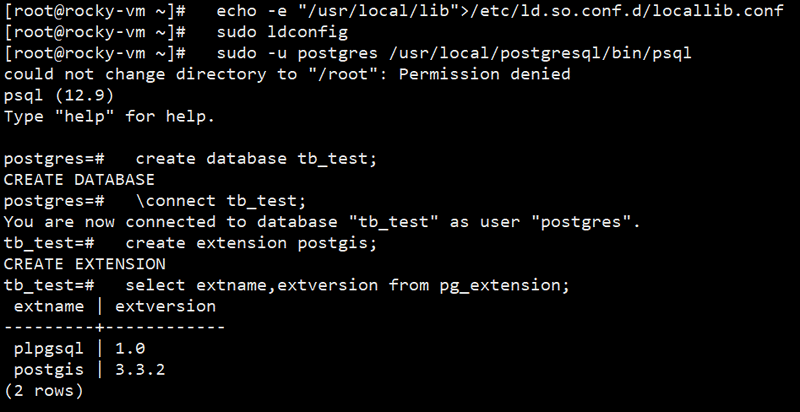
最后,开启postgis扩展。
echo -e "/usr/local/lib">/etc/ld.so.conf.d/locallib.confsudo ldconfigsudo -u postgres /usr/local/postgresql/bin/psqlcreate database tb_test;\connect tb_test;create extension postgis;select extname,extversion from pg_extension;
二、deb
本章节所有示例步骤,均是基于Debian12.10完成。
Linux debian 6.1.0-32-amd64 #1 SMP PREEMPT_DYNAMIC Debian 6.1.129-1 (2025-03-06) x86_64 GNU/Linux
2.1 dpkg命令基础
下面简单记录常见的dpkg命令使用方式
# 安装/更新软件包
dkpg -i xxx.deb
# 查看包信息
dpkg -s xxx
# 查看包的安装清单
dpkg -L xxx
# 查找文件属于哪个包
dpkg -S /usr/bin/sh
# 卸载包
dpkg -r xxx
# 列出所有已安装包
dpkg -l
# 查看包依赖的其他内容
dpkg -s xxx
2.2 编译入门
按如下格式创建hello目录
hello
├── DEBIAN
│   └── control
└── usr└── local└── bin└── hello5 directories, 2 files
规范说明
- 路径
包名/DEBIAN/control:存放deb编译的规范文件。 - 路径
包名/usr/local/bin/hello:安装deb后,将脚本放置在/usr/local/bin路径下。
创建control
Package: hello
Version: 0.0.1
Section: base
Priority: optional
Architecture: all
Build-Depends: gcc
Depends: bash
Maintainer: YourName <your.email@example.com>
Description: A simple Hello World example script
运行命令,编译deb
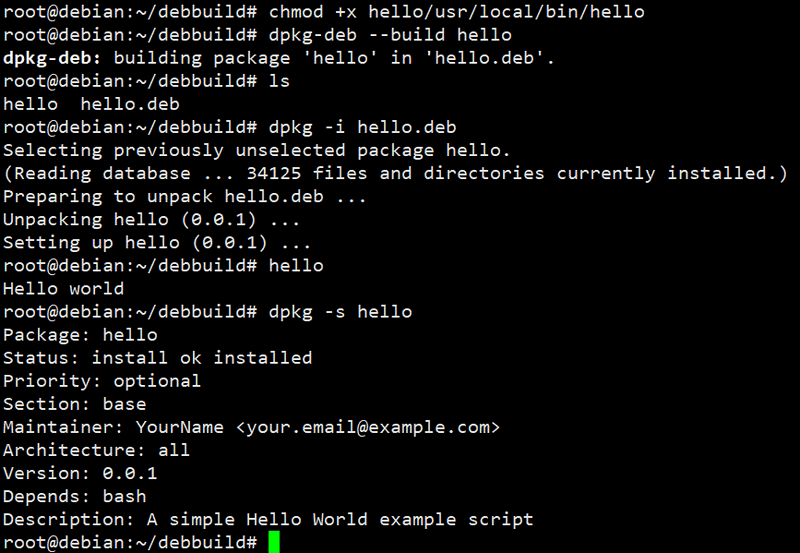
dpkg-deb --build hello hello-0.0.1-1.noarch.deb
dpkg-deb在build时,不会校验Build-Depends,只有像debuild或者dpkg-buildpackage这类才会在编译时校验。
2.3 实践-编译
meethigher/deb-build-examples: 基于Debian12.10构建deb的脚本示例
2.3.1 编译PostgreSQL12.9
deb的编译,比rpm要麻烦不少,但是却又更灵活。他需要自己手动编译并导出编译结果到指定目录,然后打包。
按如下格式创建postgresql目录
root@debian:~/debbuild# tree postgresql/
postgresql/
└── DEBIAN└── control2 directories, 1 file
首先,我们需要安装make相关的命令。
apt -y install make
之后,安装postgresql编译需要的软件包。
apt -y install gcc libreadline-dev zlib1g-dev
解压postgresql-12.9.tar.gz并将编译结果输出到指定目录~/debbuild/postgresql
tar -zxvf postgresql-12.9.tar.gz
cd postgresql-12.9
./configure --prefix=/usr/local/postgresql && make
make install DESTDIR=~/debbuild/postgresql
cd ~/debbuild/
dpkg-deb --build postgresql postgresql-12.9-1.aarch64.deb

2.4 实践-安装
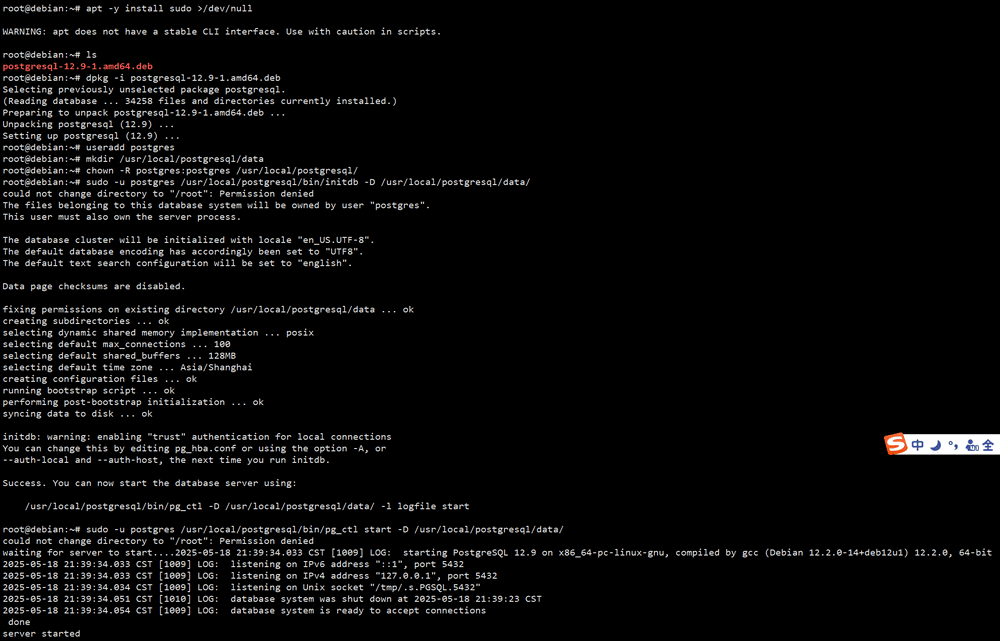
debian默认是不安装sudo,需要手动安装,之后再安装postgresql.deb
apt -y install sudo
dpkg -i postgresql-12.9-1.amd64.deb
useradd postgres
mkdir /usr/local/postgresql/data
mkdir /usr/local/postgresql/data
sudo -u postgres /usr/local/postgresql/bin/initdb -D /usr/local/postgresql/data/
sudo -u postgres /usr/local/postgresql/bin/pg_ctl start -D /usr/local/postgresql/data/