【Vue】路由1——路由的引入 以及 路由的传参
目录
一、什么是路由 !
1.1 一个完整的前端路由规则编辑
1.2 后端路由
1.3 安装路由插件
1.4 嵌套(多级)路由
二、路由的query传参
2.1 传参
2.2 取值
三、命名路由
四、 路由的params参数
五、路由的props配置
第一种写法:props的对象写法,但是由于数据是死的,这样传参没有意义就用的很少
第二种写法:传递params值 为布尔值
第三种写法:函数形式 (最推荐)
总结:
路由
1.基本使用
2.几个注意点
3.多级路由(多级路由)
4.路由的query参数
5.命名路由
6.路由的params参数
7.路由的props配置
总结不易~ 本章节对我有很大的收获, 希望对你也是!!!
本节素材已上传至Gitee:yihaohhh/我爱Vue - Gitee.com![]() https://gitee.com/liu-yihao-hhh/i-love---vue/tree/master/30_src_%E8%B7%AF%E7%94%B1%E7%9A%84%E5%9F%BA%E6%9C%AC%E4%BD%BF%E7%94%A8
https://gitee.com/liu-yihao-hhh/i-love---vue/tree/master/30_src_%E8%B7%AF%E7%94%B1%E7%9A%84%E5%9F%BA%E6%9C%AC%E4%BD%BF%E7%94%A8
一、什么是路由 !
路由这一节非常重要!几乎每一个用vue写的项目里面都要包含路由~ 我们先来区分路由和路由器的区别是什么!
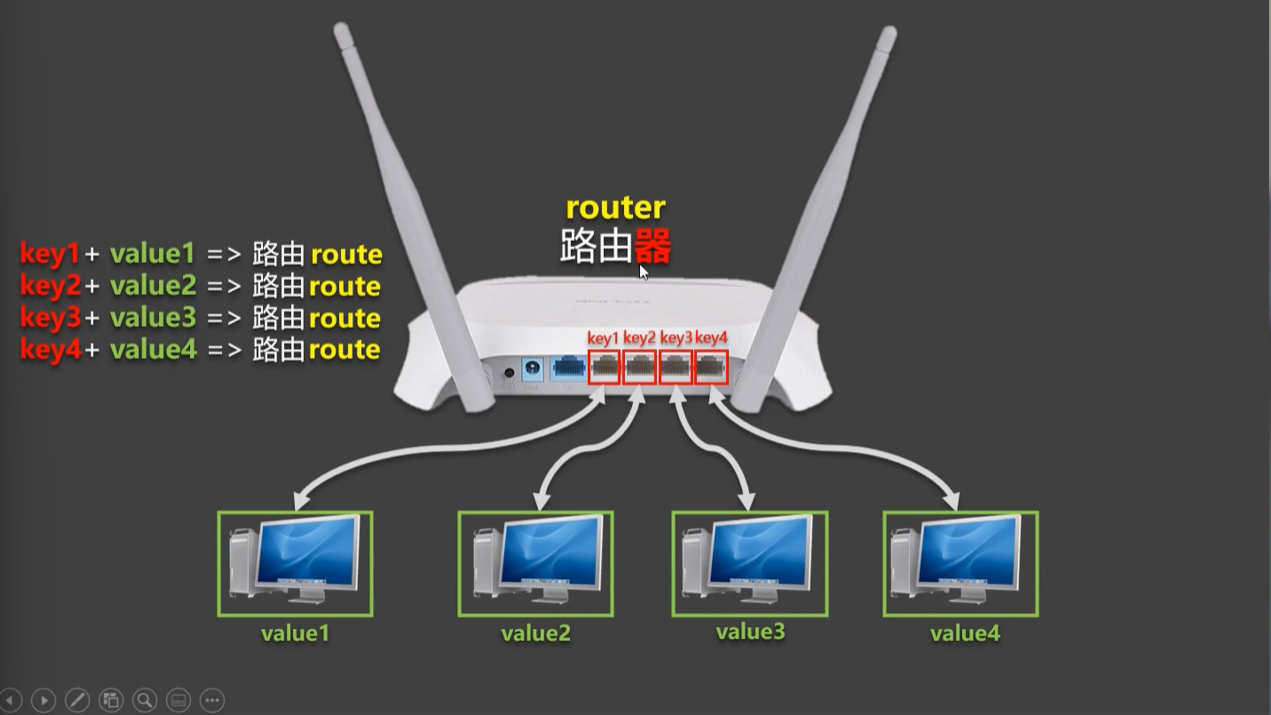
- 路由就是一组key-value的对应关系
- 多个路由,需要经过路由器的管理
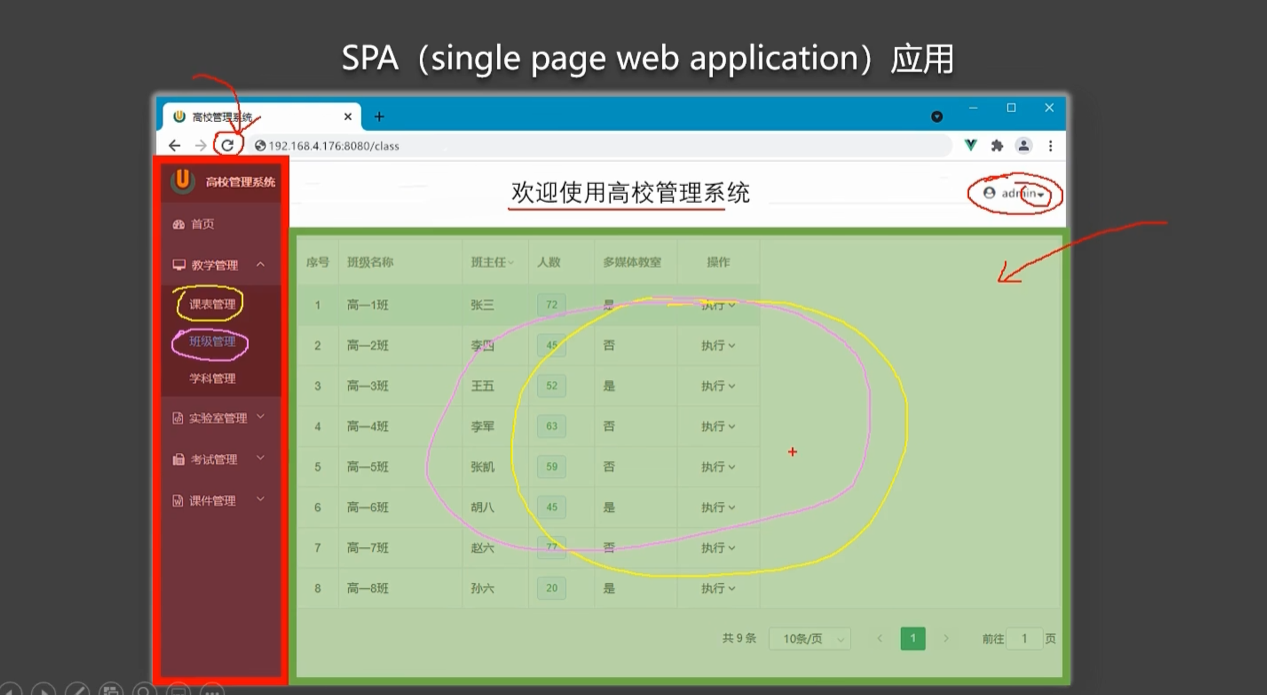
生活里的路由就是实现多台设备同时上网,编程里面的路由就是实现单页面应用!以前我们写的页面都是通过一个a超链接进行各种跳转来实现各种丰富多彩的页面,但是那就会存在一个问题,每次页面都要重新渲染你大量的页面信息,会造成页面抖动还很慢交互效果很不好。所以现在就都采用的是单页面应用(SPA),也就是路由控制。
这就是单页面应用,在同一页面中点击左侧的导航位置,页面是不发生跳转的,但是页面内容会发生变化!
1.1 一个完整的前端路由规则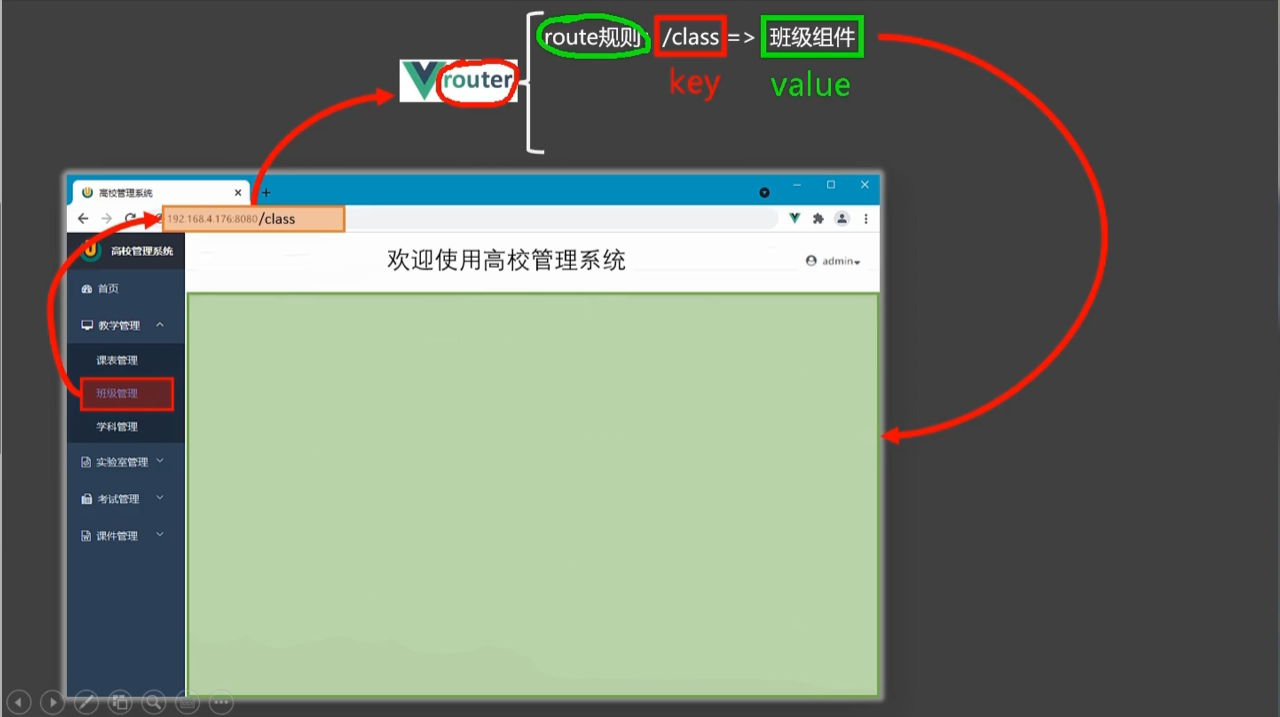
当年点击班级管理的时候, Vue里面的router路由器时刻都在监测,监测到端口号后面内容发生了改变,/class 然后router路由器就去进行route路由规则对比,发现真的存在一个/class的key值,然后就去配对value的班级组件来渲染在页面上!
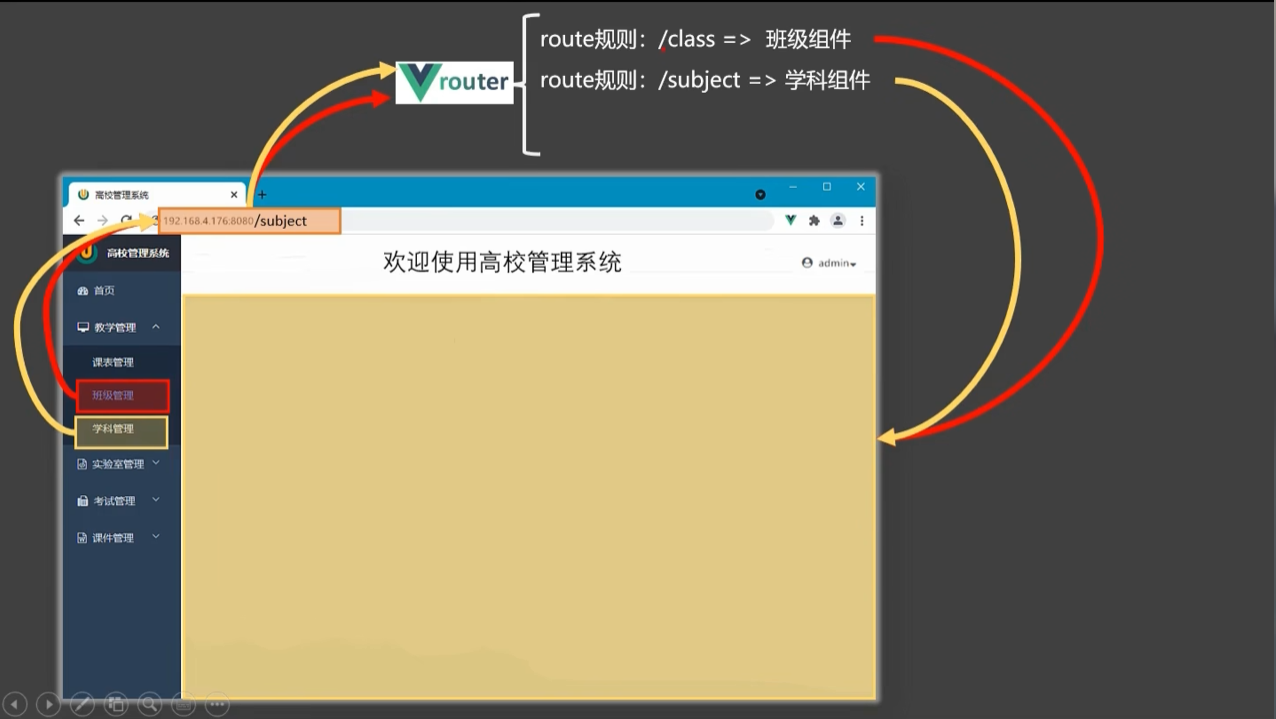
此时,你又点击了学科管理,此时端口号后面的路径再次发生变化,router又监测到了,那么Vue里面的router路由器又进行route规则比对,发现又存在一个/subject的key值,然后进行配对当前的value值学科组件然后再次渲染在页面上
所以SPA里面的路由应用是为了实现导航区和展示区的相互切换
1.2 后端路由
对于后端路由,你是什么路径,我就调用什么样的函数去响应你的请求
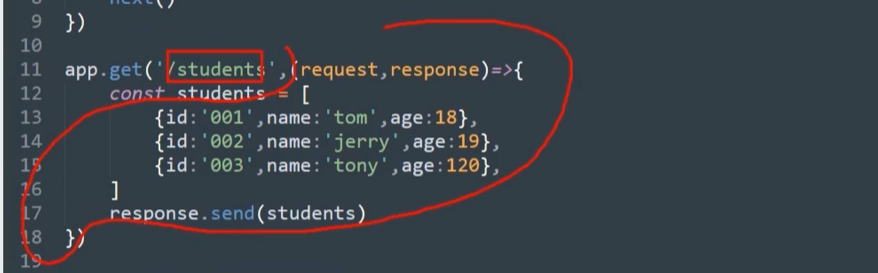
- 理解:value 是 function, 用于处理客户端提交的请求。
- 工作过程:服务器接收到一个请求时, 根据请求路径找到匹配的函数来处理请求, 返回响应数据。
1.3 安装路由插件
npm i vue-router@3main.js 进行引入和应用插件:
import Vue from 'vue'import App from './App.vue'// 引入
import VueRouter from 'vue-router'// 引入路由器
import router from './router'// 关闭Vue生产提示
Vue.config.productionTip = false// 应用插件
Vue.use(VueRouter)// 创建vm
new Vue({el: '#app',render: h => h(App),router: router
})
那么引入的路由器,肯定在一个应用中要来专门创建这个路由器,一个应用里面由一个router文件专门管理路由

./router/index.js文件时专门创建并暴露一个路由器的, 写法很简单!
// 该文件专门用于创建整个应用的路由器
import VueRouter from "vue-router";
// 引入组件
import About from '../components/About.vue'
import Home from '../components/Home.vue'// 创建并暴露一个路由器
export default new VueRouter({routes: [{path: '/about',component: About},{path: 'home',component: Home}]
})
回到App组件中,我们的a链接跳转就不在用了,以后都可以用路由跳转,那就是由重新的语法描述:a改成router-link, href改成to 同时跳转的链接改成 / + 组件名
<!-- 原始html中 我们使用a标签实现页面的跳转 --><!-- <a class="list-group-item active" href="./about.html">About</a> --><!-- <a class="list-group-item" href="./home.html">Home</a> --><router-link class="list-group-item" active-class="active" to="/about">About</router-link><router-link class="list-group-item" active-class="active" to="/home">Home</router-link>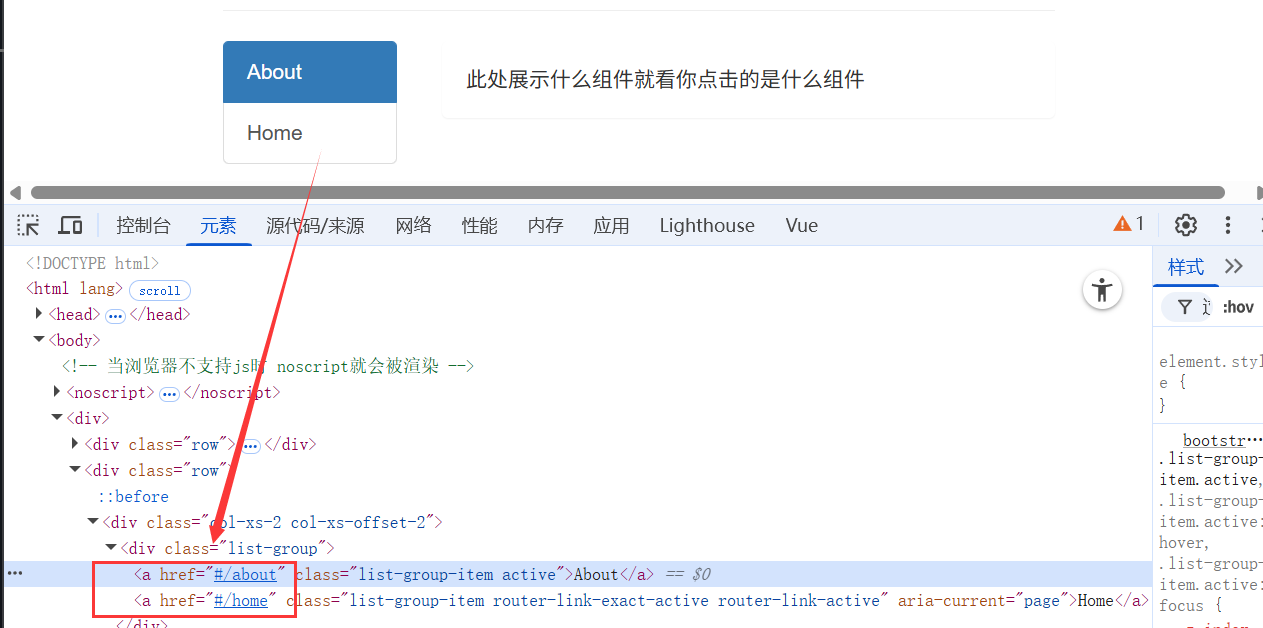
但其实也可以看到,当前的router-link在vue-router库下又给我们转成了a标签
active-class="active"
是 Vue Router 中 <router-link> 组件的一个属性,用来自定义激活状态时应用的 CSS 类名。

可以观察此时实现的效果,左上角的刷新也没有该改变,但是实现了跳转功能!
这里实现有个误区,并不是靠点击激活的!而是路径改变来激活!!
在你点击 <router-link> 的时候,Vue Router 会跳转到目标路由:
-
比如你点击
/home,路径就变成/home -
然后 Vue Router 会找到
to="/home"的<router-link>,给它加上class="list-group-item active"
所以是路径变化带来的“激活效果”,而不是“点击”这个动作本身带来的。
<router-view></router-view>
那么回到App组件中,要想指定组件呈现的位置,就是跟插槽有着一样的效果但是不叫slot 而是vue-router提供的router-view,此时就已经能够实现组件展示的效果了~
<div class="panel-body"><!-- 指定组件的呈现位置 --><router-view></router-view></div>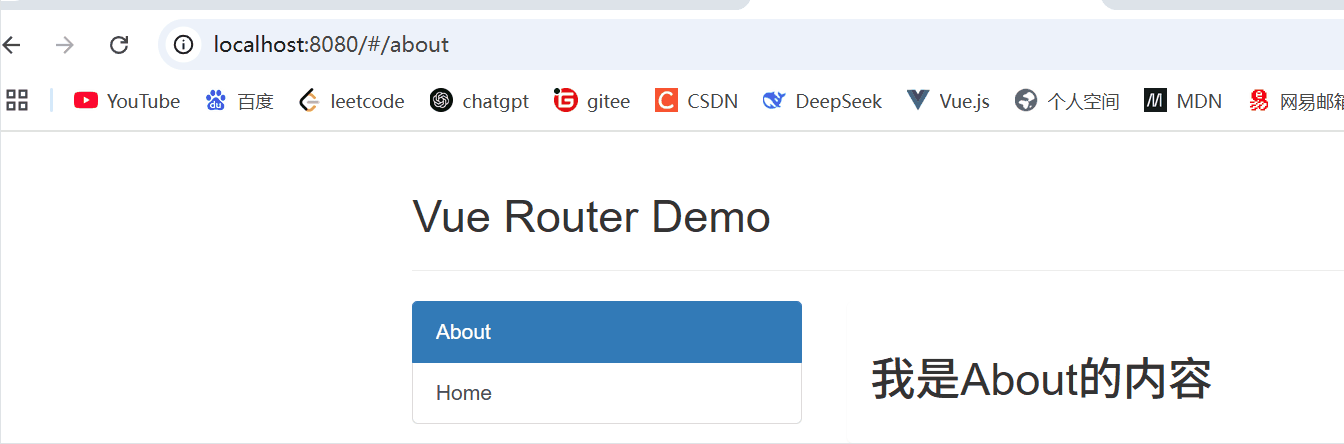
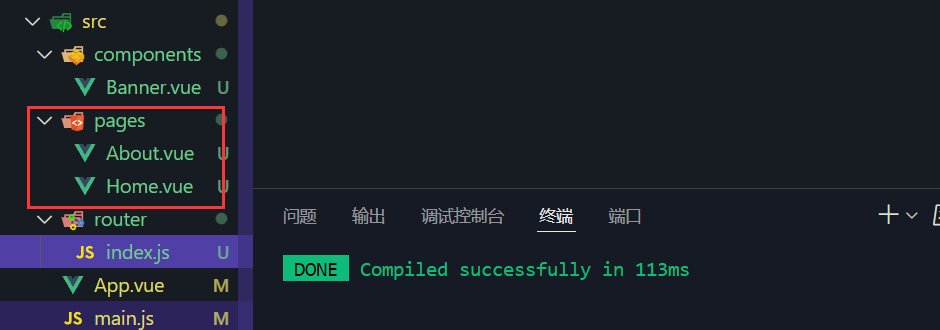
我们主打就是一个专业!创建一个Benner组件进行引入,来区分路由组件的区别,那么久创建一个pages文件夹,专门来存放路由组件!记得修改router的路由路径!!!
1.4 嵌套(多级)路由

分别创建Message组件 和 News组件:
<ul><li><a href="/message1">message001</a> </li><li><a href="/message2">message002</a> </li><li><a href="/message/3">message003</a> </li></ul> <ul><li>news001</li><li>news002</li><li>news003</li></ul>创建好后,我们推荐第一步先不要在Home路由组件内修改结构,先去修改路由路径:二级路径在children对象下书写,是一个数组,配置path的时候不要添加'/'
// 该文件专门用于创建整个应用的路由器
import VueRouter from "vue-router";
// 引入组件
import About from '../pages/About.vue'
import Home from '../pages/Home.vue'
import News from '../pages/News.vue'
import Message from '../pages/Message.vue'// 创建并暴露一个路由器
export default new VueRouter({routes: [// 一级路由{path: '/about',component: About},{path: '/home',component: Home,// 二级路由 不用加 /children: [{path: 'news',component: News},{path: 'message',component: Message},]},]
})
修改Home组件的结构,进行二级路由引入,其实就跟一级一样没什么区别,同样是touter-link 来进行链接跳转 active-class进行路由激活,router-view配置路由出口进行展示引入的路由组件
<ul class="nav nav-tabs"><li><!-- 二级路由及必须要写父路由的路径 --><router-link class="list-group-item" active-class="active" to="/home/news">News</router-link></li><li><router-link class="list-group-item" active-class="active" to="/home/message">Message</router-link></li></ul><router-view></router-view>本节素材已上传至Gitee:yihaohhh/我爱Vue - Gitee.com![]() https://gitee.com/liu-yihao-hhh/i-love---vue/tree/master/32_src_%E8%B7%AF%E7%94%B1%E7%9A%84query%E5%8F%82%E6%95%B0
https://gitee.com/liu-yihao-hhh/i-love---vue/tree/master/32_src_%E8%B7%AF%E7%94%B1%E7%9A%84query%E5%8F%82%E6%95%B0
二、路由的query传参
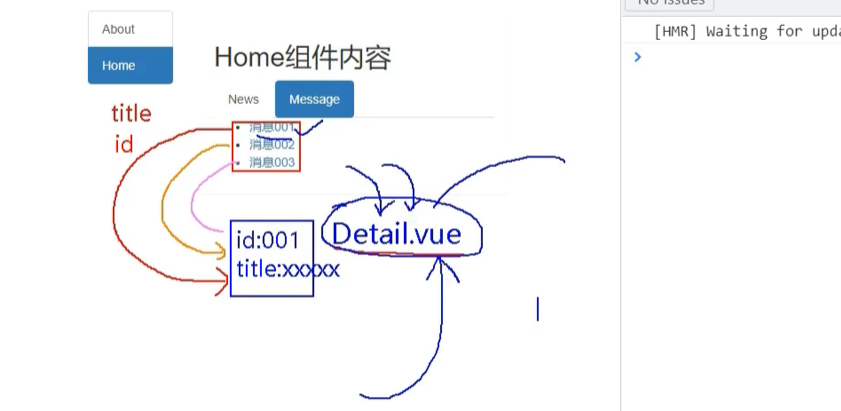
设想一下,假如我们现在需要三级路由,只是进行一个消息列表展示,倘若有100个消息列表,我们不可能去写一百个路由组件在来分别展示,所以我们要想办法将说要展示的消息都存放在一个路由组件中,然后通过传参来进行判断我们要获取的是什么内容来展示!
我们配置好三级路由后,就可以开始进行传参了:
2.1 传参
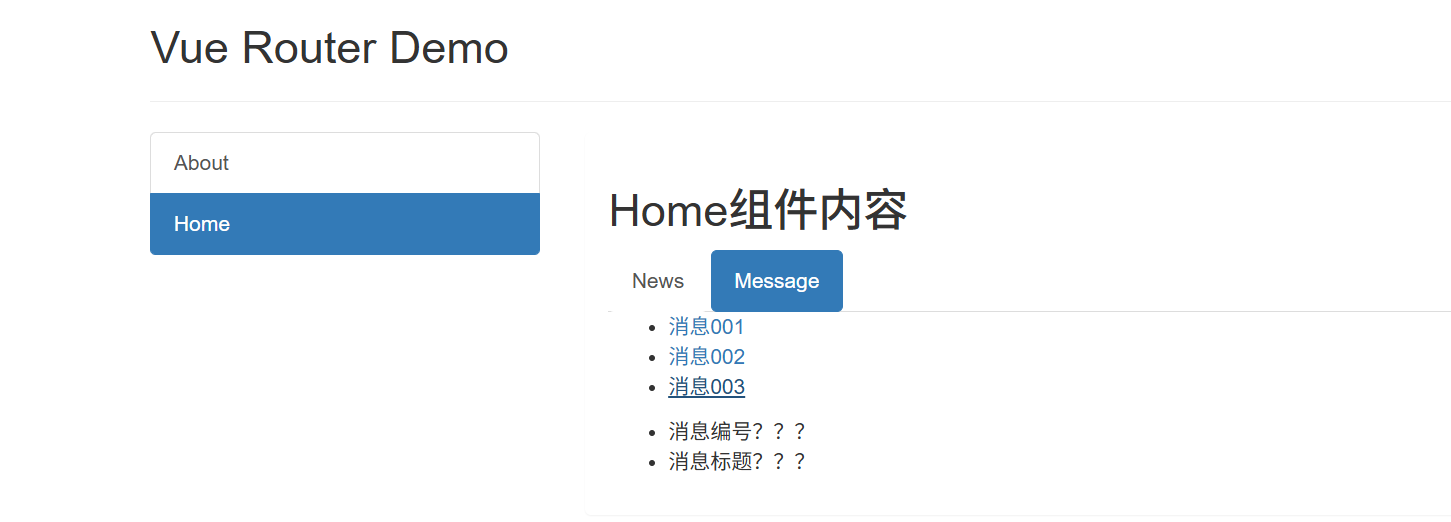
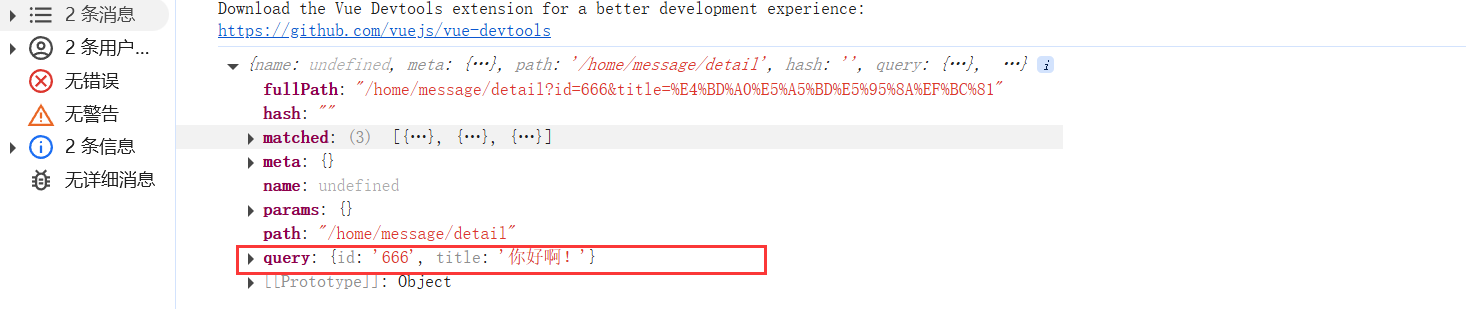
<router-link to="/home/message/detail?id=666&title=你好啊!">{{ e.title }}</router-link> 
2.2 取值
在Detail组件内用生命周期钩子观察到数据router
export default {name:'Detail',mounted() {console.log(this.$route)}
}
Detail组件:取值
<template><div><ul><li>消息编号{{$route.query.id}}</li><li>消息标题{{$route.query.title}}</li></ul></div>
</template><script>
export default {name:'Detail',mounted() {console.log(this.$route)}
}
</script>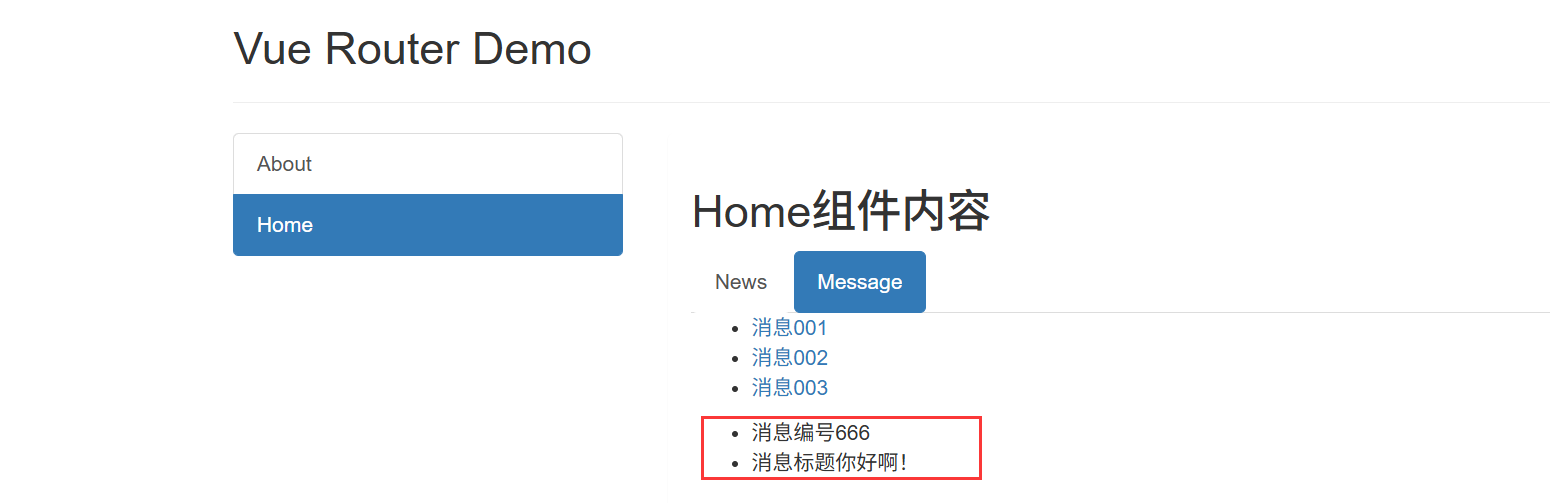
传参:v-bind来进行数据绑定,因为当前的数据获取是会变化的
to的字符串写法:
<router-link :to="`/home/message/detail?${id=m.id}&${title=m.title}`">{{ e.title }}</router-link> to的对象写法(推荐):
<!-- 跳转路由并携带query参数 to的对象写法 --><router-link :to="{path:'/home/message/detail',query: {id: e.id,title: e.title}}">{{ e.title }}</router-link> 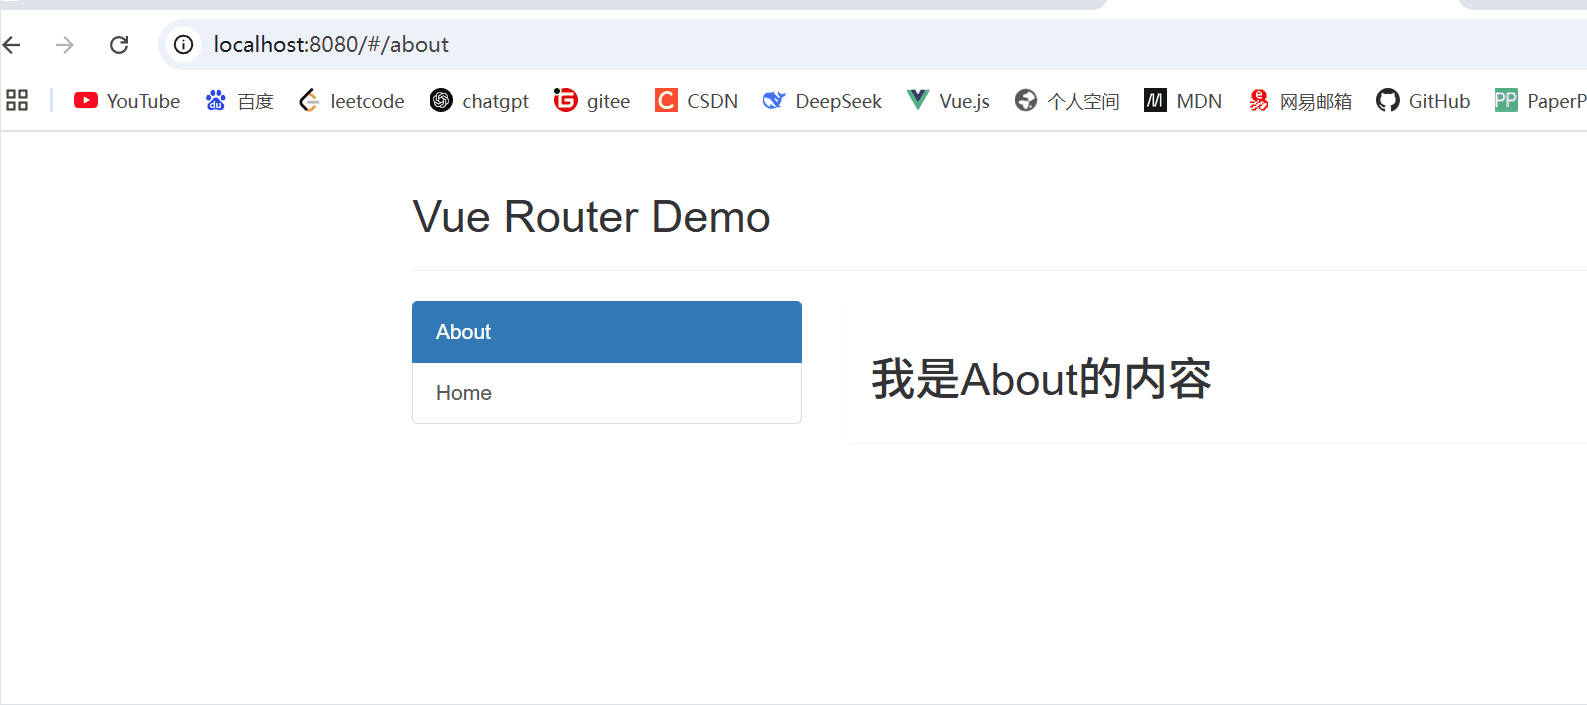
本节素材已上传至Gitee:yihaohhh/我爱Vue - Gitee.com![]() https://gitee.com/liu-yihao-hhh/i-love---vue/tree/master/33_src_%E8%B7%AF%E7%94%B1%E5%91%BD%E5%90%8D
https://gitee.com/liu-yihao-hhh/i-love---vue/tree/master/33_src_%E8%B7%AF%E7%94%B1%E5%91%BD%E5%90%8D
三、命名路由
我们可以给每一个路由都起一个自己的名字,这样再多级路由下,就不用写那么长的路径才能跳转
name 就代替了path的路径跳转,可以看到只能使用对象的形式进行书写
<router-link :to="{// path:'/home/message/detail',name:'xinxi',query: {id: e.id,title: e.title}}">{{ e.title }}</router-link> 像这种一级路由,要用name方式还是要进行改写对象的形式,所以,这种比较短的路由,就还是建议用path方法
<!-- <router-link class="list-group-item" active-class="active" to="/about">About</router-link> --><router-link class="list-group-item" active-class="active" :to="{name:'guanyu'}">About</router-link><router-link class="list-group-item" active-class="active" to="/home">Home</router-link>
// 该文件专门用于创建整个应用的路由器
import VueRouter from "vue-router";
// 引入组件
import About from '../pages/About.vue'
import Home from '../pages/Home.vue'
import News from '../pages/News.vue'
import Message from '../pages/Message.vue'
import Detail from '../pages/Detail.vue'// 创建并暴露一个路由器
export default new VueRouter({routes: [// 一级路由{name: 'guanyu',path: '/about',component: About},{name: 'jia',path: '/home',component: Home,// 二级路由 不用加 /children: [{name: 'xinwen',path: 'news',component: News},{name: 'xinxi',path: 'message',component: Message,children: [{name: 'xiaoxi',path: 'detail',component: Detail}]},]},]
})本节素材已上传至Gitee:yihaohhh/我爱Vue - Gitee.com![]() https://gitee.com/liu-yihao-hhh/i-love---vue/tree/master/34_src_%E8%B7%AF%E7%94%B1%E7%9A%84params%E5%8F%82%E6%95%B0
https://gitee.com/liu-yihao-hhh/i-love---vue/tree/master/34_src_%E8%B7%AF%E7%94%B1%E7%9A%84params%E5%8F%82%E6%95%B0
四、 路由的params参数
to方式传参
<!-- 跳转路由并携带params参数 to的字符串写法 --><router-link :to="`/home/message/detail/${e.id}/${e.title}`">{{ e.title }}</router-link> 路径后面直接跟的是传入的参数,那么未来让路由器明白我们传入的参数而不是要他去寻找多级路由,那么我们就要配置路由规则,再要传入参数的路由路径下进行配置
path: 'detail/:id/:title'
children: [{name: 'xiaoxi',path: 'detail/:id/:title',component: Detail}Detail路由组件进行参数接受,使用params规则即可
<ul><li>消息编号{{$route.params.id}}</li><li>消息标题{{$route.params.title}}</li></ul>本节素材已上传至Gitee:yihaohhh/我爱Vue - Gitee.com![]() https://gitee.com/liu-yihao-hhh/i-love---vue/tree/master/35_src_%E8%B7%AF%E7%94%B1%E7%9A%84props%E9%85%8D%E7%BD%AE
https://gitee.com/liu-yihao-hhh/i-love---vue/tree/master/35_src_%E8%B7%AF%E7%94%B1%E7%9A%84props%E9%85%8D%E7%BD%AE
五、路由的props配置
你有没有一直感觉,组件的模板如果写100个会不会很麻烦!
<li>消息编号{{$route.params.id}}</li><li>消息标题{{$route.params.title}}</li>那有没有什么办法可以用来简化呢??
计算属性!
<template><div><ul><li>消息编号{{id}}</li><li>消息标题{{title}}</li></ul></div>
</template><script>
export default {name:'Detail',computed: {id() {return this.$route.params.id},title() {return this.$route.params.title}},mounted() {// console.log(this.$route)}
}
</script>
但是这样有一百个参数要传值也未免太夸张了些,所以就有我们之前学组件间通信的props可以用来路由间传参
第一种写法:props的对象写法,但是由于数据是死的,这样传参没有意义就用的很少
children: [{name: 'xiaoxi',path: 'detail/:id/:title',component: Detail,// props的第一种写法, 值为对象,该对象的所有key-value都会以props的形式传给Detail组件// 这种写法非常少,因为传递的是死数据,那没有意义props: { a: 1, b: 'hello' }}在Detail组件中用props来进行接受:
<template><div><ul><li>消息编号{{id}}</li><li>消息标题{{title}}</li><li>{{ a }}</li><li>{{ b }}</li></ul></div>
</template><script>
export default {name:'Detail',props: ['a', 'b'],
}
</script>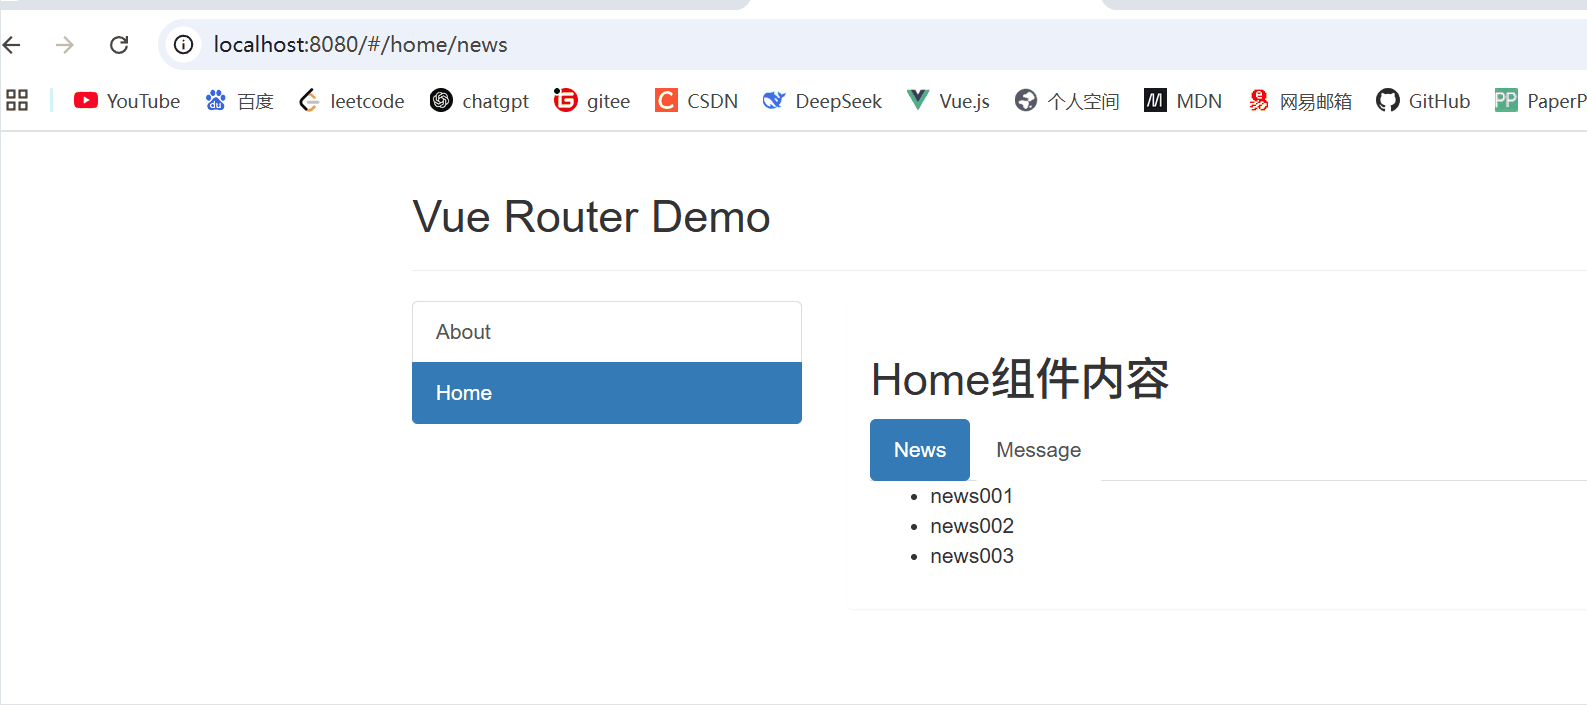
第二种写法:传递params值 为布尔值
值为布尔值 若为真,就会把该路由组件收到的所有params参数 以props的形式传递给了Detail组件
children: [{name: 'xiaoxi',path: 'detail/:id/:title',component: Detail,// 第二种写法, 值为布尔值 若为真,就会把该路由组件收到的所有params参数 以props的形式传递给了Detail组件props: true}]Detail组件直接用props进行数据接受就可以直接使用,但是但是!!!这种办法虽然很香,但是不可以接受query参数
<template><div><ul><li>消息编号{{id}}</li><li>消息标题{{title}}</li></ul></div>
</template><script>
export default {name:'Detail',props: ['id', 'title'],
}
</script>
第三种写法:函数形式 (最推荐)
children: [{name: 'xiaoxi',path: 'detail',component: Detail,// 第三种写法:值为函数 props($route) {return { id: $route.query.id, title: $route.query.title }}// 解构赋值的连续写法props({ query: { id, title } }) {return { id: id, title: title }}}]Detail组件直接接受即可!
<template><div><ul><li>消息编号{{id}}</li><li>消息标题{{title}}</li></ul></div>
</template><script>
export default {name:'Detail',// props: ['a', 'b'],props: ['id', 'title'],
}
</script>
但是这里注意是用query方式进行传值的,所以在Message传入的时候,一定要修改成query方式传入! 修改为query方式传值
<router-link :to="{// path:'/home/message/detail',// 如果使用params参数 那么就不允许使用path 必须使用name name:'xiaoxi',query: {id: e.id,title: e.title}}">{{ e.title }}</router-link> 本节素材已上传至Gitee:yihaohhh/我爱Vue![]() https://gitee.com/liu-yihao-hhh/i-love---vue
https://gitee.com/liu-yihao-hhh/i-love---vue
总结:
路由
-
理解: 一个路由(route)就是一组映射关系(key - value),多个路由需要路由器(router)进行管理。
-
前端路由:key是路径,value是组件。
1.基本使用
-
安装vue-router,命令:
npm i vue-router -
应用插件:
Vue.use(VueRouter) -
编写router配置项:
//引入VueRouterimport VueRouter from 'vue-router'//引入Luyou 组件import About from '../components/About'import Home from '../components/Home'//创建router实例对象,去管理一组一组的路由规则const router = new VueRouter({routes:[{path:'/about',component:About},{path:'/home',component:Home}]})//暴露routerexport default router -
实现切换(active-class可配置高亮样式)
<router-link active-class="active" to="/about">About</router-link> -
指定展示位置
<router-view></router-view>
2.几个注意点
-
路由组件通常存放在
pages文件夹,一般组件通常存放在components文件夹。 -
通过切换,“隐藏”了的路由组件,默认是被销毁掉的,需要的时候再去挂载。
-
每个组件都有自己的
$route属性,里面存储着自己的路由信息。 -
整个应用只有一个router,可以通过组件的
$router属性获取到。
3.多级路由(多级路由)
-
配置路由规则,使用children配置项:
routes:[{path:'/about',component:About,},{path:'/home',component:Home,children:[ //通过children配置子级路由{path:'news', //此处一定不要写:/newscomponent:News},{path:'message',//此处一定不要写:/messagecomponent:Message}]}] -
跳转(要写完整路径):
<router-link to="/home/news">News</router-link>
4.路由的query参数
-
传递参数
<!-- 跳转并携带query参数,to的字符串写法 --><router-link :to="/home/message/detail?id=666&title=你好">跳转</router-link><!-- 跳转并携带query参数,to的对象写法 --><router-link :to="{path:'/home/message/detail',query:{id:666,title:'你好'}}">跳转</router-link> -
接收参数:
$route.query.id$route.query.title
5.命名路由
-
作用:可以简化路由的跳转。
-
如何使用
-
给路由命名:
{path:'/demo',component:Demo,children:[{path:'test',component:Test,children:[{name:'hello' //给路由命名path:'welcome',component:Hello,}]}]} -
简化跳转:
<!--简化前,需要写完整的路径 --><router-link to="/demo/test/welcome">跳转</router-link><!--简化后,直接通过名字跳转 --><router-link :to="{name:'hello'}">跳转</router-link><!--简化写法配合传递参数 --><router-link :to="{name:'hello',query:{id:666,title:'你好'}}">跳转</router-link>
-
6.路由的params参数
-
配置路由,声明接收params参数
{path:'/home',component:Home,children:[{path:'news',component:News},{component:Message,children:[{name:'xiangqing',path:'detail/:id/:title', //使用占位符声明接收params参数component:Detail}]}]} -
传递参数
<!-- 跳转并携带params参数,to的字符串写法 --><router-link :to="/home/message/detail/666/你好">跳转</router-link><!-- 跳转并携带params参数,to的对象写法 --><router-link :to="{name:'xiangqing',params:{id:666,title:'你好'}}">跳转</router-link>特别注意:路由携带params参数时,若使用to的对象写法,则不能使用path配置项,必须使用name配置!
-
接收参数:
$route.params.id$route.params.title
7.路由的props配置
作用:让路由组件更方便的收到参数
{name:'xiangqing',path:'detail/:id',component:Detail,//第一种写法:props值为对象,该对象中所有的key-value的组合最终都会通过props传给Detail组件// props:{a:900}//第二种写法:props值为布尔值,布尔值为true,则把路由收到的所有params参数通过props传给Detail组件// props:true//第三种写法:props值为函数,该函数返回的对象中每一组key-value都会通过props传给Detail组件props(route){return {id:route.query.id,title:route.query.title}}}