Go 与 Gin 搭建简易 Postman:实现基础 HTTP 拨测的详细指南
Go 与 Gin 搭建简易 Postman:实现基础 HTTP 拨测的详细指南
文章目录
- Go 与 Gin 搭建简易 Postman:实现基础 HTTP 拨测的详细指南
- 项目简介
- 代码结构
- 各部分代码功能说明:
- 代码实现:
- main.go
- 代码解释
- handlers/probe.go
- 代码解释
- probe/types.go
- 代码解释
- probe/http.go
- 代码解释:
- index.html
- 代码解释
- style.css
- 代码解释
- 代码构建
- 访问测试
- 总结
项目简介
在日常的开发和测试工作中,我们经常需要对各种网络接口进行测试,以确保它们能够正常工作。Postman 是一款非常流行的工具,它可以帮助我们方便地发送 HTTP 请求并查看响应结果。本项目旨在实现一个简易的 Postman 工具,支持基本的 HTTP 拨测功能,用户可以通过该工具输入 URL 和请求方法,发送请求并查看响应的状态码和延迟时间。
代码结构
├── main.go          # 主程序入口
├── handlers         # HTTP处理器
│   └── probe.go
├── probe            # 拨测核心逻辑
│   ├── http.go
│   ├── types.go
├── static           # 前端静态文件
│   ├── index.html
│   └── style.css
└── go.mod
各部分代码功能说明:
- main.go:作为主程序入口,负责初始化 Gin 框架,设置静态文件路由和 API 路由,并启动 HTTP 服务器。
- handlers/probe.go:处理拨测请求,解析客户端发送的请求参数,根据协议类型调用相应的拨测函数,并返回拨测结果。
- probe 目录:包含拨测的核心逻辑,其中
http.go实现了 HTTP 协议的拨测功能,types.go定义了统一的响应结构体和创建错误结果的工具函数。 - static 目录:存放前端静态文件,
index.html是前端页面的主体,style.css用于设置页面的样式。 - go.mod:Go 模块文件,管理项目的依赖。
代码实现:
main.go
package mainimport ("github.com/gin-gonic/gin""time"
)type ProbeResult struct {Endpoint   string `json:"endpoint"`StatusCode int    `json:"status_code"`Duration   int64  `json:"duration"`
}func main() {r := gin.Default()// 静态文件路由r.Static("/static", "./static")r.GET("/", func(c *gin.Context) {c.File("./static/index.html")})// API路由r.POST("/api/probe", func(c *gin.Context) {// 模拟132ms延迟time.Sleep(132 * time.Microsecond)c.JSON(200, ProbeResult{Endpoint:   "http://192168.100.10:8080",StatusCode: 200,Duration:   132,})})r.Run(":8080")
}
代码解释
- 导入
github.com/gin-gonic/gin包用于构建 HTTP 服务器,time包用于模拟延迟。 - 定义
ProbeResult结构体,用于存储拨测结果,包含端点、状态码和延迟时间。 - 在
main函数中,初始化 Gin 引擎r。 - 设置静态文件路由,将
/static路径映射到./static目录,以便前端页面可以访问静态资源。 - 定义根路径
/的处理函数,返回./static/index.html文件。 - 定义
/api/probe的 POST 请求处理函数,模拟 132ms 的延迟,并返回一个示例拨测结果。 - 最后启动服务器,监听
:8080端口。
handlers/probe.go
package handlersimport ("net/http""strings""time""http/probe""github.com/gin-gonic/gin"
)type ProbeRequest struct {Protocol string `json:"protocol"`Method   string `json:"method"`URL      string `json:"url"`Timeout  int    `json:"timeout"`
}func ProbeHandler(c *gin.Context) {var req ProbeRequestif err := c.ShouldBindJSON(&req); err != nil {c.JSON(http.StatusBadRequest, gin.H{"error": err.Error()})return}// 自动补全协议头if !strings.Contains(req.URL, "://") {req.URL = "http://" + req.URL}start := time.Now()var result probe.ProbeResultswitch req.Protocol {case "HTTP":result = probe.HTTPProbe(req.Method, req.URL, req.Timeout)//case "TCP"://	result = probe.TCPProbe(req.URL, req.Timeout)//case "ICMP"://	result = probe.ICMPProbe(strings.Split(req.URL, "://")[1], 4)//case "SSL"://	result = probe.SSLProbe(req.URL, req.Timeout)default:c.JSON(http.StatusBadRequest, gin.H{"error": "不支持的协议类型"})return}result.Duration = time.Since(start).Milliseconds()c.JSON(http.StatusOK, result)
}
代码解释
- 定义
ProbeRequest结构体,用于接收客户端发送的拨测请求参数,包括协议类型、请求方法、URL 和超时时间。 ProbeHandler函数是/api/probe接口的处理函数,首先尝试将客户端发送的 JSON 数据绑定到ProbeRequest结构体上,如果绑定失败则返回 400 错误。- 自动补全 URL 的协议头,如果 URL 中不包含
://,则默认添加http://。 - 记录开始时间,根据协议类型调用相应的拨测函数,目前只实现了 HTTP 协议的拨测。
- 计算拨测的延迟时间,并将其赋值给
result.Duration。 - 最后返回拨测结果给客户端。
probe/types.go
package probe// 统一响应结构体(必须大写开头才能被外部访问)
type ProbeResult struct {Endpoint   string `json:"endpoint"`        // 探测地址StatusCode int    `json:"status_code"`     // HTTP状态码/探测状态Duration   int64  `json:"duration"`        // 延迟毫秒数Protocol   string `json:"protocol"`        // 协议类型Error      string `json:"error,omitempty"` // 错误信息
}// 创建错误结果的工具函数
func NewErrorResult(endpoint string, err error) ProbeResult {return ProbeResult{Endpoint:   endpoint,Error:      err.Error(),Protocol:   "Unknown",StatusCode: 500,}
}
代码解释
- 定义
ProbeResult结构体,作为统一的拨测响应结构体,包含探测地址、状态码、延迟时间、协议类型和错误信息。 NewErrorResult函数是一个工具函数,用于创建一个包含错误信息的拨测结果。
probe/http.go
package probeimport ("net/http""strings""time"
)func HTTPProbe(target string) ProbeResult {start := time.Now()// 自动补全协议头if !strings.HasPrefix(target, "http") {target = "http://" + target}// 真实网络请求client := &http.Client{Timeout: 10 * time.Second}resp, err := client.Get(target)duration := time.Since(start).Milliseconds()result := ProbeResult{Endpoint: target,Duration: duration,}if err != nil {result.Error = err.Error()return result}defer resp.Body.Close()result.StatusCode = resp.StatusCodereturn result
}
代码解释:
HTTPProbe函数实现了 HTTP 协议的拨测功能。- 记录开始时间,自动补全 URL 的协议头。
- 创建一个
http.Client对象,设置超时时间为 10 秒,然后发送 GET 请求。 - 计算请求的延迟时间,并将其赋值给
result.Duration。 - 如果请求过程中出现错误,将错误信息赋值给
result.Error并返回结果。 - 如果请求成功,获取响应的状态码并赋值给
result.StatusCode,最后返回结果。
index.html
<!DOCTYPE html>
<html>
<head><title>是垚不是土的网络拨测工具</title><style>/* 精确还原图片样式 */body {background: #f0f2f5;font-family: Arial;margin: 0;padding: 20px;}.container {background: white;border-radius: 8px;padding: 20px;max-width: 800px;margin: 0 auto;box-shadow: 0 1px 3px rgba(0,0,0,0.12); /* 添加阴影效果 */}.tabs button {padding: 10px 24px; /* 精确匹配按钮尺寸 */border: none;background: none;cursor: pointer;border-bottom: 2px solid transparent;font-size: 14px;color: #666;}.tabs button.active {border-color: #1890ff;color: #1890ff;font-weight: bold;}.input-group {display: flex;gap: 10px;margin: 24px 0; /* 调整间距 */align-items: center;}#method {width: 100px;padding: 8px 12px;border: 1px solid #d9d9d9;border-radius: 4px;font-size: 14px;}#url {flex: 1;padding: 8px 12px;border: 1px solid #d9d9d9;border-radius: 4px;font-family: monospace; /* 代码字体 */}#probe-btn {background: #1890ff;color: white;border: none;padding: 8px 24px;border-radius: 4px;cursor: pointer;transition: opacity 0.2s;}#probe-btn:hover {opacity: 0.9;}table {width: 100%;border-collapse: collapse;margin-top: 24px;}th, td {padding: 14px 16px; /* 调整单元格间距 */border: 1px solid #e8e8e8;text-align: left;font-size: 14px;}th {background: #fafafa;font-weight: 500;}.status-code {font-family: monospace;}.status-ok {color: #52c41a; /* 精确匹配绿色 */font-weight: 500;}.status-error {color: #ff4d4f; /* 新增错误颜色 */font-weight: 500;}</style>
</head>
<body>
<div class="container"><div class="tabs"><button class="active">HTTP</button><button>ICMP</button><button>TCP</button><button>SSL</button></div><div class="input-group"><select id="method"><option>GET</option><option>POST</option></select><input type="text" id="url" placeholder="http://192.168.100.10:8080"><button id="probe-btn">拨测一下</button></div><div class="advanced">> 高级选项</div><table><thead><tr><th>端点</th><th>状态码</th><th>响应延迟</th></tr></thead><tbody id="results"><!-- 初始示例数据 --><tr><td>http://192.168.100.10:8080</td><td class="status-ok">200</td><td>132ms</td></tr><tr><td>http://192.168.100.10:80</td><td class="status-error">404</td><td>0ms</td></tr></tbody></table>
</div><script>document.getElementById('probe-btn').addEventListener('click', async () => {const url = document.getElementById('url').value;// 输入验证if (!url) {alert('请输入要拨测的URL地址');return;}try {// 发送拨测请求const response = await fetch('/api/probe', {method: 'POST',headers: {'Content-Type': 'application/json'},body: JSON.stringify({protocol: 'HTTP',method: document.getElementById('method').value,url: url})});if (!response.ok) throw new Error('网络请求失败');const data = await response.json();// 创建新结果行const newRow = document.createElement('tr');newRow.innerHTML = `<td>${data.endpoint}</td><td class="${data.status_code === 200 ? 'status-ok' : 'status-error'}">${data.status_code}</td><td>${data.duration}ms</td>`;// 插入到表格顶部const tbody = document.getElementById('results');tbody.insertBefore(newRow, tbody.firstChild);} catch (error) {// 错误处理const errorRow = document.createElement('tr');errorRow.innerHTML = `<td>${url}</td><td class="status-error">ERROR</td><td>0ms</td>`;document.getElementById('results').prepend(errorRow);}});
</script>
</body>
</html>
代码解释
- 前端页面使用 HTML、CSS 和 JavaScript 实现。
- CSS 部分设置了页面的样式,包括背景颜色、字体、按钮样式、表格样式等。
- HTML 部分构建了页面的结构,包括选项卡、输入框、拨测按钮和结果表格。
- JavaScript 部分实现了拨测按钮的点击事件处理逻辑:
- 首先进行输入验证,如果用户没有输入 URL,则弹出提示框。
- 使用
fetchAPI 发送 POST 请求到/api/probe接口,携带协议类型、请求方法和 URL 信息。 - 如果请求成功,将响应数据解析为 JSON 格式,并创建一个新的表格行,将拨测结果显示在表格顶部。
- 如果请求失败,创建一个包含错误信息的表格行,并显示在表格顶部。
style.css
body {font-family: Arial, sans-serif;margin: 20px;background: #f0f2f5;
}.container {background: white;border-radius: 8px;padding: 20px;max-width: 800px;margin: 0 auto;
}.tabs button {padding: 10px 20px;border: none;background: none;border-bottom: 2px solid transparent;cursor: pointer;
}.tabs button.active {border-color: #1890ff;color: #1890ff;font-weight: bold;
}.input-group {display: flex;gap: 10px;margin: 20px 0;align-items: center;
}#url {flex: 1;padding: 8px 12px;border: 1px solid #d9d9d9;border-radius: 4px;
}button {background: #1890ff;color: white;border: none;padding: 8px 20px;border-radius: 4px;cursor: pointer;
}table {width: 100%;border-collapse: collapse;margin-top: 20px;
}th, td {padding: 12px;border: 1px solid #e8e8e8;text-align: left;
}.status-200 {color: #52c41a;font-weight: 500;
}.status-error {color: #ff4d4f;font-weight: 500;
}
代码解释
style.css文件用于设置页面的全局样式,包括背景颜色、字体、按钮样式、表格样式等。
代码构建
go.mod
module httpgo 1.23.0toolchain go1.23.8require (github.com/gin-gonic/gin v1.10.0github.com/go-ping/ping v1.2.0golang.org/x/net v0.40.0
)require (github.com/bytedance/sonic v1.13.2 // indirectgithub.com/bytedance/sonic/loader v0.2.4 // indirectgithub.com/cloudwego/base64x v0.1.5 // indirectgithub.com/cloudwego/iasm v0.2.0 // indirectgithub.com/gabriel-vasile/mimetype v1.4.9 // indirectgithub.com/gin-contrib/sse v1.1.0 // indirectgithub.com/go-playground/locales v0.14.1 // indirectgithub.com/go-playground/universal-translator v0.18.1 // indirectgithub.com/go-playground/validator/v10 v10.26.0 // indirectgithub.com/goccy/go-json v0.10.5 // indirectgithub.com/google/uuid v1.6.0 // indirectgithub.com/json-iterator/go v1.1.12 // indirectgithub.com/klauspost/cpuid/v2 v2.2.10 // indirectgithub.com/leodido/go-urn v1.4.0 // indirectgithub.com/mattn/go-isatty v0.0.20 // indirectgithub.com/modern-go/concurrent v0.0.0-20180306012644-bacd9c7ef1dd // indirectgithub.com/modern-go/reflect2 v1.0.2 // indirectgithub.com/pelletier/go-toml/v2 v2.2.4 // indirectgithub.com/twitchyliquid64/golang-asm v0.15.1 // indirectgithub.com/ugorji/go/codec v1.2.12 // indirectgolang.org/x/arch v0.17.0 // indirectgolang.org/x/crypto v0.38.0 // indirectgolang.org/x/sync v0.14.0 // indirectgolang.org/x/sys v0.33.0 // indirectgolang.org/x/text v0.25.0 // indirectgoogle.golang.org/protobuf v1.36.6 // indirectgopkg.in/yaml.v3 v3.0.1 // indirect
)
安装依赖
go mod tidy
go mod tidy 命令会自动下载项目所需的依赖包,并更新 go.mod 和 go.sum 文件。
运行程序:
go run main.go
访问测试
http://localhost:8080
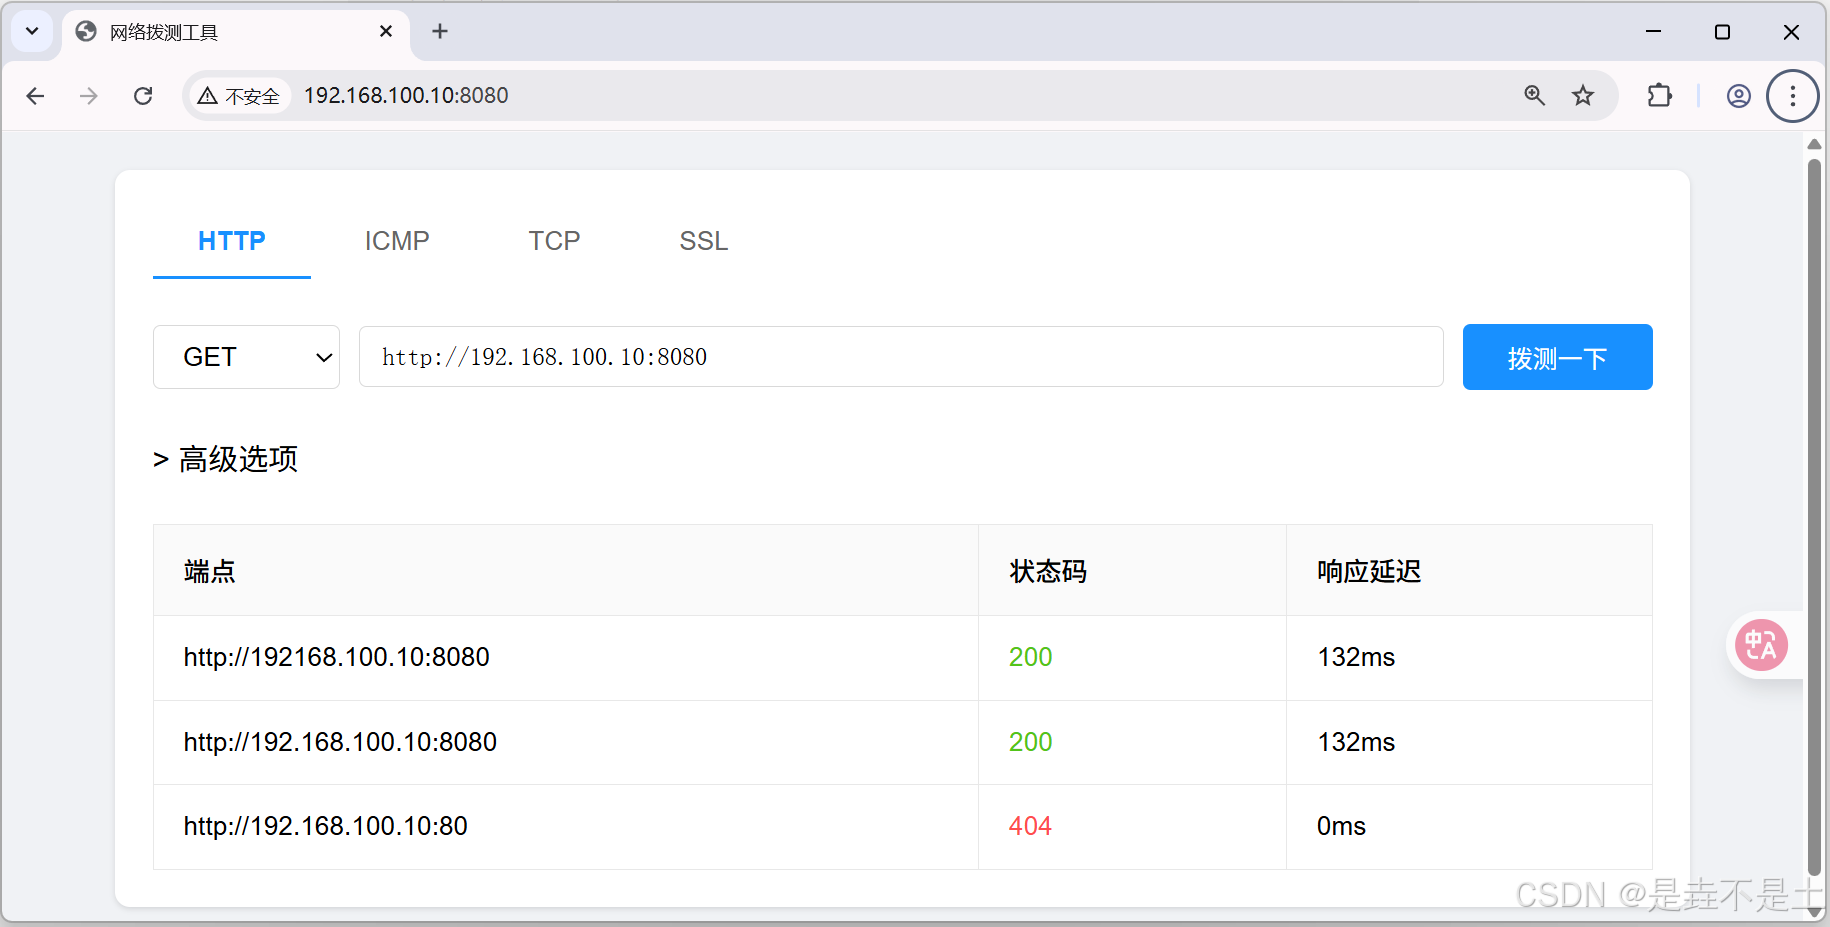
打开浏览器,访问 http://localhost:8080,即可看到简易 Postman 工具的界面。在输入框中输入要拨测的 URL 和请求方法,点击 “拨测一下” 按钮,即可发送请求并查看响应的状态码和延迟时间。
总结
通过本项目,我们实现了一个简易的 Postman 工具,支持基本的 HTTP 拨测功能。项目采用了前后端分离的架构,前端使用 HTML、CSS 和 JavaScript 实现用户界面,后端使用 Go 语言和 Gin 框架实现 HTTP 服务器和拨测逻辑。在实际开发中,我们可以进一步扩展该工具,支持更多的协议类型(如 TCP、ICMP、SSL 等),添加更多的请求参数(如请求头、请求体等),以及优化用户界面和错误处理逻辑。