【springboot+vue3的前后端分离项目实现支付宝的沙箱支付】
【springboot+vue3的前后端分离项目实现支付宝的沙箱支付】
以下是基于SpringBoot + Vue前后端分离项目实现支付宝沙箱支付的完整解决方案,包含关键代码和调试技巧
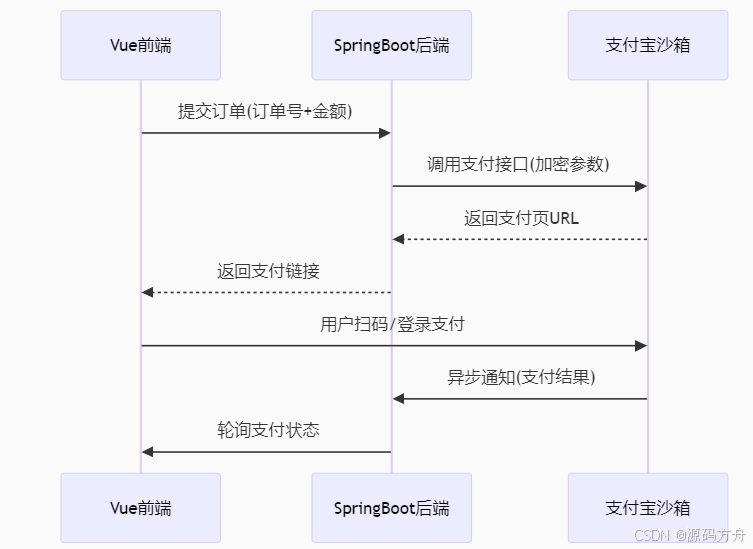
一、项目架构设计
二、后端实现(SpringBoot)
1. 添加依赖
<!-- pom.xml -->
<dependency><groupId>com.alipay.sdk</groupId><artifactId>alipay-easysdk</artifactId><version>2.3.0</version>
</dependency>
2. 配置参数类
@Data
@Configuration
@ConfigurationProperties(prefix = "alipay")
public class AlipayConfig {private String appId;          // 沙箱APPIDprivate String appPrivateKey;  // 应用私钥private String alipayPublicKey;// 支付宝公钥private String notifyUrl;      // 异步通知地址private String returnUrl;      // 同步跳转地址private String gatewayUrl;     // 沙箱环境网关
}
3. 支付服务核心代码
@Service
public class AlipayService {@Autowiredprivate AlipayConfig config;public String createOrder(String orderNo, BigDecimal amount, String subject) {try {Config options = getOptions();Factory factory = new Factory(options);AlipayTradePagePayResponse response = factory.Payment().Page().pay(subject, orderNo, amount.toString(), config.getReturnUrl(), config.getNotifyUrl());return response.getBody();} catch (Exception e) {throw new RuntimeException("支付宝下单失败", e);}}private Config getOptions() {Config options = new Config();options.protocol = "https";options.gatewayHost = "openapi.alipaydev.com"; // 沙箱环境options.signType = "RSA2";options.appId = config.getAppId();options.merchantPrivateKey = config.getAppPrivateKey();options.alipayPublicKey = config.getAlipayPublicKey();return options;}
}
4.支付控制器
@RestController
@RequestMapping("/api/pay")
public class PaymentController {@Autowiredprivate AlipayService alipayService;@PostMapping("/alipay")public String createPayment(@RequestBody PaymentRequest request) {// 生成商户订单号(需保证唯一性)String orderNo = "T" + System.currentTimeMillis() + UUID.randomUUID().toString().substring(0, 8);return alipayService.createOrder(orderNo, request.getAmount(), request.getSubject());}@PostMapping("/notify") // 支付宝异步通知public String paymentNotify(HttpServletRequest request) {Map<String, String> params = convertParams(request);try {// 验签和业务处理boolean signVerified = Factory.Payment.Common().verifyNotify(params);if(signVerified) {// 处理订单逻辑String tradeStatus = params.get("trade_status");if("TRADE_SUCCESS".equals(tradeStatus)) {orderService.handlePaymentSuccess(params.get("out_trade_no"));return "success";}}} catch (Exception e) {log.error("支付宝回调处理异常", e);}return "failure";}
}
三、前端实现(Vue3)
1. 支付页面组件
<template><div><button @click="handlePay">立即支付</button><div v-html="paymentForm" v-if="paymentForm"></div></div>
</template><script setup>
import { ref } from 'vue';
import axios from 'axios';const paymentForm = ref('');const handlePay = async () => {if(this.goodsData.goodNumber< 1){this.$message.error("商品库存不足")}else {this.$request.get('/aliPay/pay?subject='+this.goodsData.name+'&totalAmount='+this.goodsData.price).then(res =>{const divForm = document.getElementsByTagName('div')if(divForm.length){document.body.removeChild(divForm[0])}const div = document.createElement("div");div.innerHTML = res.data document.body.appendChild(div)document.forms[0].submit()})}
};
</script>
2. 支付结果轮询
// 在支付后页面增加轮询
const checkPayment = (orderNo) => {const timer = setInterval(async () => {const res = await axios.get(`/api/orders/${orderNo}/status`);if(res.data.paid) {clearInterval(timer);alert('支付成功');}}, 3000);
}
四、沙箱环境配置
1. 测试账号准备
登录支付宝开放平台沙箱
获取:
沙箱APPID(如:20210031234)
获取应用私钥和支付宝公钥
卖家账号(沙箱版支付宝账号)
下载支付宝沙箱钱包APP,模拟扫码支付使用
2. 配置文件
#支付宝
alipay:# 沙箱中的应用idappId: 2021000148685142# 应用私钥appPrivateKey: 自己的私钥# 支付宝公钥alipayPublicKey: 自己的公钥# TODO 调用支付宝支付接口后产生的回调,需要内网穿透notifyUrl: http://localhost:9090/aliPay/notify# 支付成功后的页面跳转,设置成你项目中的成功支付界面(可不填)returnUrl: http://localhost:8080/# 支付宝网关地址GATEWAY_URL: https://openapi-sandbox.dl.alipaydev.com/gateway.do# 格式FORMAT: JSON# 编码字符格式CHARSET: utf-8# 签名方式SIGN_TYPE: RSA2
五.支付中断处理
// 增加交易查询接口
@GetMapping("/orders/{orderNo}/status")
public PaymentStatus checkPayment(@PathVariable String orderNo) {AlipayTradeQueryResponse response = factory.Payment().Common().query(orderNo);return new PaymentStatus(response.getTradeStatus());
}
通过以上实现,可完成从沙箱测试到生产上线的全流程。测试时建议使用沙箱提供的各种异常场景验证系统健壮性。
标签:支付宝、沙箱支付