炼丹学习笔记3---ubuntu2004部署运行openpcdet记录
前言
环境 cuda 11.3 python 3.8 ubuntu2004
一、cuda环境检测
ylh@y:~/code_ws/OpenPCDet/tools$ nvcc -V
nvcc: NVIDIA (R) Cuda compiler driver
Copyright (c) 2005-2021 NVIDIA Corporation
Built on Sun_Mar_21_19:15:46_PDT_2021
Cuda compilation tools, release 11.3, V11.3.58
Build cuda_11.3.r11.3/compiler.29745058_0
二、创建conda环境
conda create -n pcdet python=3.8
三、安装依赖
pip install torch==1.12.0+cu113 torchvision==0.13.0+cu113 torchaudio==0.12.0 --extra-index-url https://download.pytorch.org/whl/cu113
pip install opencv-python -i https://pypi.tuna.tsinghua.edu.cn/simple
pip install av2==0.1.0 -i https://pypi.tuna.tsinghua.edu.cn/simple
pip install kornia==0.6.8
pip install spconv-cu113
pip install open3d -i https://pypi.tuna.tsinghua.edu.cn/simple
四、编译安装pcdet
使用的是master分支commit 为8cacccec11db6f59bf6934600c9a175dae254806版本
git clone https://github.com/open-mmlab/OpenPCDet.git
python setup.py develop
五、数据预处理
python -m pcdet.datasets.kitti.kitti_dataset create_kitti_infos tools/cfgs/dataset_configs/kitti_dataset.yaml
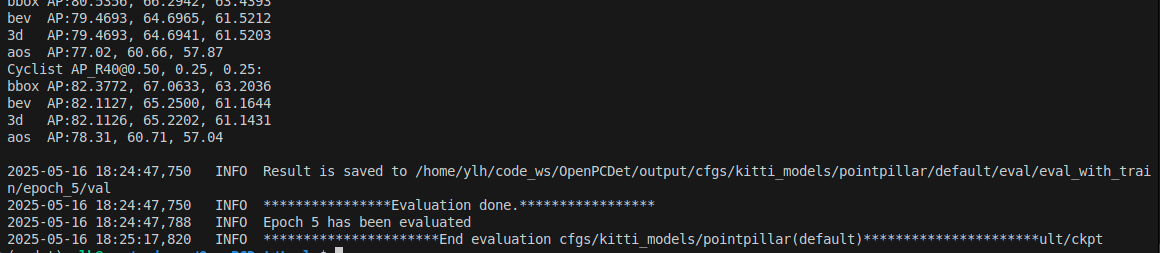
六、训练测试
cd tools/
python train.py --cfg_file ./cfgs/kitti_models/pointpillar.yaml  --batch_size 1 --epochs 50
注意pointpillar.yaml中的USE_ROAD_PLANE设置为False,否则demo会出错

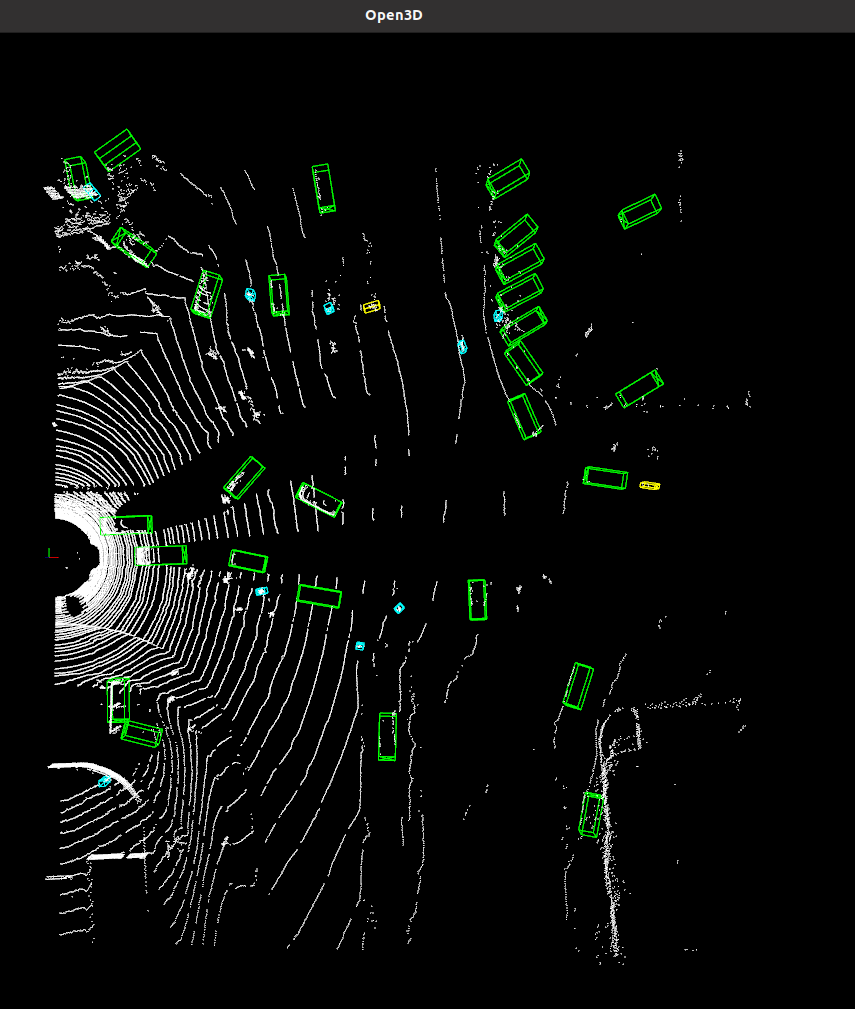
七、推理测试
cd tools/
python demo.py --cfg_file ../tools/cfgs/kitti_models/pointpillar.yaml --ckpt ../tools/pth/kitti/pointpillar_7728.pth --data_path ../data/kitti/testing/velodyne/000517.bin
八、小结
安装时,务必注意python 3.8、cuda 11.3,贴出来的依赖版本均为验证可行。
torch版本安装参考
###################
好记性不如烂笔头
积跬步期千里