Nginx高级配置
目录
一.网页的状态页
二. Nginx第三方模块
2.1 echo模块
三. 变量
3.1 内置变量
3.2 自定义变量
四. 自定义访问日志 (优化)
4.1 自定义访问日志的格式
4.2 自定义json 格式日志
五. Nginx压缩功能
六 . HTTPS 功能
6.1 https概述
6.2 配置实例-----自签名证书
1. 先进行编译安装
2. 进行证书配置
七. 自定义图标
一.网页的状态页
网页的状态页(Status Page)通常是指一个专门用于展示系统、服务或应用程序当前运行状态的页面。它可以帮助用户、开发人员或运维团队实时了解系统的健康状况、性能指标、故障信息等。
基于nginx 模块 ngx_http_stub_status_module 实现,在编译安装nginx的时候需要添加编译参数 --with-http_stub_status_module
状态页显示的是整个服务器的状态,而非虚拟主机的状态 。
vim /apps/nginx/conf/nginx.confnginx_status 页面需要在 Nginx 配置文件中显式配置。通常,配置如下:server {listen 80;server_name 192.168.52.102;location /nginx_status {stub_status on;allow 192.168.52.0/24;  # 允许访问的 IP 段deny all;               # 拒绝其他所有 IP}
}#因为我是通过编译安装nginx,而编译安装默认不会自动配置systemd服务
/apps/nginx/sbin/nginx -t  # 测试配置语法
/apps/nginx/sbin/nginx -s reload  # 重新加载
运行结果如下:
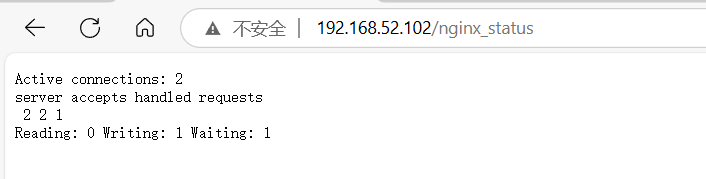
Active connections:
#当前处于活动状态的客户端连接数,包括连接等待空闲连接数=reading+writing+waiting
accepts
#统计总值,Nginx自启动后已经接受的客户端请求的总数。
handled
#统计总值,Nginx自启动后已经处理完成的客户端请求总数,通常等于accepts,除非有因worker_connections限制等被拒绝的连接
requests
#统计总值,Nginx自启动后客户端发来的总的请求数。
Reading
#当前状态,正在读取客户端请求报文首部的连接的连接数,数值越大,说明排队现象严重,性能不足
Writing
#当前状态,正在向客户端发送响应报文过程中的连接数,数值越大,说明访问量很大
Waiting
#当前状态,正在等待客户端发出请求的空闲连接数,开启 keep-alive的情况下,这个值等于active – (reading+writing)
二. Nginx第三方模块
Nginx 第三方模块是由 社区开发者或组织(非 Nginx 官方团队)开发的扩展组件,用于增强 Nginx 的核心功能。
要使用第三方模块,您需要在编译和安装Nginx时包含相应的模块源代码,并按照模块提供的说明进行配置。
以下主要以echo为例
2.1 echo模块
echo 模块是 Nginx 的一个第三方模块,用于在 Nginx 配置中直接输出自定义内容到 HTTP 响应中。
主要功能
- 可以直接在 Nginx 配置中输出静态字符串或 HTML 内容。
- 支持输出 Nginx 变量、请求头、查询参数等动态内容。
- 控制请求处理流程:通过终止请求或将请求重定向到其他 URL 来控制请求的处理流程。
要使用echo模块,需要在编译安装nginx时添加echo-nginx-module ,或者通过第三方软件包管理工具进行安装。
https://github.com/vozlt/nginx-module-vts
#通过该网站下载echo包

#安装依赖
yum install -y gcc make zlib zlib-devel openssl openssl-devel pcre pcre-develcd /opt
unzip '//tmp/VMwareDnD/3sUYrw/echo-nginx-module-master.zip'
ls
#查看解压路径cd /data/nginx-1.18.0# 清理旧文件(如果之前编译过)
make clean 2>/dev/null || true#配置Nginx
./configure --prefix=/apps/nginx --user=nginx --group=nginx --with-http_ssl_module --with-http_v2_module --with-http_realip_module --with-http_stub_status_module --with-http_gzip_static_module --with-pcre --with-stream --with-stream_ssl_module --with-stream_realip_module --add-module=/opt/echo-nginx-module-master#编译和安装
make && make install#注意配置Nginx时要确定 echo 模块的实际路径
find / -name "echo-nginx-module" 2>/dev/null#我的echo模块的实际路径是 /root/nginx-1.18.0/echo-nginx-module,所以--add-module的参数为
/opt/echo-nginx-module-master
#在配置文件中加入echo模块配置
vim /apps/nginx/conf/nginx.conf location /hello {root html;echo "ni hao";index index.html index.htm index.php;
}/apps/nginx/sbin/nginx -tapps/nginx/sbin/nginx -s reload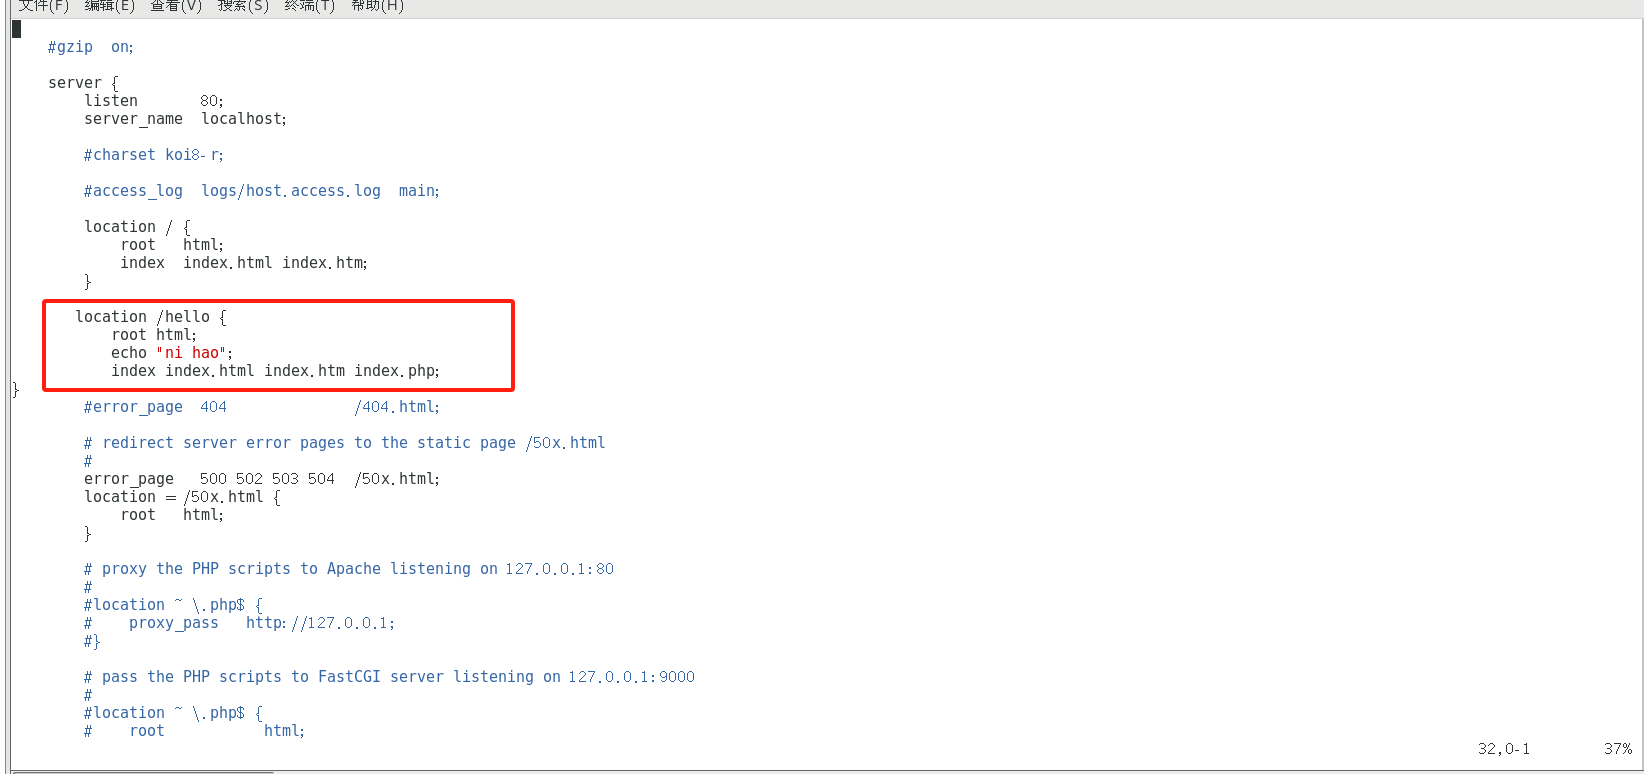 测试结果:
测试结果:
![]()
三. 变量
在NGINX中,变量是一种用于存储和检索HTTP请求和响应中的数据的机制。
3.1 内置变量
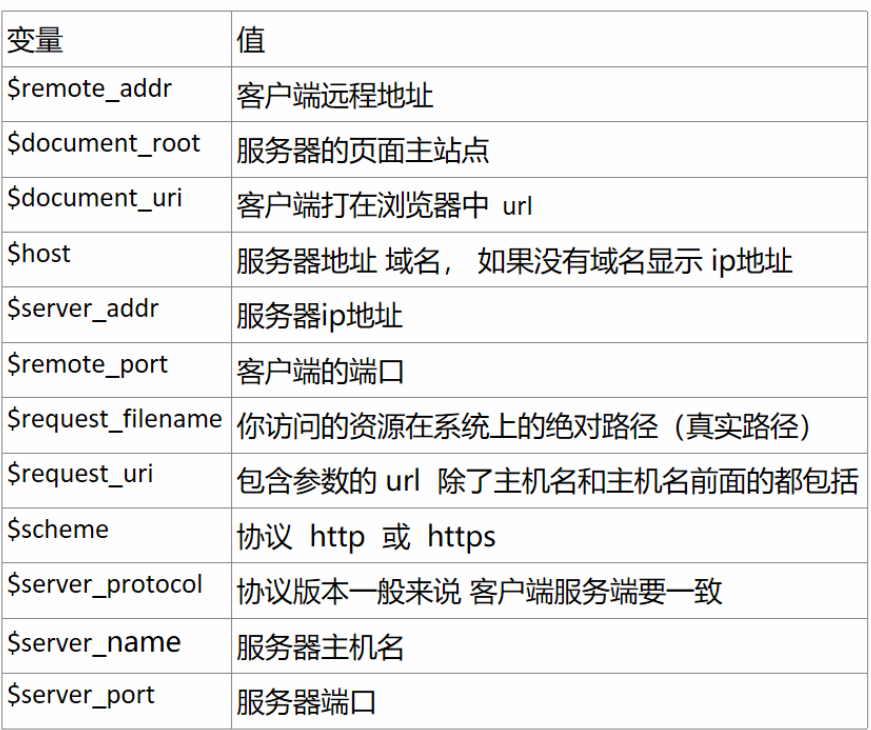
内置变量是 Nginx 预定义的变量,由 Nginx 核心或模块自动生成,用于存储 HTTP 请求、响应、连接状态等信息。
这些变量无需声明,直接可用,名称以 $ 开头
vim /apps/nginx/conf/nginx.conf#添加以下内容
location /main {index index.html;default_type text/html;echo "hello world,main-->";echo $remote_addr;echo $args;echo $arg_userecho $document_root;echo $document_uri;echo $host;echo $http_user_agent;echo $http_cookie;echo $request_filename;echo $scheme;echo $scheme://$host$document_uri?$args;}- `index index.html;`:指定默认的索引文件为index.html,当访问/main时,如果有index.html文件,将自动显示该文件。- `default_type text/html;`:指定默认的Content-Type为text/html,如果响应中没有特别指定Content-Type,则使用默认值。- `echo "hello world,main-->";`:输出字符串"hello world,main-->"。- `echo $remote_addr;`:输出客户端的IP地址。- `echo $args;`:输出请求的查询参数。- `echo $arg_user;`:输出名为user的查询参数的值。- `echo $document_root;`:输出当前请求的根目录路径。- `echo $document_uri;`:输出当前请求的URI。- `echo $host;`:输出请求的主机名。- `echo $http_user_agent;`:输出客户端使用的用户代理。- `echo $http_cookie;`:输出请求中的Cookie。- `echo $request_filename;`:输出当前请求的文件路径。- `echo $scheme;`:输出请求使用的协议(http或https)。- `echo $scheme://$host$document_uri?$args;`:输出完整的URL,包括协议、主机、路径和查询参数。
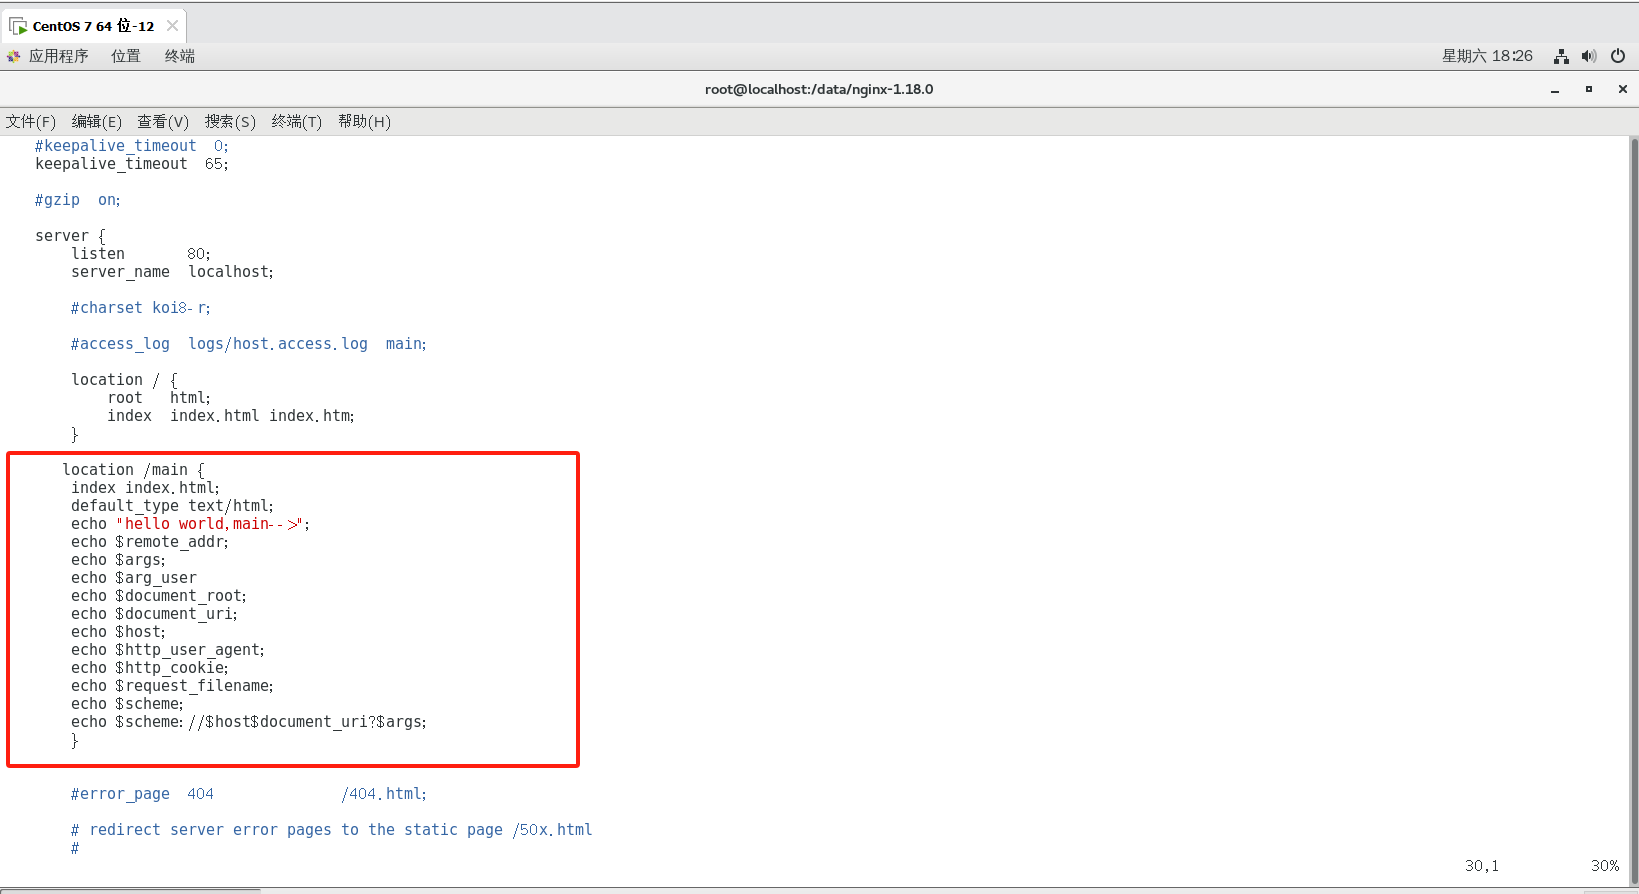
/apps/nginx/sbin/nginx -s reloadcurl 192.168.52.102/main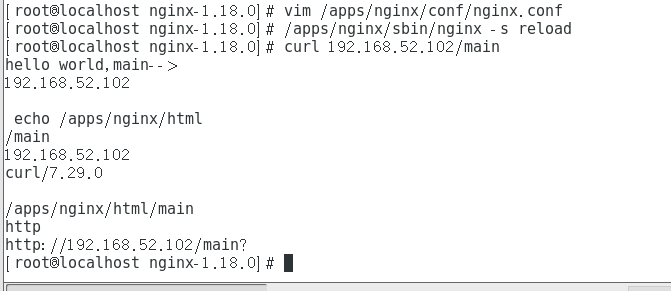
3.2 自定义变量
在 Nginx 中,自定义变量可以用于存储和操作一些特定的值,以便在配置文件中的不同位置进行重用。
语法格式
基本语法
set $variable value; #变量名可自定义使用环境
server, location, if
#举例:
vim /apps/nginx/conf/nginx.conf#添加以下内容
location /test {set $name  kgc;echo $name;set $my_port $server_port;echo $my_port;}


四. 自定义访问日志 (优化)
访问日志是Web服务器记录客户端请求信息的文件,自定义访问日志允许管理员根据需求灵活配置记录的内容和格式。
4.1 自定义访问日志的格式
Nginx 使用 log_format 指令来定义日志格式,然后在 access_log 指令中引用该格式。
1. 打开 Nginx 配置文件(通常位于 /etc/nginx/nginx.conf 或 /etc/nginx/conf.d/default.conf)。
2. 在 http 块中定义自定义日志格式:
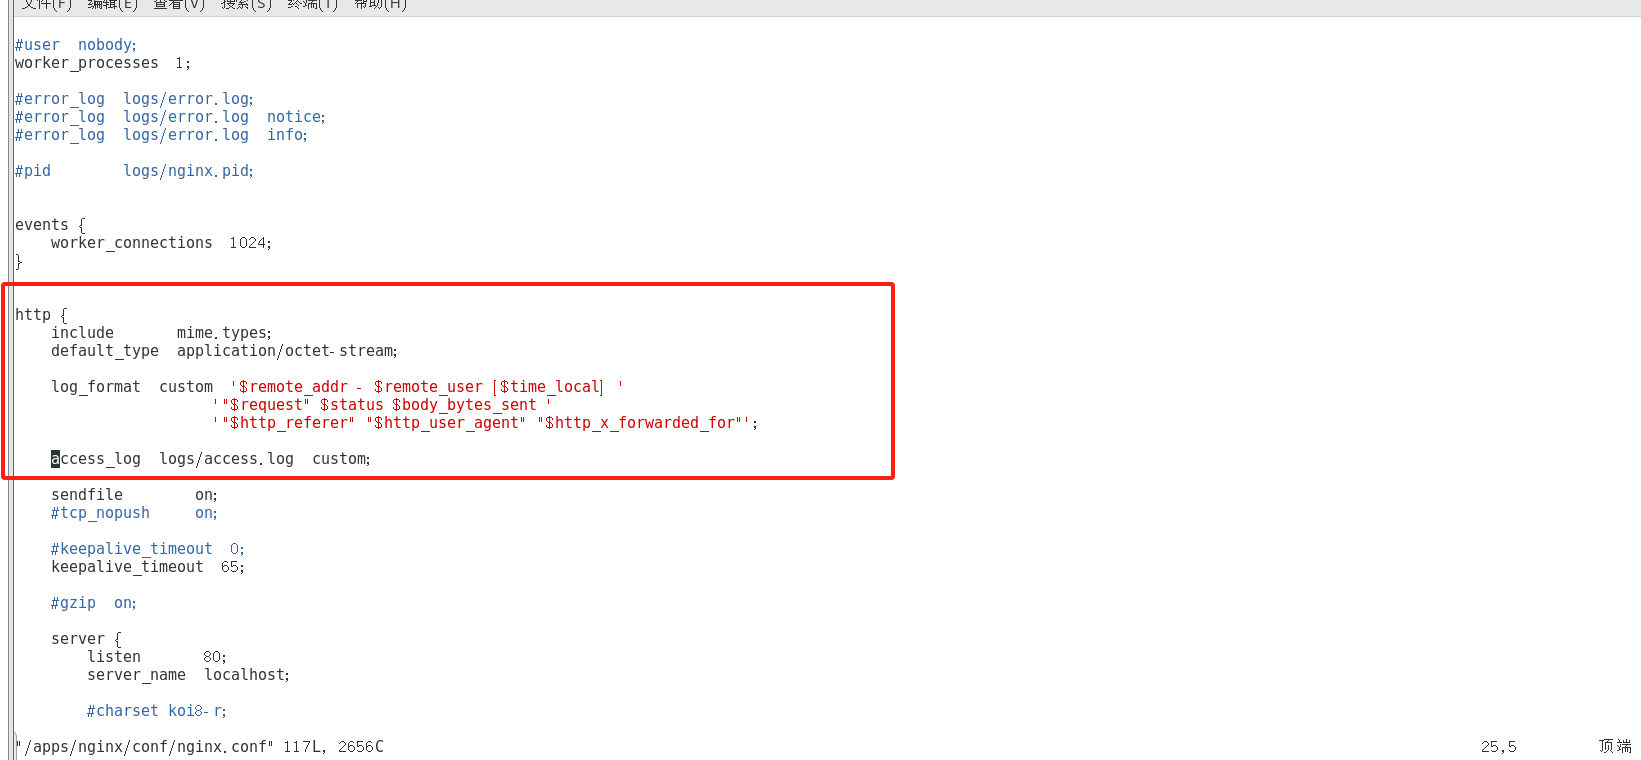
#这是我的nginx配置文件
vim /apps/nginx/conf/nginx.confhttp {log_format custom '$remote_addr - $remote_user [$time_local] ''"$request" $status $body_bytes_sent ''"$http_referer" "$http_user_agent" "$http_x_forwarded_for"';
}
这里的 custom 是自定义日志格式的名称,$remote_addr、$request 等是 Nginx 的内置变量。
3. 在 server 块中引用自定义日志格式:
server {access_log logs/access.log custom;
}日志文件的路径是/apps/nginx/logs/access.log
但是因为 Nginx 的工作目录是 /apps/nginx,那么 logs/access.log 会被解析为 /apps/nginx/logs/access.log,custom 是之前定义的日志格式名称。
4. 保存配置文件并重启 Nginx
nginx -t # 测试配置文件是否正确nginx -s reloadcurl http://localhost -I #访问 Nginx 服务tail -f /apps/nginx/logs/access.log #检查访问日志是否记录
4.2 自定义json 格式日志
Nginx 支持通过 log_format 指令定义 JSON 格式的日志。
配置步骤:
1. 打开 Nginx 配置文件(通于 /etc/nginx/nginx.conf 或 /etc/nginx/conf.d/default.conf)。
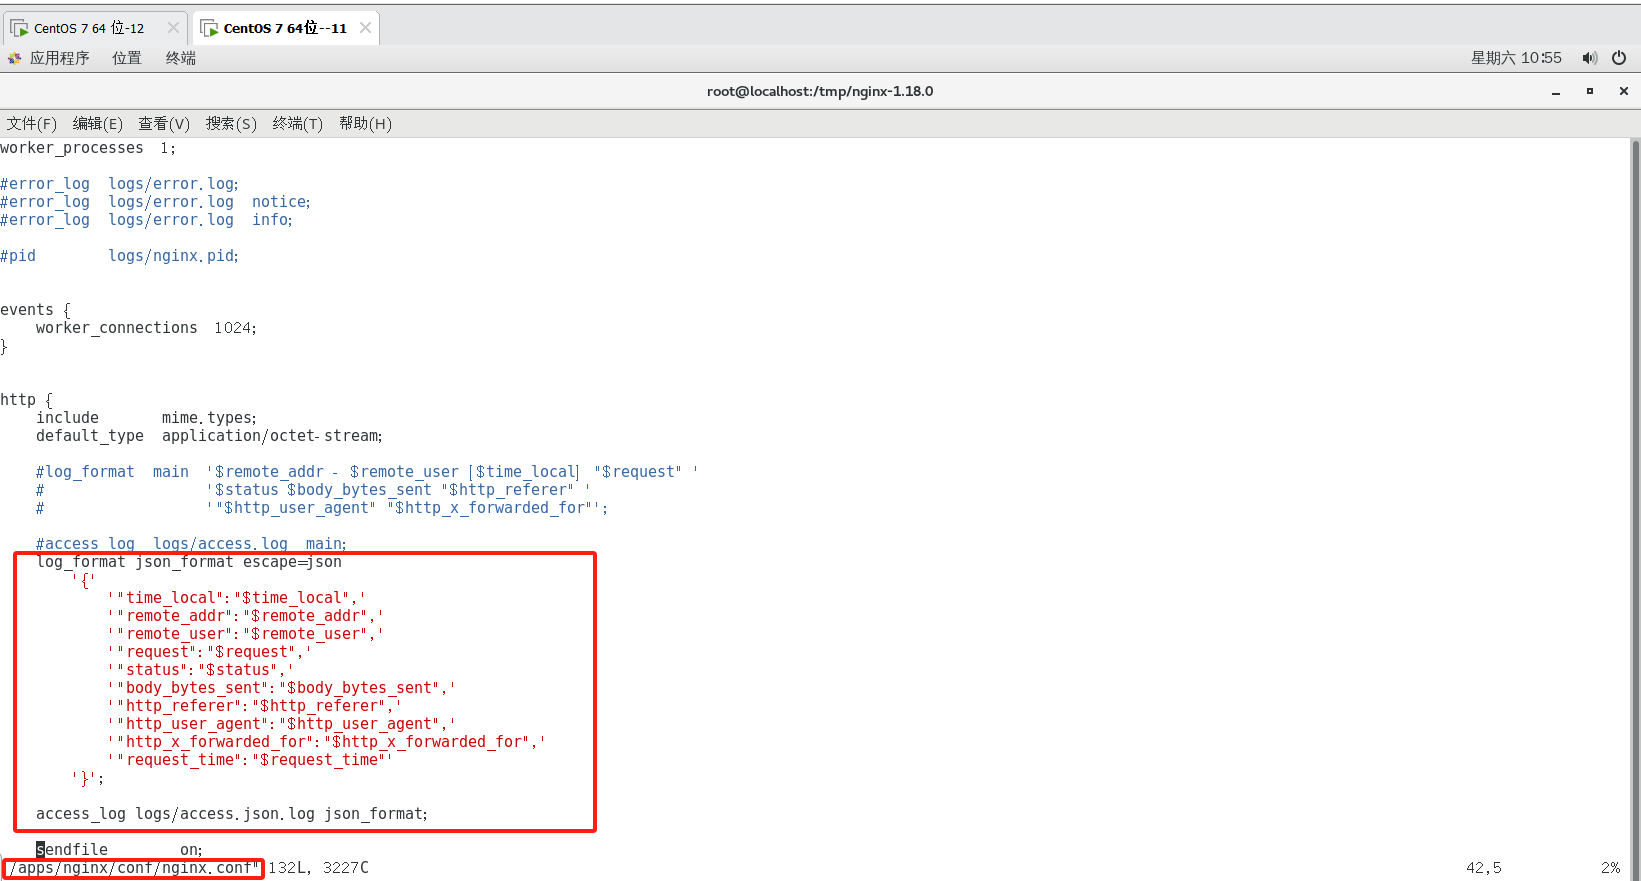
2. 在 http 块中定义 JSON 格式的日志:
http {log_format json_format escape=json'{''"time_local":"$time_local",''"remote_addr":"$remote_addr",''"remote_user":"$remote_user",''"request":"$request",''"status":"$status",''"body_bytes_sent":"$body_bytes_sent",''"http_referer":"$http_referer",''"http_user_agent":"$http_user_agent",''"http_x_forwarded_for":"$http_x_forwarded_for",''"request_time":"$request_time"''}';
}
这里的 json_format 是自定义日志格式的名称,escape=json 确保特殊字符(如引号)被正确转义。
3.在 server 块中引用 JSON 格式的日志:
server {access_log logs/access.json.log json_format;
}
4. 保存配置文件并重启 Nginx:
nginx -t # 测试配置文件是否正确nginx -s reload # 重启 Nginxmkdir -p /apps/nginx/logstouch /apps/nginx/logs/access.json.log #创建日志目录curl http://localhost -Itail -f /apps/nginx/logs/access.json.log

五. Nginx压缩功能
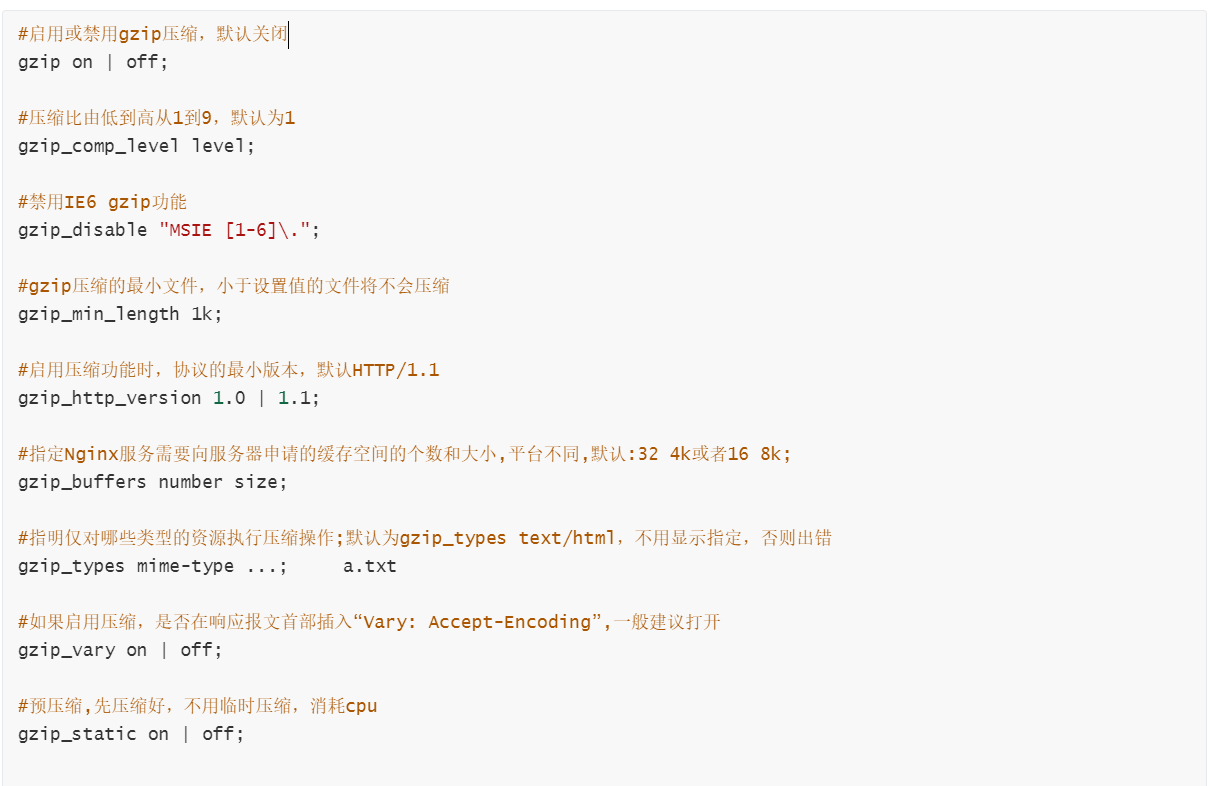
Nginx通过在服务器上启用gzip模块来提供压缩功能。
官方文档: Module ngx_http_gzip_module
1. 创建配置文件
mkdir -p /etc/nginx/conf.d  # 确保目录存在2. 配置文件内容
vim /etc/nginx/conf.d/gzip-test.confserver {listen 80;server_name localhost;# Gzip基本配置gzip on;gzip_min_length 1k;gzip_comp_level 6;gzip_types text/plain text/css application/json application/javascript text/xml;gzip_vary on;# 测试目录设置location / {root /var/www/html/gzip-test;index index.html;}# 日志记录(调试用)access_log /var/log/nginx/gzip-test.access.log;error_log /var/log/nginx/gzip-test.error.log;
}3.创建测试目录和文件
mkdir -p /var/www/html/gzip-test && \echo "<h1>Gzip测试</h1><p>这是一段用于测试压缩的文本。</p>" | sudo tee /var/www/html/gzip-test/index.html#sudo tee /var/www/html/gzip-test/index.html`	将内容写入文件	tee 同时输出到文件和屏幕4.编辑主配置文件
vim /apps/nginx/conf/nginx.conf
gzip on;  #取消这行的注释5.nginx -t && sudo nginx -s reload6.curl -I -H "Accept-Encoding: gzip" http://localhost #检查Gzip是否生效

六 . HTTPS 功能
6.1 https概述
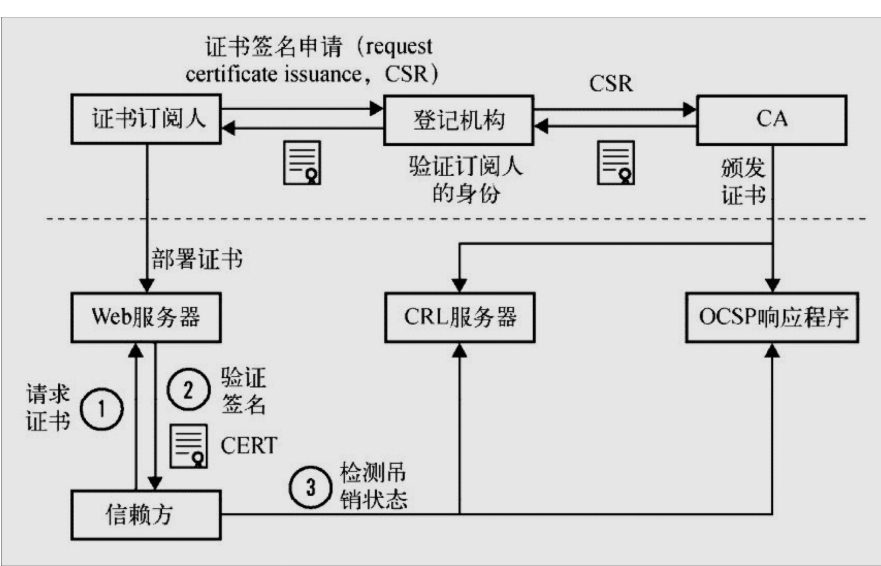
在 Nginx 中配置 HTTPS 是为了通过加密的 HTTPS 协议来保护网站的数据传输安全。HTTPS 使用 SSL/TLS 证书来加密客户端和服务器之间的通信。
当客户端首次访问 HTTPS 网站时,会发生以下握手过程:
-
Client Hello:
-
客户端发送支持的 SSL/TLS 版本、加密套件列表和随机数
-
-
Server Hello:
-
Nginx 选择双方都支持的 SSL/TLS 版本和加密套件
-
发送服务器随机数和服务器证书(包含公钥)
-
-
证书验证:
-
客户端验证服务器证书的有效性(是否过期、是否由受信任 CA 签发等)
-
-
密钥交换:
-
客户端生成预主密钥(pre-master secret),用服务器公钥加密后发送
-
服务器用私钥解密获取预主密钥
-
-
会话密钥生成:
-
双方使用客户端随机数、服务器随机数和预主密钥生成会话密钥
-
-
加密通信开始:
-
使用会话密钥进行对称加密通信
-
Nginx的HTTPS功能通过ngx_http_ssl_module模块来实现的。
6.2 配置实例-----自签名证书
该功能很重要,所以从编译安装开始详细做完。
1. 先进行编译安装
cd /datayum -y install gcc pcre-devel openssl-devel zlib-devel openssl  openssl-develuseradd -M -s /sbin/nologin nginxwget http://nginx.org/download/nginx-1.18.0.tar.gztar xf nginx-1.18.0.tar.gz cd nginx-1.18.0/./configure --prefix=/apps/nginx \
--user=nginx \
--group=nginx \
--with-http_ssl_module \
--with-http_v2_module \
--with-http_realip_module \
--with-http_stub_status_module \
--with-http_gzip_static_module \
--with-pcre \
--with-stream \
--with-stream_ssl_module \
--with-stream_realip_modulemake -j2 && make install#创建一个 systemd 服务单元文件,用于管理 Nginx 服务。
tee   /usr/lib/systemd/system/nginx.service   <<eof
[Unit]
Description=nginx - high performance web server
Documentation=http://nginx.org/en/docs/
After=network-online.target remote-fs.target nss-lookup.target
Wants=network-online.target[Service]
Type=forking
PIDFile=/apps/nginx/logs/nginx.pid
ExecStart=/apps/nginx/sbin/nginx -c /apps/nginx/conf/nginx.conf
ExecReload=/bin/kill -s HUP \$MAINPID
ExecStop=/bin/kill -s TERM \$MAINPID
LimitNOFILE=100000[Install]
WantedBy=multi-user.target
eof#重新加载配置
systemctl daemon-reload systemctl restart nginx
2. 进行证书配置
mkdir /zs
cd /zs
#建立一个文件用于存放证书#将证书脚本拖入虚拟机 进行编译
vim '//tmp/VMwareDnD/thy0ti/certificate.sh' :%s/kgc/cxk/g:wq#执行一个 Bash 脚本文件
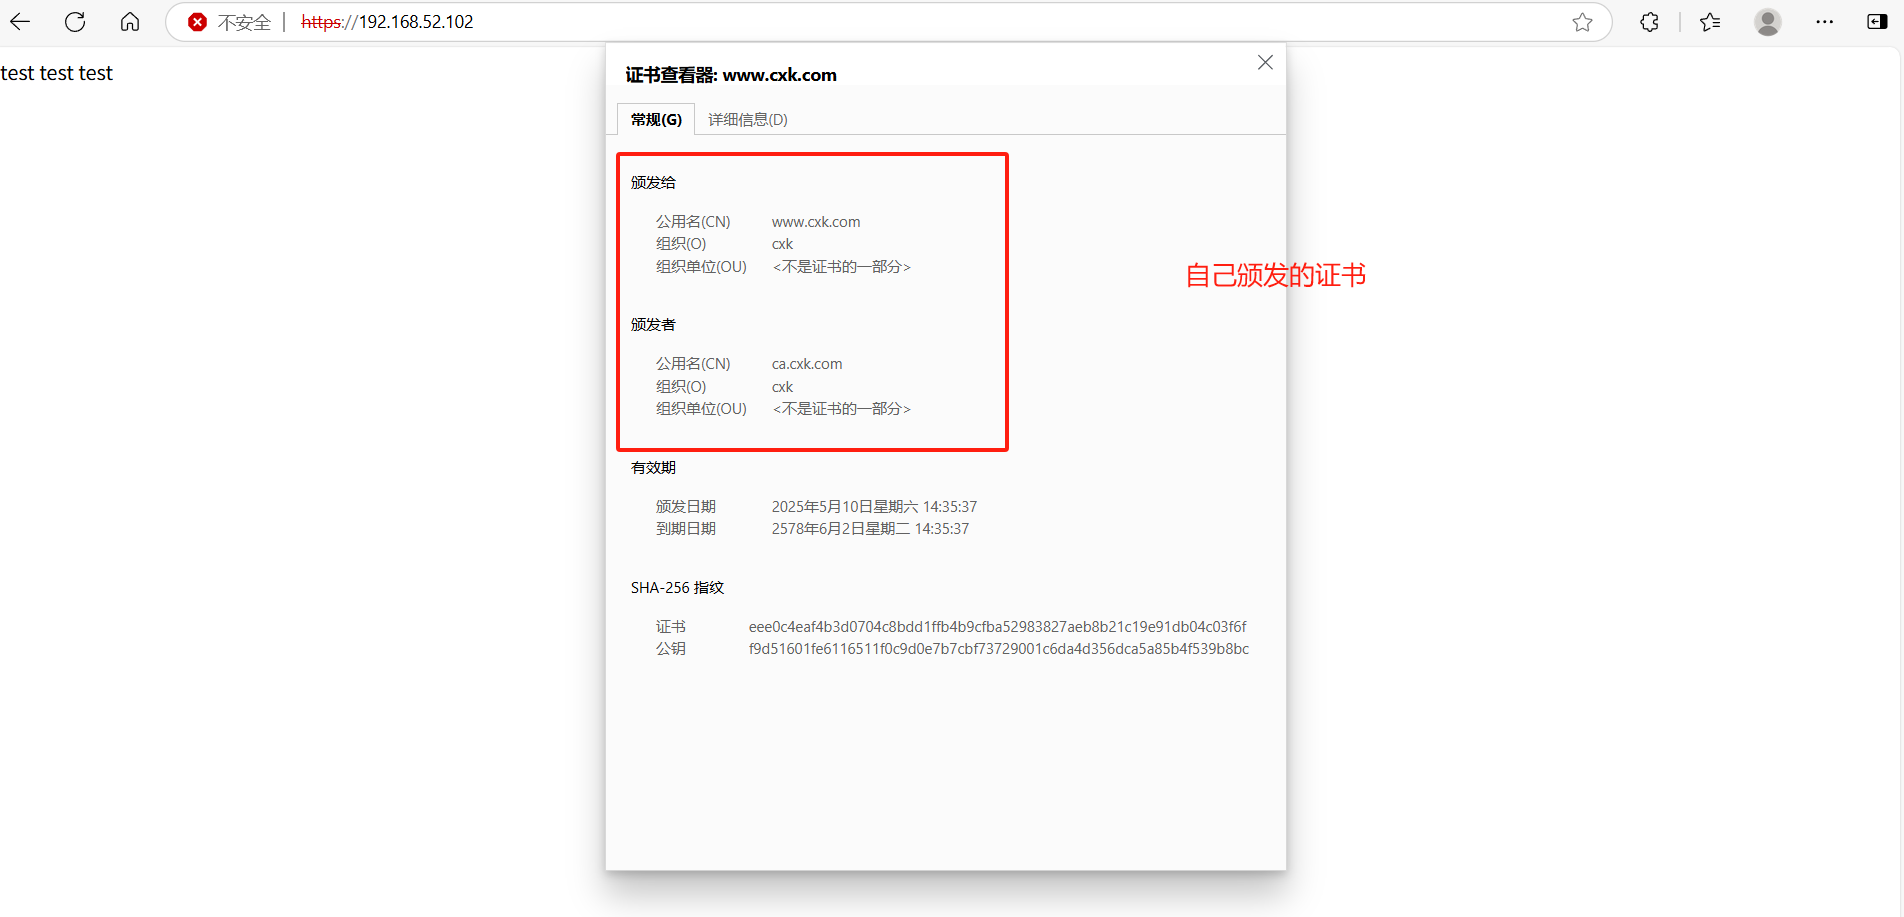
bash '//tmp/VMwareDnD/thy0ti/certificate.sh'ls
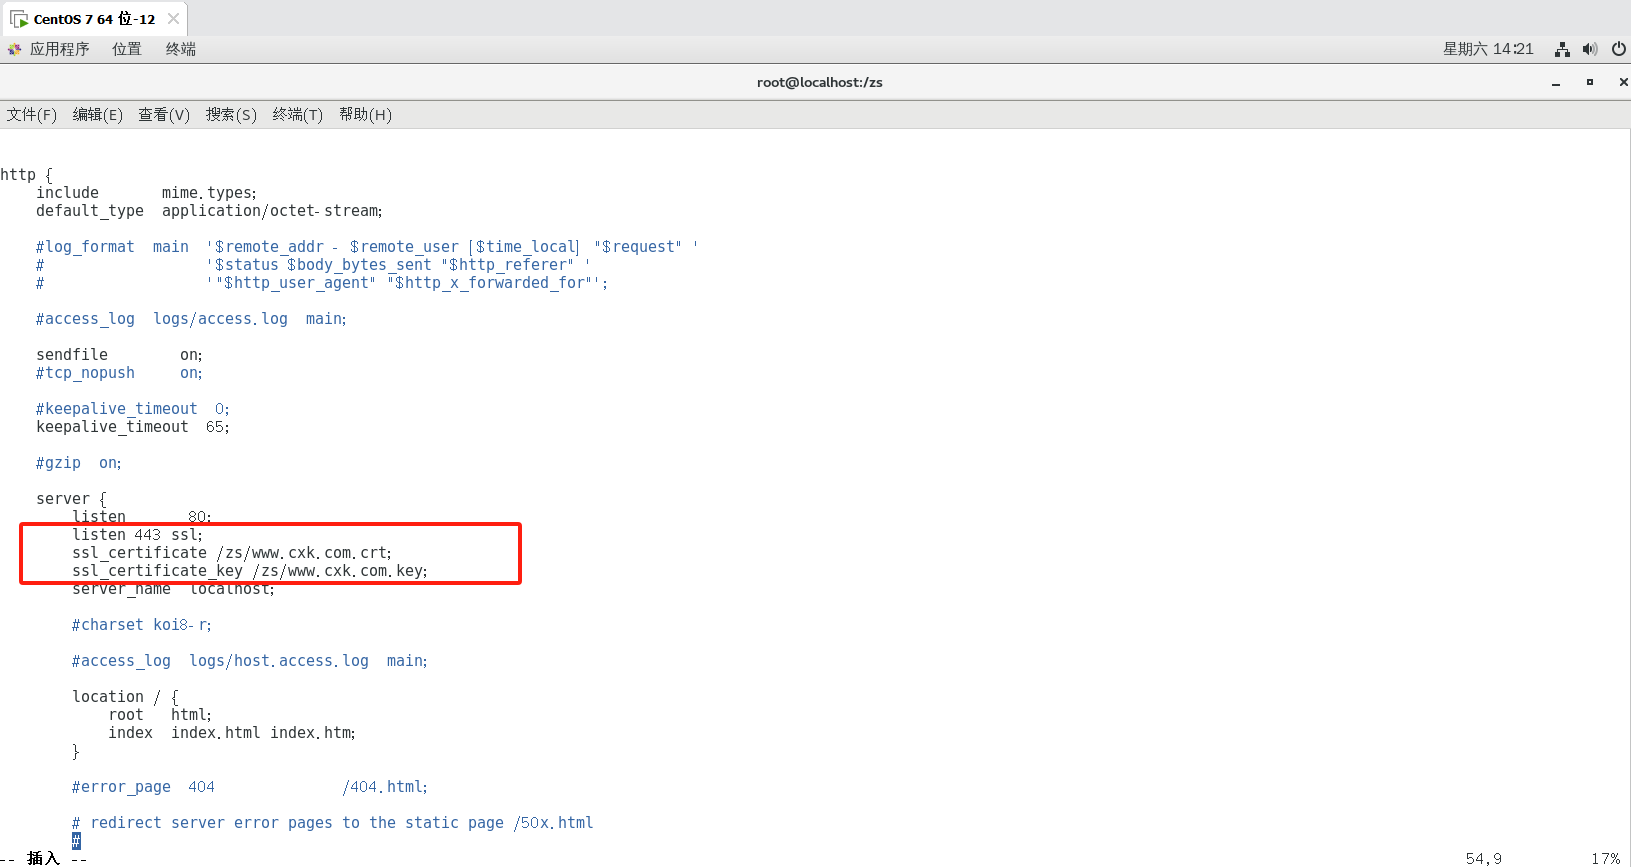
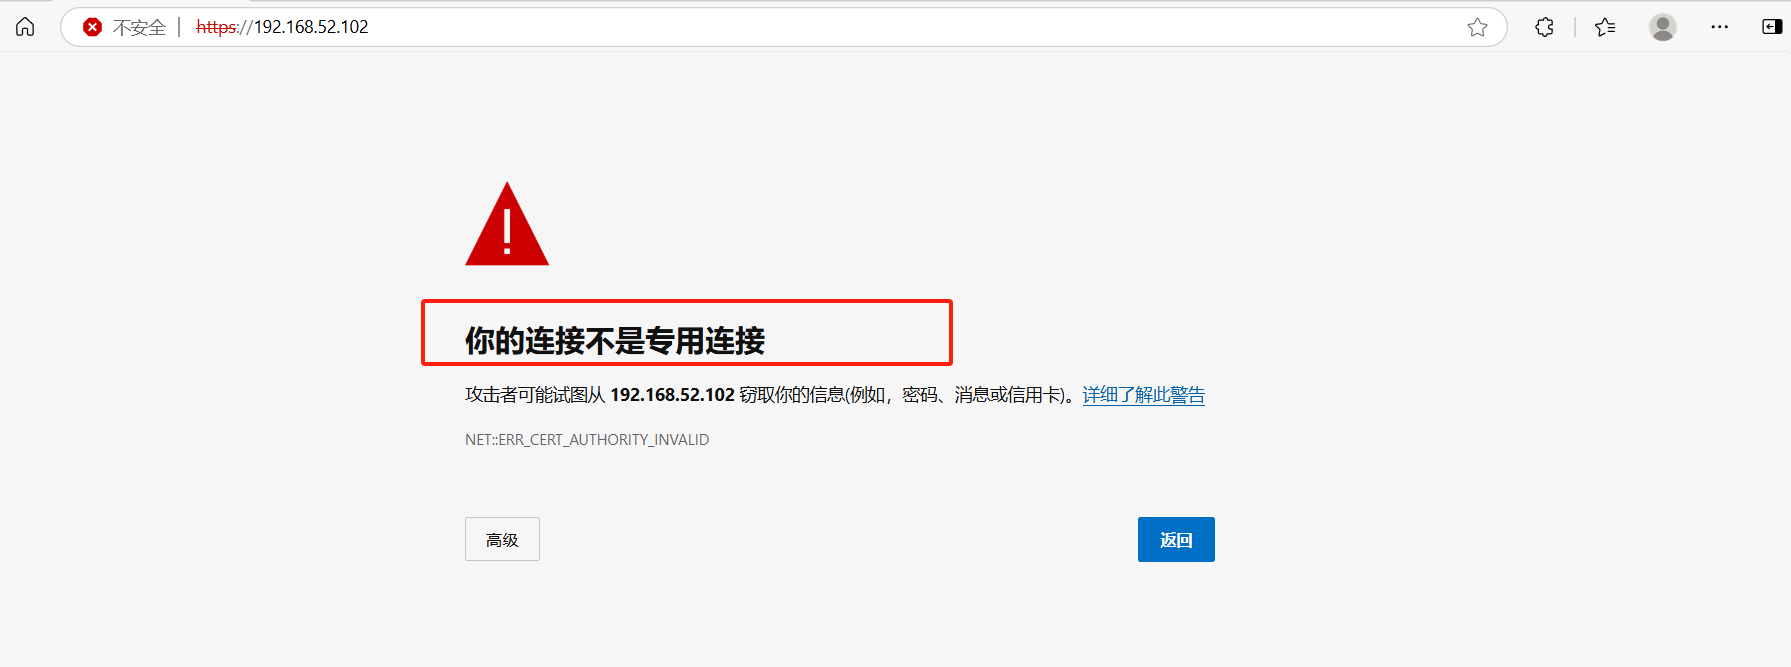
#查看cat cxk.com.crt ca.crt > www.cxk.com.crtmv kgc.com.key www.cxk.com.keyvim /apps/nginx/conf/nginx.conf#在linsten 80下添加listen 443 ssl;ssl_certificate /zs/www.cxk.com.crt;ssl_certificate_key /zs/www.cxk.com.key;#建立软连接
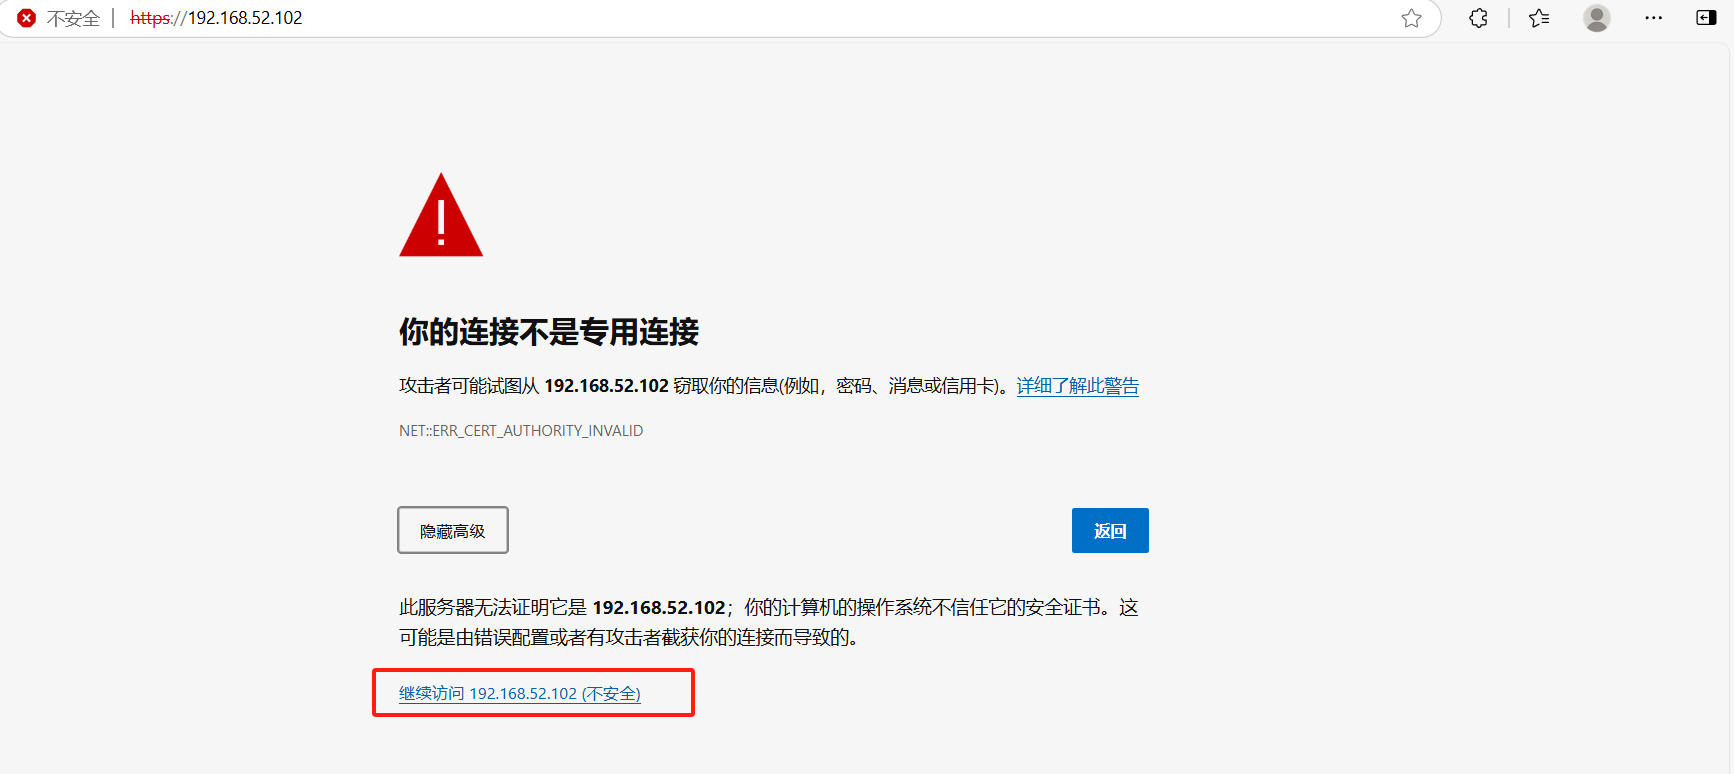
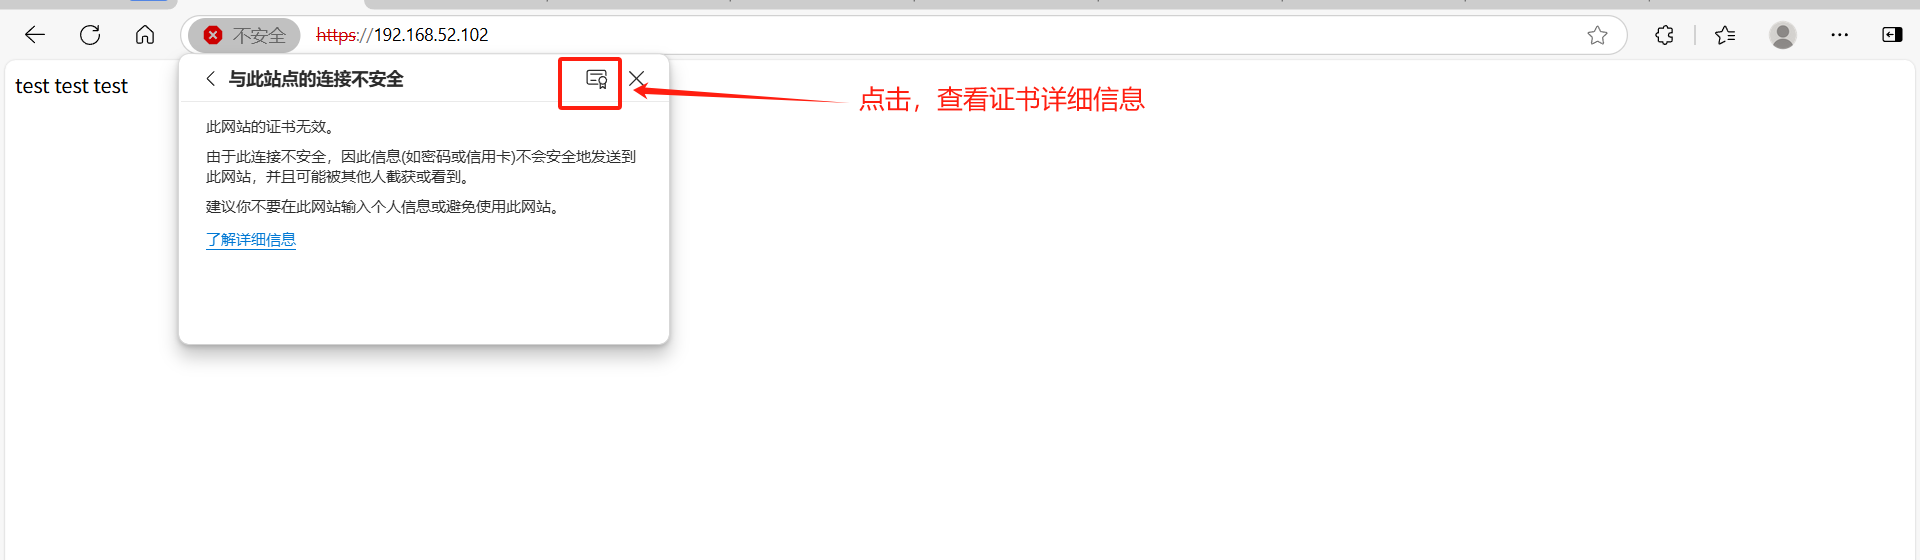
ln -s /apps/nginx/sbin/nginx /usr/bin/nginx -tnginx -s reloadsystemctl restart nginx修改默认网页内容
cd /apps/nginx/htmlvim index.html#清空,输入以下内容
test test test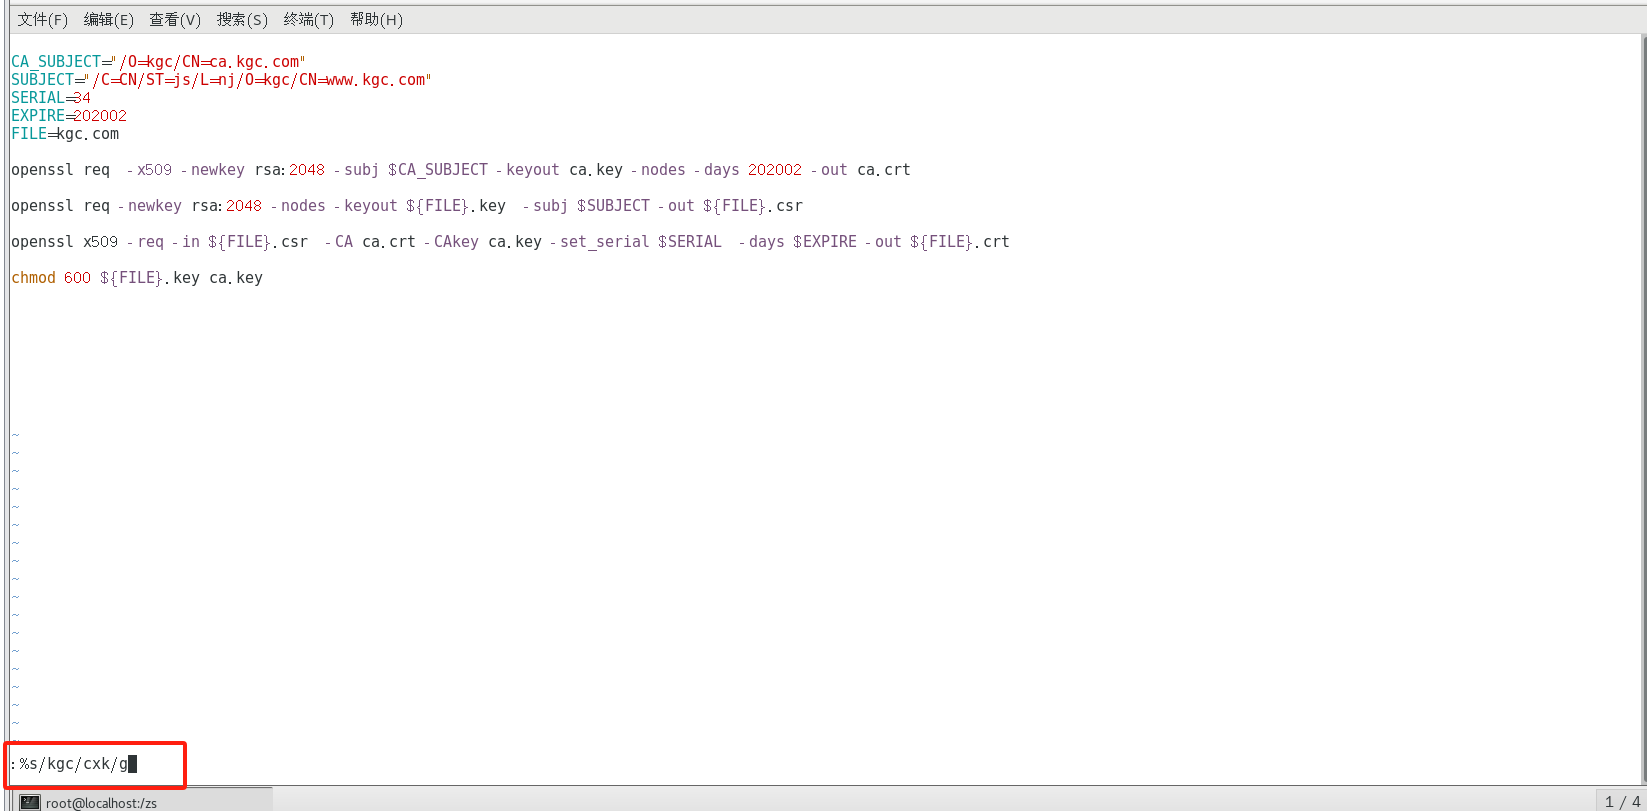

七. 自定义图标
在 Nginx 中,自定义图标通常指的是为网站设置自定义的 favicon(浏览器标签页图标)或自定义错误页面中的图标。
当客户端使用浏览器问页面时,浏览器会自己主动发起请求获取页面的favicon.ico文件。
当浏览器请求的favicon.ico文件不存在时,服务器会记录404日志,而浏览器会显示404报错。
#方法一:服务器不记录访问日志:
location = /favicon.ico {log_not_found off;access_log off;
}
#方法二:将图标保存到指定目录访问:
#location ~ ^/favicon\.ico$ {
location = /favicon.ico {root   /data/nginx/html/pc/images;expires 365d;  #设置文件过期时间
}