从字节码开始到ASM的gadgetinspector源码解析
Intro
目前在CTF比赛中,对于Java反序列化基本上靠codeql、tabby等工具分析利用链,tabby基于字节码的特性会更准确一些。而gadgetinspector作为一个有些年头的基于ASM对字节码进行分析的自动化反序列化链挖掘工具,虽然在实际场景使用中用到的不算很多,但是经过一些功能上的补足和二开后也提高了一部分的准确率。我们主要通过二开后的gadgetinspector来学习一下作者是如何通过ASM来对字节码进行处理并跟踪污点流进行分析。在分析gadgetInspector之前,我们要先对字节码的相关结构有一些了解,所以我们可以按照字节码的固定架构使用十六进制编辑器查看一下字节码中到底存储了些什么东西。
二开后的GadgetInspector:https://github.com/threedr3am/gadgetinspector
字节码分析
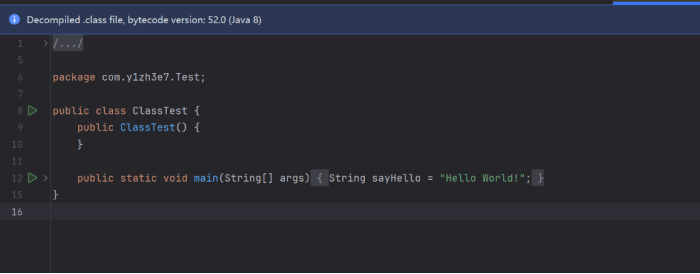
我们以如下类进行分析:
package com.y1zh3e7.Test;publicclassClassTest{publicstaticvoid main(String[] args){String sayHello ="Hello World!";}}
编译后class文件扔到hex编辑器里查看十六进制方便分析:
CA FE BA BE 0000003400180A000400140800150700160700170100063C696E69743E010003282956010004436F646501000F4C696E654E756D6265725461626C650100124C6F63616C5661726961626C655461626C650100047468697301001C4C636F6D2F79317A683365372F546573742F436C617373546573743B0100046D61696E010016285B4C6A6176612F6C616E672F537472696E673B2956010004617267730100135B4C6A6176612F6C616E672F537472696E673B01000873617948656C6C6F0100124C6A6176612F6C616E672F537472696E673B01000A536F7572636546696C6501000E436C617373546573742E6A6176610C0005000601000C48656C6C6F20576F726C642101001A636F6D2F79317A683365372F546573742F436C617373546573740100106A6176612F6C616E672F4F626A656374002100030004000000000002000100050006000100070000002F00010001000000052A B7 0001 B1 0000000200080000000600010000000300090000000C000100000005000A000B00000009000C000D000100070000003C00010002000000041202S4C B1 0000000200080000000A00020000000500030006000900000016000200000004000E000F00000003000100100011000100010012000000020013
class文件结构如下
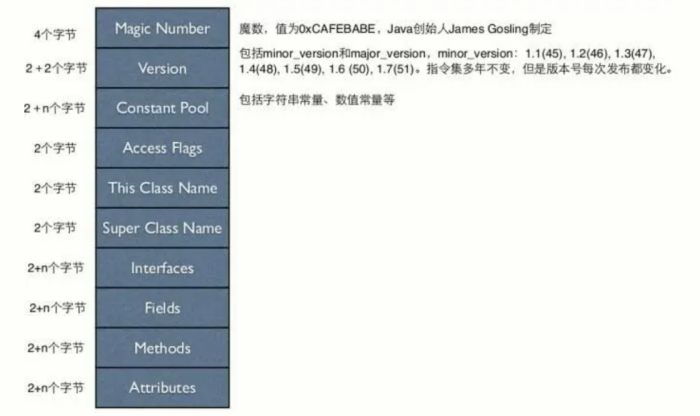
0x01 魔术头 Magic Number-4Byte
class文件的魔术头为四字节并且值固定,可以看到为如下内容,这个十六进制表达还是挺有意思的
CA FE BA BE
0x02 版本号 Version-2+2Byte
十六进制对应内容为
00000034
前面的0000为次版本号,后面的0034为主版本号,0x0034对应十进制为52,对应版本为jdk1.8,对应的我IDEA中的jdk版本也是1.8
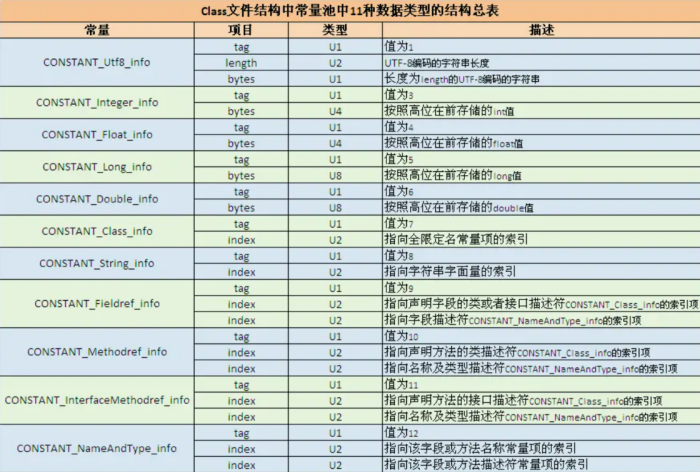
0x03 常量池 Constant Pool-2+nByte
常量池的2+n指的是两字节的常量数量,加上nByte的常量内容,常量池存储如下内容:
接下来我们继续分析十六进制并以此说明:
首先的两个字节代表常量数量,0x0018转换为十进制为24。这里需要注意的是,常量池的常量索引并不是从0开始而是从1开始,因此24表示常量池中共有23个常量,索引以此为1-23,并且在.class文件中,只有常量池的下标是从0开始,后面的接口、属性、方法等下表依然都是从0开始计数:
0018
CONSTANT-1
根据上面的表格,我们可以发现不论是何种类型的常量,都是以u1(1字节)的tag位作为起始,因此我们向下读取一字节,为第一个常量的tag,为0x0A:
0A
0x0A对应十进制10,我们在表格中寻找值为10的索引,可以找到该常量类型为CONSTANT_Methodref_info,并且接下来还分别有两个u2的index,我们继续向下读取两个字节,则对应表格中指向声明方法的类描述符的索引项,这些东西的作用我们到后面就会知道了,先继续往下看
0004
继续向下读取两个字节,对应指向名称及类型描述符索引项,值为20
0014
constant#1:
0x0a:Methodref_info
0x00 04:Class_info索引项#4
0x00 14:NameAndType索引项#20
CONSTANT-2
向下读取1B,即为第二个常量的TAG位,值为08,对应表格中CONSTANT_Fieldref_info,依旧是两个u2的index
constant#2:
0x08:String_info
0x00 15::指向字符串字面量#21
CONSTANT-3
0x07:Class_info
0x00 16:全局限定名常量项索引#22
CONSTANT-4
0x07:Class_info
0x00 17:全局限定名常量项索引#23
CONSTANT-5
0x01:Utf8_info
0x00 06:字符串长度为6
0x3C 69 6E 69 74 3E:字符串<init>
CONSTANT-6
0x01:Utf8-info
0x00 03:字符串长度为3
0x28 29 56:字符串()V
CONSTANT-7
0x01:Utf8-info
0x00 04:字符串长度为4
0x43 6F 64 65:字符串Code
CONSTANT-8
0x01:Utf8-info
0x00 0F:字符串长度为15
0x4C 69 6E 65 4E 75 6D 62 65 72 54 61 62 6C 65:字符串LineNumberTable
CONSTANT-9
0x01:Utf8-info
0x00 12:字符串长度为18
0x4C 6F 63 61 6C 56 61 72 69 61 62 6C 65 54 61 62 6C 65:字符串LocalVariableTable
CONSTANT-10
0x01:Utf8-info
0x00 04:字符串长度为4
0x74 68 69 73:字符串this
CONSTANT-11
0x01:Utf8-info
0x00 1C:字符串长度为28
0x4C 63 6F 6D 2F 79 31 7A 68 33 65 37 2F 54 65 73 74 2F 43 6C 61 73 73 54 65 73 74 3B:字符串Lcom/y1zh3e7/Test/ClassTest;
CONSTANT-12
0x01:Utf8-info
0x00 04:字符串长度为4
0x6D 61 69 6E:字符串main
CONSTANT-13
0x01:Utf8-info
0x00 16:字符串长度为22
0x28 5B 4C 6A 61 76 61 2F 6C 61 6E 67 2F 53 74 72 69 6E 67 3B 29 56:字符串([Ljava/lang/String;)V
CONSTANT-14
0x01:Utf8-info
0x00 04:字符串长度为4
0x61 72 67 73:字符串args
CONSTANT-15
0x01:Utf8-info
0x00 13:字符串长度为19
0x5B 4C 6A 61 76 61 2F 6C 61 6E 67 2F 53 74 72 69 6E 67 3B:字符串[Ljava/lang/String;
CONSTANT-16
0x01:Utf8-info
0x00 08:字符串长度为8
0x73 61 79 48 65 6C 6C 6F:字符串sayHello
CONSTANT-17
0x01:Utf8-info
0x00 08:字符串长度为18
0x4C 6A 61 76 61 2F 6C 61 6E 67 2F 53 74 72 69 6E 67 3B:字符串Ljava/lang/String;
CONSTANT-18
0x01:Utf8-info
0x00 0A:字符串长度为10
0x53 6F 75 72 63 65 46 69 6C 65:字符串SourceFile
CONSTANT-19
0x01:Utf8-info
0x00 0A:字符串长度为14
0x43 6C 61 73 73 54 65 73 74 2E 6A 61 76 61:字符串ClassTest.java
CONSTANT-20
0x0C:NameAndType_info
0x00 05:字段或方法名常量项索引#5
0x00 06:字段或方法描述符常量索引#6
CONSTANT-21
0x01:Utf8-info
0x00 0C:字符串长度为12
0x48 65 6C 6C 6F 20 57 6F 72 6C 64 21:字符串Hello World!
CONSTANT-22
0x01:Utf8-info
0x00 1A:字符串长度为26
0x63 6F 6D 2F 79 31 7A 68 33 65 37 2F 54 65 73 74 2F 43 6C 61 73 73 54 65 73 74:字符串com/y1zh3e7/Test/ClassTest
CONSTANT-23
0x01:Utf8-info
0x00 10:字符串长度为16
0x6A 61 76 61 2F 6C 61 6E 67 2F 4F 62 6A 65 63 74:字符串java/lang/Object
0x04 访问标志位 Access Flags-2Byte
访问标志位包括一个class文件的属性(如是类还是接口,是否被定义成public,是否是abstract,是否是final)
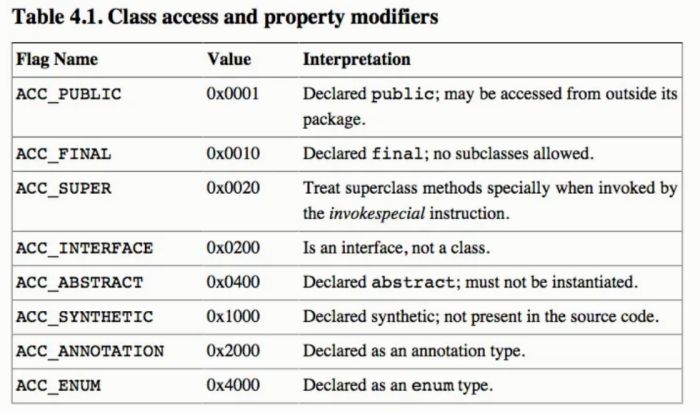
我们向下读取两个Byte0x0021,代表的是0x0020和0x0001的集合,意思是该类为public,并且继承object(0x06父类索引)
0x05 类索引-2Byte
类索引可以确定类的全局限定名称,我们读取两个字节为0x00 03,对应常量池第三个常量CONSTANT-3,可以发现CONSTANT-3:0x00 16:全局限定名常量项索引#22,所以继续去CONSTANT-22查找对应常量,得到全局限定类名com/y1zh3e7/Test/ClassTest
0x06 父类索引-2Byte
0X00 04,对应CONSTANT-4,0x00 17:全局限定名常量项索引#23,对应java/lang/Object
0X07 接口索引-2+n
2+n依旧指两个字节代表接口数量,n代表接口表,我们向下读取两个字节0X00 00,即接口数量为0,自然也没有n了
0x08 字段表集合-2+nByte
字段表中包含了类中声明的变量,以及实例化后的变量,但是不包括方法内声明的局部变量,因此继续向下读取两个字节,可以发现也是0x00 00,因为我们的变量是定义在psvm中,如果将代码修改如下:
publicclassClassTest{String sayHello ="Hello World!";}
那么此处的2byte则为0x00 01
0x09 方法-2+nByte
继续读取2Byte,0X00 02,说明我们的类中有两个方法,但是代码中我们明明只有一个方法psvm,其实是因为除了接口和抽象类,在javac时会自动生成一个无参构造,我们可以反编译看到他,也可以javap后看到这个构造器:
{public com.y1zh3e7.Test.ClassTest();descriptor:()Vflags: ACC_PUBLICCode:stack=1, locals=1, args_size=10: aload_01: invokespecial #1 // Method java/lang/Object."<init>":()V4:returnLineNumberTable:line 3:0LocalVariableTable:StartLengthSlotNameSignature050thisLcom/y1zh3e7/Test/ClassTest;publicstaticvoid main(java.lang.String[]);descriptor:([Ljava/lang/String;)Vflags: ACC_PUBLIC, ACC_STATICCode:stack=1, locals=2, args_size=10: ldc #2 // String Hello World!2: astore_13:returnLineNumberTable:line 5:0line 6:3LocalVariableTable:StartLengthSlotNameSignature040 args [Ljava/lang/String;311 sayHello Ljava/lang/String;}
我们继续向下读取两个方法,方法表结构如下:
method_info {u2 access_flags;u2 name_index;u2 descriptor_index;u2 attributes_count;attribute_info attributes[attributes_count];}
构造方法解析
我们按照格式来读取第一个方法:
0x00 01,访问标志位,代表public方法,给出以下访问标志控制符掩码解析:
十六进制值名称说明0x0001 ACC_PUBLIC 方法为public权限0x0002 ACC_PRIVATE 方法为private权限0x0004 ACC_PROTECTED 方法为protected权限0x0008 ACC_STATIC 方法为static静态方法0x0010 ACC_FINAL 方法为final(不可被覆盖)0x0020 ACC_SYNCHRONIZED 方法为synchronized(同步方法)0x0040 ACC_BRIDGE 方法是由编译器生成的桥接方法(用于泛型类型擦除)0x0080 ACC_VARARGS 方法接受可变参数(如String... args)0x0100 ACC_NATIVE 方法为native(由本地代码实现)0x0400 ACC_ABSTRACT 方法为abstract(抽象方法,无实现)0x0800 ACC_STRICT 方法为strictfp(严格浮点模式)0x1000 ACC_SYNTHETIC 方法是由编译器生成的(如默认构造方法、枚举类的 values()方法等)
控制符可以组合使用,如
public static方法:
0x0001 (ACC_PUBLIC) | 0x0008 (ACC_STATIC) = 0x0009private final synchronized方法:
0x0002 | 0x0010 | 0x0020 = 0x0032
其中某些标志不能同时存在(如 public、private、protected 只能三选一)。
0x00 05,name_index代表方法索引名,我们去CONSTANT-5进行查找为<init>,这是字节码中对构造方法的专用描述。
0x00 06,方法描述符索引。查找CONSTANT-6,为()V。方法描述符的语法是 (参数类型)返回类型,其中 V 表示 void(即无返回值)。():表示方法没有参数。V:表示方法的返回类型为 void。
- 为什么构造方法的返回类型是
void?
虽然构造方法在 Java 语法中没有显式返回值,但在字节码层面,构造方法的返回类型被标记为void。实际上,构造方法隐式返回构造的实例对象(this),但这一过程由 JVM 自动处理,不需要在描述符中体现。
0x00 01,attributes_count,这里引入属性表的概念。属性表可以描述方法的专有信息,这里则代表了该方法的属性表数量为一个。
通用属性表结构如下:
attribute_info {u2 attribute_name_index;u4 attribute_length;u1 info[attribute_length];}
根据通用属性表结构,我们读取一个u2,0x00 07到CONSTANT-7中查找,发现是Code。
在 JVM 的 .class 文件中,Code、LineNumberTable、LocalVariableTable 和 SourceFile 是类文件属性的重要组成部分,分别用于描述方法的行为、调试信息、局部变量与源码的映射关系,以及源码文件的元数据。
Code属性:
Code 属性是方法表(method_info)中的核心属性,作用如下:
- 存储字节码
:包含方法的具体指令(如
aload_0,invokespecial等)。 - 定义执行环境
:通过
max_stack和max_locals告诉 JVM 如何分配栈帧内存。 - 异常处理
:通过
exception_table定义try-catch块的范围和异常类型。 - 关联调试信息
:通过子属性(如
LineNumberTable)将字节码与源码关联。
Code属性结构如下:
Code_attribute{u2 attribute_name_index;u4 attribute_length;u2 max_stack;u2 max_locals;u4 code_length;u1 code[code_length];u2 exception_table_length;{ u2 start_pc;u2 end_pc;u2 handler_pc;u2 catch_type;} exception_table[exception_table_length];u2 attributes_count;attribute_info attributes[attributes_count];}
继续读取一个u4,attribute_length,0x0000002F代表接下来的47个字节为Code属性的指令字节码。
读取一个u2,0x00 01,max_stack,代表操作数栈最大深度1,一会我们在分析字节码指令时就知道这是什么意思了。
0X00 01,max_locals,代表方法的局部变量表大小为1,局部变量为this,因为所有实例方法(非静态方法)和构造方法的第一个局部变量槽位(索引 0)都存储了当前对象的引用(即 this)。这是 JVM 的隐式规则,无需在代码中显式声明,因此在psvm这个静态方法中就不会包含this了。此外如果该构造方法为有参构造,那么max_locals数量会+n(参数列表的参数数量)
0x00 00 00 05,code_length为指令长度,也就是说接下来的五个字节为指令。
2A B7 00 01 B1,我们分别来分析这几条指令的作用。2A对应指令aload_0,用于加载局部方法表中的参数到操作数栈中,因此这一步会将this加载到操作数栈上。B7 对应指令invokespecial ,00 01对应CONSTANT-1,即调用父类构造方法。B1对应指令return,方法返回。
0x00 00,exception_table_length,代表异常表为空。
0x00 02,attributes_count,代表该Code属性中还包含了两个子属性。
0x00 08,对应CONSTANT-8,LineNumberTable,则说明该子属性为一个LineNumberTable。
LineNumberTable 属性:
Code 属性的子属性,记录 字节码偏移量 与 源码行号 的映射关系,作用如下:
- 调试支持
:在 IDE 或异常堆栈中显示源码行号(如
Exception in thread "main" java.lang.NullPointerException at Test.java:12)。 - 反编译辅助
:帮助工具(如
javap)生成更易读的反编译结果。 - 优化限制
:若省略此属性,JIT 编译器可能无法进行某些优化(如基于行号的 Profiling)。
LineNumberTable属性结构如下:
LineNumberTable_attribute{u2 attribute_name_index;u4 attribute_length;u2 line_number_table_length;{ u2 start_pc;u2 line_number;} line_number_table[line_number_table_length];}
0x00 00 00 06,attribute_length,代表接下来的六字节为属性。
00 01,line_number_table_length为1,代表了下面的line_number_table长度为1。
每个line_number_table包含两个字段,0x00 00对应start_pc,0x00 03对应line_number,这两个字段负责将字节码偏移量与源码行数进行映射,start_pc对应字节码偏移量,line_number对应源码行数,因此0003意思是将第0行开始的字节码指令全部与第三行源码进行对应。如果line_number_table长度不为1,还会有多个start_pc来负责映射字节码指令和源码的关系。比如如果还有一组start_pc=3,line_number=4,那么两组映射关系意思是字节码偏移量0-2对应源码第三行,字节码偏移量3及之后的指令对应源码第四行。
我们继续向下读取第Code的第二个子属性,0x00 09,对应CONSTANT-9,LocalVariableTable。
LocalVariableTable属性:
Code 属性的子属性,记录 局部变量名、类型 及其在局部变量表中的 槽位 和作用域,作用如下:
- 调试支持
:在 IDE 中显示局部变量名和值(如调试时查看
sayHello变量的内容)。 - 反射支持
:通过
Method.getParameters()获取参数名(需编译时启用-parameters选项)。 - 反编译辅助
:帮助反编译器还原变量名(否则变量名会变成
var1,var2)。
LocalVariableTable属性结构如下:
LocalVariableTable_attribute{u2 attribute_name_index;u4 attribute_length;u2 local_variable_table_length;{ u2 start_pc;u2 length;u2 name_index;u2 descriptor_index;u2 index;} local_variable_table[local_variable_table_length];}
0x00 0000 0C,attribute_length,代表接下来12字节为属性长度。
0x00 01,代表一个局部变量条目,因此下面的local_variable_table[1]中即为描述局部变量this的相关信息。
0x00 00,start_pc,代表this的作用域从字节码偏移量0开始,作用域覆盖0x00 05length,共五个字节。
0x00 0A,name_index,指向CONSTANT-10,局部变量名为this。
0x00 0B,类的全局限定名,指向CONSTANT-11,Lcom/y1zh3e7/Test/ClassTest
0x00 00,index,指该局部变量存储在局部变量表的槽位 0(实例方法的 this 固定占用槽位 0)
main方法解析
0x00 09:访问标志,0x01和0x08的集合,即public static。
0x00 0C:name_index,指向CONSTANT-12,类名main,
0x00 0D:descriptor_index,指向CONSTANT-13,([Ljava/lang/String;)V,方法接收参数为String,返回类型为viod。
0x00 01:attributes_count,属性数量为1。
继续解析属性:
| 字段 | 十六进制值 | 十进制值/说明 |
|---|---|---|
attribute_name_index | 00 07 | 指向常量池第 7 项(”Code”) |
attribute_length | 00 00 00 3C | 属性总长度:60 字节 |
max_stack | 00 01 | 操作数栈最大深度:1 |
max_locals | 00 02 | 局部变量表大小:2( |
code_length | 00 00 00 04 | 字节码长度:4 字节 |
| 字节码 | 12 02 4C B1 | 指令解析: |
12 02 | ldc #2 (加载常量 “Hello World!”) | |
4C | astore_1 (存储到局部变量 1) | |
B1 | return (方法返回) | |
exception_table_length | 00 00 | 异常表为空 |
attributes_count | 00 02 | 包含 2 个子属性 |
子属性 1:LineNumberTable
| 字段 | 十六进制值 | 说明 |
|---|---|---|
attribute_name_index | 00 08 | 常量池第 8 项(”LineNumberTable”) |
attribute_length | 00 00 00 0A | 长度 10 字节 |
line_number_table_length | 00 02 | 2 个行号条目 |
| 条目 1: | 00 00 | 字节码偏移 0 → 源码第 5 行 |
| 条目 1: | 00 05 | |
| 条目 2: | 00 03 | 字节码偏移 3 → 源码第 6 行 |
| 条目 2: | 00 06 |
子属性 2:LocalVariableTable
| 字段 | 十六进制值 | 说明 |
|---|---|---|
attribute_name_index | 00 09 | 常量池第 9 项(”LocalVariableTable”) |
attribute_length | 00 00 00 16 | 长度 22 字节 |
local_variable_table_length | 00 02 | 2 个局部变量条目 |
| 条目 1: | 00 00 | 变量 |
length | 00 04 | 作用域长度 4 字节 |
name_index | 00 0E | 常量池第 14 项(变量名 |
descriptor_index | 00 0F | 常量池第 15 项(类型 |
index | 00 00 | 局部变量槽位 0 |
| 条目 2: | 00 03 | 变量 |
length | 00 01 | 作用域长度 1 字节 |
name_index | 00 10 | 常量池第 16 项(变量名 |
descriptor_index | 00 11 | 常量池第 17 项(类型 |
index | 00 01 | 局部变量槽位 1 |
0x10 属性Attribute-2+nByte
0x00 01:属性数量1
0x0012:属性名称,CONSTANT-18,SourceFile。
SourceFile属性:
类文件的顶级属性,记录 源码文件名,作用如下:
- 调试支持
:在异常堆栈中显示源码文件名(如
Test.java)。 - 代码溯源
:帮助开发者快速定位源码文件。
- 可读性
:反编译时显示原始文件名,而非匿名类名。
SourceFile文件结构如下:
SourceFile_attribute{u2 attribute_name_index;u4 attribute_length;u2 sourcefile_index;}
0x00 00 00 02,attribute_length,属性长度2.
0x00 13,sourcefile_index,指向CONSTANT-19,为ClassTest.java。
gadgetInspector分析
0x01 Intro
工具基于ASM技术来对控制字节码,从而达到对传入jar及war包的classpath下的类进行读取,并依次记录类信息、类方法信息、调用关系信息。最后基于以上收集的信息来进行反序列化链的挖掘,分别对应如下几个类:
-
GadgetInspector:main方法,程序的入口,做一些配置以及数据的准备工作
-
MethodDiscovery:类、方法数据以及父子类、超类关系数据的搜索
-
PassthroughDiscovery:分析参数能影响到返回值的方法,并收集存储
-
CallGraphDiscovery:记录调用者caller方法和被调用者target方法的参数关联
-
SourceDiscovery:入口方法的搜索,只有具备某种特征的入口才会被标记收集
-
GadgetChainDiscovery:整合以上数据,并通过判断调用链的最末端slink特征,从而判断出可利用的gadget chain
0x02 主入口-GadgetInspetcor
该类为整个工具的入口类,基本上是对于相关配置做出初始化处理,静态代码块中创建准备写入相关结果的文件。main中首先验证是否存在参数,若为空退出。工具在挖掘时需要我们指定不同的gadget-chain,如jdk原生反序列化、jackson等,以及指定classpath的路径。
接下来会对日志进行配置,之后是对历史dat文件(上面提到的类、方法等相关数据的本地化存储)的管理,以及反序列化链类型的指定。我们主要看这一部分是如何指定反序列化链类型的:
elseif(arg.equals("--config")){//--config参数指定fuzz类型config =ConfigRepository.getConfig(args[++argIndex]);if(config ==null){thrownewIllegalArgumentException("Invalid config name: "+ args[argIndex]);}
跟进到getConfig方法中,并且也可以看到所有的gadget-chain是通过不同的Config来实现的,并且都实现了GIConfig接口:
publicinterfaceGIConfig{String getName();SerializableDecider getSerializableDecider(Map<MethodReference.Handle,MethodReference> methodMap,InheritanceMap inheritanceMap);ImplementationFinder getImplementationFinder(Map<Handle,MethodReference> methodMap,Map<Handle,Set<Handle>> methodImplMap,InheritanceMap inheritanceMap,Map<ClassReference.Handle,Set<Handle>> methodsByClass);SourceDiscovery getSourceDiscovery();SlinkDiscovery getSlinkDiscovery();}
我们以Jackson的实现来看,这些被实现的方法都会在后面用到,他们都是用来对指定gadget-chain进行区分的方法,不同的gadget-chain的特征不同,因此我们可以通过这些方法来确认对应的chain。
package gadgetinspector.config;import gadgetinspector.ImplementationFinder;import gadgetinspector.SerializableDecider;import gadgetinspector.SlinkDiscovery;import gadgetinspector.SourceDiscovery;import gadgetinspector.data.ClassReference;import gadgetinspector.data.InheritanceMap;import gadgetinspector.data.MethodReference;import gadgetinspector.data.MethodReference.Handle;import gadgetinspector.jackson.JacksonImplementationFinder;import gadgetinspector.jackson.JacksonSerializableDecider;import gadgetinspector.jackson.JacksonSourceDiscovery;import java.util.Map;import java.util.Set;publicclassJacksonDeserializationConfigimplementsGIConfig{@OverridepublicString getName(){return"jackson";}@OverridepublicSerializableDecider getSerializableDecider(Map<MethodReference.Handle,MethodReference> methodMap,InheritanceMap inheritanceMap){returnnewJacksonSerializableDecider(methodMap);}@OverridepublicImplementationFinder getImplementationFinder(Map<Handle,MethodReference> methodMap,Map<Handle,Set<Handle>> methodImplMap,InheritanceMap inheritanceMap,Map<ClassReference.Handle,Set<Handle>> methodsByClass){returnnewJacksonImplementationFinder(getSerializableDecider(methodMap, inheritanceMap));}@OverridepublicSourceDiscovery getSourceDiscovery(){returnnewJacksonSourceDiscovery();}@OverridepublicSlinkDiscovery getSlinkDiscovery(){returnnull;}}
跟进JacksonSerializableDecider,两个map中记录的是可以通过Jackson决策的类和方法:
//类是否通过决策的缓存集合privatefinalMap<ClassReference.Handle,Boolean> cache =newHashMap<>();//类名-方法集合 映射集合privatefinalMap<ClassReference.Handle,Set<MethodReference.Handle>> methodsByClassMap;
具体的决策判断逻辑在apply中,在后面的分析中我们也可以看到会调用apply方法来判断类和方法是否通过决策。以jackson的apply来举例,由于jackson的json反序列化是需要以类的无参构造为起始,在java中如果没有显式声明无参构造器,但是显式声明了一个有参构造,那么该类是没有无参构造的,因此代表着该类不可进行jackson反序列化。
@OverridepublicBoolean apply(ClassReference.Handle handle){if(isNoGadgetClass(handle)){returnfalse;}Boolean cached = cache.get(handle);if(cached !=null){return cached;}Set<MethodReference.Handle> classMethods = methodsByClassMap.get(handle);if(classMethods !=null){for(MethodReference.Handle method : classMethods){//该类,只要有无参构造方法,就通过决策if(method.getName().equals("<init>")&& method.getDesc().equals("()V")){cache.put(handle,Boolean.TRUE);returnBoolean.TRUE;}}}cache.put(handle,Boolean.FALSE);returnBoolean.FALSE;}
接下来回到Config中,继续看InplementationFinder,在决策时由于Java的多态性,并且gadgetinspector无法在要被检测的jar运行时进行判断,因此当调用到某一接口的方法时,需要查找接口所有的实现类中的该方法,并将这些方法组成实际的调用链去进行污点分析。这些方法是否可进行当前指定的gadget-chain反序列化,还是需要通过apply方法来进行判断:
publicclassJacksonImplementationFinderimplementsImplementationFinder{privatefinalSerializableDecider serializableDecider;publicJacksonImplementationFinder(SerializableDecider serializableDecider){this.serializableDecider = serializableDecider;}@OverridepublicSet<MethodReference.Handle> getImplementations(MethodReference.Handle target){Set<MethodReference.Handle> allImpls =newHashSet<>();// For jackson search, we don't get to specify the class; it uses reflection to instantiate the// class itself. So just add the target method if the target class is serializable.if(Boolean.TRUE.equals(serializableDecider.apply(target.getClassReference()))){allImpls.add(target);}return allImpls;}}
继续看JacksonSourceDiscovery,内部只有一个discover方法,这个方法的作用就是帮我们找到可进行Jackson反序列化的入口方法,对于jackson反序列化来说,会以无参构造为入口,并依次执行setter以及getter。因此discover会查找出通过了apply决策后的类的无参构造(()V代表无参,返回值为viod),以及getter和setter。
@Overridepublicvoid discover(Map<ClassReference.Handle,ClassReference> classMap,Map<MethodReference.Handle,MethodReference> methodMap,InheritanceMap inheritanceMap,Map<MethodReference.Handle,Set<GraphCall>> graphCallMap){finalJacksonSerializableDecider serializableDecider =newJacksonSerializableDecider(methodMap);for(MethodReference.Handle method : methodMap.keySet()){if(skipList.contains(method.getClassReference().getName())){continue;}if(serializableDecider.apply(method.getClassReference())){if(method.getName().equals("<init>")&& method.getDesc().equals("()V")){addDiscoveredSource(newSource(method,0));}if(method.getName().startsWith("get")&& method.getDesc().startsWith("()")){addDiscoveredSource(newSource(method,0));}if(method.getName().startsWith("set")&& method.getDesc().matches("\\(L[^;]*;\\)V")){addDiscoveredSource(newSource(method,0));}}
继续向下看GadgetInspector,进入到initJarData方法中,通过for循环读取最后面的参数,从而指定多个jar或war包,通过URLClassLoader,根据绝对路径将这些jar或war包进行加载,并通过ClassResourceEnumerator将jar或war包中的class进行加载:
ClassLoader classLoader = initJarData(args, boot, argIndex, haveNewJar, pathList);
for(int i =0; i < args.length - argIndex; i++){String pathStr = args[argIndex + i];if(!pathStr.endsWith(".jar")){//todo 主要用于大批量的挖掘链//非.jar结尾,即目录,需要遍历目录找出所有jar文件File file =Paths.get(pathStr).toFile();if(file ==null||!file.exists())continue;Files.walkFileTree(file.toPath(),newSimpleFileVisitor<Path>(){@OverridepublicFileVisitResult visitFile(Path file,BasicFileAttributes attrs){if(!file.getFileName().toString().endsWith(".jar"))returnFileVisitResult.CONTINUE;File readFile = file.toFile();Path path =Paths.get(readFile.getAbsolutePath());if(Files.exists(path)){if(ConfigHelper.history){if(!scanJarHistory.contains(path.getFileName().toString())){if(jarCount.incrementAndGet()<=ConfigHelper.maxJarCount){pathList.add(path);}}}else{if(jarCount.incrementAndGet()<=ConfigHelper.maxJarCount){pathList.add(path);}}}returnFileVisitResult.CONTINUE;}});continue;}Path path =Paths.get(pathStr).toAbsolutePath();if(!Files.exists(path)){thrownewIllegalArgumentException("Invalid jar path: "+ path);}pathList.add(path);
//类枚举加载器,具有两个方法//getRuntimeClasses获取rt.jar的所有class//getAllClasses获取rt.jar以及classLoader加载的classfinalClassResourceEnumerator classResourceEnumerator =newClassResourceEnumerator(classLoader);
接下来进入beginDiscovery方法中,接下来我们开始分析具体的挖掘逻辑。
0x03 类、方法、继承关系数据收集-MethodDiscovery
首先进入methodDiscovery当中,可以看到如果不存在,会生成classes.dat、methods .dat、inheritanceMap.dat,分别对类数据、方法数据以及继承关系数据进行收集:
if(!Files.exists(Paths.get("classes.dat"))||!Files.exists(Paths.get("methods.dat"))||!Files.exists(Paths.get("inheritanceMap.dat"))){LOGGER.info("Running method discovery...");MethodDiscovery methodDiscovery =newMethodDiscovery();methodDiscovery.discover(classResourceEnumerator);//保存了类信息、方法信息、继承实现信息methodDiscovery.save();}
跟进MethodDiscovery.discover,传入了上面保存了类信息的classResourceRnumerator,并且调用了getAllClasses方法,获取到了包括rt.jar和指定jar、war包中的所有类,并调用ClassReader的accept方法进行下一步,这里所用到的就是ASM。
publicvoid discover(finalClassResourceEnumerator classResourceEnumerator)throwsException{for(ClassResourceEnumerator.ClassResource classResource : classResourceEnumerator.getAllClasses()){try(InputStream in = classResource.getInputStream()){ClassReader cr =newClassReader(in);try{//使用asm的ClassVisitor、MethodVisitor,利用观察模式去扫描所有的class和method并记录cr.accept(newMethodDiscoveryClassVisitor(),ClassReader.EXPAND_FRAMES);}catch(Exception e){LOGGER.error("Exception analyzing: "+ classResource.getName(), e);}}catch(Exception e){e.printStackTrace();}}}
ASM及访问者模式
ASM的设计原理基于访问者模式,常用于类的属性无改变,在不侵入类的情况下并对属性的操作做出扩充的场景(类似于AOP)。用生活中的例子我们可以这么理解,想象你是一个导游,要带游客参观一个由多个景点(类、方法、字段等)组成的旅游区(Java类)。访问者模式的工作方式是这样的:
- 景点清单
:旅游区有一份固定的景点清单(类的结构,比如方法、字段,并且这些不会变动)。
- 游客自由行动
:游客(XXXVisitor)可以自由选择在每个景点做什么(比如拍照、记录日志、修改行为)。
- 导游协调
:导游(ASM-ClassReader)负责按顺序带游客访问每个景点,并让游客在每个景点执行自己的操作。
ASM的关键思想:字节码(景点)的结构是固定的,但你可以通过”游客”灵活地定义在每个”景点”做什么,使用时我们需要先通过字节流等方式读入要控制的类,之后传入给ClassReader的accept方法,accept方法会按照JVM规定好的类文件结构来依次调用对应的方法,我们可以通过重写ClassVisitor的各个visit方法,在调用accept时传入,从而实现自己的visitXXX的逻辑。因为ASM是基于责任链的调用,并且支持visiter的嵌套包装来进行遍历调用,调用顺序为从最外层的子visitor开始调用,直到最内层的ClassVisitor,因此需要在我们的visit逻辑中处理下一层的visitor逻辑,直到将所有嵌套的visitor逻辑处理完毕(最外层也就是ASM中的ClassVisitor)否则有可能会造成visiter的逻辑断链。
1. visit()→访问类的基础信息(版本、类名等)2. visitSource()→源码信息(可选)3. visitModule()→模块信息(Java9+,可选)4. visitNestHost()→嵌套类宿主(Java11+,可选)5. visitPermittedSubtype()→sealed类的许可子类(Java17+,可选)6. visitOuterClass()→外部类信息(如果是内部类)7. visitAnnotation()→类上的注解(可能有多个)8. visitTypeAnnotation()→类上的类型注解(可能有多个)9. visitAttribute()→类的自定义属性(可能有多个)10. visitField()→类的字段(按字节码中的顺序访问)11. visitMethod()→类的方法(按字节码中的顺序访问)12. visitEnd()→类访问结束
我们回到MethodDiscovery.discover,在通过cr.accept后,cr先调用visit方法,因此我们跟进传入cr的MethodDiscoveryClassVisitor的visit方法,MDCV的visit方法保存了当前观察类的信息
-
this.name:类名
-
this.superName:继承的父类名
-
this.interfaces:实现的接口名
-
this.isInterface:当前类是否接口
-
this.members:类的字段集合
-
this.classHandle:gadgetinspector中对于类名的封装,可以通过类名来操作类中相关属性
publicvoid visit (int version,int access,String name,String signature,String superName,String[]interfaces){this.name = name;this.superName = superName;this.interfaces = interfaces;this.isInterface =(access &Opcodes.ACC_INTERFACE)!=0;this.members =newArrayList<>();this.classHandle =newClassReference.Handle(name);//类名annotations =newHashSet<>();super.visit(version, access, name, signature, superName, interfaces);}
接下来我们跳过几个不太重要的visit,来到visitField,在cr的控制下,被观察的类有多少个字段,visitField就会被调用多少次,来对字段进行处理。参数列表分别代表属性访问限定符,属性名,属性类型,泛型,属性的初始值(只有静态字段生效)该方法调用时,会先判断该字段是否是静态if ((access & Opcodes.ACC_STATIC) == 0),之后会通过判断字段的类型,如果是Object或者数组类型,就获取其具体内部类型,如果是基本类型,就获取类型的原始描述符。
比如String类型是Object,String[]是Array,那么最后保存的是java/lang/String,Int类型保留原始描述符后为I。获取到类型后将数据保存到visit中初始化好的列表member中。
@OverridepublicFieldVisitor visitField(int access,String name,String desc,String signature,Object value){if((access &Opcodes.ACC_STATIC)==0){Type type =Type.getType(desc);String typeName;if(type.getSort()==Type.OBJECT || type.getSort()==Type.ARRAY){typeName = type.getInternalName();}else{typeName = type.getDescriptor();}members.add(newClassReference.Member(name, access,newClassReference.Handle(typeName)));}returnsuper.visitField(access, name, desc, signature, value);}
可以看到传入的是ClassReference的内部类Member的构造函数,我们跟进ClassReference及Member的结构,可以发现在ClassReference中通过member数组来存储字段信息,内部类Member存储了字段的名字,访问限定修饰符,以及一个Handle类型的type,用来存储属性类型。Handle也是ClassReference中的一个内部类,只有一个字段,用来存储类名。大概访问流程是每个被观测的类对应一个MethodDiscoveryClassVisitor及ClassReference,当ASM观测到一个字段时调用visitField,此时visitField会new一个ClassReference.Member来存储字段信息,并将其添加到MDCV的List<ClassReference.Member> members中。当类中所有字段都被add进去之后,会调用到后续的visit,在最后调用visitEnd时,可以发现members.toArray(new ClassReference.Member[members.size()]),将member中所有被创建的ClassReference.Member转成了数组,并且初始化了一个ClassReference,将所有的字段合并到了ClassReference的Member[]数组中。
privatefinalMember[] members;
publicstaticclassMember{privatefinalString name;privatefinalint modifiers;privatefinalClassReference.Handle type;publicMember(String name,int modifiers,Handle type){this.name = name;this.modifiers = modifiers;this.type = type;}
publicstaticclassHandle{privatefinalString name;publicHandle(String name){this.name = name;}publicString getName(){return name;}@Overridepublicboolean equals(Object o){if(this== o)returntrue;if(o ==null|| getClass()!= o.getClass())returnfalse;Handle handle =(Handle) o;return name !=null? name.equals(handle.name): handle.name ==null;}@Overridepublicint hashCode(){return name !=null? name.hashCode():0;}}
接下来进行 visitMethod,依旧是观察到多少个方法就会调用多少次,初始化一个MethodReference,传入类名,方法名,方法描述(方法的返回值类型以及参数类型,需要使用Type类来进行解析),并且将方法添加到列表discoveredMethods中。
@OverridepublicMethodVisitor visitMethod(int access,String name,String desc,String signature,String[] exceptions){boolean isStatic =(access &Opcodes.ACC_STATIC)!=0;//找到一个方法,添加到缓存discoveredMethods.add(newMethodReference(classHandle,//类名name,desc,isStatic));returnsuper.visitMethod(access, name, desc, signature, exceptions);}
最后进入到visitEnd,刚才也说过了会将所有字段整合到一个ClassReference中,并且将整合好的ClassReference添加到discoveredClasses中
@Overridepublicvoid visitEnd(){ClassReference classReference =newClassReference(name,superName,interfaces,isInterface,members.toArray(newClassReference.Member[members.size()]),annotations);//把所有找到的字段封装//找到一个方法遍历完成后,添加类到缓存discoveredClasses.add(classReference);super.visitEnd();}
整个methodDiscovery.discovr执行完成,继续到下一步methodDiscovery.save();中,通过DataLoader.saveData完成。其中对于classes.dat和methods.dat分别通过ClassReference.Factory()和MethodReference.Factory()创建的factory进行序列化存储
publicstatic<T>void saveData(Path filePath,DataFactory<T> factory,Collection<T> values)throwsIOException{try(BufferedWriter writer =Files.newWriter(filePath.toFile(),StandardCharsets.UTF_8)){for(T value : values){finalString[] fields = factory.serialize(value);if(fields ==null){continue;}StringBuilder sb =newStringBuilder();for(String field : fields){if(field ==null){sb.append("\t");}else{sb.append("\t").append(field);}}writer.write(sb.substring(1));writer.write("\n");}}
最终形成的文件格式如下:
classes.dat:
类名(例:java/lang/String)父类接口A,接口B,接口C 是否接口字段1!字段1access!字段1类型!字段2!字段2access!字段1类型
methods.dat:
类名方法名方法描述是否静态方法
在持久化相关数据后,会通过Map来整合ClassReference.Handle和ClassReference之间的映射关系
Map<ClassReference.Handle,ClassReference> classMap =newHashMap<>();for(ClassReference clazz : discoveredClasses){classMap.put(clazz.getHandle(), clazz);}
接下来进行类的继承以及实现关系的整合分析
InheritanceDeriver.derive(classMap).save();
跟进到InheritanceDeriver.derive中,可以看到做的事就是利用Map来保存继承关系,形成了类- >(父类,接口,超类)的映射关系。
publicstaticInheritanceMap derive(Map<ClassReference.Handle,ClassReference> classMap){LOGGER.debug("Calculating inheritance for "+(classMap.size())+" classes...");Map<ClassReference.Handle,Set<ClassReference.Handle>> implicitInheritance =newHashMap<>();//遍历所有类for(ClassReference classReference : classMap.values()){if(implicitInheritance.containsKey(classReference.getHandle())){thrownewIllegalStateException("Already derived implicit classes for "+ classReference.getName());}Set<ClassReference.Handle> allParents =newHashSet<>();//获取classReference的所有父类、超类、接口类getAllParents(classReference, classMap, allParents);//添加缓存:类名 -> 所有的父类、超类、接口类implicitInheritance.put(classReference.getHandle(), allParents);}//InheritanceMap翻转集合,转换为{class:[subclass]}returnnewInheritanceMap(implicitInheritance);}
getAllParents方法会递归的将当前观察类的所有父类、接口的父类查找出来,并且添加到allParents集合中
privatestaticvoid getAllParents(ClassReference classReference,Map<ClassReference.Handle,ClassReference> classMap,Set<ClassReference.Handle> allParents){Set<ClassReference.Handle> parents =newHashSet<>();//把当前classReference类的父类添加到parentsif(classReference.getSuperClass()!=null){parents.add(newClassReference.Handle(classReference.getSuperClass()));}//把当前classReference类实现的所有接口添加到parentsfor(String iface : classReference.getInterfaces()){parents.add(newClassReference.Handle(iface));}for(ClassReference.Handle immediateParent : parents){//从所有类数据集合中,遍历找出classReference的父类、接口ClassReference parentClassReference = classMap.get(immediateParent);if(parentClassReference ==null){LOGGER.debug("No class id for "+ immediateParent.getName());continue;}//继续添加到集合中allParents.add(parentClassReference.getHandle());//继续递归查找,直到把classReference类的所有父类、超类、接口类都添加到allParentsgetAllParents(parentClassReference, classMap, allParents);}}
最后将类名与整合好的allParents形成映射关系,存储到implicitInheritance中:
implicitInheritance.put(classReference.getHandle(), allParents);
接下来会用InheritanceMap构造函数将implicitInheritance的子->父的映射关系进行逆转整合。
privatefinalMap<ClassReference.Handle,Set<ClassReference.Handle>> inheritanceMap;//父-子关系集合privatefinalMap<ClassReference.Handle,Set<ClassReference.Handle>> subClassMap;publicInheritanceMap(Map<ClassReference.Handle,Set<ClassReference.Handle>> inheritanceMap){this.inheritanceMap = inheritanceMap;subClassMap =newHashMap<>();for(Map.Entry<ClassReference.Handle,Set<ClassReference.Handle>> entry : inheritanceMap.entrySet()){ClassReference.Handle child = entry.getKey();for(ClassReference.Handle parent : entry.getValue()){subClassMap.computeIfAbsent(parent, k ->newHashSet<>()).add(child);}}}
其中这一行代码会判断inheritanceMap中每个子类对应的set中的value(parent),是否在subClassMap中,如果不存在执行Lambda表达式,创建一个新的空HashSet,将parent作为key,HashSet作为value存入subClassMap,并且将child添加到HashSet中。最终subClassMap就变成了父类->子类的映射关系。
subClassMap.computeIfAbsent(parent, k ->newHashSet<>()).add(child);
举个例子:
假设 inheritanceMap 包含:
"Dog"→{"Animal","Object"}"Cat"→{"Animal","Object"}
则 subClassMap 的构建过程如下:
-
处理
Dog的父类Animal:subClassMap中没有
Animal,创建HashSet →Animal: {Dog}
-
处理
Dog的父类Object:-
没有
Object,创建HashSet →Object: {Dog}
-
-
处理
Cat的父类Animal:Animal已存在,直接添加 →
Animal: {Dog, Cat}
-
处理
Cat的父类Object:Object已存在,添加 →
Object: {Dog, Cat}
最终 subClassMap 结果:
"Animal"→{"Dog","Cat"}"Object"→{"Dog","Cat"}
最后调用save方法对继承关系进行保存,方法依旧和上面一样,会进行序列化后持久化存储:
publicvoid save()throwsIOException{//inheritanceMap.dat数据格式://类名 父类或超类或接口类1 父类或超类或接口类2 父类或超类或接口类3 ...DataLoader.saveData(Paths.get("inheritanceMap.dat"),newInheritanceMapFactory(), inheritanceMap.entrySet());}
最终形成的inheritanceMap.dat结构如下:
类名父类或超类或接口类1父类或超类或接口类2父类或超类或接口类3...
0x04 入参返回值污染关系收集-PassthroughDiscovery
这一步类似于污点分析,我们对各个方法的参数对返回值的污染关系做出总结:
if(!Files.exists(Paths.get("passthrough.dat"))&&ConfigHelper.taintTrack){LOGGER.info("Analyzing methods for passthrough dataflow...");PassthroughDiscovery passthroughDiscovery =newPassthroughDiscovery();//记录参数在方法调用链中的流动关联(如:A、B、C、D四个方法,调用链为A->B B->C C->D,其中参数随着调用关系从A流向B,在B调用C过程中作为入参并随着方法结束返回,最后流向D)//该方法主要是追踪上面所说的"B调用C过程中作为入参并随着方法结束返回",入参和返回值之间的关联passthroughDiscovery.discover(classResourceEnumerator, config);passthroughDiscovery.save();}
跟进passthroughDiscovery.discover当中,首先会将我们上一步MethodDiscovery所生成的类、方法、继承信息读取进来
publicvoid discover(finalClassResourceEnumerator classResourceEnumerator,finalGIConfig config)throwsIOException{//加载文件记录的所有方法信息Map<MethodReference.Handle,MethodReference> methodMap =DataLoader.loadMethods();//加载文件记录的所有类信息Map<ClassReference.Handle,ClassReference> classMap =DataLoader.loadClasses();//加载文件记录的所有类继承、实现关联信息InheritanceMap inheritanceMap =InheritanceMap.load();
接下来通过discoverMethodCalls,来找出所有方法间的调用关系,我们继续跟进
//搜索方法间的调用关系,缓存至methodCalls集合,返回 类名->类资源 映射集合Map<String,ClassResourceEnumerator.ClassResource> classResourceByName = discoverMethodCalls(classResourceEnumerator);
在该方法中,依然是通过ASM来先对所有的类进行一次观察,用到的visitor是MethodCallDiscoveryClassVisitor,并且这里的MethodCallDiscoveryClassVisitor内部是做了一些包装的,这一部分的执行顺序可能会有点乱,我会在方法分析结束后总结一下:
privateMap<String,ClassResourceEnumerator.ClassResource> discoverMethodCalls(finalClassResourceEnumerator classResourceEnumerator)throwsIOException{Map<String,ClassResourceEnumerator.ClassResource> classResourcesByName =newHashMap<>();for(ClassResourceEnumerator.ClassResource classResource : classResourceEnumerator.getAllClasses()){try(InputStream in = classResource.getInputStream()){ClassReader cr =newClassReader(in);try{MethodCallDiscoveryClassVisitor visitor =newMethodCallDiscoveryClassVisitor(Opcodes.ASM6);cr.accept(visitor,ClassReader.EXPAND_FRAMES);classResourcesByName.put(visitor.getName(), classResource);}catch(Exception e){LOGGER.error("Error analyzing: "+ classResource.getName(), e);}}}return classResourcesByName;}
分别跟进MCDCV的visit以及visitMethod方法,visit方法中将传入进来的classname进行记录
@Overridepublicvoid visit(int version,int access,String name,String signature,String superName,String[] interfaces){super.visit(version, access, name, signature, superName, interfaces);if(this.name !=null){thrownewIllegalStateException("ClassVisitor already visited a class!");}this.name = name;}
visitMethod方法又创建了一个MethodCallDiscoveryMethodVisitor,并且可以看到在实例化时将上面的mv也传了进去。但其实我们观察MethodCallDiscoveryClassVisitor的构造函数,在调用父类构造函数时并没有传入任何的classvisitor,因此父类ClassVisitor的cv属性为null,最终返回的也是个null,在这里传入给MCDMV的mv也是个null:
@OverridepublicMethodVisitor visitMethod(int access,String name,String desc,String signature,String[] exceptions){MethodVisitor mv =super.visitMethod(access, name, desc, signature, exceptions);//在visit每个method的时候,创建MethodVisitor对method进行观察MethodCallDiscoveryMethodVisitor modelGeneratorMethodVisitor =newMethodCallDiscoveryMethodVisitor(api, mv,this.name, name, desc);returnnewJSRInlinerAdapter(modelGeneratorMethodVisitor, access, name, desc, signature, exceptions);}
// MethodCallDiscoveryClassVisitor的构造函数MethodCallDiscoveryClassVisitor visitor =newMethodCallDiscoveryClassVisitor(Opcodes.ASM6);//父类ClassVisitor的构造函数publicClassVisitor(finalint api){this(api,null);}publicClassVisitor(finalint api,finalClassVisitor classVisitor){if(api !=Opcodes.ASM6&& api !=Opcodes.ASM5&& api !=Opcodes.ASM4&& api !=Opcodes.ASM7_EXPERIMENTAL){thrownewIllegalArgumentException();}this.api = api;this.cv = classVisitor;}//父类ClassVisitor的visitMethod方法publicMethodVisitor visitMethod(finalint access,finalString name,finalString descriptor,finalString signature,finalString[] exceptions){if(cv !=null){return cv.visitMethod(access, name, descriptor, signature, exceptions);}returnnull;}
跟进MethodCallDiscoveryMethodVisitor,可以发现父类为MethodVisitor,并且调用父类的构造函数时传入了mv,但其实我们这里静态分析可以分析出来mv是null的,即便传入了在调用MethodVisitor.visitXXX时,最终也不会走到cv.visitXXX上,我这里推测是作者为了工具的扩充性,如果我们需要添加其他的visitor来对方法进行其他处理,那么就可以形成我们之前提到的类似于责任链的方式,来遍历的调用visitXXX:
publicMethodCallDiscoveryMethodVisitor(finalint api,finalMethodVisitor mv,finalString owner,String name,String desc){super(api, mv);
我们继续看,可以看到接下来会将传入的owner(此时正在观察的类名)封装到ClassReference.Handle中,并再将这个CRF.Handle和方法名、方法的相关描述封装到一个MethodReference.Handle中,calledMethods是每次观察到一个方法,都会创建的空HashSet,最终形成了观察方法:{被观察方法调用方法}的映射关系存入到methodCalls中:
// private final Map<MethodReference.Handle, Set<MethodReference.Handle>> methodCalls = new HashMap<>();this.calledMethods =newHashSet<>();methodCalls.put(newMethodReference.Handle(newClassReference.Handle(owner), name, desc), calledMethods);}
继续向下看,类中还有一个visitMethodInsn方法,当检测到方法内部的调用时就会执行(底层原理是检查到字节码指令INVOKEVIRTUAL、INVOKESPECIAL、INVOKESTATIC、INVOKEINTERFACE),从而将正在观察的方法中调用的方法加入到calledMethods中
@Overridepublicvoid visitMethodInsn(int opcode,String owner,String name,String desc,boolean itf){calledMethods.add(newMethodReference.Handle(newClassReference.Handle(owner), name, desc));super.visitMethodInsn(opcode, owner, name, desc, itf);}
| 指令 | 调用类型 | 适用方法 | 特点 |
|---|---|---|---|
INVOKEVIRTUAL | 虚方法调用(动态绑定) | 普通实例方法(非私有、非构造器、非静态) | 运行时根据对象实际类型选择方法,支持多态 |
INVOKESPECIAL | 特殊方法调用(静态绑定) | 构造器、私有方法、 | 编译时就决定调用哪一个,不支持多态 |
INVOKESTATIC | 静态方法调用 | static 修饰的方法 | 无需对象即可调用,直接通过类名调用 |
INVOKEINTERFACE | 接口方法调用 | 接口定义的方法 | 运行时通过接口表定位目标方法,支持多态 |
回到visitMethod中,最后会进行return操作,并且return的是JSRInlinerAdapter。为什么要return这个类呢,因为在早期的java版本中,使用JSR和RET跳转指令来进行程序流程控制,在后续版本已废弃并使用GOTO指令,因此需要进行兼容处理。JSRInlinerAdapter会将JSR和RET指令转为GOTO指令,从而兼容了早期项目。
returnnewJSRInlinerAdapter(modelGeneratorMethodVisitor, access, name, desc, signature, exceptions);
经过这些封装,调用cr.accept(visitor, ClassReader.EXPAND_FRAMES);将封装好的MethodCallDiscoveryClassVisitor传入进行方法调用关系收集。accept执行顺序如下:
-
MethodCallDiscoveryClassVisitor.visit对类进行观察
-
当观察到方法时调用MethodCallDiscoveryClassVisitor.visitMethod,其中会创建一个MethodCallDiscoveryMethodVisitor实例,并包装为JSRInlinerAdapter返回,创建实例时会自动为观察到的方法添加一个映射关系,即当前观察方法->calledMethods
-
当触发了visitxxx时,会先把这些visitxxx发给JSRInlinerAdapter,JSRInlinerAdapter通过各个visit方法对JSR和RET跳转指令进行转换。
JSRInlinerAdapter本身也是一个MethodVisitor,它的回调时机完全跟 ASM 的方法遍历流程一致,只不过它在内部额外“钩”了两个地方来做子例程(JSR/RET)内联:换句话说:
这样保证了旧版子例程指令在生成新的字节码之前就被全部消除,适配现代 JVM 对 StackMapFrame 的要求。
4.JSRInlinerAdapter将指令转换并内联后,会通过其visitend方法再次通过accept将visitXXX传递给下一个visitor,也就是传入的MethodCallDiscoveryMethodVisitor的visitMethodInsn方法,从而将被调用的方法添加到当前观察方法的calledMethods中。
accept方法结束后还剩一行,还是将类名和classResource的映射关系存储起来并return:
discoverMethodCalls逻辑结束后,接下来是对methodCalls进行一次逆拓扑排序,所谓逆拓扑排序就是把拓扑排序的序列倒过来,什么你还不知道什么是拓扑排序?或许你该学一下数据结构了,或者看一下这篇文章介绍的吧
https://paper.seebug.org/1034/
为什么我们要进行逆拓扑排序,因为在方法的调用链上,假设a方法传递参数给b方法,并且b方法的返回值影响到了a方法的返回值,那么我们在判断方法链的时候就不能从a方法来入手,需要从最深处被调用的b方法来入手,观察b方法的参数与返回值之间是否存在关系,如果存在关系则证明了a方法传入b方法的参数与b方法返回值有关,此时b方法返回值影响到了a方法返回值,那么我们也就可以断定ab方法之间存在污染关系。
在方法调用的关系中,我们可以将这些调用抽象为有向图,假设a方法内部调用了b方法,那么我们就可以将a方法对应的图节点引出一条有向边,指向b方法。最终将所有的调用关系全部依次类推,就形成了一个有向图。我们将指向其他节点的边的数量叫做一个点的出度,指向自己的边的数量叫做一个节点的入度,如果找到有向图中一个入度为0的节点,将其节点以及所有的边全部消去,并输出该节点。不断重复这一操作,直到图中所有节点和边全部被消除掉,我们就得到了一组拓扑排序序列,而这一个序列就对应了我们的方法调用顺序。
但事情并没有想象中这么顺利,在方法调用中会出现两种情况,一个是相同的方法可能会存在重复调用,并且方法调用中由于回调等方式的存在,造成图中可能会出现环路,而环路的出现会导致拓扑排序在某一时刻无法找到一个入度为0的点,也就没有拓扑序列的产生了,解决办法上面的文章也提到了。我们用一个例子来看一下具体的执行过程:
假设有以下方法调用关系:
对应的调用图为:
若存在循环调用(如
A → B → A):stack包含
A→ 触发if (stack.contains(node)) return;-
终止递归,避免死循环。
- 污点分析顺序
:
-
从
stack中移除A(当前路径:[])。 -
将
A加入visitedNodes和sortedMethods:
-
获取
D的被调用方法集合{}(无子节点)。 -
将
D加入visitedNodes和sortedMethods: -
返回处理
A。
-
将
D加入stack(当前路径:[A, D])。 -
递归处理
D:
-
从
stack中移除B(当前路径:[A])。 -
将
B加入visitedNodes和sortedMethods: -
处理
B的下一个子节点(无剩余节点),返回处理A。
-
stack包含A, B,不包含C→ 继续。 -
获取
C的被调用方法集合{}(无子节点)。 -
将
C加入visitedNodes和sortedMethods: -
返回处理
B。
-
stack包含A,不包含B→ 继续。 -
获取
B的被调用方法集合{C}。 -
将
B加入stack(当前路径:[A, B])。 -
递归处理子节点
C:
-
stack为空,visitedNodes为空 → 继续。 -
获取
A的被调用方法集合{B, D}。 -
将
A加入stack(当前路径:[A])。 -
递归处理子节点
B:
- 只要你把
JSRInlinerAdapter插到你的 MethodVisitor 链上(手动 new 一个 或者在使用
ClassWriter.COMPUTE_FRAMES/ClassReader.EXPAND_FRAMES时 ASM 自动给你插入), -
在方法遍历时遇到跳转就会进
visitJumpInsn, -
在方法结束时(
visitEnd)就会真正触发“内联 JSR→GOTO” 的逻辑。
-
如果有,就走
markSubroutines()→emitCode()的流程,把所有老版本的JSR/RET全部展开成GOTO(以及必要的空值占位等) -
然后再把重写后的指令列表一次性转发给它下游的
MethodVisitor(通常是一个MethodWriter)代码浏览器
-
如果
opcode == JSR,它就把这个子例程入口标签记下来,标记说“后面要做内联”
-
处理
A→B→A时,第二次进入A的递归:
-
先分析
C(无依赖),确定其污点传播规则。 -
分析
B(依赖C),利用C的结果。 -
分析
D(无依赖)。 -
最后分析
A(依赖B和D),确保所有被调用方法已处理。
visitedNodes ={C, B, D, A}, sortedMethods =[C, B, D, A]
visitedNodes ={C, B, D}, sortedMethods =[C, B, D]
dfsTsort(outgoingReferences, sortedMethods, visitedNodes, stack, D);
visitedNodes ={C, B}, sortedMethods =[C, B]
visitedNodes ={C}, sortedMethods =[C]
dfsTsort(outgoingReferences, sortedMethods, visitedNodes, stack, C);
dfsTsort(outgoingReferences, sortedMethods, visitedNodes, stack, B);
dfsTsort(outgoingReferences, sortedMethods, visitedNodes, stack, A);
-
初始调用:从根节点
A开始。 -
处理节点
A: -
处理节点
B: -
处理节点
C: -
回溯节点
B: -
处理节点
A的第二个子节点D: -
处理节点
D: -
回溯节点
A:
outgoingReferences ={A:{B, D},B:{C},C:{},D:{}}
A → B → CA → D
List<MethodReference.Handle> sortedMethods = topologicallySortMethodCalls();
classResourcesByName.put(visitor.getName(), classResource);
visitJumpInsn每当 ASM 在浏览方法字节码时碰到一个跳转指令(
visitJumpInsn(int opcode, Label lbl)),就会调用到它的这个方法。visitEnd当 ASM 遍历完一个方法的所有指令并调用到
visitEnd()时,JSRInlinerAdapter会先检查在visitJumpInsn里有没有记录过任何JSR。
逆拓扑排序后,接下来就是对方法参数和返回值之间污染关系的分析:
passthroughDataflow = calculatePassthroughDataflow(classResourceByName, classMap, inheritanceMap, sortedMethods,config.getSerializableDecider(methodMap, inheritanceMap));
跟进calculatePassthroughDataflow,首先会遍历sortedMethods,如果是静态初始化代码,即静态代码块,就直接跳过,因为静态代码块是在类加载的时候就加载到JVM当中,我们一般没有办法在程序运行中进行控制
finalMap<MethodReference.Handle,Set<Integer>> passthroughDataflow =newHashMap<>();//遍历所有方法,然后asm观察所属类,经过前面DFS的排序,调用链最末端的方法在最前面for(MethodReference.Handle method : sortedMethods){//跳过static静态初始化代码if(method.getName().equals("<clinit>")){continue;}
接下来就是对当前所遍历的方法的所属类进行ASM观察:
ClassResourceEnumerator.ClassResource classResource = classResourceByName.get(method.getClassReference().getName());try(InputStream inputStream = classResource.getInputStream()){ClassReader cr =newClassReader(inputStream);try{PassthroughDataflowClassVisitor cv =newPassthroughDataflowClassVisitor(classMap, inheritanceMap,passthroughDataflow, serializableDecider,Opcodes.ASM6, method);cr.accept(cv,ClassReader.EXPAND_FRAMES);
跟进visitor逻辑,查看visit方法,visit方法会判断当前观察的类是否是要准备观察方法的所属类
@Overridepublicvoid visit(int version,int access,String name,String signature,String superName,String[] interfaces){super.visit(version, access, name, signature, superName, interfaces);this.name = name;//不是目标观察的class跳过if(!this.name.equals(methodToVisit.getClassReference().getName())){thrownewIllegalStateException("Expecting to visit "+ methodToVisit.getClassReference().getName()+" but instead got "+this.name);}}
接着看visitMethod,我们需要观察的类中的方法只需要是sortedMethod中的方法即可,也就是传入进来的methodToVisit,其他方法是不存在调用关系的:
//不是目标观察的method需要跳过,上一步得到的method都是有调用关系的method才需要数据流分析if(!name.equals(methodToVisit.getName())||!desc.equals(methodToVisit.getDesc())){returnnull;}
接下来是对方法进行更细致的观察,依旧看封装后的PassthroughDataflowMethodVisitor
MethodVisitor mv =super.visitMethod(access, name, desc, signature, exceptions);passthroughDataflowMethodVisitor =newPassthroughDataflowMethodVisitor(classMap, inheritanceMap,this.passthroughDataflow, serializableDecider,api, mv,this.name, access, name, desc, signature, exceptions);
下面作者用代码模拟了方法调用的过程,从而在模拟的局部变量表(污点变量表)中对参数进行污点标记。我们先来回顾JVM在进行方法调用时都做了哪些事情。假设现在A方法中要调用B方法,那么此时我们是在A方法内部的,那么JVM中会有A方法的栈帧,栈帧中主要两部分,一个是局部变量表,一个是操作数栈,当A方法内部准备调用B方法时,会先将要传给B方法的参数保存到A方法栈帧的操作数栈上,此时JVM会为B方法创建其对应的栈帧,然后在A方法操作数栈上的参数会被弹到B方法栈帧的局部变量表中。B方法内部使用这些参数时,会通过LOAD指令将其从局部变量表加载到操作数栈上,再进行使用。这里的思想就是用代码去模仿JVM的行为,从而将JVM的方法调用流程可视化。
下面的分析过程基于如下例子,这一段代码调用包含了入参与返回结果相同,返回结果与入参有关的情况,我们分别来看:
publicclassMain{publicString main(String args)throwsIOException{String cmd =new A().method1(args);returnnew B().method2(cmd);}}class A {publicString method1(String param){return param;}}class B {publicString method2(String param){returnnew C().method3(param);}}class C {publicString method3(String param){return param;}}
逆拓扑排序后的结果为:
A.method1C.method3B.method2main
A.method1
因此我们先从A.method1来进行分析:
这里我们看到visitCode方法,在进入方法的第一时间,ASM会先调用这个方法。对于非静态方法来说,方法参数插槽的第一个0号位位this,对于静态方法,0号位为参数,所以这里将方法内的所有参数保存在一个使用Java代码模拟的局部变量表中,localIndex为参数在局部变量表中的位置,由于参数的类型不同,所以其在局部变量表中占用的大小也不同。而argIndex对应了参数在方法中的索引,通过setLocalTaint方法,形成了局部变量表与方法参数索引之间的映射关系
@Overridepublicvoid visitCode(){super.visitCode();int localIndex =0;int argIndex =0;if((this.access &Opcodes.ACC_STATIC)==0){//非静态方法,第一个局部变量应该为对象实例this//添加到局部变量表集合setLocalTaint(localIndex, argIndex);localIndex +=1;argIndex +=1;}for(Type argType :Type.getArgumentTypes(desc)){//判断参数类型,得出变量占用空间大小,然后存储setLocalTaint(localIndex, argIndex);localIndex += argType.getSize();argIndex +=1;}}protectedvoid setLocalTaint(int index, T ... possibleValues){Set<T> values =newHashSet<T>();for(T value : possibleValues){values.add(value);}savedVariableState.localVars.set(index, values);}
接下来执行A.method1方法内部逻辑时(即return param),要将局部变量表中的参数通过ALOAD指令读取到操作数栈上,继续模拟,在检测到ALOAD指令时(包括其他访问局部变量表的指令),会回调visitVarInsn,将参数push到模拟的污点栈上,这里的参数可以看到是列表localVars的值,也就是局部变量表中对应的参数索引
@Overridepublicvoid visitVarInsn(int opcode,int var){// Extend local variable state to make sure we include the variable indexfor(int i = savedVariableState.localVars.size(); i <= var; i++){savedVariableState.localVars.add(newHashSet<T>());}//变量操作,var为操作的本地变量索引Set<T> saved0;switch(opcode){caseOpcodes.ILOAD:caseOpcodes.FLOAD:push();break;caseOpcodes.LLOAD:caseOpcodes.DLOAD:push();push();break;caseOpcodes.ALOAD://从局部变量表取出变量数据入操作数栈,这个变量数据可能是被污染的push(savedVariableState.localVars.get(var));break;caseOpcodes.ISTORE:caseOpcodes.FSTORE:pop();savedVariableState.localVars.set(var,newHashSet<T>());break;caseOpcodes.DSTORE:caseOpcodes.LSTORE:pop();pop();savedVariableState.localVars.set(var,newHashSet<T>());break;caseOpcodes.ASTORE://从栈中取出数据存到局部变量表,这个数据可能是被污染的(主要还是得看调用的方法,返回值是否可被污染)saved0 = pop();savedVariableState.localVars.set(var, saved0);break;caseOpcodes.RET:// No effect on stackbreak;default:thrownewIllegalStateException("Unsupported opcode: "+ opcode);}super.visitVarInsn(opcode, var);sanityCheck();}privatevoid push(Set<T> possibleValues){// Intentionally make this a reference to the same setsavedVariableState.stackVars.add(possibleValues);}
接下来当方法调用结束return时,由于使用了ARETURN指令,在解析到无操作数的简单指令时触发visitInsn,我们查看其具体逻辑,可以发现在方法return时,将当前栈上的值返回,即返回的是参数索引set,并将存储到了returnTaint中,代表了A.method1这个方法的调用,参数索引为1的参数param会污染返回值:
@Overridepublicvoid visitInsn(int opcode){switch(opcode){caseOpcodes.IRETURN://从当前方法返回intcaseOpcodes.FRETURN://从当前方法返回floatcaseOpcodes.ARETURN://从当前方法返回对象引用returnTaint.addAll(getStackTaint(0));//栈空间从内存高位到低位分配空间break;caseOpcodes.LRETURN://从当前方法返回longcaseOpcodes.DRETURN://从当前方法返回doublereturnTaint.addAll(getStackTaint(1));break;caseOpcodes.RETURN://从当前方法返回voidbreak;default:break;}super.visitInsn(opcode);}
最后对于该方法的观察结束,将污点分析结果存到了passthroughDataflow中,可以看到形成了方法与污染参数目录集合之间的映射关系:
finalMap<MethodReference.Handle,Set<Integer>> passthroughDataflow =newHashMap<>();passthroughDataflow.put(method, cv.getReturnTaint());
C.method3
与A.method1流程一样
B.method2
class B {publicString method2(String param){returnnew C().method3(param);}}
-
进入到方法内部,触发visitCode,将参数this、param放入虚拟局部变量表,并形成与参数列表索引的映射关系。
-
内部方法执行,ALOAD指令触发visitVarInsn,参数this、param push到污点栈。
-
方法内部调用C.method3,INVOKEVIRTUAL指令触发visitMethodInsn,该方法首先将C.method3参数类型提取,并判断该方法是否是静态方法,如果不是静态方法,将this(被调用方法所在类的实例对象)存入argTypes第一个,并依次存入其他参数。之后获取了方法的返回值类型的所占大小,后面进行使用:
Type[] argTypes =Type.getArgumentTypes(desc);if(opcode !=Opcodes.INVOKESTATIC){//如果执行的非静态方法,则把数组第一个元素类型设置为该实例对象的类型,类比局部变量表Type[] extendedArgTypes =newType[argTypes.length+1];System.arraycopy(argTypes,0, extendedArgTypes,1, argTypes.length);extendedArgTypes[0]=Type.getObjectType(owner);argTypes = extendedArgTypes;}
-
接下来初始化argTaint,将其内部元素设置为空,argTaint大小为参数的数量。然后将污点栈中的参数依次存放进argTaint中,对于污点栈savedVariableState.stackVars来说,list从右往左为栈底到栈顶,假设方法参数列表为abc,那么从栈底到栈顶分别为a、b、c。继续将污点栈栈顶元素取出后放在argTaint的最后一个位置,以此类推,从而保证了argTaint中存放的参数索引与C.method3的参数列表的顺序相同。
finalList<Set<Integer>> argTaint =newArrayList<Set<Integer>>(argTypes.length);for(int i =0; i < argTypes.length; i++){argTaint.add(null);}int stackIndex =0;for(int i =0; i < argTypes.length; i++){Type argType = argTypes[i];if(argType.getSize()>0){//根据参数类型大小,从栈顶获取入参,参数入栈是从左到右的argTaint.set(argTypes.length -1- i, getStackTaint(stackIndex + argType.getSize()-1));}stackIndex += argType.getSize();}
-
接下来判断方法是否是构造器,如果是构造器的话意味着在当前调用方法(B.method2)当中会有这么一段代码:
因此可以确定被调用方法(C.method3)的返回值结果受到了this(C类实例对象)的污染,那么将argTaint中的0号索引取出,即为this,并将其加入resultTaint。如果不是构造器,那么就创造一个空的HashSet来存储后面的resultTaint。
C c =new C();
-
从passthroughDataflow中拿到被调用方法C.method3的参数与返回值污点分析关系,并判断污点分析关系中的参数是否在当前的argTaint中,如果在则说明被调用方法的返回值被调用者传入的参数污染,这也就是为什么要进行逆拓扑排序。
Set<Integer> passthrough = passthroughDataflow.get(newMethodReference.Handle(newClassReference.Handle(owner), name, desc));if(passthrough !=null){for(Integer passthroughDataflowArg : passthrough){//判断是否和同一方法体内的其它方法返回值关联,有关联则添加到栈底,等待执行return时保存resultTaint.addAll(argTaint.get(passthroughDataflowArg));}
-
最后还是return,将B.method2的结果存到passthroughDataflow中
main方法
publicclassMain{publicString main(String args)throwsIOException{String cmd =new A().method1(args);returnnew B().method2(cmd);}}
第一步,执行visitCode存储入参到局部变量表
第二步,执行visitVarInsn参数入栈
第三步,执行visitMethodInsn调用A.method1,A.method1被污染的返回结果,也就是参数索引会被放在栈顶
第四步,执行visitVarInsn把放在栈顶的污染参数索引,放入到本地变量表
第五步,执行visitVarInsn参数入栈
第六步,执行visitMethodInsn调用B.method2,被污染的返回结果会被放在栈顶
第七步,执行visitInsn,返回栈顶数据,缓存到passthroughDataflow,也就是main方法的污点分析结果
最后通过passthroughDiscovery.save方法保存分析数据
publicstaticclassPassThroughFactoryimplementsDataFactory<Map.Entry<MethodReference.Handle,Set<Integer>>>{...@OverridepublicString[] serialize(Map.Entry<MethodReference.Handle,Set<Integer>> entry){if(entry.getValue().size()==0){returnnull;}finalString[] fields =newString[4];fields[0]= entry.getKey().getClassReference().getName();fields[1]= entry.getKey().getName();fields[2]= entry.getKey().getDesc();StringBuilder sb =newStringBuilder();for(Integer arg : entry.getValue()){sb.append(Integer.toString(arg));sb.append(",");}fields[3]= sb.toString();return fields;}}
最后持久化的passthrough.dat文件的数据格式如下:
类名方法名方法描述能污染返回值的参数索引1,能污染返回值的参数索引2,能污染返回值的参数索引3...
0x05 方法调用污染关联-CallGraphDiscovery
我们用这个例子进行分析:
publicclassMain{privateString name;publicvoid main(String args)throwsIOException{new A().method1(args, name);}}class A {publicString method1(String param,String param2){return param + param2;}}
跟进callGraphDiscovery.discover,读取前面收集的数据,然后使用ModelGeneratorClassVisitor进行观察,visitCode观察每一个类,visitMethod观察类中的每一个方法,继续跟进ModelGeneratorMethodVisitor
@OverridepublicMethodVisitor visitMethod(int access,String name,String desc,String signature,String[] exceptions){MethodVisitor mv =super.visitMethod(access, name, desc, signature, exceptions);ModelGeneratorMethodVisitor modelGeneratorMethodVisitor =newModelGeneratorMethodVisitor(classMap,inheritanceMap, passthroughDataflow, serializableDecider, api, mv,this.name, access, name, desc, signature, exceptions);returnnewJSRInlinerAdapter(modelGeneratorMethodVisitor, access, name, desc, signature, exceptions);}
进入main方法内部,触发visitCode,main方法不是静态,将this以及参数args存入局部变量表,此处与前面不同的是会在参数索引前加一个arg前缀来进行标识:
publicvoid visitCode(){super.visitCode();int localIndex =0;int argIndex =0;//使用arg前缀来表示方法入参,后续用于判断是否为目标调用方法的入参if((this.access &Opcodes.ACC_STATIC)==0){setLocalTaint(localIndex,"arg"+ argIndex);localIndex +=1;argIndex +=1;}for(Type argType :Type.getArgumentTypes(desc)){setLocalTaint(localIndex,"arg"+ argIndex);localIndex += argType.getSize();argIndex +=1;}}
我在写到这里的时候有一点疑问,对于visitVarInsn的调用时机。我们来看如下两个例子:
// example 1A a =new A();a.method1(args);//example 2new A().method1(args);
我们先来看第一个例子,new A()的字节码指令大概如下,可以看到是没有LOAD指令的,在调用构造方法时直接消费的是操作数栈上的A对象引用:
NEW A //创建A类实例DUP //创建对象引用INVOKESPECIAL A.<init>()V //调用构造方法
接下来由于要把对象引用存到a中,因此会把对象引用存储到局部变量表中(假设在局部变量表2号位,局部变量表1号位存储args),即ASTORE指令,此时会触发一次visitVarInsn。那么接下来在调用a.method1(args)时需要进行两次ALOAD,首先把a的对象引用加载到操作数栈上,再把args加载到操作数栈上,从而接着触发了两次visitVarInsn
NEW ADUPINVOKESPECIAL A.<init>()VASTORE 2// 存到局部槽 2 —> visitVarInsn(ASTORE,2)ALOAD 2// 再加载回来 —> visitVarInsn(ALOAD,2)ALOAD 1// 加载 args —> visitVarInsn(ALOAD,1)INVOKEVIRTUAL A.method1…
继续我们看第二个例子,当构造函数执行完毕后,不需要进行ASTORE,并且再调用method1时也不需要从局部变量表中加载a的对象引用,因此最终只有加载args时才会调用一次visitVarInsn
NEW ADUPINVOKESPECIAL A.<init>()V// 上一步执行完 new A(),操作数栈上已经有了 A 的实例ALOAD 1// 将 args(槽 1)加载到栈顶 — 触发一次 visitVarInsn(AL OAD,1)INVOKEVIRTUAL A.method1:(Ljava/lang/String;)Ljava/lang/Strin
检测到字节码指令new,触发visitTypeInsn,会push一个空的HashSet到污点栈中:
@Overridepublicvoid visitTypeInsn(int opcode,String type){switch(opcode){caseOpcodes.NEW:push();break;caseOpcodes.ANEWARRAY:pop();push();break;caseOpcodes.CHECKCAST:// No-opbreak;caseOpcodes.INSTANCEOF:pop();push();break;default:thrownewIllegalStateException("Unsupported opcode: "+ opcode);}
字节码指令INVOKESPECIALA.<init>()V,调用A的构造器,触发visitMethodInsn,判断是否是构造器,被调用方法为构造器,将this设置为argTypes第一个参数:
Type[] argTypes =Type.getArgumentTypes(desc);if(opcode !=Opcodes.INVOKESTATIC){Type[] extendedArgTypes =newType[argTypes.length+1];System.arraycopy(argTypes,0, extendedArgTypes,1, argTypes.length);extendedArgTypes[0]=Type.getObjectType(owner);argTypes = extendedArgTypes;}
jiee下来检测启动工具时参数是否要进行污点分析,如果不进行污点分析,则直接把调用方法以及被调用方法封装为GraphCall,加入discoveredCalls中:
if(!ConfigHelper.taintTrack){//不进行污点分析,全部调用关系都记录discoveredCalls.add(newGraphCall(newMethodReference.Handle(newClassReference.Handle(this.owner),this.name,this.desc),newMethodReference.Handle(newClassReference.Handle(owner), name, desc),0,"",0));break;}
启动污点分析后的逻辑接着往下看,会从污点栈中取出对应的参数,但我们这里由于没有进入到visitVarInsn,因此污点栈目前只有一个在visitInsn中push进去的一个空的set,这一步不会对discoverdCalls做任何事情
接着我们分析method1(args,name)的调用情况,首先需要加载args,触发visitVarInsn,ALOAD指令,将args(arg1)推入污点栈,然后调用visitMethodInsn。由于要传递的参数name是a的属性,因此需要加载this,从this中拿到name属性。触发ALOAD指令,将this(arg0)推入污点栈。此时污点栈中为如下内容:
stackVars[{},{"arg1"},{"arg0"}]
接下来需要读入实例a的name字段,检测到字节码指令GETFIELD,触发visitFieldInsn,首先在ClassReference中不断遍历,直到找到该字段,判断该字段是否是transient,如果是transient就没必要加入污点栈。如果是非transient属性,就把栈顶当前的arg0修改为arg0.name加入污点栈中
Set<String> newTaint =newHashSet<>();if(!Boolean.TRUE.equals(isTransient)){for(String s : getStackTaint(0)){newTaint.add(s +"."+ name);}}super.visitFieldInsn(opcode, owner, name, desc);//在调用方法前,都会先入栈,作为参数setStackTaint(0, newTaint);
非静态方法,argTypes第一个为A(this),第二个为String(args),第三个为String(name),对应了污点栈上的[{},{“arg1”}, {“arg0”} ](从左到右为栈底到栈顶),for循环i从0到2,分别从污点栈中拿到了arg0.name,arg1和空set。首先对arg0.name进行拆解,最终拆解出来dotIndex为4,srcArgIndex为0,srcArgPath为name,并记录到了discoverdCalls当中。继续拆解arg1,dotindex为-1,srcArgIndexn为1,srcArgPath为null,记录到discoverdCalls中。
int stackIndex =0;for(int i =0; i < argTypes.length; i++){//最右边的参数,就是最后入栈,即在栈顶int argIndex = argTypes.length-1-i;Type type = argTypes[argIndex];//操作数栈出栈,调用方法前,参数都已入栈Set<String> taint = getStackTaint(stackIndex);if(taint.size()>0){for(String argSrc : taint){//取出出栈的参数,判断是否为当前方法的入参,arg前缀if(!argSrc.substring(0,3).equals("arg")){thrownewIllegalStateException("Invalid taint arg: "+ argSrc);}int dotIndex = argSrc.indexOf('.');int srcArgIndex;String srcArgPath;if(dotIndex ==-1){srcArgIndex =Integer.parseInt(argSrc.substring(3));srcArgPath =null;}else{srcArgIndex =Integer.parseInt(argSrc.substring(3, dotIndex));srcArgPath = argSrc.substring(dotIndex+1);}//记录参数流动关系//argIndex:当前方法参数索引,srcArgIndex:对应上一级方法的参数索引discoveredCalls.add(newGraphCall(newMethodReference.Handle(newClassReference.Handle(this.owner),this.name,this.desc),newMethodReference.Handle(newClassReference.Handle(owner), name, desc),srcArgIndex,srcArgPath,argIndex));}}stackIndex += type.getSize();}
最后save保存数据,持久化后的callgraph.dat格式如下:
调用者类名调用者方法caller调用者方法描述被调用者类名被调用者方法target 被调用者方法描述调用者方法参数索引调用者字段名被调用者方法参数索引
0x06 利用链入口搜索-SourceDiscovery
在一开始我们也说到了,在挖掘反序列化链的时候需要指定类型,所以此处先获得对应的sourceDiscovery,我们这里以Jackson反序列化分析
if(!Files.exists(Paths.get("sources.dat"))){LOGGER.info("Discovering gadget chain source methods...");SourceDiscovery sourceDiscovery = config.getSourceDiscovery();//查找利用链的入口(例:java原生反序列化的readObject)sourceDiscovery.discover();sourceDiscovery.save();}
跟进SourceDiscovery.discover在jackson中的实现,可以发现对于Jackson反序列化来说,source需要判断方法是否是无参构造、setter和getter,只有这些方法才能作为jackson反序列化的入口:
@Overridepublicvoid discover(Map<ClassReference.Handle,ClassReference> classMap,Map<MethodReference.Handle,MethodReference> methodMap,InheritanceMap inheritanceMap,Map<MethodReference.Handle,Set<GraphCall>> graphCallMap){finalJacksonSerializableDecider serializableDecider =newJacksonSerializableDecider(methodMap);for(MethodReference.Handle method : methodMap.keySet()){if(skipList.contains(method.getClassReference().getName())){continue;}if(serializableDecider.apply(method.getClassReference())){if(method.getName().equals("<init>")&& method.getDesc().equals("()V")){addDiscoveredSource(newSource(method,0));}if(method.getName().startsWith("get")&& method.getDesc().startsWith("()")){addDiscoveredSource(newSource(method,0));}if(method.getName().startsWith("set")&& method.getDesc().matches("\\(L[^;]*;\\)V")){addDiscoveredSource(newSource(method,0));}}}}
最后还是将方法保存持久化为sources.dat,格式如下:
类名方法名方法描述污染参数索引
0x07 gadgetChain挖掘-GadgetChainDiscovery
跟进GadgetChainDiscovery.discover,首先进行所有重写方法的扫描,在一开始我们也说了工具没有办法在运行时进行扫描,所以对于各种方法的重写我们没有办法确定到底调用的是哪个方法
Map<MethodReference.Handle,MethodReference> methodMap =DataLoader.loadMethods();InheritanceMap inheritanceMap =InheritanceMap.load();Map<MethodReference.Handle,Set<MethodReference.Handle>> methodImplMap =InheritanceDeriver.getAllMethodImplementations(inheritanceMap, methodMap);Map<ClassReference.Handle,Set<MethodReference.Handle>> methodsByClass =InheritanceDeriver.getMethodsByClass(methodMap);
跟进InheritanceDeriver.getAllMethodImplementations,获取之前收集到的method的类,并通过之前收集到的继承关系来获取类的所有子孙类,最终形成类->子孙类的映射关系:
Map<Handle,Set<MethodReference.Handle>> methodsByClass = getMethodsByClass(methodMap);Map<ClassReference.Handle,Set<ClassReference.Handle>> subClassMap =newHashMap<>();for(Map.Entry<ClassReference.Handle,Set<ClassReference.Handle>> entry : inheritanceMap.entrySet()){for(ClassReference.Handle parent : entry.getValue()){if(!subClassMap.containsKey(parent)){Set<ClassReference.Handle> subClasses =newHashSet<>();subClasses.add(entry.getKey());subClassMap.put(parent, subClasses);}else{subClassMap.get(parent).add(entry.getKey());}}}
接下来遍历所有的方法,并遍历subclasses,如果某一个subclass中存在与当前遍历的方法名和返回值一致的方法,就将其加入overridingMethods,最后整合所有重写的方法,形成方法名到重写方法之间的映射关系,由于静态方法不可重写,因此遇到静态方法直接跳过:
//遍历所有方法,根据父类->子孙类集合,找到所有的override的方法,记录下来(某个类的方法->所有的override方法)Map<MethodReference.Handle,Set<MethodReference.Handle>> methodImplMap =newHashMap<>();for(MethodReference method : methodMap.values()){// Static methods cannot be overridenif(method.isStatic()){continue;}Set<MethodReference.Handle> overridingMethods =newHashSet<>();Set<ClassReference.Handle> subClasses = subClassMap.get(method.getClassReference());if(subClasses !=null){for(ClassReference.Handle subClass : subClasses){// This class extends ours; see if it has a matching methodSet<MethodReference.Handle> subClassMethods = methodsByClass.get(subClass);if(subClassMethods !=null){for(MethodReference.Handle subClassMethod : subClassMethods){if(subClassMethod.getName().equals(method.getName())&& subClassMethod.getDesc().equals(method.getDesc())){overridingMethods.add(subClassMethod);}}}}}if(overridingMethods.size()>0){methodImplMap.put(method.getHandle(), overridingMethods);}}
然后下面的一大堆逻辑就是对重写方法关系的持久化存储,最终的methodimpl.dat格式如下:
类名方法名方法描述\t重写方法的类名方法名方法描述\t重写方法的类名方法名方法描述\t重写方法的类名方法名方法描述\t重写方法的类名方法名方法描述类名方法名方法描述\t重写方法的类名方法名方法描述\t重写方法的类名方法名方法描述
接下来对callgraph.dat的调用关系进行整合,对于同一个方法发起的调用,整合成caller->被调用方法集合之间的映射关系:
Map<MethodReference.Handle,Set<GraphCall>> graphCallMap =newHashMap<>();for(GraphCall graphCall :DataLoader.loadData(Paths.get("callgraph.dat"),newGraphCall.Factory())){MethodReference.Handle caller = graphCall.getCallerMethod();if(!graphCallMap.containsKey(caller)){Set<GraphCall> graphCalls =newHashSet<>();graphCalls.add(graphCall);graphCallMap.put(caller, graphCalls);}else{graphCallMap.get(caller).add(graphCall);}}
剩下的挖掘逻辑我们用一个例子来分析:
设我们有如下方法间调用:
- 源
:
A.sources()污染参数 0 A.sources(0)→ 调用
B.load(0)B.load(0)→ 调用接口方法
C.handle(0)C.handle(0)在实现类
CImpl中有实现CImpl.handle(0)CImpl.handle(0)→ 调用
D.sink(1)(这里假设它把参数 1 污染到 sink)D.sink(1)是最终的 sink
对应的数据结构:
-
sources.dat 只包含一个
Source(A.sources, taintedArgIndex=0) -
graphCallMap
A.sources →{GraphCall(callerArgIndex=0, targetMethod=B.load, targetArgIndex=0)}B.load →{GraphCall(callerArgIndex=0, targetMethod=C.handle, targetArgIndex=0)}C.handle →{GraphCall(callerArgIndex=0, targetMethod=C.handle, targetArgIndex=0)}// interfaceCImpl.handle →{GraphCall(callerArgIndex=0, targetMethod=D.sink, targetArgIndex=1)}
-
implementationFinder.getImplementations(C.handle) →
{ CImpl.handle } -
isSink(D.sink,1) →
true
对于是否为sink点的判断逻辑如下:
privateboolean isSink(MethodReference.Handle method,int argIndex,InheritanceMap inheritanceMap){if(!customSlinks.isEmpty()){for(CustomSlink customSlink:customSlinks){boolean flag =false;if(customSlink.getClassName()!=null)flag &= customSlink.getClassName().equals(method.getClassReference().getName());if(customSlink.getMethod()!=null)flag &= customSlink.getMethod().equals(method.getName());if(customSlink.getDesc()!=null)flag &= customSlink.getDesc().equals(method.getDesc());if(flag)return flag;}returnfalse;}if(config.getName().equals("sqlinject")){//SQLInject只能检测注入return isSQLInjectSink(method, argIndex, inheritanceMap);}if(config.getName().equals("hessian")){//仅hessian可选BCEL slinkif(ConfigHelper.slinks.contains("BCEL")&&BCELSlink(method, argIndex, inheritanceMap)){returntrue;}}//通用slink,不设定slink则全部都挖掘if((ConfigHelper.slinks.isEmpty()||ConfigHelper.slinks.contains("JNDI"))&&JNDISlink(method, inheritanceMap)){returntrue;}if((ConfigHelper.slinks.isEmpty()||ConfigHelper.slinks.contains("CLASSLOADER"))&&ClassLoaderlink(method, argIndex, inheritanceMap)){returntrue;}if((ConfigHelper.slinks.isEmpty()||ConfigHelper.slinks.contains("SSRFAndXXE"))&&SSRFAndXXESlink(method, inheritanceMap)){returntrue;}if((ConfigHelper.slinks.isEmpty()||ConfigHelper.slinks.contains("EXEC"))&&EXECSlink(method, argIndex)){returntrue;}if((ConfigHelper.slinks.isEmpty()||ConfigHelper.slinks.contains("FileIO"))&&FileIOSlink(method)){returntrue;}if((ConfigHelper.slinks.isEmpty()||ConfigHelper.slinks.contains("Reflect"))&&ReflectSlink(method, argIndex, inheritanceMap)){returntrue;}if((ConfigHelper.slinks.isEmpty()||ConfigHelper.slinks.contains("JDBC"))&&JDBCSlink(method, argIndex, inheritanceMap)){returntrue;}if((ConfigHelper.slinks.isEmpty()||ConfigHelper.slinks.contains("EL"))&&ELSlink(method, argIndex, inheritanceMap)){returntrue;}if((ConfigHelper.slinks.isEmpty()||ConfigHelper.slinks.contains("SQLInject"))&& isSQLInjectSink(method, argIndex, inheritanceMap)){returntrue;}returnfalse;}
配置参数:
maxChainLength =10opLevel =2taintTrack =true
1️⃣ 初始化
for each Source:srcLink =(A.sources,0)methodsToExplore =[[ A.sources(0)]]exploredMethods ={ A.sources(0)}discoveredGadgets ={}
2️⃣ 第一次迭代
-
iteration=0 → pop first chain
chain =[ A.sources(0)]lastLink =(A.sources,0)
-
长度检查:
1 < maxChainLength→ 通过 -
取出 graphCallMap.get(A.sources) →
{ GC1 }- GC1
:
(callerArgIndex=0 → targetMethod=B.load, targetArgIndex=0)
- GC1
-
taintTrack:
GC1.callerArgIndex(0) == lastLink.taintedArgIndex(0)→ 通过 -
找实现:
allImpls = getImpls(B.load)→{ B.load }(普通方法) -
遍历 impls:
-
methodImpl = B.load -
newLink = (B.load,0) -
去重:
exploredMethods不含 → 继续 -
新链:
newChain = [ A.sources(0), B.load(0) ] -
sink 检测:
isSink(B.load,0)→false -
加入队列:
methodsToExplore =[[A.sources(0),B.load(0)]]exploredMethods.add(B.load(0))
-
3️⃣ 第二次迭代
-
iteration=1 → pop
chain =[A.sources(0),B.load(0)]lastLink =(B.load,0)
-
graphCallMap.get(B.load) →
{ GC2 }- GC2
:
(callerArgIndex=0 → targetMethod=C.handle, targetArgIndex=0)
- GC2
-
taintTrack:匹配 → 通过
-
impls:
getImpls(C.handle)→{ },
fallback 父类查找也无(接口),所以按注释 “GadgetInspector bug”,跳到父类去搜,依次找到C.handle本身,加入。 -
impls 变为 →
{ C.handle } -
for each impl:
-
newLink = (C.handle,0) -
去重通过
-
newChain = [A.sources(0),B.load(0),C.handle(0)] -
isSink(C.handle,0)→false -
加入:
methodsToExplore =[[A.sources(0),B.load(0),C.handle(0)]]exploredMethods.add(C.handle(0))
-
4️⃣ 第三次迭代
- chain = [A.sources(0),B.load(0),C.handle(0)]
- graphCallMap.get(C.handle)
→
{ GC3 }- GC3
:
(callerArgIndex=0 → targetMethod=C.handle, targetArgIndex=0)// 发自实现类
- GC3
- taintTrack
:匹配
- impls
:
getImpls(C.handle)→{ CImpl.handle } - for each
:
newLink = (CImpl.handle,0)-
去重通过
newChain = [A.sources(0),B.load(0),C.handle(0),CImpl.handle(0)]isSink(CImpl.handle,0)→
false-
入队 & 加入
exploredMethods
5️⃣ 第四次迭代
- chain = [ …, CImpl.handle(0)]
- graphCallMap.get(CImpl.handle)
→
{ GC4 }- GC4
:
(callerArgIndex=0 → targetMethod=D.sink, targetArgIndex=1)
- GC4
- taintTrack
:匹配
- impls
:
getImpls(D.sink)→{ D.sink } - for each
:
newLink = (D.sink,1)-
去重通过
newChain = [ …, CImpl.handle(0), D.sink(1)]isSink(D.sink,1)→
true- 加入
discoveredGadgets
此时 methodsToExplore 可能为空,循环结束。
接下来进行链路聚合优化
java复制编辑for(GadgetChain shortChain : methodsToExploreRepeat){for(GadgetChain fullChain : discoveredGadgets){if(shortChain.lastLink 出现在 fullChain 里){// 把 fullChain 从 shortChain.lastLink 之后的部分拼过来tmpDiscoveredGadgets.add(拼合后的链);}}}discoveredGadgets.addAll(tmpDiscoveredGadgets);
-
比如如果我们因为
opLevel限制,把某条中间链放进了methodsToExploreRepeat而没展开到 sink,那么这段逻辑就能 把这些中途链 自动补全到 已知的完整 Chain,得到更多发现。
Reference
https://www.jianshu.com/p/252f381a6bc4
https://www.cnblogs.com/binarylei/p/10508441.html
https://xz.aliyun.com/news/6654#toc-6
https://paper.seebug.org/1034/