rancher 采用ingerss ssl 部署nginx+php项目
rancher 采用ingerss ssl 部署nginx+php项目
一、创建nginx dockerfile,上传到阿里云镜像仓库(公有,不需要密码)


二、 创建php7.4 dockerfile,需要必须扩展, 上传到阿里云镜像仓库(公有,不需要密码)
# 基于 Debian 10 (Buster) 的基础镜像
FROM php:7.4-fpm-buster

# 安装系统依赖和编译工具(增加 Swoole/Redis 所需依赖)
RUN apt-get update && apt-get install -y \
    libxml2-dev \
    libssl-dev \
    libpng-dev \
    libjpeg62-turbo-dev \
    libfreetype6-dev \
    libzip-dev \
    libxslt1-dev \
    libicu-dev \
    libonig-dev \
    libffi-dev \
    libpq-dev \
    libcurl4-openssl-dev \
    libc-ares-dev \
    libyaml-dev \
    procps \
    git \
    wget \
    unzip \
    make \
    autoconf \
    g++ \
    && rm -rf /var/lib/apt/lists/*

# 编译 PHP 核心扩展
RUN docker-php-ext-configure gd --with-freetype --with-jpeg \
    && docker-php-ext-configure intl \
    && docker-php-ext-configure zip \
    && docker-php-ext-configure ffi --with-ffi

# 启用内置扩展
RUN docker-php-ext-install -j$(nproc) \
    bcmath \
    calendar \
    exif \
    ffi \
    gd \
    gettext \
    mysqli \
    pcntl \
    shmop \
    sysvmsg \
    sysvsem \
    sysvshm \
    xsl \
    zip \
    intl \
    opcache \
    pdo_mysql

# 分步安装 PECL 扩展(指定兼容版本)
RUN pecl install igbinary-3.2.14 \
    && docker-php-ext-enable igbinary

RUN pecl install redis-5.3.7 \
    && echo "extension=redis.so" > /usr/local/etc/php/conf.d/redis.ini

RUN pecl install swoole-4.8.13 \
    && docker-php-ext-enable swoole

# 最后清理编译工具(保留运行时依赖)
RUN apt-get purge -y --auto-remove \
    autoconf \
    g++ \
    make \
    && rm -rf /tmp/pear
构建命令docker build -t php7.4:v1 .
docker build -t php7.4:v1 .
docker login --username=xiaohuhl registry.cn-hangzhou.aliyuncs.com
docker tag 3332b182e011 registry.cn-hangzhou.aliyuncs.com/hooclub/k8s-php:v6
docker push registry.cn-hangzhou.aliyuncs.com/hooclub/k8s-php:v6
登录阿里云镜像服务,镜像仓库

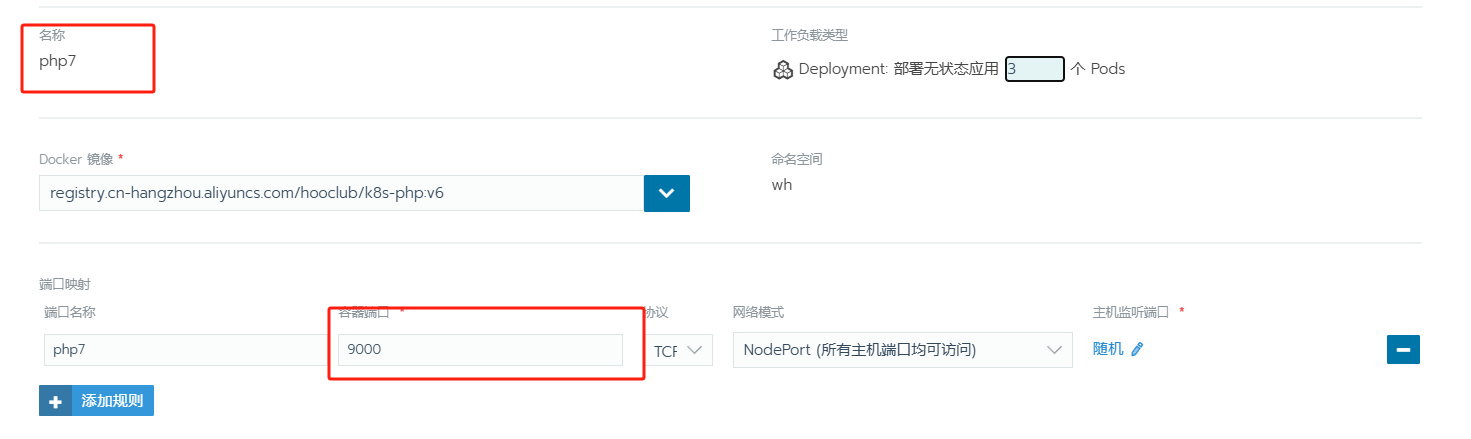
在rancher 控制台部署服务,镜像采用的上面的阿里云公有仓库的,映射配置文件、项目目录、日志等


php的部署也是一样,也要映射项目目录、配置、日志等


php的配置文件www.conf
[www]


user = www-data
group = www-data

listen = 127.0.0.1:9000


pm = dynamic

pm.max_children = 5

pm.start_servers = 2

pm.min_spare_servers = 1

pm.max_spare_servers = 3

; www.conf
catch_workers_output = yes
php_flag[display_errors] = off
php_admin_value[error_log] = /var/log/php/error.log
php_admin_flag[log_errors] = on
nginx有两个pod ,对应两个域名,一个前端,一个后台管理,这是最后部署完的截图
下面的nginx配置的都是80端口,在ingerss配置完https后,就显示443了。如下图

前端nginx配置文件
#user  nobody;
worker_processes  1;


events {
    worker_connections  1024;
}


http {
    include       mime.types;
    default_type  application/octet-stream;


    sendfile        on;
    #tcp_nopush     on;

    #keepalive_timeout  0;
    keepalive_timeout  65;
    access_log /var/log/nginx/access.log;
    error_log /var/log/nginx/error.log;
    #gzip  on;

server {
    listen 80;

    root /var/www/html/;
    index index.php index.html index.htm;

    location / {
        try_files $uri $uri/ /index.html;
    }
}

}
后台nginx配置,php转发配置的容器名+端口
user  www-data;
worker_processes  1;


events {
    worker_connections  1024;
}


http {
    include       mime.types;
    default_type  application/octet-stream;


    sendfile        on;
    #tcp_nopush     on;

    #keepalive_timeout  0;
    keepalive_timeout  65;
    access_log /var/log/nginx/access.log;
    error_log /var/log/nginx/error.log;
    #gzip  on;

server {
    listen 80;

    root /var/www/html;
    index index.php index.html index.htm;

location / {

        index index.php;
        autoindex off;

        # 如果请求的文件不存在,则重写 URL 到 index.php
        if (!-e $request_filename) {
            rewrite ^(.*)$ /index.php?s=/$1 last;
            break;
        }
    }

    location ~ \.php$ {
        fastcgi_pass php7:9000;
        fastcgi_index index.php;
        include fastcgi_params;
        fastcgi_param SCRIPT_FILENAME $document_root$fastcgi_script_name;
        fastcgi_param PATH_INFO $fastcgi_path_info;
    }
}

}
部署完成后,所有worker节点都有30080和30081端口。访问ip+端口都可访问nginx

配置ingerss ,先添加ssl证书,在资源-密文-证书中添加


将域名指向其中一个worker节点ip
