线程同步的学习与应用
1.多线程并发
1).多线程并发引例
#include <stdio.h>
#include <stdlib.h>
#include <unistd.h>
#include <assert.h>
#include <pthread.h>

int wg=0;
void *fun(void *arg)
{
    for(int i=0;i<1000;i++)
    {
        wg++;
        printf("wg=%d\n",wg);
    }
}
int main()
{
    pthread_t id[5];
    for(int i=0;i<5;i++)
    {
        pthread_create(&id[i],NULL,fun,NULL);
    }
    for(int i=0;i<5;i++)
    {
        pthread_join(id[i],NULL);
    }
    exit(0);
} 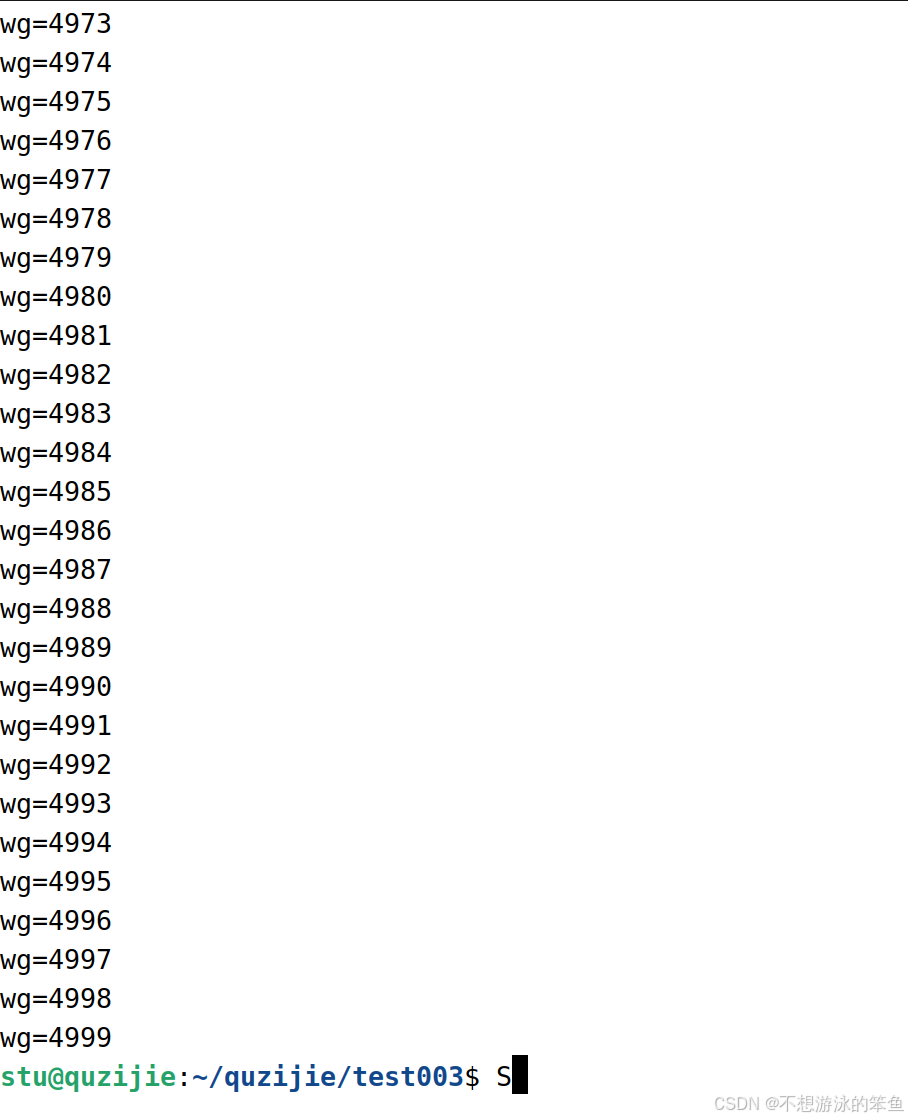
运行结果出错!!!
原子操作的概念:一个或多个指令的序列,对外是不可分的;即没有其他进程可以看到其中间状态或者中断此操作;
而wg++不是一个原子操作;
这种情况也不是每一次都发生,也不是一定发生了多少次.这种情况就是最可怕的,给人的感觉是时对时错;
注意,只有一个处理器的时候这种情况出现的概率是非常小的,同一时刻只有一个线程在运行,不容易出现两个线程同时去获取i的值的情况,但是也会发生;
2).解决多线程并发---线程同步
多线程并发就有可能出现问题的,比如两个线程都去在链表中插入,比如都在做尾插,都在找尾巴,那么多线程就会出问题;
怎么解决这个问题呢?就是线程同步;
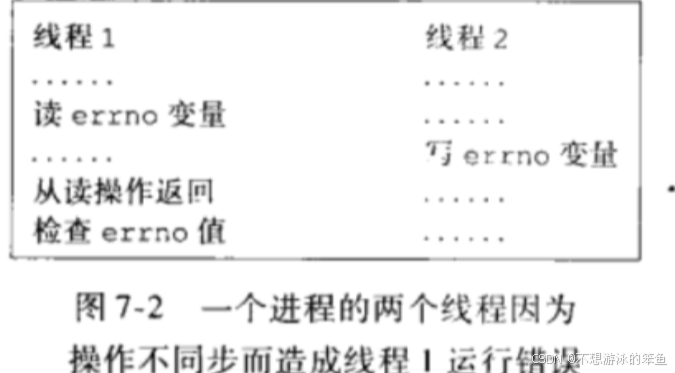
在一个多线程程序里,默认情况下,只有一个errno变量供所有的线程共享.在一个线程准备获取刚才的错误代码时,该变量很容易被另一个线程中的函数调用所改变.
2.线程同步的概念:
一个进程中的所有线程共享同一个地址空间和诸如打开的文件之类的其他资源.一个线程对资源的任何修改都会影响同一个进程中其他线程的环境.因此,需要同步各种线程的活动,以便它们互不干涉且不破坏数据结构.例如,如果两个线程都试图同时往一个双向链表中增加一个元素,则可能会丢失一个元素或者破坏链表结构.
同步就是让所有线程按照一定的规则执行,使得其正确性和效率都有迹可循.线程同步的手段就是对线程之间的穿插进行控制.
线程同步指的是当一个线程在对某个临界资源进行操作时,其他线程都不可以对这个资源进行操作,直到该线程完成操作, 其他线程才能操作,也就是协同步调,让线程按预定的先后次序进行运行。
临界资源:同一时刻,只允许被一个进程或者线程访问的资源;(比如打印机)
临界区:访问临界资源的代码段;
线程同步的方法有四种:互斥锁、信号量、条件变量、读写锁.
3.互斥锁:线程同步方法一
(1)互斥锁接口
int pthread_mutex_init(pthread_mutex_t *mutex, pthread_mutexattr_t *attr);
attr:锁的属性,不需要传空即可

int pthread_mutex_lock(pthread_mutex_t *mutex);

int pthread_mutex_unlock(pthread_mutex_t *mutex);

int pthread_mutex_destroy(pthread_mutex_t *mutex);
//注意,互斥锁mutex都需要传地址,因为要改变它;
(2)互斥锁例1(解决多线程并发问题)
#include <stdio.h>
#include <stdlib.h>
#include <unistd.h>
#include <assert.h>
#include <pthread.h>

pthread_mutex_t  mutex;
int wg=0;
void *fun(void *arg)
{
    for(int i=0;i<1000;i++)
    {
        pthread_mutex_lock(&mutex);
        wg++;
        pthread_mutex_unlock(&mutex);
        printf("wg=%d\n",wg);

    }
}
int main()
{
    pthread_t id[5];
     pthread_mutex_init(&mutex,NULL);
    for(int i=0;i<5;i++)
    {
        pthread_create(&id[i],NULL,fun,NULL);
    }
    for(int i=0;i<5;i++)
    {
        pthread_join(id[i],NULL);
    }
    pthread_mutex_destroy(&mutex);
    exit(0);
} 
(3)互斥锁例2(共享资源(打印机)使用问题)
主线程和函数线程模拟访问打印机,主线程输出第一个字符‘ A’表示开始使用打印机,输出第二个字符‘ A’表示结束使用,函数线程操作与主线程相同。
(由于打印机同一时刻只能被一个线程使用,所以输出结果不应该出现ABAB交替出现) :
原来是用信号量进行控制的,我们这里也可以用互斥锁进行同步;
示例代码:
#include <stdio.h>
#include <stdlib.h>
#include <assert.h>
#include <unistd.h>
#include <string.h>
#include <pthread.h>


pthread_mutex_t mutex;

void *thread_fun(void *arg)
{
    int i=0;
    for(;i<5;i++)
    {
        pthread_mutex_lock(&mutex);
        write(1,"B",1);
        int n=rand()%3;
        sleep(n);
        write(1,"B",1);
        pthread_mutex_unlock(&mutex);

        n=rand()%3;
        sleep(n);
    }

    pthread_exit(NULL);
}

int main()
{
    pthread_t id;

    pthread_mutex_init(&mutex,NULL);
    pthread_create(&id,NULL,thread_fun,NULL);

    int i=0;
    for(;i<5;i++)
    {
        pthread_mutex_lock(&mutex);
        write(1,"A",1);
        int n=rand()%3;
        sleep(n);
        write(1,"A",1);
        pthread_mutex_unlock(&mutex);

        n=rand()%3;
        sleep(n);
    }

    pthread_join(id,NULL);
    pthread_mutex_destroy(&mutex);

    exit(0);
}
4.信号量(线程)线程同步方法二
(1)信号量接口
信号量的类型:
sem_t  全局定义一个sem_t类型的信号量
注意,必须要加头文件:#include <semaphore.h>

int sem_init(sem_t *sem, int pshared, unsigned int value);
//信号量的初始化
//sem_init()在sem指向的地址初始化未命名的信号量。这个value参数指定信号量的初始值(第三个参数)。
//pshared:设置信号量是否在进程间共享,Linux不支持,一般给0; (非0为共享)

int sem_wait(sem_t *sem);
//P操作,wait表示等待,相当于是等待获取资源,那么就是P操作

int sem_post(sem_t *sem);
//V操作

int sem_destroy(sem_t *sem);
//销毁信号量
(2)信号量例1(全局变量++正确性问题)
#include <stdio.h>
#include <stdlib.h>
#include <assert.h>
#include <unistd.h>
#include <string.h>
#include <semaphore.h>
#include <pthread.h>

sem_t sem;
int wg=0;
void *fun(void *arg)
{
    for(int i=0;i<1000;i++)
    {
        sem_wait(&sem);
        wg++;
        sem_post(&sem);
        printf("wg=%d\n",wg);

    }
}
int main()
{
    pthread_t id[5];
    sem_init(&sem,0,1);
    for(int i=0;i<5;i++)
    {
        pthread_create(&id[i],NULL,fun,NULL);
    }
    for(int i=0;i<5;i++)
    {
        pthread_join(id[i],NULL);
    }
    sem_destroy(&sem);
    exit(0);
}
(3)信号量例2
主线程获取用户输入,函数线程将用户输入的数据存储到文件中;
//semtest.c
#include <stdio.h>
#include <stdlib.h>
#include <assert.h>
#include <string.h>
#include <unistd.h>
#include <pthread.h>
#include <semaphore.h>
#include <fcntl.h>

char buff[128]={0};
//主线程完成获取用户数据的数据,并存储在全局数组buff中;

sem_t sem1;
sem_t sem2;

void *PthreadFun(void *arg)
{
    int fd=open("a.txt",O_RDWR|O_CREAT,0664);//O_RDWR:读写方式打开
    assert(fd!=-1);

    //函数线程完成将用户输入的数据存储到文件中
    while(1)
    {
        sem_wait(&sem2);

        if(strncmp(buff,"end",3)==0)
        {
            break;
        }

        write(fd,buff,strlen(buff));
        memset(buff,0,128);

        sem_post(&sem1);
    }

    sem_destroy(&sem1);
    sem_destroy(&sem2);
}


int main()
{
    sem_init(&sem1,0,1);
    sem_init(&sem2,0,0);

    pthread_t id;
    int res=pthread_create(&id,NULL,PthreadFun,NULL);
    assert(res==0);

    //主线程完成获取用户数据的数据,并存储在全局数组buff中;
    while(1)
    {
        sem_wait(&sem1);

        printf("please input data:");
        fflush(stdout);

        fgets(buff,128,stdin);
        buff[strlen(buff)-1]=0;

        sem_post(&sem2);

        if(strncmp(buff,"end",3)==0)
        {
            break;
        }
    }

    pthread_exit(NULL);
}
(3)信号量例3
(以前是用多进程做的,封装比较麻烦.那如果用多线程的信号量做,如何做呢)
刚开始先打印A,所以信号量为1,后面的B和C不能打印,所以后面两个信号量的初始值都为0;
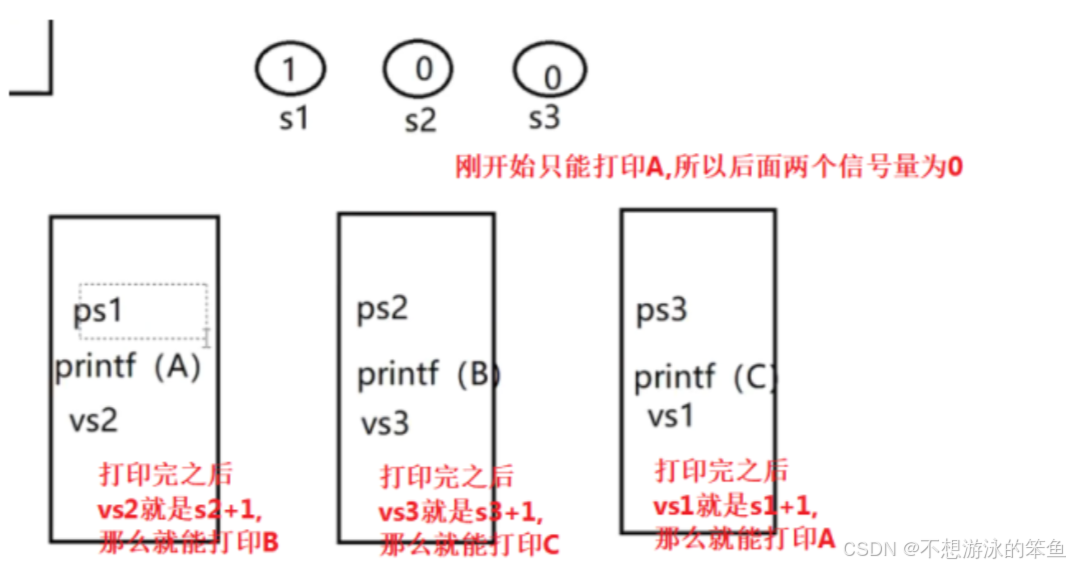
上面是多进程的思路图,多线程的思路和多进程是一样的.
不使用信号量,代码如下:
#include <stdio.h>
#include <stdlib.h>
#include <unistd.h>
#include <pthread.h>
#include <semaphore.h>

void * funa(void *arg)
{
    for(int i=0;i<5;i++)
    {
        printf("A");
        fflush(stdout);
        sleep(1);//这个其实不需要的,只是为了便于观察程序的执行;
    }
}

void * funb(void *arg)
{
    for(int i=0;i<5;i++)
    {
        printf("B");
        fflush(stdout);
        sleep(1);//这个其实不需要的,只是为了便于观察程序的执行;
    }
}

void * func(void *arg)
{
    for(int i=0;i<5;i++)
    {
        printf("C");
        fflush(stdout);
        sleep(1);//这个其实不需要的,只是为了便于观察程序的执行;
    }
}

int main()
{
    pthread_t id[3];
    pthread_create(&id[0],NULL,funa,NULL);
    pthread_create(&id[1],NULL,funb,NULL);
    pthread_create(&id[2],NULL,func,NULL);

    for(int i=0;i<3;i++)
    {
        pthread_join(id[i],NULL);
    }

    exit(0);

}
执行三次,三次不一样的结果

如何使用信号量呢?
#include <stdio.h>
#include <stdlib.h>
#include <unistd.h>
#include <pthread.h>
#include <semaphore.h>

//加入1-15 代码
sem_t sema;//1
sem_t semb;//2
sem_t semc;//3

void * funa(void *arg)
{
    for(int i=0;i<5;i++)
    {
        sem_wait(&sema);//4相当于图上的ps1;
        printf("A");
        fflush(stdout);
        sem_post(&semb);//5相当于图上的vs2;
        sleep(1);//这个其实不需要的,只是为了便于观察程序的执行;
    }
}

void * funb(void *arg)
{
    for(int i=0;i<5;i++)
    {
        sem_wait(&semb);//6相当于图上的ps2;
        printf("B");
        fflush(stdout);
        sem_post(&semc);//7相当于图上的vs3;
        sleep(1);//这个其实不需要的,只是为了便于观察程序的执行;
    }
}

void * func(void *arg)
{
    for(int i=0;i<5;i++)
    {
        sem_wait(&semc);//8相当于图上的ps3;
        printf("C");
        fflush(stdout);
        sem_post(&sema);//9相当于图上的vs1;
        sleep(1);//这个其实不需要的,只是为了便于观察程序的执行;
    }
}

int main()
{
    sem_init(&sema,0,1);//10也可以这么理解,第二个参数一直为0,因为不能在进程间共享;
    sem_init(&semb,0,0);//11
    sem_init(&semc,0,0);//12


    pthread_t id[3];
    pthread_create(&id[0],NULL,funa,NULL);
    pthread_create(&id[1],NULL,funb,NULL);
    pthread_create(&id[2],NULL,func,NULL);

    for(int i=0;i<3;i++)
    {
        pthread_join(id[i],NULL);
    }

    sem_destroy(&sema);//13
    sem_destroy(&semb);//14
    sem_destroy(&semc);//15

    exit(0);

} 
5.条件变量(线程同步方法三)
1)条件变量的接口:
#include <pthread.h>
int pthread_cond_init(pthread_cond_t *cond, pthread_condattr_t *attr);
int pthread_cond_wait(pthread_cond_t *cond, pthread_mutex_t *mutex);
//将条件变量添加到等待队列中,阻塞,等待被唤醒;第一个参数是条件变量的地址,第二个参数是互斥锁;也就是说条件变量往往伴随着互斥锁的使用;
int pthread_cond_signal(pthread_cond_t *cond); //唤醒单个线程
int pthread_cond_broadcast(pthread_cond_t *cond); //唤醒所有等待的线程
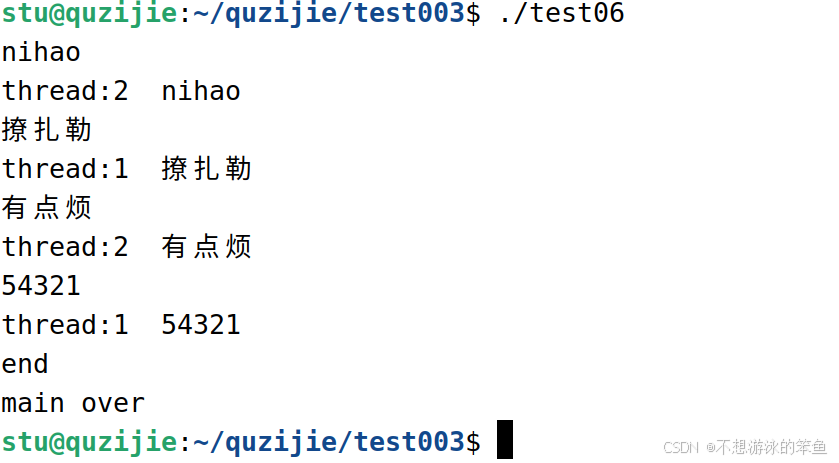
int pthread_cond_destroy(pthread_cond_t *cond);//销毁条件变量例题:主函数输入数据到全局变量buf中.
主线程负责从键盘获取数据,获取到数据之后把数据写入到buff中,我们就认为条件满足了,我们就去唤醒等待着的两个线程,让其中的某一个线程将buff中的数据打印出去;
#include <stdio.h>
#include <stdlib.h>
#include <unistd.h>
#include <string.h>
#include <pthread.h>

pthread_cond_t cond;
pthread_mutex_t mutex;//条件变量一般伴随着互斥锁的使用;

char buff[128]={0};

void *work_thread(void *arg)
{
    char *thread_name=(char *)arg;

    while(1)
    {
        pthread_mutex_lock(&mutex);
        pthread_cond_wait(&cond,&mutex);
        pthread_mutex_unlock(&mutex);

        if(strncmp(buff,"end",3)==0)
        {
            break;//1
        }
        printf("%s  %s",thread_name,buff);//2

    }
}

int main()
{
    pthread_cond_init(&cond,NULL);
    pthread_mutex_init(&mutex,NULL);

    pthread_t id1,id2;
    pthread_create(&id1,NULL,work_thread,"thread:1");
    pthread_create(&id2,NULL,work_thread,"thread:2");

    while(1)
    {
        fgets(buff,128,stdin);

       if(strncmp(buff,"end",3)==0)
       {
           pthread_cond_broadcast(&cond);
           break;
       }
       else
       {
          pthread_cond_signal(&cond);
       }
    }


    pthread_join(id1,NULL);
    pthread_join(id2,NULL);
    pthread_mutex_destroy(&mutex);
    pthread_cond_destroy(&cond);

    printf("main over\n");
    exit(0);
} 
pthread_cond_broadcast函数以广播的方式唤醒所有等待目标条件变量的线程; pthread_cond_signal函数用于唤醒一个等待目标条件变量的线程.至于哪个线程将被唤醒,则取决于线程的优先级和调度策略.有时候我们可能想唤醒一个指定的线程,但是pthread没有对该需求提供解决方法.
pthread_cond_wait函数用于等待目标条件变量.mutex参数是用于保护条件变量的互斥锁,以确保pthread_conde_wait操作的原子性.在调用pthread_cond_wait前,必须确保互斥锁mutex已经加锁,否则将导致不可预期的结果.pthread_cond_wait函数执行时,首先把调用线程放入条件变量的等待队列中,然后将互斥锁mutex解锁.可见,从pthread_cond_wait开始执行到其调用线程被放入条件变量的等待队列之间的这段时间内,pthread_cond_signal和pthread_cond_broadcast等函数不会修改条件变量.换言之,pthread_cond_wait函数不会错过目标条件变量的任何变化.当pthread_cond_wait函数成功返回时,互斥锁mutex将再次被锁上.
6.读写锁(线程同步方法四)
读写锁保证了更高的并发性;
读写锁适用读的场景比较多的场景;
#include <pthread.h>
int pthread_rwlock_init(pthread_rwlock_t *rwlock, pthread_rwlockattr_t *attr);//第一个参数是锁的地址,第二个参数是锁的属性
int pthread_rwlock_rdlock(pthread_rwlock_t *rwlock);//加读锁
int pthread_rwlock_wrlock(pthread_rwlock_t *rwlock);//加写锁
int pthread_rwlock_unlock(pthread_rwlock_t *rwlock);//解锁,不管加的读锁还是写锁,都是通过unlock解锁;
int pthread_rwlock_destroy(pthread_rwlock_t *rwlock);//销毁


//读模式下的加锁状态,写模式下的加锁状态,不加锁的状态
///模拟 //我们可以创建3个线程,两个线程进行读操作,一个线程进行写操作; //我们模拟一下这个,可以让两个读操作同时操作;但是读和写是不能同时操作的;
我们首先来看没有控制的代码:
#include <stdio.h>
#include <stdlib.h>
#include <unistd.h>
#include <pthread.h>
#include <semaphore.h>

pthread_rwlock_t rwlock;
void * fun_read(void * arg)
{
    char *s=(char *)arg;
    for(int i=0;i<5;i++)
    {
        printf("%s:  start\n",s);
        int n=rand()%3;
        sleep(n);
        printf("%s:  end\n",s);

        n=rand()%3;
        sleep(n);
    }
}

void * fun_write(void * arg)
{
    char *s=(char *)arg;
    for(int i=0;i<5;i++)
    {
        printf("%s:  start\n",s);
        int n=rand()%3;
        sleep(n);
        printf("%s:  end\n",s);

        n=rand()%3;
        sleep(n);
    }
}


int main()
{
    pthread_rwlock_init(&rwlock,NULL);
    pthread_t id1,id2,id3;
    pthread_create(&id1,NULL,fun_read,"第一个读线程:");
    pthread_create(&id2,NULL,fun_read,"第二个读线程:");
    pthread_create(&id3,NULL,fun_write,"第一个写线程:");

    pthread_join(id1,NULL);
    pthread_join(id2,NULL);
    pthread_join(id3,NULL);

    pthread_rwlock_destroy(&rwlock);
    exit(0);

} 
如何运用读写锁呢?代码如下:
#include <stdio.h>
#include <stdlib.h>
#include <unistd.h>
#include <pthread.h>
#include <semaphore.h>

pthread_rwlock_t rwlock;
void * fun_read(void * arg)
{
    char *s=(char *)arg;
    for(int i=0;i<5;i++)
    {
        pthread_rwlock_rdlock(&rwlock);//1pthread_rwlock_rdlock命名含有:线程的_读写锁_读锁;
        printf("%s:  start\n",s);
        int n=rand()%3;
        sleep(n);
        printf("%s:  end\n",s);
        pthread_rwlock_unlock(&rwlock);//2pthread_rwlock_unlock命名含有:线程的_读写锁_解锁;

        n=rand()%3;
        sleep(n);
    }
}

void * fun_write(void * arg)
{
    char *s=(char *)arg;
    for(int i=0;i<5;i++)
    {
        pthread_rwlock_wrlock(&rwlock);//3pthread_rwlock_rwlock命名含有:线程的_读写锁_写锁;
        printf("%s:  start\n",s);
        int n=rand()%3;
        sleep(n);
        printf("%s:  end\n",s);
        pthread_rwlock_unlock(&rwlock);//4pthread_rwlock_unlock命名含有:线程的_读写锁_解锁;

        n=rand()%3;
        sleep(n);
    }
}


int main()
{
    pthread_rwlock_init(&rwlock,NULL);
    pthread_t id1,id2,id3;
    pthread_create(&id1,NULL,fun_read,"r1");
    pthread_create(&id2,NULL,fun_read,"r2");
    pthread_create(&id3,NULL,fun_write,"w1");

    pthread_join(id1,NULL);
    pthread_join(id2,NULL);
    pthread_join(id3,NULL);

    pthread_rwlock_destroy(&rwlock);
    exit(0);

}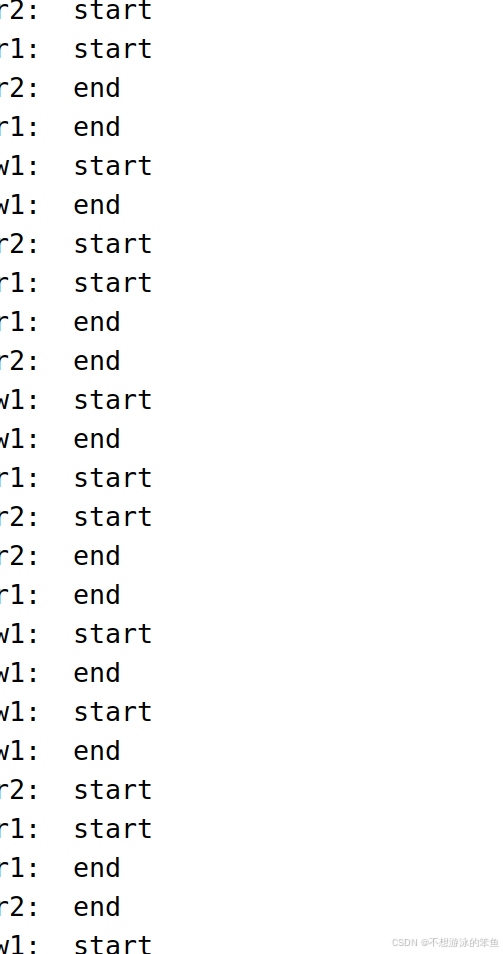
我们要保证写的start和end中间是不能出现读的,而且读两个可以,读的中间不能有写;