mybatis-genertor(代码生成)源码及扩展笔记
文章目录
- 生成过程
- MyBatisGenerator.generate()代码入口 pid='0',id='0'
- context.generateFiles()代码 pid='0',id='1'
- introspectedTable.getGeneratedJavaFiles() java部分生成 pid='1',id='11'
- introspectedTable.getGeneratedXmlFiles() xml部分生成 pid='1',id='12'
- 这里是一波三连调用
- XMLMapperGenerator#getSqlMapElement() pid='12',id='121'
- 如何添加!=''
- plugin插件
- plugin插件-定义插件
- plugin插件-在配置文件里面配置插件
- 主要组件有哪些
- 主要组件-MyBatisGenerator(生成类入口)
- 主要组件-Context(上下文)
- 主要组件-XMLMapperGenerator、JavaMapperGenerator
- 主要组件-Plugin(插件)
- context部分
- context部分-IntrospectedTables(内省表s)
- xml中没有的配置项有哪些
- 其他
- 不错的文章
代码生成工具很有用,提高了开发效率。
但是也遇到些问题,例如原生的sql只有
!=null 没有 !='' ,每次生成完还得手动加,增加了工作量。
想改成自己想要的,只能从源码下手了,这也是看源码的源动力。
生成过程
捋了一遍,清晰多了。(建议下载下来源码,更准确,比class文件好理解)
MyBatisGenerator.generate()代码入口 pid=‘0’,id=‘0’
MyBatisGenerator.generate()是代码入口。其中的中文注释就是个人理解。代码:
// calculate the contexts to run  # 根据xml配置文件生成context
List<Context> contextsToRun;
if (contextIds == null || contextIds.size() == 0) {
    contextsToRun = configuration.getContexts();
} else {
    contextsToRun = new ArrayList<Context>();
    for (Context context : configuration.getContexts()) {
        if (contextIds.contains(context.getId())) {
            contextsToRun.add(context);
        }
    }
}

// setup custom classloader if required # 类加载器,略
if (configuration.getClassPathEntries().size() > 0) {
    ClassLoader classLoader = getCustomClassloader(configuration.getClassPathEntries());
    ObjectFactory.addExternalClassLoader(classLoader);
}

// now run the introspections... # 内省,主要是给context.introspectTables赋值
int totalSteps = 0;
for (Context context : contextsToRun) {
    totalSteps += context.getIntrospectionSteps();
}
callback.introspectionStarted(totalSteps);

for (Context context : contextsToRun) {
    context.introspectTables(callback, warnings,
            fullyQualifiedTableNames);
}

// now run the generates # 实际生成代码,主逻辑都在这里
totalSteps = 0;
for (Context context : contextsToRun) {
    totalSteps += context.getGenerationSteps();
}
callback.generationStarted(totalSteps);

for (Context context : contextsToRun) {
    context.generateFiles(callback, generatedJavaFiles,
            generatedXmlFiles, warnings);
}

// now save the files # 保存文件,略
if (writeFiles) {
    callback.saveStarted(generatedXmlFiles.size()
            + generatedJavaFiles.size());

    for (GeneratedXmlFile gxf : generatedXmlFiles) {
        projects.add(gxf.getTargetProject());
        writeGeneratedXmlFile(gxf, callback);
    }

    for (GeneratedJavaFile gjf : generatedJavaFiles) {
        projects.add(gjf.getTargetProject());
        writeGeneratedJavaFile(gjf, callback);
    }

    for (String project : projects) {
        shellCallback.refreshProject(project);
    }
}
所以,这段的核心是context.generateFiles()。
context.generateFiles()代码 pid=‘0’,id=‘1’
代码:
pluginAggregator = new PluginAggregator();
for (PluginConfiguration pluginConfiguration : pluginConfigurations) {
    Plugin plugin = ObjectFactory.createPlugin(this,
            pluginConfiguration);
    if (plugin.validate(warnings)) {
        pluginAggregator.addPlugin(plugin);
    } else {
        warnings.add(getString("Warning.24", //$NON-NLS-1$
                pluginConfiguration.getConfigurationType(), id));
    }
}

if (introspectedTables != null) {
    for (IntrospectedTable introspectedTable : introspectedTables) {
        callback.checkCancel();
        /* 核心代码 start */
        introspectedTable.initialize(); // 初始化,重要但是不要关注
        introspectedTable.calculateGenerators(warnings, callback);
        generatedJavaFiles.addAll(introspectedTable
                .getGeneratedJavaFiles()); // java部分(Entity、Mapper等)
        generatedXmlFiles.addAll(introspectedTable
                .getGeneratedXmlFiles()); // xml部分

        generatedJavaFiles.addAll(pluginAggregator
                .contextGenerateAdditionalJavaFiles(introspectedTable));
        generatedXmlFiles.addAll(pluginAggregator
                .contextGenerateAdditionalXmlFiles(introspectedTable));
        /* 核心代码 end*/
    }
}

generatedJavaFiles.addAll(pluginAggregator
        .contextGenerateAdditionalJavaFiles());
generatedXmlFiles.addAll(pluginAggregator
        .contextGenerateAdditionalXmlFiles());
introspectedTable.getGeneratedJavaFiles() java部分生成 pid=‘1’,id=‘11’
代码:
List<GeneratedJavaFile> answer = new ArrayList<GeneratedJavaFile>();

// 这部分是entity和example类
for (AbstractJavaGenerator javaGenerator : javaModelGenerators) {
    List<CompilationUnit> compilationUnits = javaGenerator
            .getCompilationUnits();
    for (CompilationUnit compilationUnit : compilationUnits) {
        GeneratedJavaFile gjf = new GeneratedJavaFile(compilationUnit,
                context.getJavaModelGeneratorConfiguration()
                        .getTargetProject(),
                        context.getProperty(PropertyRegistry.CONTEXT_JAVA_FILE_ENCODING),
                        context.getJavaFormatter());
        answer.add(gjf);
    }
}


// 这部分是Mapper类
for (AbstractJavaGenerator javaGenerator : clientGenerators) {
    List<CompilationUnit> compilationUnits = javaGenerator
            .getCompilationUnits();
    for (CompilationUnit compilationUnit : compilationUnits) {
        GeneratedJavaFile gjf = new GeneratedJavaFile(compilationUnit,
                context.getJavaClientGeneratorConfiguration()
                        .getTargetProject(),
                        context.getProperty(PropertyRegistry.CONTEXT_JAVA_FILE_ENCODING),
                        context.getJavaFormatter());
        answer.add(gjf);
    }
}

return answer;
AbstractJavaGenerator和CompilationUnit都是java基础类,以上代码主要生成了3个类。
两个基础类(Entity和Example)
一个Mapper类
introspectedTable.getGeneratedXmlFiles() xml部分生成 pid=‘1’,id=‘12’
代码:
List<GeneratedXmlFile> answer = new ArrayList<GeneratedXmlFile>();

if (xmlMapperGenerator != null) {
    Document document = xmlMapperGenerator.getDocument(); // 核心代码是这句
    GeneratedXmlFile gxf = new GeneratedXmlFile(document,
            getMyBatis3XmlMapperFileName(), getMyBatis3XmlMapperPackage(),
            context.getSqlMapGeneratorConfiguration().getTargetProject(),
            true, context.getXmlFormatter());
    if (context.getPlugins().sqlMapGenerated(gxf, this)) {
        answer.add(gxf);
    }
}

return answer;
这里是一波三连调用
这段调用关系比较清楚,所以不用逐级的形式了,直接用文本标出来。
Document document = xmlMapperGenerator.getDocument();
到
XMLMapperGenerator#getDocument();
到
XMLMapperGenerator#getSqlMapElement();
XMLMapperGenerator#getSqlMapElement() pid=‘12’,id=‘121’
代码:
FullyQualifiedTable table = introspectedTable.getFullyQualifiedTable();
progressCallback.startTask(getString(
        "Progress.12", table.toString())); //$NON-NLS-1$
XmlElement answer = new XmlElement("mapper"); //$NON-NLS-1$
String namespace = introspectedTable.getMyBatis3SqlMapNamespace();
answer.addAttribute(new Attribute("namespace", //$NON-NLS-1$
        namespace));

context.getCommentGenerator().addRootComment(answer);

addResultMapWithoutBLOBsElement(answer);
addResultMapWithBLOBsElement(answer);
addExampleWhereClauseElement(answer);
addMyBatis3UpdateByExampleWhereClauseElement(answer);
addBaseColumnListElement(answer);
addBlobColumnListElement(answer);
addSelectByExampleWithBLOBsElement(answer);
addSelectByExampleWithoutBLOBsElement(answer);
addSelectByPrimaryKeyElement(answer);
addDeleteByPrimaryKeyElement(answer);
addDeleteByExampleElement(answer);
addInsertElement(answer);
addInsertSelectiveElement(answer);
addCountByExampleElement(answer);
addUpdateByExampleSelectiveElement(answer);
addUpdateByExampleWithBLOBsElement(answer);
addUpdateByExampleWithoutBLOBsElement(answer);
addUpdateByPrimaryKeySelectiveElement(answer);
addUpdateByPrimaryKeyWithBLOBsElement(answer);
addUpdateByPrimaryKeyWithoutBLOBsElement(answer);

return answer;
如上是组装各种语句,以生成UpdateByExampleSelective()方法为例。
代码:
protected void addUpdateByExampleSelectiveElement(XmlElement parentElement) {
    if (introspectedTable.getRules().generateUpdateByExampleSelective()) {
        AbstractXmlElementGenerator elementGenerator = new UpdateByExampleSelectiveElementGenerator(); // 重点是这句
        initializeAndExecuteGenerator(elementGenerator, parentElement);
    }
}
然后是:
UpdateByExampleSelectiveElementGenerator#addElements();
如果要调整xml的内容,调整对应语句的addElements()方法即可。
这种直接改代码的方式虽然可以实现,但是不推荐,mybatis有现成的机制解决这个问题,那就是插件机制。
如何添加!=‘’
至少有两种方案:
1、直接修改对应的generator。 # 简单粗暴,不推荐这种方式,但是比较好实现
2、通过插件实现。 # 推荐,这是比较优雅的方式,但是实测也不太好写(主要是dom操作这不好写)。
以updateByExampleSelective语句为例。
左边是修改后的代码,右边带Y的表是原代码。
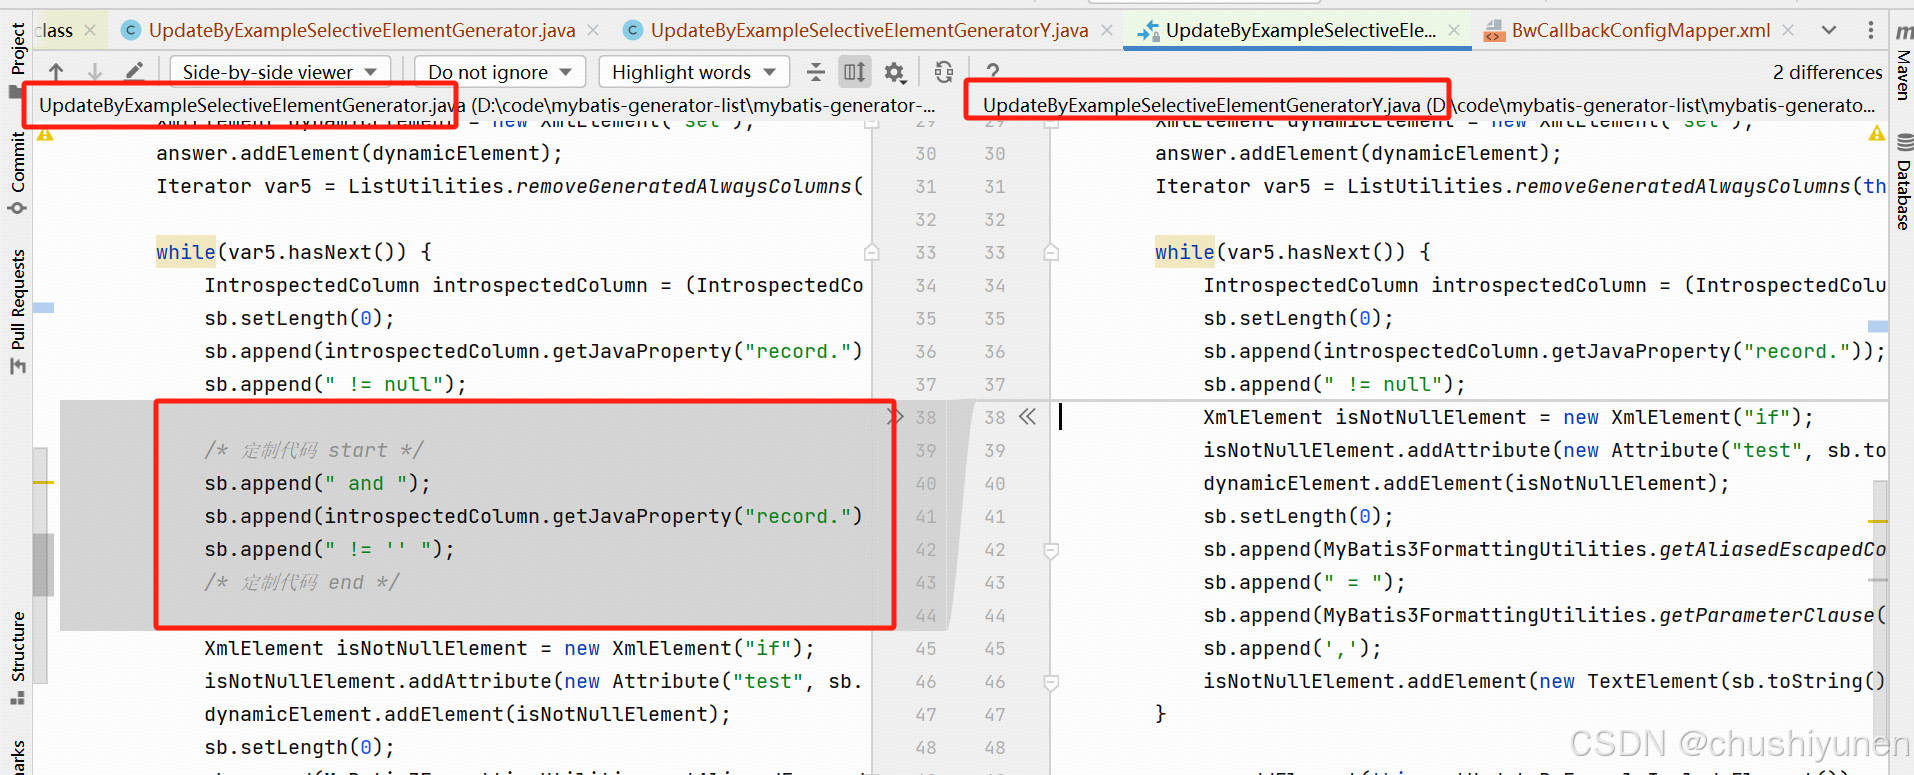
实测成功了,那么其他的也可以类似着改。
代码也附上吧,万一用的到。
/* 定制代码 start */
sb.append(" and ");
sb.append(introspectedColumn.getJavaProperty("record."));
sb.append(" != '' ");
/* 定制代码 end */
plugin插件
以修改UpdateByPrimaryKeySelective对应的xml为例。
plugin插件-定义插件
代码:
public class CustomPlugin extends PluginAdapter {
    public boolean validate(List<String> warnings) {
        return true;
    }

    @Override
    public boolean sqlMapUpdateByPrimaryKeySelectiveElementGenerated(
            XmlElement element, IntrospectedTable introspectedTable) {
        // 这里只是添加个属性意思下,实际操作dom不太好写,需要好好整理下
        element.addAttribute(new Attribute("fetchSize", "100"));
        return true;
    }
}
注:Plugin是一个接口,PluginAdapter是实现Plugin的抽象类。
public abstract class PluginAdapter implements Plugin {}
里面预定义了很多方法,对应代码生成中的不同动作,要修改哪块,覆盖(不是重写,重写会改参数)对应方法即可。
这里有些基础的要求:
1、对插件的预定义方法有一定了解,不然可能找不准方法。
2、对dom及java内省比较熟悉,否则也写不出来。这两个都不是很好操作,觉得很简单,但是实际写的时候代码惨不忍睹。
扩展点: 这里是sql完毕后,修改对应的sql,如何在生成sql时就进行操作呢?
plugin插件-在配置文件里面配置插件
在xml的context元素下添加plugin内容:
<plugin type="plugins.CustomPlugin">
<!--			<property name="annotationClass" value="org.apache.ibatis.annotations.Mapper" />-->
<!--			<property name="annotationName" value="@Mapper" />-->
</plugin>
然后运行生成方法即可。
注:这里的property是如果需要构造参数,通过该标签传递。
主要组件有哪些
主要组件-MyBatisGenerator(生成类入口)
git上都有代码,这里也贴下吧:
public void generator() throws Exception {
    String path = this.getClass().getClassLoader().getResource("\\").getPath().replace("%5c","")+"generatorConfig.xml";
    List<String> warnings = new ArrayList<String>();
    boolean overwrite = true;
    //指定 逆向工程配置文件
    File configFile = new File(path);
    ConfigurationParser cp = new ConfigurationParser(warnings);
    Configuration config = cp.parseConfiguration(configFile);
    DefaultShellCallback callback = new DefaultShellCallback(overwrite);
    MyBatisGenerator myBatisGenerator = new MyBatisGenerator(config,
            callback, warnings);
    myBatisGenerator.generate(null);

}
意思一目了然,传入一个配置文件,根据配置文件生成即可。
主要组件-Context(上下文)
context同名的类太多了,这里带上包名,org.mybatis.generator.config.Context。
主要组件-XMLMapperGenerator、JavaMapperGenerator
主要组件-Plugin(插件)
context部分
context部分-IntrospectedTables(内省表s)
Introspect的字面意思是内省、反省。
仅从字面意思根本没法理解,但是如果知道内省和反射都是java自带的机制的话,那么就好理解了。
详见反射相关文章,这里只需要知道内省是java的机制,主要用于获取属性等信息。
xml中没有的配置项有哪些
因为xml中列出的可能少,实际项目是支持的,但是不知道有哪些是不是就没功能最大化。
其他
不错的文章
开源MyBatisGenerator组件源码分析