remix做歌网站win优化大师
1. 前言
今天,我们来聊聊CLIP。CLIP(Contrastive Language–Image Pre-training)是由 OpenAI 在 2021 年提出的一种强大的多模态模型,能够理解图像和自然语言之间的关系。它的核心思想是将图像和文本映射到同一个向量空间中,通过对比学习(Contrastive Learning)来训练模型,从而实现图文匹配、图像分类、文本生成图片(作为基座模型提供给多模态模型)等任务。
CLIP 同时使用两个编码器:
- 图像编码器(一般是 ResNet 或 ViT):将图像编码成一个向量。
- 文本编码器(Transformer):将文本描述编码成一个向量。
然后,它使用对比学习让对应的图文对距离更近,不相关的图文对距离更远。
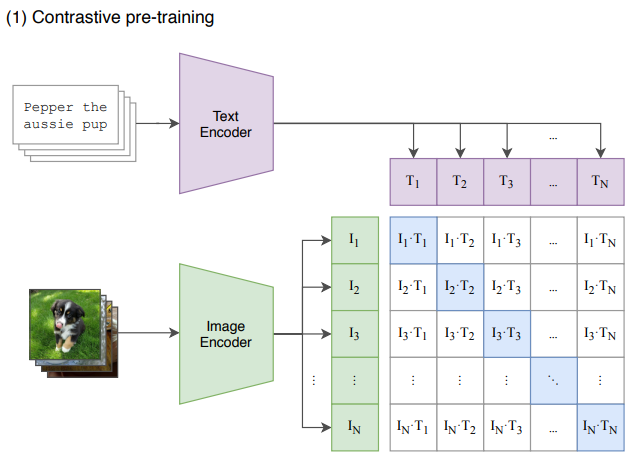
简单来讲,就是让一张图片和其对应的文本标签更接近,和其它图片的文本标签距离更远;一段文本和其对应的图片更接近,和其它的图片距离更远。举个例子,假设现在有N个文本-图片对构成一个矩阵,矩阵的每一行表示每条文本的向量,每一列表示每张图片的向量,那么,对角线上的值就是某条文本和其对应图片之间向量的相似度,对应的真实标签就是1,其余的位置就是0.
目前,大量的论文还是在openclip开源库上进行的实验,代码比较复杂,对于初学者而言,比较难理解。接下来,我们将以较少量的代码来动手训练一个CLIP,来学习CLIP的核心思想。
2. MiniClip
我们使用hugging face的Trainer来进行训练,使用它的好处是我们不需要去手动写训练的主代码,比如前向传播、反向传播等,而更关注于数据的预处理、模型的搭建以及损失函数的计算。
整理的项目结构如下:
--model_configs/:模型配置
--model_hub/:预训练权重
--output/:训练保存
--model.py:模型
--search_gradio.py:gradio可视化页面
--test.py:测试加载的权重和预测
--tokenizer.py:文本tokenizer
--train.py:主训练
--transform.py:图片数据预处理
--utils.py:辅助函数
下面我们一一来看。
2.1 使用预训练的权重
我们先去https://github.com/wkcn/TinyCLIP下载一些比较小的CLIP模型的权重,这里我们选择TinyCLIP-ViT-40M-32-Text-19M,看下它的配置文件:
{"embed_dim": 512,"vision_cfg": {"image_size": 224,"layers": 12,"width": 512,"patch_size": 32},"text_cfg": {"context_length": 77,"vocab_size": 49408,"width": 512,"heads": 8,"layers": 6}
}
可以得到以下信息:
- 向量的维度是512
- 文本会被tokenizer为77个token
- 输入的图片会被转换成224×224,并使用32进行patch。也就是,每张图片会被切分为(224/32)×(224/32)=7×7=49个的图片块,然后输入到VIT中。
在model.py定义好模型的结构:
class MiniClip(nn.Module):def __init__(self, cfg_path):super(MiniClip, self).__init__()# autocast contextself.image_autocast = nullcontextself.text_autocast = nullcontextself.logit_autocast = nullcontextwith open(cfg_path, "r") as fp:cfg = json.loads(fp.read())emb_dim = cfg["embed_dim"]text_cfg = CLIPTextCfg(**cfg["text_cfg"])vision_cfg = CLIPVisionCfg(**cfg["vision_cfg"])quick_gelu = Trueself.text_encoder = TextEncoder(emb_dim, text_cfg, quick_gelu)self.image_encoder = ImageEncoder(emb_dim, vision_cfg, quick_gelu)self.logit_scale = LogitScale()def encode_image(self, image, normalized=False):with self.image_autocast():return self.image_encoder(image, normalized=normalized)def encode_text(self, text, normalized=False):with self.text_autocast():return self.text_encoder(text, normalized=normalized)def forward(self, image, text, normalized=True):image_features = text_features = Noneif image is not None:with self.image_autocast():image_features = self.image_encoder(image, normalized=normalized)if text is not None:with self.text_autocast():text_features = self.text_encoder(text, normalized=normalized)with self.logit_autocast():logit_scale = self.logit_scale(torch.tensor(0))return image_features, text_features, logit_scale.exp()
我们需要关注:对文本的预处理、对图片的预处理、文本转向量、图片转向量。之后,我们就可以加载预训练的权重来验证下我们的模型是否正确:
cfg_path = "model_configs/TinyCLIP-ViT-40M-32-Text-19M.json"
clip = MiniClip(cfg_path)for k, v in clip.named_parameters():print(k, v.shape)state_dict = torch.load("/data/gongoubo/MiniClip/model_hub/wkcn/TinyCLIP-ViT-40M-32-Text-19M-LAION400M.pt",map_location="cpu")
new_state_dict = {}
for k, v in state_dict["state_dict"].items():if "visual" in k:new_state_dict[k.replace("module", "image_encoder")] = velif "logit_scale" in k:new_state_dict[k.replace("module", "logit_scale")] = velse:new_state_dict[k.replace("module", "text_encoder")] = vclip.load_state_dict(new_state_dict, strict=True)img_path = "data/dog.png"
text = ["a dog", "a cat", "a fish", "a pig"]image = Image.open(img_path).convert("RGB")
val_processor = image_transform(clip.image_encoder.visual.image_size, is_train=False)image_input = val_processor(image).unsqueeze(0)
text_input = tokenize(text)print(image_input.shape)
print(text_input.shape)
img_feature = clip.encode_image(image_input, normalized=True)
text_feature = clip.encode_text(text_input, normalized=True)img_feature = img_feature.detach().cpu().numpy()
text_feature = text_feature.detach().cpu().numpy()
print(text_feature @ img_feature.T)
文本模型和视觉模型我们直接从openclip复制过来的,然后自定义了MiniClip模型,我们定义的模型和tinyclip训练好的权重之间会存在权重名称对不上的问题,因此在加载权重时要进行一个处理。接着我们使用一张狗的图片以及四个描述来测试模型,
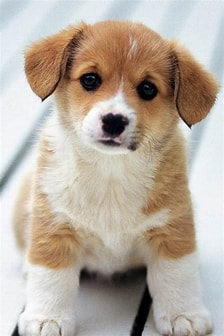
测试方法为:分别对图片和文本进行向量化,然后计算文本和图片向量之间的相似度,计算结果如下:
[[0.30785075][0.21673554][0.19231911][0.19549522]]
发现a dog和图片的相似度最高。我们再找个数据来批量测试一下,采取topN_acc来衡量(一张图片对应一个caption,使用文本检索和其最相似的图片,看是否出现在topN里面),代码如下:
def test_on_flickr(model):root = "/data/gongoubo/MiniClip/data"with open("data/en_val.json", "r") as fp:data = json.loads(fp.read())text_features = []image_features = []for i, d in tqdm(enumerate(data), total=len(data)):caption = d["caption"]image = d["image"].replace("\\", "/")image = os.path.join(root, image)# 取第0个captioncaption = caption[:1]image = Image.open(image).convert("RGB")val_processor = image_transform(model.image_encoder.visual.image_size, is_train=False)image_input = val_processor(image).unsqueeze(0)text_input = tokenize(caption)img_feature = model.encode_image(image_input, normalized=True)text_feature = model.encode_text(text_input, normalized=True)img_feature = img_feature.detach().cpu().numpy()text_feature = text_feature.detach().cpu().numpy()text_features.append(text_feature[0])image_features.append(img_feature[0])text_features = np.stack(text_features, axis=0)image_features = np.stack(image_features, axis=0)np.save("output/text2.npy", text_features)np.save("output/image2.npy", image_features)
先将图片和文本转换为numpy向量然后进行存储,接着使用faiss库进行检索:
def search_by_faiss():text_features = np.load("output/text2.npy").astype('float32')image_features = np.load("output/image2.npy").astype('float32')d = text_features.shape[1]index = faiss.IndexFlatL2(d)index.add(image_features)top1 = 0top3 = 0top5 = 0top10 = 0with open("data/en_val.json", "r") as fp:data = json.loads(fp.read())id2query = {i:d["caption"] for i,d in enumerate(data)}for i, text_feature in enumerate(text_features):distances, indices = index.search(np.array([text_feature]), k=10)# print(indices)inds = indices[0].tolist()if i == inds[0]:top1 += 1print(id2query[i])if i in inds[:3]:top3 += 1if i in inds[:5]:top5 += 1if i in inds[:10]:top10 += 1print("top1 acc:", top1 / 1000 * 100)print("top3 acc:", top3 / 1000 * 100)print("top5 acc:", top5 / 1000 * 100)print("top10 acc:", top10 / 1000 * 100)
最终该模型在flickr的en_val的准确率为:
top1  acc: 52.0
top3  acc: 70.5
top5  acc: 78.5
top10 acc: 86.3
2.2 从头训练clip
接着,我们来讲解下怎么从头训练一个自己的clip,直接看所有的代码:
import os
os.environ["CUDA_VISIBLE_DEVICES"] = "4,5,6,7"
os.environ["NCCL_P2P_DISABLE"] = "1"
os.environ["NCCL_IB_DISABLE"] = "1"
import json
import random
import faiss
import torch
import numpy as np
import torch.nn.functional as Ffrom model import MiniClip
from PIL import Image
from tqdm import tqdm
from torch.utils.data import Dataset, DataLoader
from transformers import TrainingArguments, Trainer
from transform import image_transform
from tokenizer import tokenize# 构建dataset
class MiniDataset(Dataset):def __init__(self, train_path, image_size, is_train=True):with open(train_path, "r") as fp:self.data = json.load(fp)self.root = "/data/gongoubo/MiniClip/data"self.tokenizer = tokenizeself.process = image_transform(image_size, is_train=is_train)def __len__(self):return len(self.data)def __getitem__(self, item):d = self.data[item]image = d["image"]texts = d["caption"]text = [random.choice(texts)]image = image.replace("\\", "/")image = os.path.join(self.root, image)image = Image.open(image).convert("RGB")image_input = self.process(image)text_input = self.tokenizer(text).squeeze(0)out = {"text": text_input,"image": image_input}return out#
cfg_path = "model_configs/TinyCLIP-ViT-40M-32-Text-19M.json"
clip = MiniClip(cfg_path)for k, v in clip.named_parameters():print(k, v.shape)state_dict = torch.load("/data/gongoubo/MiniClip/model_hub/wkcn/TinyCLIP-ViT-40M-32-Text-19M-LAION400M.pt",map_location="cpu")
new_state_dict = {}
for k, v in state_dict["state_dict"].items():if "visual" in k:new_state_dict[k.replace("module", "image_encoder")] = velif "logit_scale" in k:new_state_dict[k.replace("module", "logit_scale")] = velse:new_state_dict[k.replace("module", "text_encoder")] = v# clip.load_state_dict(new_state_dict, strict=True)num_train_epochs = 2000
train_batch_size = 16# 构建dataloader
train_path = "data/en_val.json"
train_dataset = MiniDataset(train_path, clip.image_encoder.visual.image_size)# train_loader = DataLoader(train_dataset, batch_size=train_batch_size, num_workers=8, shuffle=True)training_args = TrainingArguments(output_dir='./checkpoints',  # output directory 结果输出地址num_train_epochs=num_train_epochs,  # total # of training epochs 训练总批次per_device_train_batch_size=train_batch_size,  # batch size per device during training 训练批大小logging_dir='./logs/',  # directory for storing logs 日志存储位置learning_rate=3e-5,  # 学习率save_steps=False,  # 不保存检查点logging_strategy="steps",logging_steps=1,max_grad_norm=1,do_eval=False,do_train=True,
)class MiniTrainer(Trainer):def compute_loss(self, model, inputs, return_outputs=False, num_items_in_batch=None):outputs = model(**inputs)image_features, text_features, logit_scale = outputslogits_per_image = image_features @ text_features.Tlogits_per_text = text_features @ image_features.Tnum_logits = logits_per_image.shape[0]device = image_features.devicelabels = torch.arange(num_logits, device=device, dtype=torch.long)total_loss = (F.cross_entropy(logits_per_image, labels) +F.cross_entropy(logits_per_text, labels)) / 2return total_losstrainer = MiniTrainer(model=clip,  # the instantiated   Transformers model to be trained 需要训练的模型args=training_args,  # training arguments, defined above 训练参数train_dataset=train_dataset,  # training dataset 训练集
)trainer.train()
trainer.save_model()
我们使用transformers的trainer作为训练的基本组件,可以看到整体的代码很简洁,我们需要关注两个地方:数据的预处理和损失函数的计算。
在数据的预处理阶段,我们使用Datsets库,最终返回每一条样本是经过文本预处理和图片预处理。
在编写自定义的trainer时,我们要重写trainer的compute_loss方法。在compute_loss中,输入inputs是带有batch维度的,传入给模型的forward。构建标签时,对角线上的标签为1,其余位置为0。
训练完成后,会将模型保存在checkpoints下。另外,需要注意的是,为了能够快速验证我们训练的效果,我们这里使用en_val作为训练集,同时也在上面进行测试。
2.3 使用训练好的模型
训练好的模型的权重已经和我们自己定义的模型权重名称是对应的了,因此我们不必再进行转换,使用以下代码加载即可:
def load_trained_model(cfg_path, state_dict_path):from safetensors.torch import load_fileclip = MiniClip(cfg_path)# for k, v in clip.named_parameters():# print(k, v.shape)#state_dict = load_file(state_dict_path)for k,v in state_dict.items():print(k, v.shape)clip.load_state_dict(state_dict, strict=True)return clip
我们还是使用flickr/en_val来测试模型:
top1  acc: 30.2
top3  acc: 54.0
top5  acc: 64.9
top10 acc: 79.7
说明训练是正常的。最后,我们构建一个gradio可视化页面来展示下结果:
import gradio as gr
import os
import json
import faiss
import numpy as npfrom model import MiniClip
from PIL import Image
from transform import image_transform
from tokenizer import tokenize
from tqdm import tqdm
from safetensors.torch import load_filecfg_path = "model_configs/TinyCLIP-ViT-40M-32-Text-19M.json"
state_dict_path = "/data/gongoubo/MiniClip/checkpoints/model.safetensors"
clip = MiniClip(cfg_path)state_dict = load_file(state_dict_path)
for k,v in state_dict.items():print(k, v.shape)
clip.load_state_dict(state_dict, strict=True)image_features = np.load("output/image2.npy").astype('float32')
d = image_features.shape[1]
index = faiss.IndexFlatL2(d)
index.add(image_features)
with open("data/en_val.json", "r") as fp:data = json.loads(fp.read())
image_paths = {i:os.path.join("/data/gongoubo/MiniClip/data", d["image"].replace("\\", "/")) for i,d in enumerate(data)}# 处理文本 query -> 特征向量
def encode_text(query):text_input = tokenize(query)text_features = clip.encode_text(text_input, normalized=True)text_features = text_features.detach().cpu().numpy().astype('float32')return text_features# 检索函数
def search_images(query, top_k=20):text_vector = encode_text(query)  # 确保数据类型匹配 FAISSprint(text_vector.shape)_, indices = index.search(text_vector, top_k)  # 检索 top_k 个最相似图片retrieved_images = [Image.open(image_paths[i]) for i in indices[0]]  # 加载图片return retrieved_images# Gradio 界面
with gr.Blocks() as demo:gr.Markdown("##   文本检索图片")with gr.Row():query_input = gr.Textbox(label="输入查询文本")search_button = gr.Button("搜索")gallery = gr.Gallery(label="检索结果", columns=[10], height=300)  # 以网格展示图片search_button.click(fn=search_images, inputs=[query_input], outputs=[gallery])# 运行 Gradio
demo.launch(server_name="0.0.0.0", server_port=7860)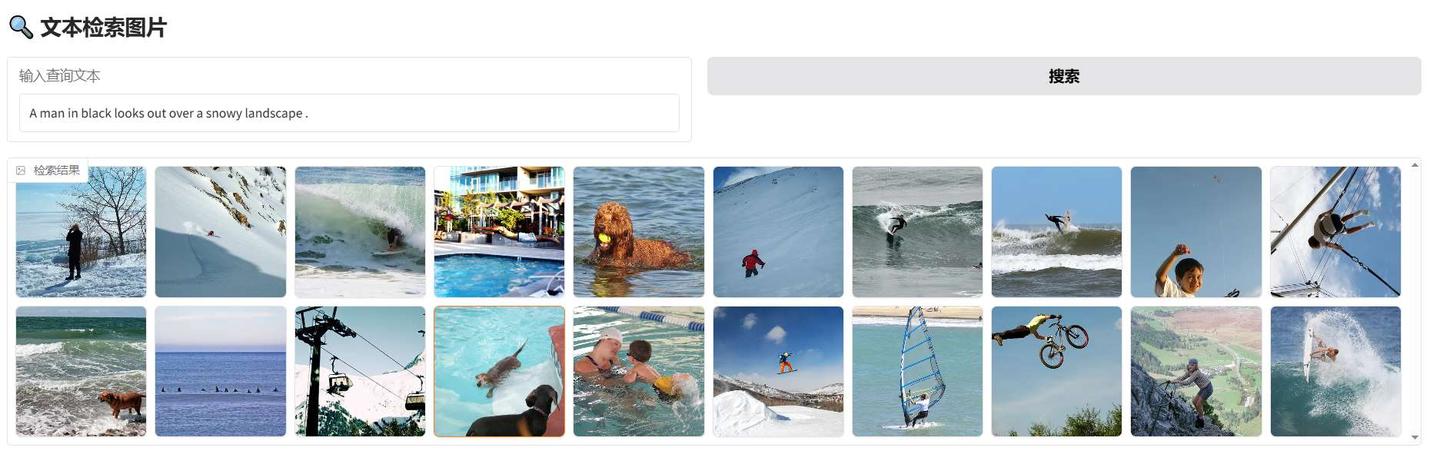
3. 总结
到这里,你已经基本了解了CLIP的基本原理,并且能够自己动手训练一个简单的CLIP模型。整体上来看,代码比较简单,但是已经基本覆盖到CLIP的整体训练流程了。另外,如果需要实际的落地,建议还是使用openclip等更加成熟的框架。