合肥网站建设电话百度百科官网首页
目录
- 0 前言
- 1 配置环境
- 1.1 安装conda
- 1.2 创建虚拟环境
- 1.3 安装vLLM
- 1.4 克隆项目到本地
- 1.5 安装其他依赖库
- 1.6 其他报错信息及解决方法
- 1.6.1 安装transformers、trl、lighteval报错
- 1.6.2 libnvJitLink.so.12报错
- 1.6.3 nvcc版本错误
- 1.6.4 flash-attention安装卡住
- 2 训练
- 2.1 准备数据集
- 2.2 下载base模型
- 2.3 训练
- 2.2.1 通过命令行训练
- 2.2.2 Train via YAML config
0 前言
最近DeepSeek-R1太火里,HuggingFace复现了R1,并将教程放到GitHub上里,我们趁热打铁,也来复现一下。
在复现过程中,踩了很多坑,在这里记录下来,大家可以跟着一步步操作避坑。
Open R1项目地址:https://github.com/huggingface/open-r1
1 配置环境
首先,我们先配置环境。
1.1 安装conda
安装教程可以参考:Linux服务器安装Anaconda + Pytorch + 本地VS Code + 本地Pycharm + Tensorflow
1.2 创建虚拟环境
conda create -n openr1 python=3.11
激活环境:
conda activate openr1
1.3 安装vLLM
可以通过阿里云安装:
pip install vllm==0.7.2 -i https://mirrors.aliyun.com/pypi/simple/
如果终端还是下载太慢,可以到清华源下载安装包离线安装,例如安装torch:
1. 打开https://pypi.tuna.tsinghua.edu.cn/simple/torch/网页,搜索对应到安装包:torch-2.5.1-cp311-cp311-manylinux1_x86_64.whl
2. 离线安装:pip install torch-2.5.1-cp311-cp311-manylinux1_x86_64.whl
哪个安装包下载较慢,就到清华源对应到文件夹里下载对应到安装包。
如何快速在清华源(https://pypi.tuna.tsinghua.edu.cn/simple/)中找到对应到文件夹?
可以根据安装包名称快速找到,例如安装包:nvidia_cublas_cu12-12.4.5.8-py3-none-manylinux2014_x86_64.whl,第一个“-”字符之前的就是对应到文件夹:“nvidia_cublas_cu12”,需要将下划线“_”改成“-”,即最终的文件夹是:“nvidia-cublas-cu12”。点进去该文件夹,找到对应到安装包,单击即可下载。
我的终端下载以下依赖库较慢,大家也可以提前下载好:
pip install torchvision-0.20.1-cp311-cp311-manylinux1_x86_64.whl torchaudio-2.5.1-cp311-cp311-manylinux1_x86_64.whl mpmath-1.3.0-py3-none-any.whl triton-3.1.0-cp311-cp311-manylinux_2_17_x86_64.manylinux2014_x86_64.whl sympy-1.13.1-py3-none-any.whl nvidia_nvjitlink_cu12-12.4.127-py3-none-manylinux2014_x86_64.whl nvidia_nccl_cu12-2.21.5-py3-none-manylinux2014_x86_64.whl nvidia_cusparse_cu12-12.3.1.170-py3-none-manylinux2014_x86_64.whl nvidia_cusolver_cu12-11.6.1.9-py3-none-manylinux2014_x86_64.whl nvidia_curand_cu12-10.3.5.147-py3-none-manylinux2014_x86_64.whl nvidia_cufft_cu12-11.2.1.3-py3-none-manylinux2014_x86_64.whl nvidia_cudnn_cu12-9.1.0.70-py3-none-manylinux2014_x86_64.whl nvidia_cuda_nvrtc_cu12-12.4.127-py3-none-manylinux2014_x86_64.whl nvidia_cuda_cupti_cu12-12.4.127-py3-none-manylinux2014_x86_64.whl nvidia_cublas_cu12-12.4.5.8-py3-none-manylinux2014_x86_64.whl torch-2.5.1-cp311-cp311-manylinux1_x86_64.whl
1.4 克隆项目到本地
git clone https://github.com/huggingface/open-r1.git
进入工程:
cd open-r1
1.5 安装其他依赖库
我们先安装其他依赖库:
pip install transformers trl lighteval -i https://mirrors.aliyun.com/pypi/simple/
将下面的代码拷贝覆盖setup.py文件:
# Copyright 2025 The HuggingFace Team. All rights reserved.
#
# Licensed under the Apache License, Version 2.0 (the "License");
# you may not use this file except in compliance with the License.
# You may obtain a copy of the License at
#
#     http://www.apache.org/licenses/LICENSE-2.0
#
# Unless required by applicable law or agreed to in writing, software
# distributed under the License is distributed on an "AS IS" BASIS,
# WITHOUT WARRANTIES OR CONDITIONS OF ANY KIND, either express or implied.
# See the License for the specific language governing permissions and
# limitations under the License.
#
# Adapted from huggingface/transformers: https://github.com/huggingface/transformers/blob/21a2d900eceeded7be9edc445b56877b95eda4ca/setup.pyimport re
import shutil
from pathlib import Pathfrom setuptools import find_packages, setup# Remove stale open_r1.egg-info directory to avoid https://github.com/pypa/pip/issues/5466
stale_egg_info = Path(__file__).parent / "open_r1.egg-info"
if stale_egg_info.exists():print(("Warning: {} exists.\n\n""If you recently updated open_r1, this is expected,\n""but it may prevent open_r1 from installing in editable mode.\n\n""This directory is automatically generated by Python's packaging tools.\n""I will remove it now.\n\n""See https://github.com/pypa/pip/issues/5466 for details.\n").format(stale_egg_info))shutil.rmtree(stale_egg_info)# IMPORTANT: all dependencies should be listed here with their version requirements, if any.
#   * If a dependency is fast-moving (e.g. transformers), pin to the exact version
_deps = ["accelerate>=1.2.1","bitsandbytes>=0.43.0","datasets>=3.2.0","deepspeed==0.15.4","distilabel[vllm,ray,openai]>=1.5.2","einops>=0.8.0","flake8>=6.0.0",# "flash_attn>=2.7.4.post1","hf_transfer>=0.1.4","huggingface-hub[cli]>=0.19.2,<1.0","isort>=5.12.0","latex2sympy2_extended>=1.0.6","liger_kernel==0.5.2",# "lighteval @ git+https://github.com/huggingface/lighteval.git@86f62259f105ae164f655e0b91c92a823a742724#egg=lighteval[math]","lighteval","math-verify==0.5.2",  # Used for math verification in grpo"packaging>=23.0","parameterized>=0.9.0","peft>=0.14.0","pytest","ruff>=0.9.0","safetensors>=0.3.3","sentencepiece>=0.1.99","torch==2.5.1",# "transformers @ git+https://github.com/huggingface/transformers.git@main",# "trl @ git+https://github.com/huggingface/trl.git@main","transformers","trl","vllm==0.7.1","wandb>=0.19.1",
]# this is a lookup table with items like:
#
# tokenizers: "tokenizers==0.9.4"
# packaging: "packaging"
#
# some of the values are versioned whereas others aren't.
deps = {b: a for a, b in (re.findall(r"^(([^!=<>~ \[\]]+)(?:\[[^\]]+\])?(?:[!=<>~ ].*)?$)", x)[0] for x in _deps)}def deps_list(*pkgs):return [deps[pkg] for pkg in pkgs]extras = {}
extras["tests"] = deps_list("pytest", "parameterized", "math-verify")
extras["torch"] = deps_list("torch")
extras["quality"] = deps_list("ruff", "isort", "flake8")
# extras["train"] = deps_list("flash_attn")
extras["eval"] = deps_list("lighteval", "math-verify")
extras["dev"] = extras["quality"] + extras["tests"] + extras["eval"] ## + extras["train"]# core dependencies shared across the whole project - keep this to a bare minimum :)
install_requires = [deps["accelerate"],deps["bitsandbytes"],deps["einops"],deps["datasets"],deps["deepspeed"],deps["hf_transfer"],deps["huggingface-hub"],deps["latex2sympy2_extended"],deps["math-verify"],deps["liger_kernel"],deps["packaging"],  # utilities from PyPA to e.g., compare versionsdeps["safetensors"],deps["sentencepiece"],deps["transformers"],deps["trl"],
]setup(name="open-r1",version="0.1.0.dev0",  # expected format is one of x.y.z.dev0, or x.y.z.rc1 or x.y.z (no to dashes, yes to dots)author="The Hugging Face team (past and future)",author_email="lewis@huggingface.co",description="Open R1",long_description=open("README.md", "r", encoding="utf-8").read(),long_description_content_type="text/markdown",keywords="llm inference-time compute reasoning",license="Apache",url="https://github.com/huggingface/open-r1",package_dir={"": "src"},packages=find_packages("src"),zip_safe=False,extras_require=extras,python_requires=">=3.10.9",install_requires=install_requires,classifiers=["Development Status :: 3 - Alpha","Intended Audience :: Developers","Intended Audience :: Education","Intended Audience :: Science/Research","License :: OSI Approved :: Apache Software License","Operating System :: OS Independent","Programming Language :: Python :: 3","Programming Language :: Python :: 3.10","Topic :: Scientific/Engineering :: Artificial Intelligence",],
)
然后在open-r1文件夹里运行以下命令,等待即可:
pip install -e ".[dev]" -i https://mirrors.aliyun.com/pypi/simple/
1.6 其他报错信息及解决方法
1.6.1 安装transformers、trl、lighteval报错
如果安装过程中报以下错误:
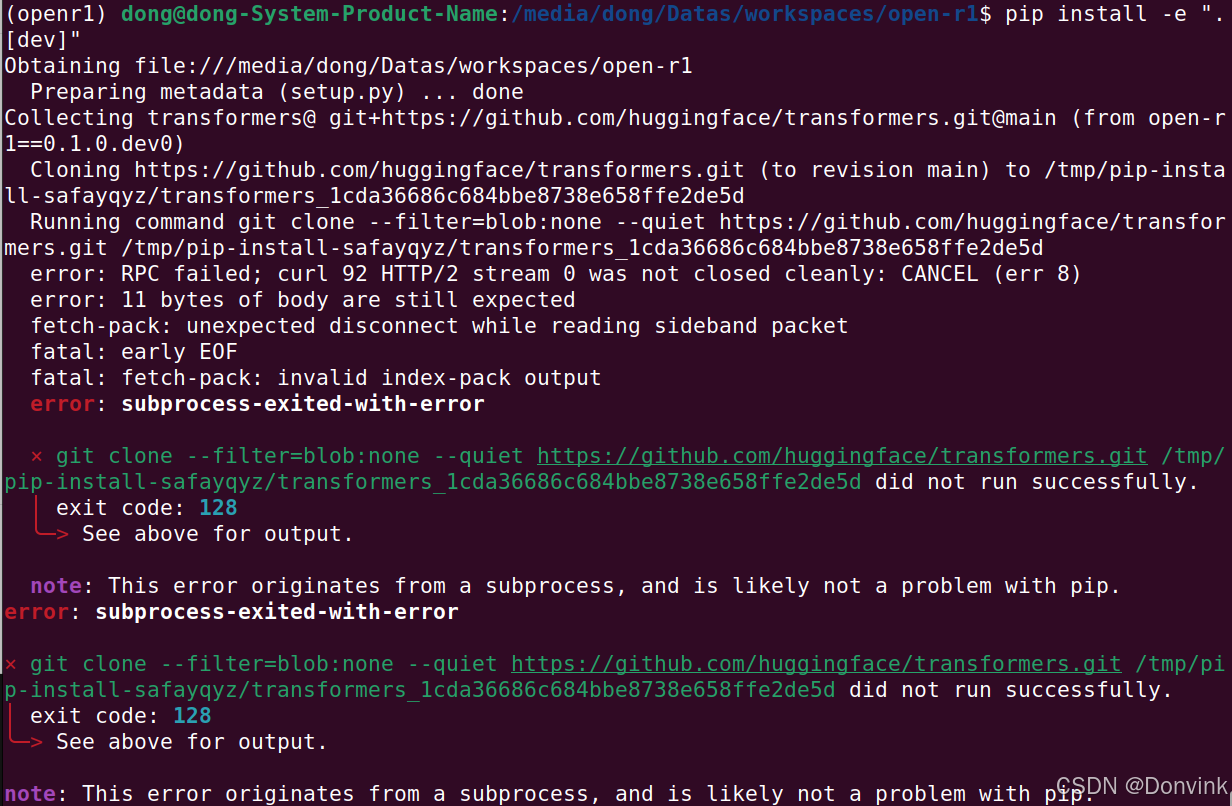
解决方法如下:
- 可以先把其中几个需要安装的库clone到本地再安装:
mkdir deps
cd depsgit clone https://github.com/huggingface/lighteval.git
cd lighteval/ && pip install -e .git clone https://github.com/huggingface/transformers.git
cd transformers/ && pip install -e .git clone https://github.com/huggingface/trl.git
cd trl/ && pip install -e .
-
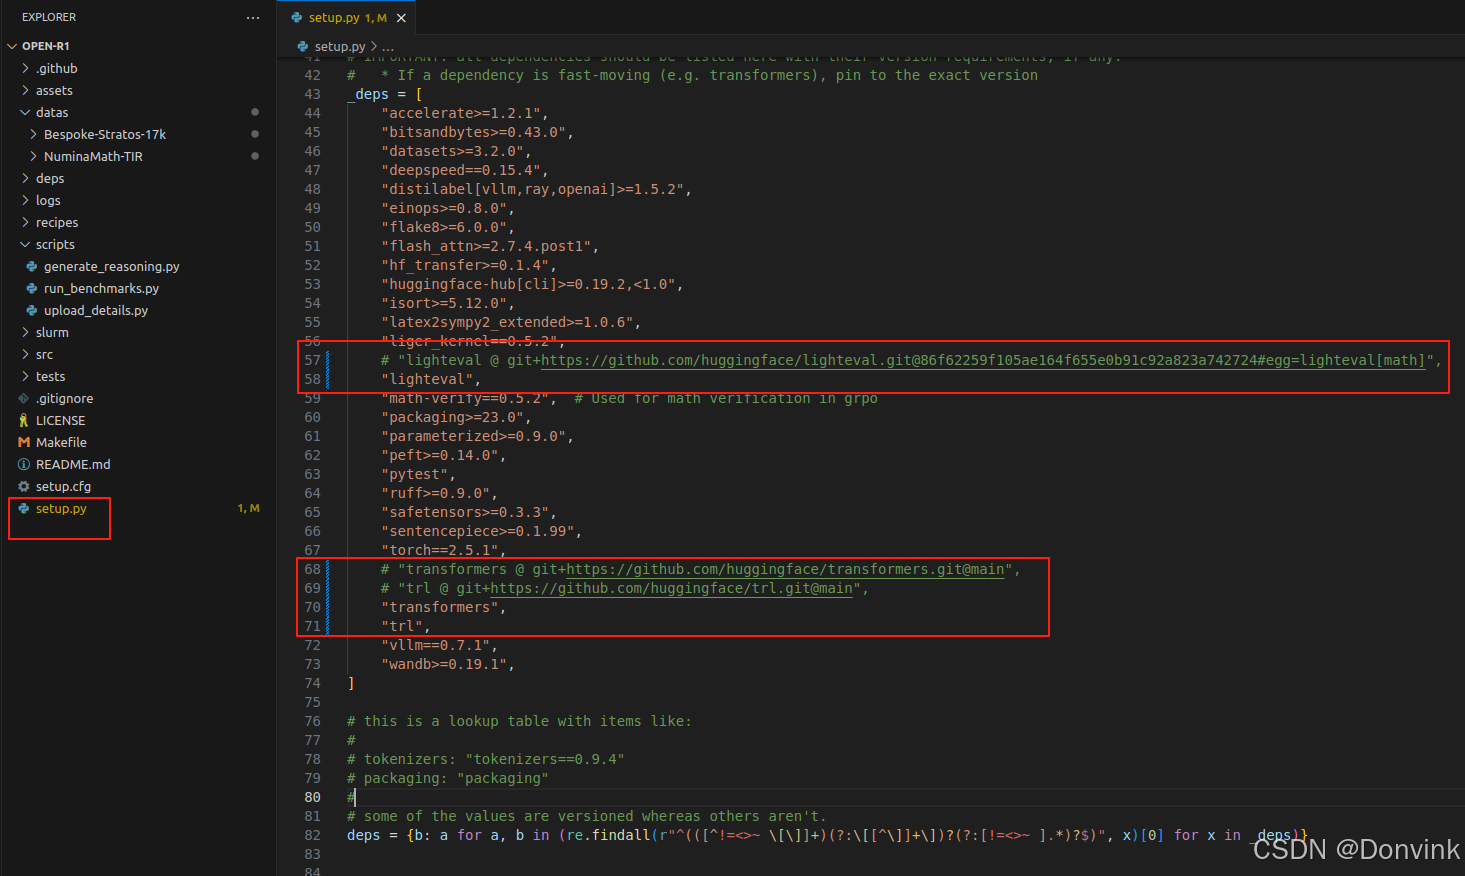
修改setup.py,如下图,即把lighteval、transformers和trl三个库后面git相关的注释掉,只保留库名:
-
再执行:
pip install -e ".[dev]"
1.6.2 libnvJitLink.so.12报错

可能是pytorch依赖没有正确链接,libnvJitLink.so.12的所依赖的链接信息,发现是系统的,其实应该是pytorch安装过程中也安装了配套的nvidia的动态库,但链接的时候没有链接正确。所以,把libnvJitLink.so.12加上nvidia库对应的软链,并把nvjitlink加到动态库中,比如这样:
ln -s /home/dong/miniconda3/envs/openr1/lib/python3.11/site-packages/nvidia/nvjitlink/lib/libnvJitLink.so.12 /home/dong/miniconda3/envs/openr1/lib/python3.11/site-packages/nvidia/cusparse/lib/libnvJitLink.so.12
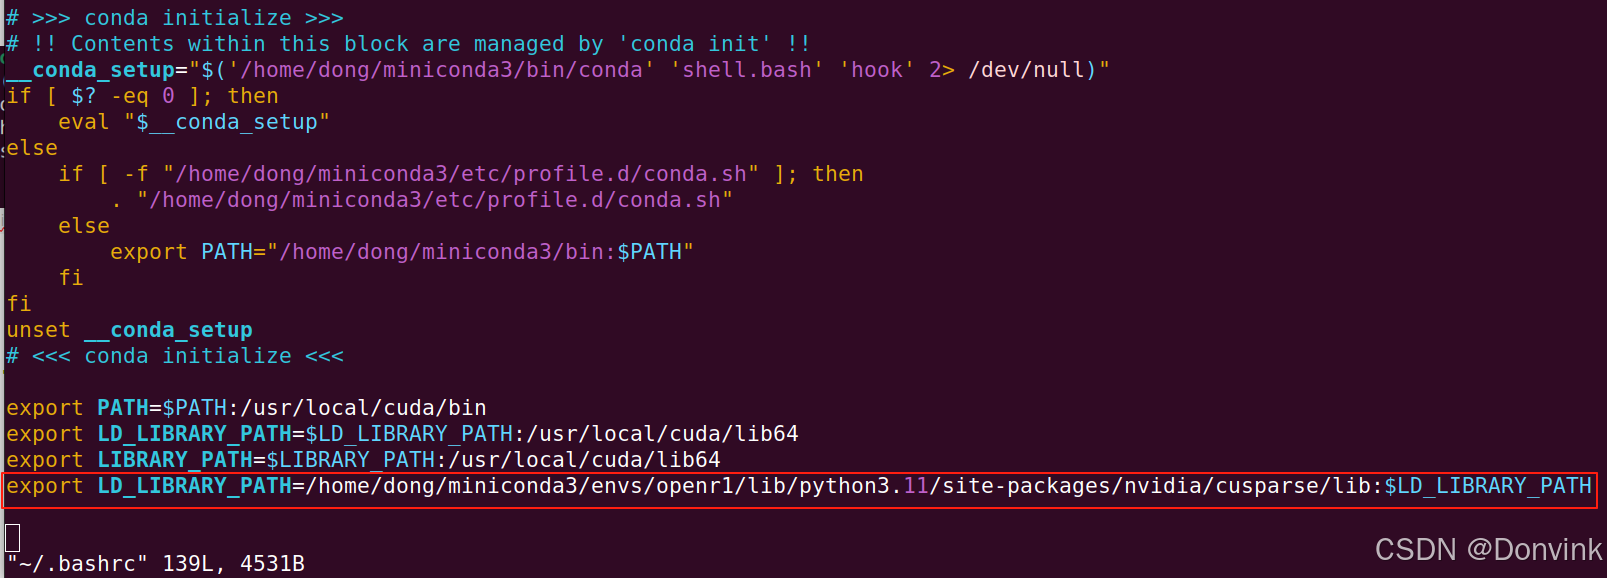
将环境变量添加到~/.bashrc文件里,再source ~/.bashrc应该就可以了:
export LD_LIBRARY_PATH=/home/dong/miniconda3/envs/openr1/lib/python3.11/site-packages/nvidia/cusparse/lib:$LD_LIBRARY_PATH
测试导入torch正常:

再执行:
pip install -e ".[dev]"
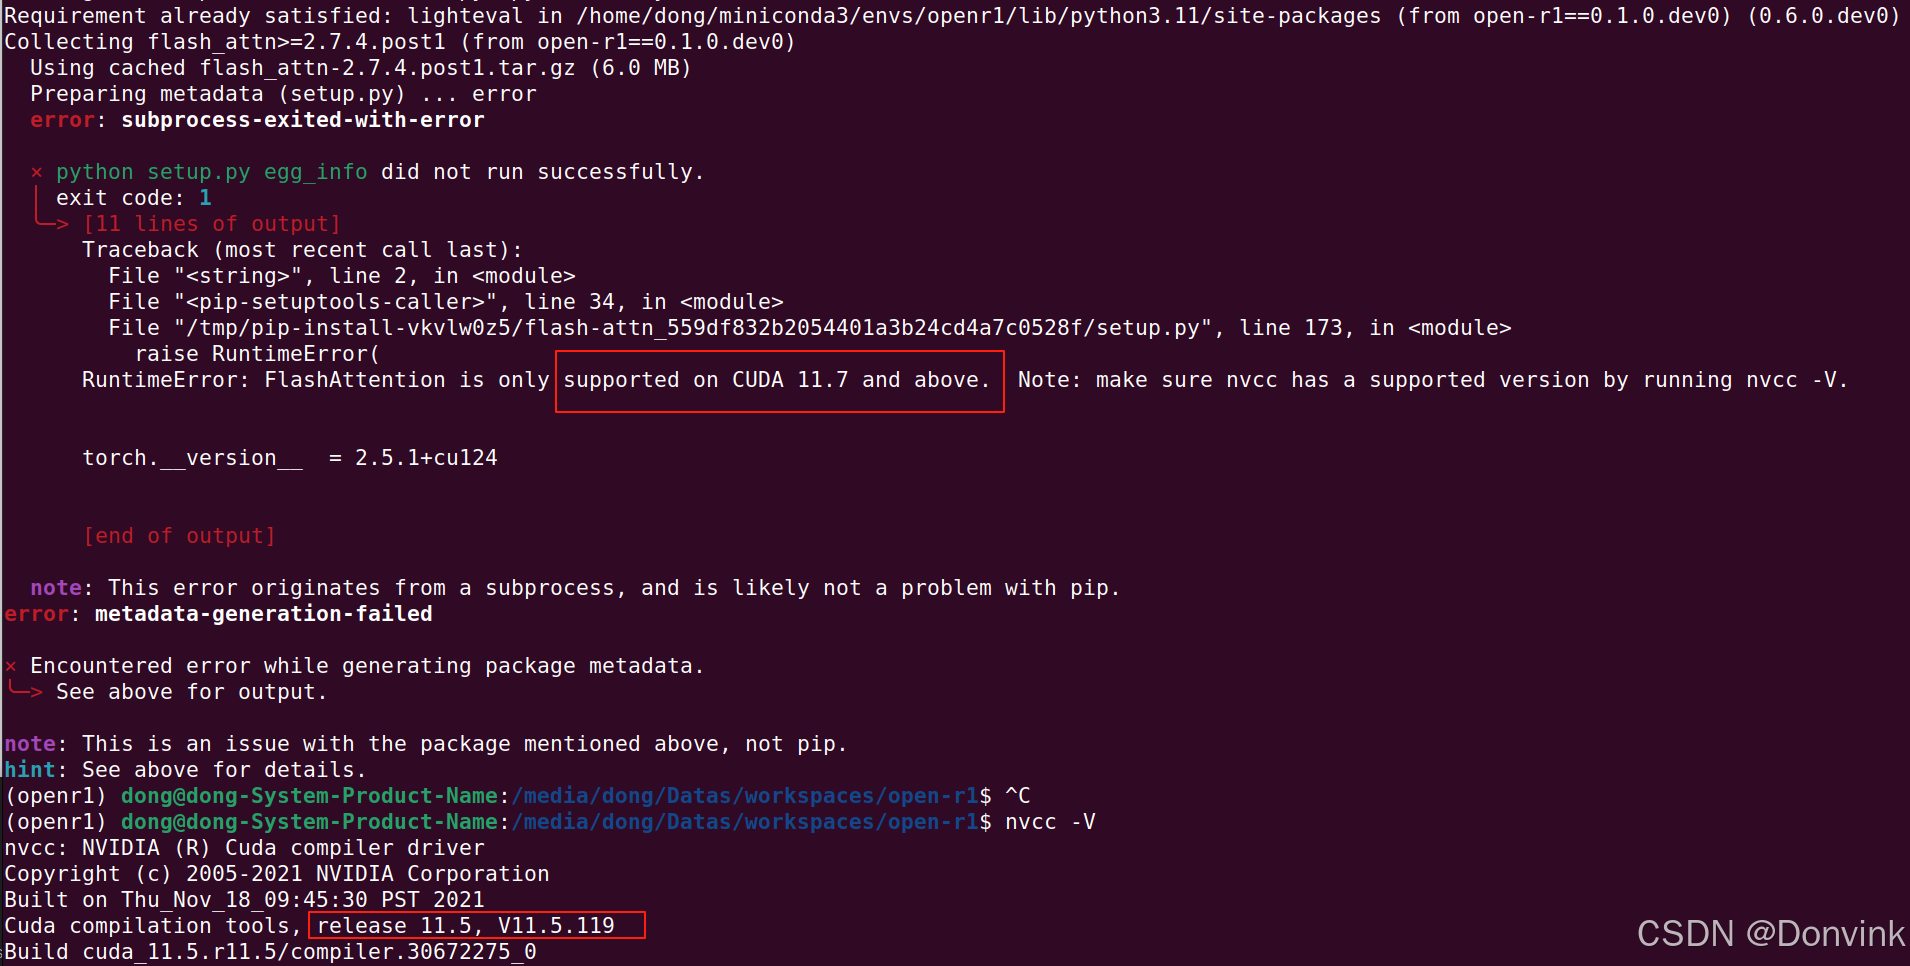
1.6.3 nvcc版本错误
cuda的版本是12.2,但是nvcc的版本是11.5,不符合>=11.7的版本要求。
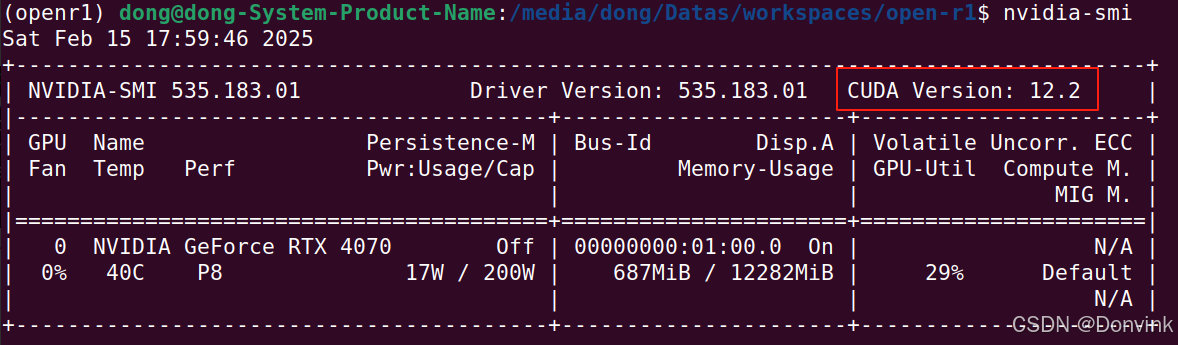
解决方法:
先备份旧的nvcc,再链接到cuda 12.2的nvcc。
sudo mv /usr/bin/nvcc /usr/bin/nvcc-bk
sudo ln -s /usr/local/cuda-12.2/bin/nvcc /usr/bin/nvcc
运行 nvcc -V,可以看到版本正常了。

1.6.4 flash-attention安装卡住
查找了一系列资料,尝试了一堆方法,暂时没解决,因为SFT没用到flash-attention库,暂时搁置,等解决后再跑GRPO版本训练代码。
2 训练
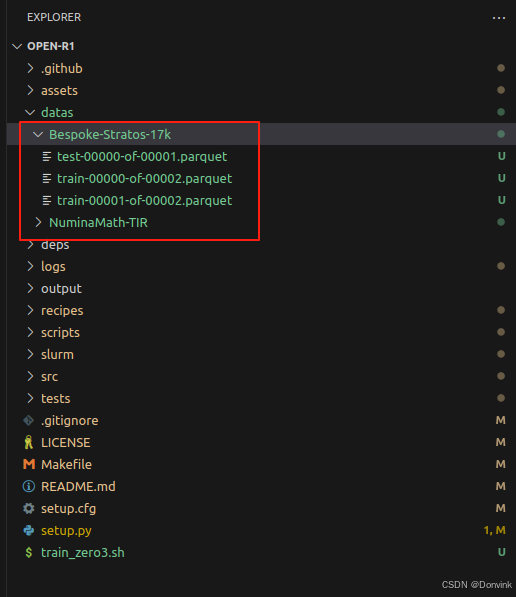
2.1 准备数据集
需要下载 Bespoke-Stratos-17k数据集。
数据集地址:(https://huggingface.co/datasets/HuggingFaceH4/Bespoke-Stratos-17k/tree/main/data)
https://huggingface.co/datasets/HuggingFaceH4/Bespoke-Stratos-17k
-
下载方法1:
直接clone到本地。 -
下载方法2:
到[https://huggingface.co/datasets/HuggingFaceH4/Bespoke-Stratos-17k/tree/main/data]这里,点击下载按钮,手动下载3个训练和测试文件。
在open-r1根目录下创建 Bespoke-Stratos-17k 文件夹,将上面三个数据集文件存于该文件夹中。
2.2 下载base模型
需要下载 千问模型:https://huggingface.co/Qwen/Qwen2.5-1.5B-Instruct/tree/main。
2.3 训练
参数说明:recipes/accelerate_configs/zero3.yaml
因为我只有一张4070显卡,所以将num_processes设置成1,其他不变。
compute_environment: LOCAL_MACHINE
debug: false
deepspeed_config:deepspeed_multinode_launcher: standardoffload_optimizer_device: noneoffload_param_device: nonezero3_init_flag: truezero3_save_16bit_model: truezero_stage: 3
distributed_type: DEEPSPEED
downcast_bf16: 'no'
machine_rank: 0
main_training_function: main
mixed_precision: bf16
num_machines: 1
num_processes: 1		# 卡数,原始是8卡
rdzv_backend: static
same_network: true
tpu_env: []
tpu_use_cluster: false
tpu_use_sudo: false
use_cpu: false
2.2.1 通过命令行训练
accelerate launch --config_file=recipes/accelerate_configs/zero3.yaml src/open_r1/sft.py \--model_name_or_path Qwen/Qwen2.5-1.5B-Instruct \--dataset_name HuggingFaceH4/Bespoke-Stratos-17k \--learning_rate 2.0e-5 \--num_train_epochs 1 \--packing \--max_seq_length 4096 \--per_device_train_batch_size 2 \--gradient_accumulation_steps 8 \--gradient_checkpointing \--bf16 \--output_dir data/Qwen2.5-1.5B-Open-R1-Distill
参数说明:
- –model_name_or_path
需要微调的模型路径,例如,我将千问模型保存在/media/dong/Datas/Projects/Qwen2.5-1.5B-Instruct/,则此处的参数需要改成:
--model_name_or_path /media/dong/Datas/Projects/Qwen2.5-1.5B-Instruct/ \
- –dataset_name
Bespoke-Stratos-17k数据集路径,例如,我将数据集保存在/media/dong/Datas/workspaces/open-r1/datas/Bespoke-Stratos-17k,则此处的参数需要改成:
--dataset_name /media/dong/Datas/workspaces/open-r1/datas/Bespoke-Stratos-17k \
-
–per_device_train_batch_size:batchsize大小,如果显存比较小,可以设置小一点
-
--gradient_accumulation_steps :梯度累计的步数,即每多少步更新一次梯度
2.2.2 Train via YAML config
或者我们也可以通过yaml config来训练:
accelerate launch --config_file recipes/accelerate_configs/zero3.yaml src/open_r1/sft.py \--config recipes/Qwen2.5-1.5B-Instruct/sft/config_demo.yaml
此处我使用第一种方法训练。
大功告成!
