唐山做网站公司数据分析师培训机构
RabbitMQ的应用
- 7种工作模式介绍
- Simple(简单模式)
- Work Queue(⼯作队列)
- Publish/Subscribe(发布/订阅)
- Routing(路由模式)
- Topics(通配符模式)
- RPC(RPC通信)
- Publisher Confirms(发布确认)
- PublishingMessagesIndividually(单独确认)
- Publishing Messages in Batches(批量确认)
- Handling Publisher Confirms Asynchronously(异步确认)
- 三种差异
- 用Spring Boot整合RabbitMQ
- Work Queue(⼯作队列)
- Publish/Subscribe(发布/订阅)
- Routing(路由模式)
- Topics(通配符模式)
7种工作模式介绍
下述代码中要在pom文件中引入依赖
<dependency><groupId>com.rabbitmq</groupId><artifactId>amqp-client</artifactId><version>5.7.3</version>
</dependency>
Simple(简单模式)
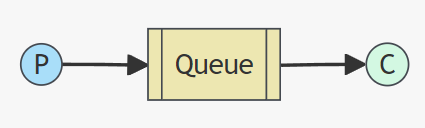
P: ⽣产者, 也就是要发送消息的程序
C: 消费者,消息的接收者
Queue: 消息队列, 图中⻩⾊背景部分. 类似⼀个邮箱, 可以缓存消息; ⽣产者向其中投递消息, 消费者从其中取出消息.
特点: ⼀个⽣产者P,⼀个消费者C, 消息只能被消费⼀次. 也称为点对点(Point-to-Point)模式.
生产者代码在上一期可以看到
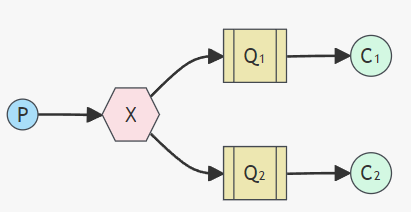
Work Queue(⼯作队列)
⼀个⽣产者P,多个消费者C1,C2. 在多个消息的情况下, Work Queue 会将消息分派给不同的消费者, 每个消费者都会接收到不同的消息.
特点: 消息不会重复, 分配给不同的消费者.
适⽤场景: 集群环境中做异步处理

先声明一个全局变量初始化
public class Constants {
public static final String H0ST = "110.41.51.65";
public static final Integer PORT = 15673;
public static final String VIRTUAL_HOST = "bite";
public static final String USER_NAME = "study";
public static final String PASSwORD = "study";
public static final String WORK_QUEUE_NAME = "work_queues";
然后在创建一个生产者
import com.rabbitmq.client.Channel;
import com.rabbitmq.client.Connection;
import com.rabbitmq.client.ConnectionFactory;
import constant.Constants;
public class WorkRabbitProducer {public static void main(String[] args) throws Exception {//1. 创建channel通道ConnectionFactory factory = new ConnectionFactory();factory.setHost(Constants.HOST);//ip 默认值localhostfactory.setPort(Constants.PORT); //默认值5672factory.setVirtualHost(Constants.VIRTUAL_HOST);//虚拟机名称, 默认 /factory.setUsername(Constants.USER_NAME);//⽤⼾名,默认guestfactory.setPassword(Constants.PASSWORD);//密码, 默认guestConnection connection = factory.newConnection();Channel channel = connection.createChannel();//2. 声明队列//如果没有⼀个这样的⼀个队列, 会⾃动创建, 如果有, 则不创建channel.queueDeclare(Constants.WORK_QUEUE_NAME, true, false, false,
null);//3. 发送消息for (int i = 0; i < 10; i++) {String msg = "Hello World" + i;channel.basicPublish("",Constants.WORK_QUEUE_NAME,null,msg.getBytes());}//4. 释放资源channel.close();connection.close();}}
再次创建一个消费者代码
import com.rabbitmq.client.*;
import constant.Constants;
import java.io.IOException;
public class WorkRabbitmqConsumer1 {public static void main(String[] args) throws Exception {//1. 创建channel通道ConnectionFactory factory = new ConnectionFactory();factory.setHost(Constants.HOST);//ip 默认值localhostfactory.setPort(Constants.PORT); //默认值5672factory.setVirtualHost(Constants.VIRTUAL_HOST);//虚拟机名称, 默认 /factory.setUsername(Constants.USER_NAME);//⽤⼾名,默认guestfactory.setPassword(Constants.PASSWORD);//密码, 默认guestConnection connection = factory.newConnection();Channel channel = connection.createChannel();//2. 声明队列//如果没有⼀个这样的⼀个队列, 会⾃动创建, 如果有, 则不创建channel.queueDeclare(Constants.WORK_QUEUE_NAME, true, false, false,
null);//3. 接收消息, 并消费DefaultConsumer consumer = new DefaultConsumer(channel) {@Overridepublic void handleDelivery(String consumerTag, Envelope envelope,
AMQP.BasicProperties properties, byte[] body) throws IOException {System.out.println("接收到消息: " + new String(body));}};channel.basicConsume(Constants.WORK_QUEUE_NAME, true, consumer);}}

Publish/Subscribe(发布/订阅)
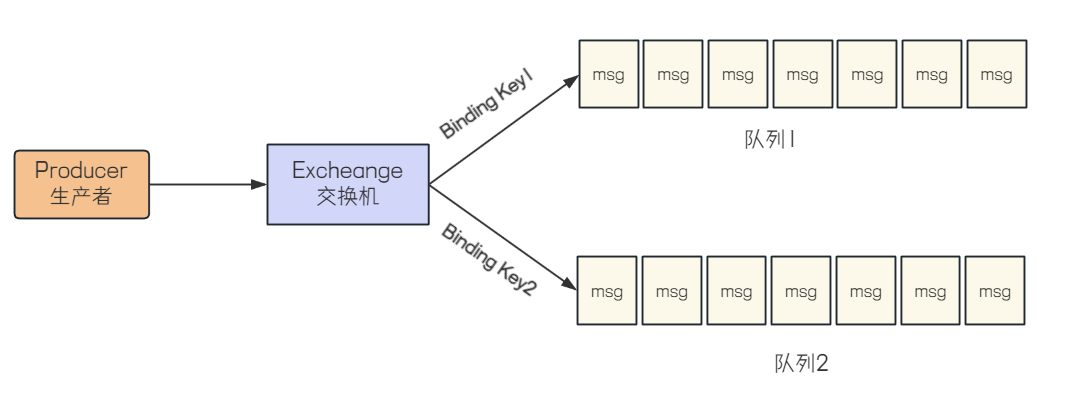
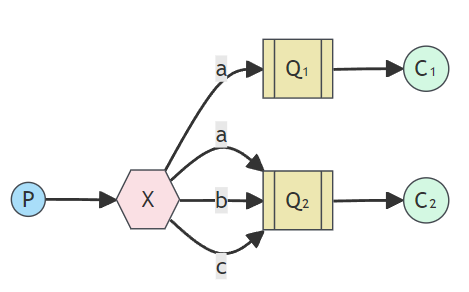
Exchange: 交换机 (X).
作⽤: ⽣产者将消息发送到Exchange, 由交换机将消息按⼀定规则路由到⼀个或多个队列中(上图中⽣产者将消息投递到队列中, 实际上这个在RabbitMQ中不会发⽣. )
RabbitMQ交换机有四种类型: fanout,direct, topic, headers, 不同类型有着不同的路由策略. AMQP协议⾥还有另外两种类型, System和⾃定义, 此处不再描述.
- Fanout:⼴播,将消息交给所有绑定到交换机的队列(Publish/Subscribe模式)
- Direct:定向,把消息交给符合指定routing key的队列(Routing模式)
- Topic:通配符,把消息交给符合routing pattern(路由模式)的队列(Topics模式)
- headers类型的交换器不依赖于路由键的匹配规则来路由消息, ⽽是根据发送的消息内容中的headers属性进⾏匹配. headers类型的交换器性能会很差,⽽且也不实⽤,基本上不会看到它的存在.
Exchange(交换机)只负责转发消息, 不具备存储消息的能⼒, 因此如果没有任何队列与Exchange绑定,或者没有符合路由规则的队列,那么消息就会丢失
RoutingKey: 路由键.⽣产者将消息发给交换器时, 指定的⼀个字符串, ⽤来告诉交换机应该如何处理这个消息.
Binding Key:绑定. RabbitMQ中通过Binding(绑定)将交换器与队列关联起来, 在绑定的时候⼀般会指定⼀个Binding Key, 这样RabbitMQ就知道如何正确地将消息路由到队列了.
 1.在使用绑定的时候,需要的路由键是BindingKey.
2.在发送消息的时候,需要的路由键是RoutingKey.
本课程后续也可能把两者合称为RoutingKey,大家根据使用场景来区分.
代码中用全局声明
public static String FANOUT_EXCHANGE_NAME = "test_fanout";
public static String FANOUT_QUEUE_NAME1 = "fanout_queue1";
public static String FANOUT_QUEUE_NAME2 = "fanout_queue2
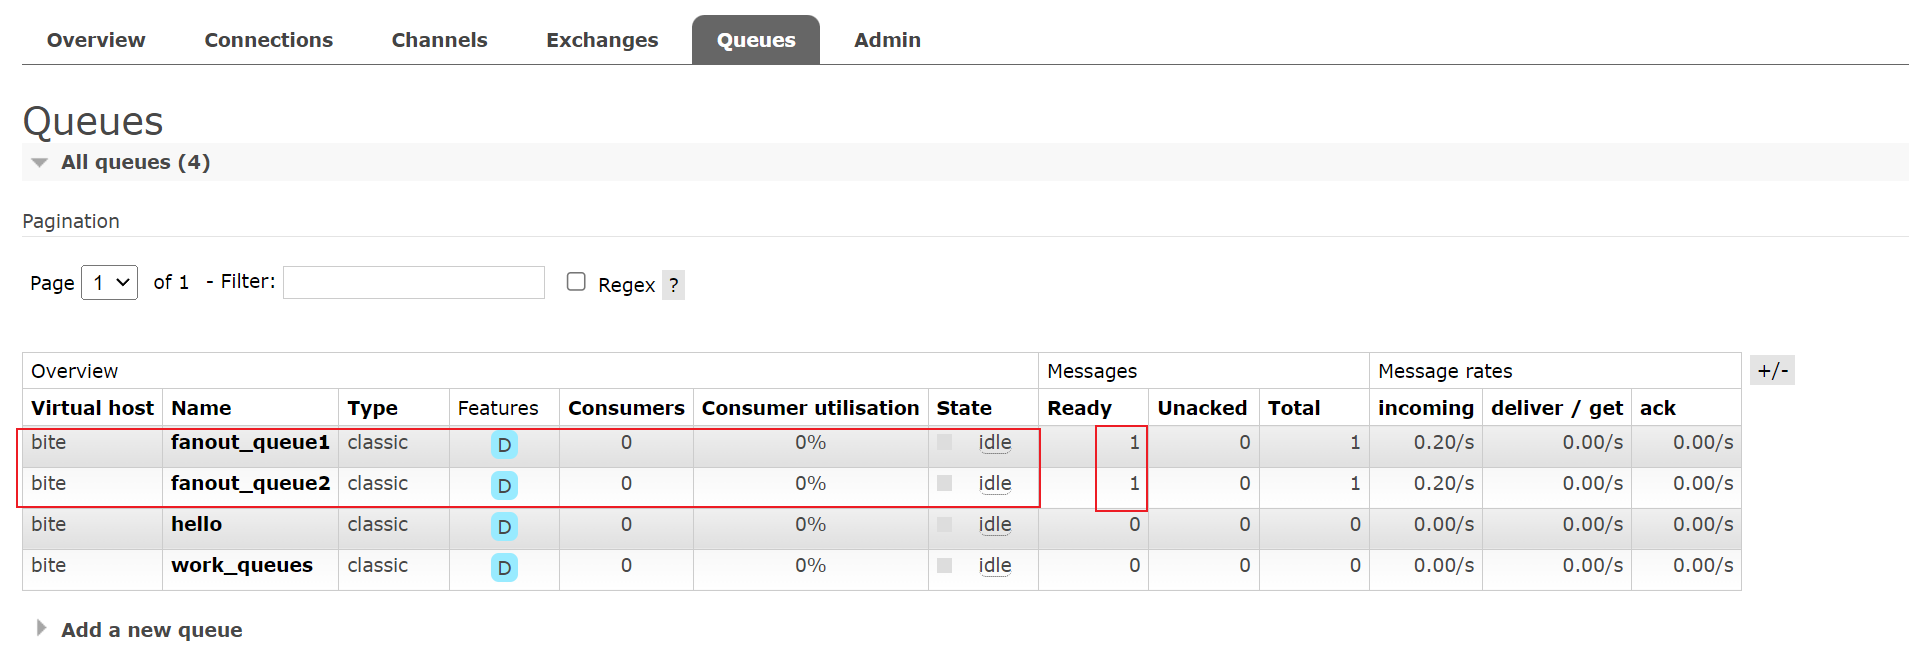
生产者代码
public class FanoutRabbitProducer {public static void main(String[] args) throws Exception {//1. 创建channel通道ConnectionFactory factory = new ConnectionFactory();factory.setHost(Constants.HOST);//ip 默认值localhostfactory.setPort(Constants.PORT); //默认值5672factory.setVirtualHost(Constants.VIRTUAL_HOST);//虚拟机名称, 默认 /factory.setUsername(Constants.USER_NAME);//⽤⼾名,默认guestfactory.setPassword(Constants.PASSWORD);//密码, 默认guestConnection connection = factory.newConnection();Channel channel = connection.createChannel();//2. 创建交换机/*exchangeDeclare(String exchange, BuiltinExchangeType type, boolean
durable, boolean autoDelete, boolean internal, Map<String, Object> arguments)参数:1. exchange:交换机名称2. type:交换机类型* DIRECT("direct"), 定向,直连,routing* * FANOUT("fanout"),扇形(⼴播), 每个队列都能收到消息* TOPIC("topic"),通配符* HEADERS("headers") 参数匹配(⼯作⽤的较少)3. durable: 是否持久化4. autoDelete: ⾃动删除5. internal: 内部使⽤, ⼀般falase6. arguments: 参数*/channel.exchangeDeclare(Constants.FANOUT_EXCHANGE_NAME,
BuiltinExchangeType.FANOUT, true, false, false, null);//3. 声明队列//如果没有⼀个这样的⼀个队列, 会⾃动创建, 如果有, 则不创建channel.queueDeclare(Constants.FANOUT_QUEUE_NAME1, true, false, false,
null);channel.queueDeclare(Constants.FANOUT_QUEUE_NAME2, true, false, false,
null);//4. 绑定队列和交换机/*queueBind(String queue, String exchange, String routingKey,
Map<String, Object> arguments)参数:1. queue: 队列名称2. exchange: 交换机名称3. routingKey: 路由key, 路由规则如果交换机类型为fanout,routingkey设置为"",表⽰每个消费者都可以收到全部信息*/channel.queueBind(Constants.FANOUT_QUEUE_NAME1,Constants.FANOUT_EXCHANGE_NAME,
"");channel.queueBind(Constants.FANOUT_QUEUE_NAME2,Constants.FANOUT_EXCHANGE_NAME,
"");//5. 发送消息/*** basicPublish(String exchange, String routingKey,
AMQP.BasicProperties props, byte[] body)* 参数说明:* Exchange: 交换机名称* routingKey: 如果交换机类型为fanout,routingkey设置为"",表⽰每个消费者都可以
收到全部信息*/String msg = "hello fanout";channel.basicPublish(Constants.FANOUT_EXCHANGE_NAME,"",null,msg.getBytes());
channel.close();connection.close();}}
消费者代码
import com.rabbitmq.client.*;
import constant.Constants;
import java.io.IOException;
public class FanoutRabbitmqConsumer1 {public static void main(String[] args) throws Exception {//1. 创建channel通道ConnectionFactory factory = new ConnectionFactory();factory.setHost(Constants.HOST);//ip 默认值localhostfactory.setPort(Constants.PORT); //默认值5672factory.setVirtualHost(Constants.VIRTUAL_HOST);//虚拟机名称, 默认 /factory.setUsername(Constants.USER_NAME);//⽤⼾名,默认guestfactory.setPassword(Constants.PASSWORD);//密码, 默认guestConnection connection = factory.newConnection();Channel channel = connection.createChannel();//2. 接收消息, 并消费DefaultConsumer consumer = new DefaultConsumer(channel) {@Overridepublic void handleDelivery(String consumerTag, Envelope envelope,
AMQP.BasicProperties properties, byte[] body) throws IOException {System.out.println("接收到消息: " + new String(body));}};channel.basicConsume(Constants.FANOUT_QUEUE_NAME1, true, consumer);}

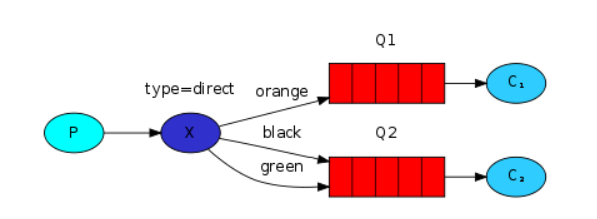
Routing(路由模式)
路由模式是发布订阅模式的变种, 在发布订阅基础上, 增加路由key
发布订阅模式是⽆条件的将所有消息分发给所有消费者, 路由模式是Exchange根据RoutingKey的规则,将数据筛选后发给对应的消费者队列
适合场景: 需要根据特定规则分发消息的场景
生产者代码
创建交换机
channel.exchang
BuiltinExchangeType.DIRECT, true,false,,false, null);
声明队列
channel.queueDeclare(Constants.DIRECT_QUEUE_NAME1, true, false, false, null);
channel.queueDeclare(Constants.DIRECT_QUEUE_NAME2, true, false, false, null);
绑定交换机和队列
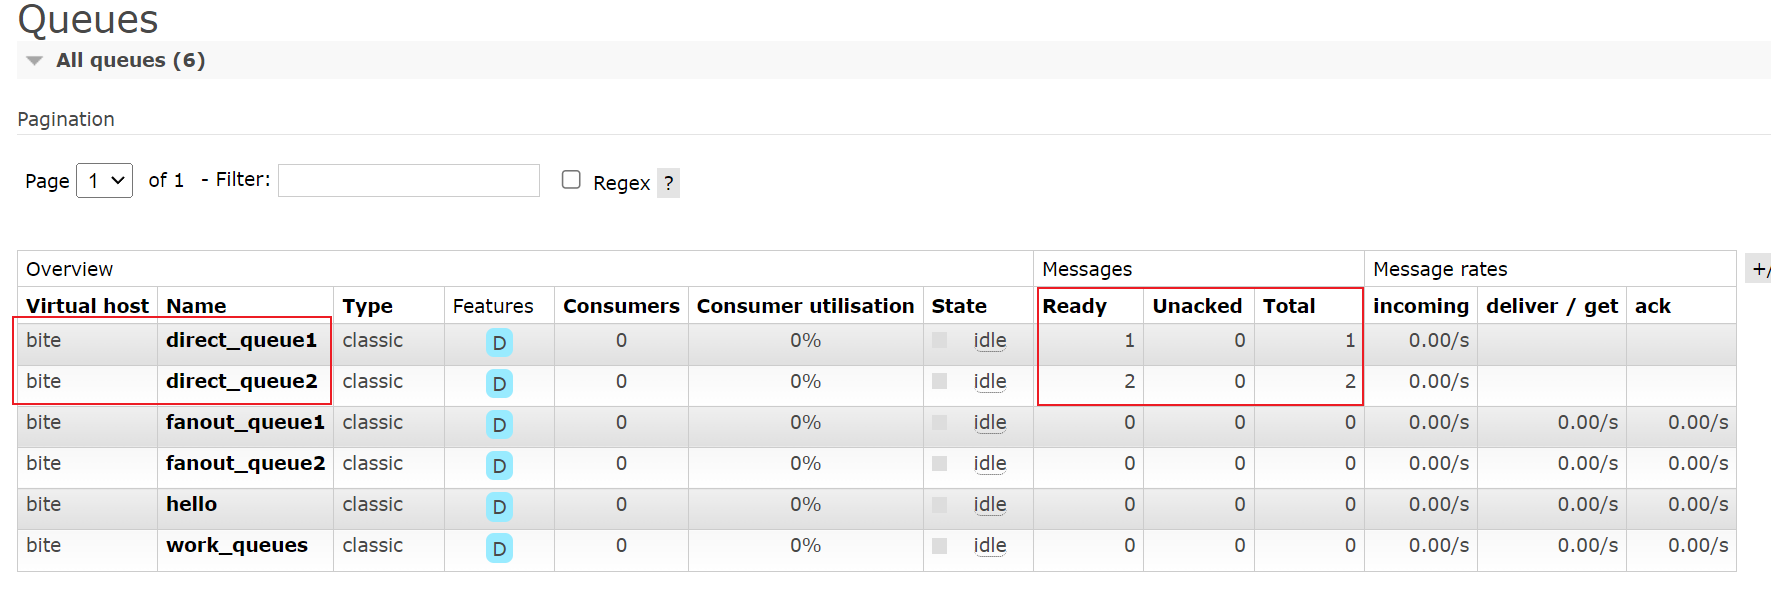
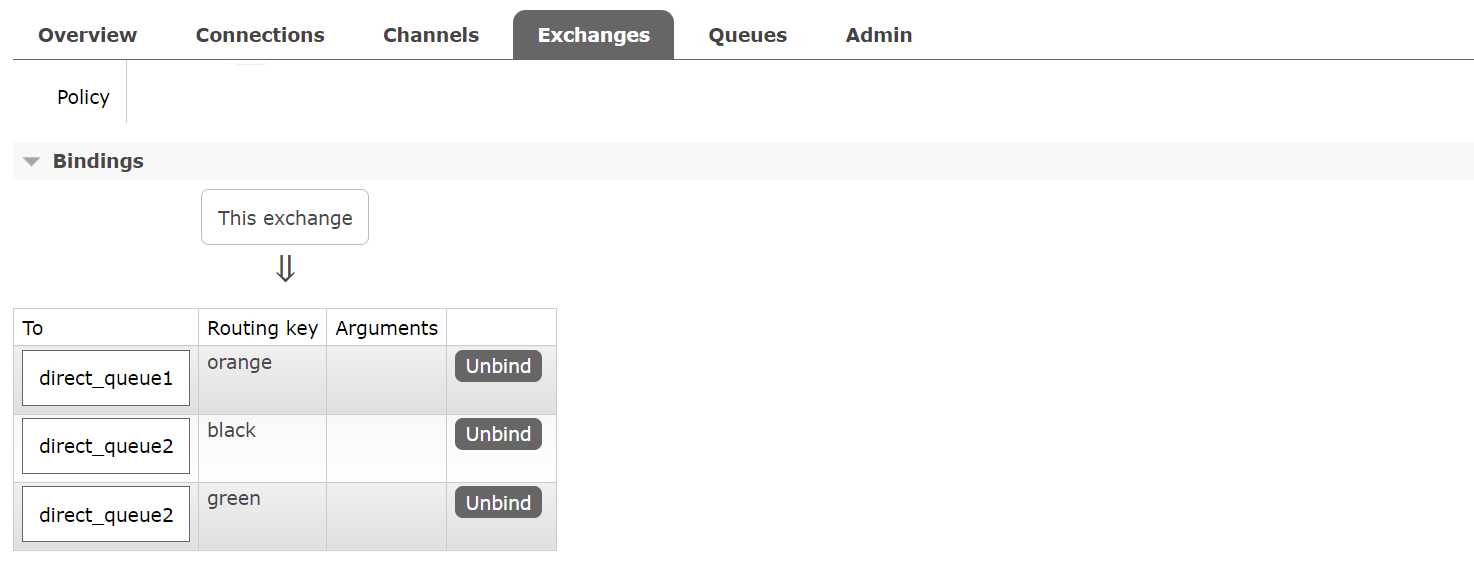
//队列1绑定orange
channel.queueBind(Constants.DIRECT_QUEUE_NAME1,Constants.DIRECT_EXCHANGE_NAME,
"orange");
//队列2绑定black,green
channel.queueBind(Constants.DIRECT_QUEUE_NAME2,Constants.DIRECT_EXCHANGE_NAME,
"black");
channel.queueBind(Constants.DIRECT_QUEUE_NAME2,Constants.DIRECT_EXCHANGE_NAME,
green
发送消息
//发送消息时,指定RoutingKey
String msg = "hello direct, I am orange";
channel.basicPublish(Constants.DIRECT_EXCHANGE_NAME,"orange",null, msg·getBytes(
));
String msg_black = "hello direct,I am black";
channel.basicPublish(Constants.DIRECT_EXCHANGE_NAME,"black", null,msg_black.getB
ytes());
String msg-green= "hello direct, I am green";
channel.basicPublish(Constants.DIRECT_EXCHANGE_NAME,"green", nuLl,msg-green.getB
ytes());
声明交换机和队列
public static String DIRECT_EXCHANGE_NAME = "test_direct";
public static String DIRECT_QUEUE_NAME1 = "direct_queue1";
public static String DIRECT_QUEUE_NAME2 = "direct_queue2";
生产者代码
import com.rabbitmq.client.BuiltinExchangeType;
import com.rabbitmq.client.Channel;
import com.rabbitmq.client.Connection;
import com.rabbitmq.client.ConnectionFactory;
import constant.Constants;
public class DirectRabbitProducer {public static void main(String[] args) throws Exception {//1. 创建channel通道ConnectionFactory factory = new ConnectionFactory();factory.setHost(Constants.HOST);//ip 默认值localhostfactory.setPort(Constants.PORT); //默认值5672factory.setVirtualHost(Constants.VIRTUAL_HOST);//虚拟机名称, 默认 /factory.setUsername(Constants.USER_NAME);//⽤⼾名,默认guestfactory.setPassword(Constants.PASSWORD);//密码, 默认guestConnection connection = factory.newConnection();Channel channel = connection.createChannel();//2. 创建交换机channel.exchangeDeclare(Constants.DIRECT_EXCHANGE_NAME,
BuiltinExchangeType.FANOUT, true, false, false, null);//3. 声明队列//如果没有⼀个这样的⼀个队列, 会⾃动创建, 如果有, 则不创建channel.queueDeclare(Constants.DIRECT_QUEUE_NAME1, true, false, false,
null);channel.queueDeclare(Constants.DIRECT_QUEUE_NAME2, true, false, false,
null);
//4. 绑定队列和交换机//队列1绑定orangechannel.queueBind(Constants.DIRECT_QUEUE_NAME1,Constants.DIRECT_EXCHANGE_NAME,
"orange");//队列2绑定black, greenchannel.queueBind(Constants.DIRECT_QUEUE_NAME2,Constants.DIRECT_EXCHANGE_NAME,
"black");channel.queueBind(Constants.DIRECT_QUEUE_NAME2,Constants.DIRECT_EXCHANGE_NAME,
"green");//5. 发送消息String msg = "hello direct, I am orange";channel.basicPublish(Constants.DIRECT_EXCHANGE_NAME,"orange",null,msg.getBytes(
));String msg_black = "hello direct,I am black";channel.basicPublish(Constants.DIRECT_EXCHANGE_NAME,"black",null,msg_black.getB
ytes());String msg_green= "hello direct, I am green";channel.basicPublish(Constants.DIRECT_EXCHANGE_NAME,"green",null,msg_green.getB
ytes());//6.释放资源channel.close();connection.close();}}
消费者代码
mport com.rabbitmq.client.*;
import constant.Constants;
import java.io.IOException;
public class DirectRabbitmqConsumer1 {public static void main(String[] args) throws Exception {//1. 创建channel通道ConnectionFactory factory = new ConnectionFactory();factory.setHost(Constants.HOST);//ip 默认值localhostfactory.setPort(Constants.PORT); //默认值5672factory.setVirtualHost(Constants.VIRTUAL_HOST);//虚拟机名称, 默认 /factory.setUsername(Constants.USER_NAME);//⽤⼾名,默认guestfactory.setPassword(Constants.PASSWORD);//密码, 默认guestConnection connection = factory.newConnection();Channel channel = connection.createChannel();//2. 接收消息, 并消费DefaultConsumer consumer = new DefaultConsumer(channel) {@Overridepublic void handleDelivery(String consumerTag, Envelope envelope,
AMQP.BasicProperties properties, byte[] body) throws IOException {System.out.println("接收到消息: " + new String(body));}};channel.basicConsume(Constants.DIRECT_QUEUE_NAME1, true, consumer);}}
Topics(通配符模式)
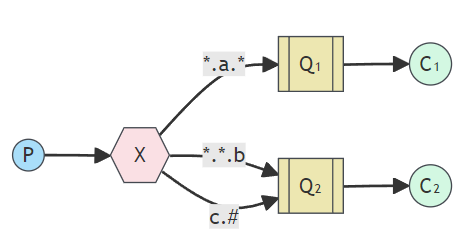
路由模式的升级版, 在routingKey的基础上,增加了通配符的功能, 使之更加灵活.
Topics和Routing的基本原理相同,即:⽣产者将消息发给交换机,交换机根据RoutingKey将消息转发给与RoutingKey匹配的队列. 类似于正则表达式的⽅式来定义Routingkey的模式.
RoutingKey 是⼀系列由点( . )分隔的单词, ⽐如 " stock.usd.nyse “, " nyse.vmw “,
" quick.orange.rabbit "
2. BindingKey 和RoutingKey⼀样, 也是点( . )分割的字符串.
3. Binding Key中可以存在两种特殊字符串, ⽤于模糊匹配
* 表⽰⼀个单词
# 表⽰多个单词(0-N个)
⽐如:
• Binding Key 为"d.a.b” 会同时路由到Q1 和Q2
• Binding Key 为"d.a.f” 会路由到Q1
• Binding Key 为"c.e.f" 会路由到Q2
• Binding Key 为"d.b.f" 会被丢弃, 或者返回给⽣产者(需要设置mandatory参数)
不同之处是:routingKey的匹配⽅式不同,Routing模式是相等匹配,topics模式是通配符匹配.
适合场景: 需要灵活匹配和过滤消息的场景
生产者代码
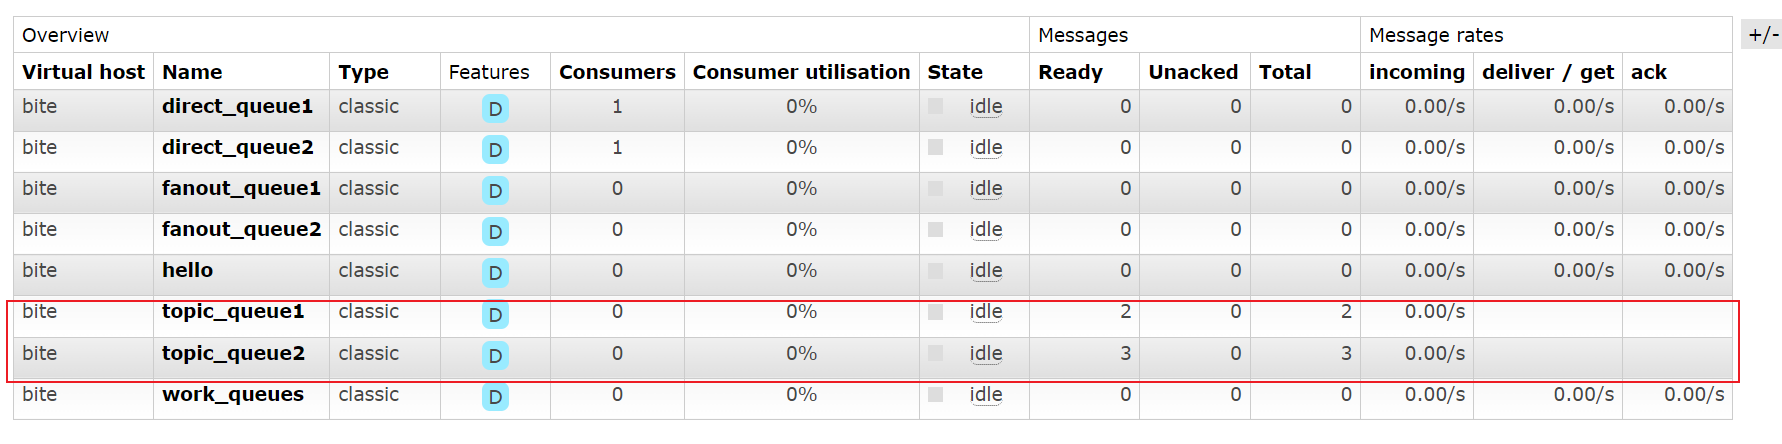
public static String TOPIC_EXCHANGE_NAME = "test_topic";
public static String TOPIC_QUEUE_NAME1 = "topic_queue1";
public static String TOPIC_QUEUE_NAME2 = "topic_queue2";
import com.rabbitmq.client.BuiltinExchangeType;
import com.rabbitmq.client.Channel;
import com.rabbitmq.client.Connection;
import com.rabbitmq.client.ConnectionFactory;
import constant.Constants;
public class TopicRabbitProducer {public static void main(String[] args) throws Exception {//1. 创建channel通道ConnectionFactory factory = new ConnectionFactory();factory.setHost(Constants.HOST);//ip 默认值localhostfactory.setPort(Constants.PORT); //默认值5672factory.setVirtualHost(Constants.VIRTUAL_HOST);//虚拟机名称, 默认 /factory.setUsername(Constants.USER_NAME);//⽤⼾名,默认guestfactory.setPassword(Constants.PASSWORD);//密码, 默认guestConnection connection = factory.newConnection();Channel channel = connection.createChannel();//2. 创建交换机channel.exchangeDeclare(Constants.TOPIC_EXCHANGE_NAME,
BuiltinExchangeType.TOPIC, true, false, false, null);//3. 声明队列//如果没有⼀个这样的⼀个队列, 会⾃动创建, 如果有, 则不创建channel.queueDeclare(Constants.TOPIC_QUEUE_NAME1, true, false, false,
null);channel.queueDeclare(Constants.TOPIC_QUEUE_NAME2, true, false, false,
null);//4. 绑定队列和交换机//队列1绑定error, 仅接收error信息channel.queueBind(Constants.TOPIC_QUEUE_NAME1,Constants.TOPIC_EXCHANGE_NAME,
"*.error");//队列2绑定info, error: error,info信息都接收channel.queueBind(Constants.TOPIC_QUEUE_NAME2,Constants.TOPIC_EXCHANGE_NAME,
"#.info");channel.queueBind(Constants.TOPIC_QUEUE_NAME2,Constants.TOPIC_EXCHANGE_NAME,
"*.error");//5. 发送消息String msg = "hello topic, I'm order.error";channel.basicPublish(Constants.TOPIC_EXCHANGE_NAME,"order.error",null,msg.getBy
tes());String msg_black = "hello topic, I'm order.pay.info";channel.basicPublish(Constants.TOPIC_EXCHANGE_NAME,"order.pay.info",null,msg_bl
ack.getBytes());String msg_green= "hello topic, I'm pay.error";channel.basicPublish(Constants.TOPIC_EXCHANGE_NAME,"pay.error",null,msg_green.g
etBytes());//6.释放资源channel.close();connection.close();}
}
消费者代码
import com.rabbitmq.client.*;
import constant.Constants;
import java.io.IOException;
public class TopicRabbitmqConsumer1 {public static void main(String[] args) throws Exception {//1. 创建channel通道ConnectionFactory factory = new ConnectionFactory();factory.setHost(Constants.HOST);//ip 默认值localhostfactory.setPort(Constants.PORT); //默认值5672factory.setVirtualHost(Constants.VIRTUAL_HOST);//虚拟机名称, 默认 /factory.setUsername(Constants.USER_NAME);//⽤⼾名,默认guestfactory.setPassword(Constants.PASSWORD);//密码, 默认guestConnection connection = factory.newConnection();Channel channel = connection.createChannel();//2. 接收消息, 并消费DefaultConsumer consumer = new DefaultConsumer(channel) {@Overridepublic void handleDelivery(String consumerTag, Envelope envelope,
AMQP.BasicProperties properties, byte[] body) throws IOException {System.out.println("接收到消息: " + new String(body));}};channel.basicConsume(Constants.TOPIC_QUEUE_NAME1, true, consumer);}
}
RPC(RPC通信)
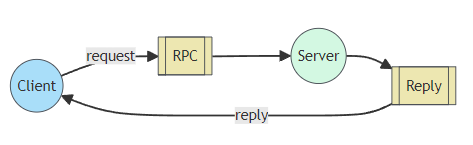
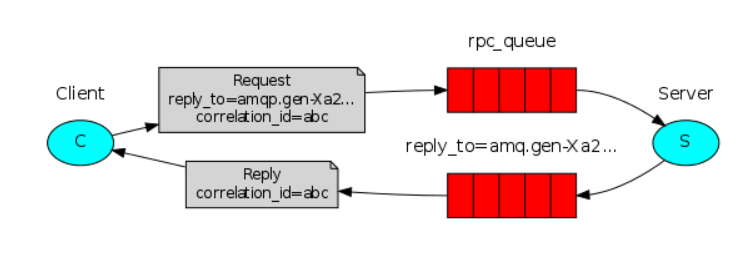
1.客户端发送消息到一个指定的队列,并在消息属性中设置replyTo字段,这个字段指定了一个回调队列,用于接收服务端的响应。
2.服务端接收到请求后,处理请求并发送响应消息到replyTo指定的回调队列
3.客户端在回调队列上等待响应消息.一旦收到响应,客户端会检查消息的correlationld属性,以确保它是所期望的响应
生产者代码
public static String RPC_REQUEST_QUEUE_NAME = "rpc_request_queue";
import com.rabbitmq.client.*;
import constant.Constants;
import java.io.IOException;
import java.util.UUID;
import java.util.concurrent.ArrayBlockingQueue;
import java.util.concurrent.BlockingQueue;
public class RPCClient {public static void main(String[] args) throws Exception {//1. 创建Channel通道ConnectionFactory factory = new ConnectionFactory();factory.setHost(Constants.HOST);//ip 默认值localhostfactory.setPort(Constants.PORT); //默认值5672factory.setVirtualHost(Constants.VIRTUAL_HOST);//虚拟机名称, 默认 /factory.setUsername(Constants.USER_NAME);//⽤⼾名,默认guestfactory.setPassword(Constants.PASSWORD);//密码, 默认guestConnection connection = factory.newConnection();Channel channel = connection.createChannel();//2. 声明队列channel.queueDeclare(Constants.RPC_REQUEST_QUEUE_NAME, true, false,
false, null);// 唯⼀标志本次请求String corrId = UUID.randomUUID().toString();// 定义临时队列,并返回⽣成的队列名称String replyQueueName = channel.queueDeclare().getQueue();// ⽣成发送消息的属性AMQP.BasicProperties props = new AMQP.BasicProperties.Builder().correlationId(corrId) // 唯⼀标志本次请求.replyTo(replyQueueName) // 设置回调队列.build();// 通过内置交换机, 发送消息String message = "hello rpc...";channel.basicPublish("", Constants.RPC_REQUEST_QUEUE_NAME, props,
message.getBytes());// 阻塞队列,⽤于存储回调结果final BlockingQueue<String> response = new ArrayBlockingQueue<>(1);//接收服务端的响应DefaultConsumer consumer = new DefaultConsumer(channel) {@Overridepublic void handleDelivery(String consumerTag, Envelope envelope,
AMQP.BasicProperties properties, byte[] body) throws IOException {System.out.println("接收到回调消息:"+ new String(body));if (properties.getCorrelationId().equals(corrId)) {response.offer(new String(body, "UTF-8"));}};channel.basicConsume(replyQueueName, true, consumer);// 获取回调的结果String result = response.take();System.out.println(" [RPCClient] Result:" + result);//释放资源channel.close();connection.close();}}}
服务端代码
import com.rabbitmq.client.*;
import constant.Constants;
import java.io.IOException;
import java.util.concurrent.TimeoutException;
public class RPCServer {public static void main(String[] args) throws IOException,
TimeoutException {//1. 创建Channel通道ConnectionFactory factory = new ConnectionFactory();factory.setHost(Constants.HOST);//ip 默认值localhostfactory.setPort(Constants.PORT); //默认值5672factory.setVirtualHost(Constants.VIRTUAL_HOST);//虚拟机名称, 默认 /factory.setUsername(Constants.USER_NAME);//⽤⼾名,默认guestfactory.setPassword(Constants.PASSWORD);//密码, 默认guestConnection connection = factory.newConnection();Channel channel = connection.createChannel();//2. 声明队列channel.queueDeclare(Constants.RPC_REQUEST_QUEUE_NAME, true, false,
false, null);//3. 接收消息, 并消费// 设置同时最多只能获取⼀个消息channel.basicQos(1);System.out.println("Awaiting RPC request");Consumer consumer = new DefaultConsumer(channel){@Overridepublic void handleDelivery(String consumerTag, Envelope envelope,
AMQP.BasicProperties properties, byte[] body) throws IOException {AMQP.BasicProperties replyProps = new AMQP.BasicProperties.Builder().correlationId(properties.getCorrelationId()).build();// ⽣成返回String message = new String(body);String response = "request:"+ message + ", response: 处理成功";// 回复消息,通知已经收到请求channel.basicPublish( "", properties.getReplyTo(), replyProps,
response.getBytes());// 对消息进⾏应答channel.basicAck(envelope.getDeliveryTag(), false);}};channel.basicConsume(Constants.RPC_REQUEST_QUEUE_NAME, false,consumer);}
Publisher Confirms(发布确认)
Publisher Confirms模式是RabbitMQ提供的⼀种确保消息可靠发送到RabbitMQ服务器的机制。在这种模式下,⽣产者可以等待RabbitMQ服务器的确认,以确保消息已经被服务器接收并处理.
- ⽣产者将Channel设置为confirm模式(通过调⽤channel.confirmSelect()完成)后, 发布的每⼀条消息都会获得⼀个唯⼀的ID, ⽣产者可以将这些序列号与消息关联起来,以便跟踪消息的状态.
- 当消息被RabbitMQ服务器接收并处理后,服务器会异步地向⽣产者发送⼀个确认(ACK)给⽣产者(包含消息的唯⼀ID),表明消息已经送达.
发送方确认机制最大的好处在于它是异步的,生产者可以同时发布消息和等待信道返回确认消息,
1.当消息最终得到确认之后,生产者可以通过回调方法来处理该确认消息.
2.如果RabbitMQ因为自身内部错误导致消息丢失,就会发送一条nack(Basic.Nack)命令,生产者同样
可以在回调方法中处理该nack命令.
发布确认有三种策略
PublishingMessagesIndividually(单独确认)
static void publishMessagesIndividually() throws Exception {try (Connection connection = createConnection()) {//创建channelChannel ch = connection.createChannel();//开启信道确认模式ch.confirmSelect();//声明队列ch.queueDeclare(PUBLISHER_CONFIRMS_QUEUE_NAME1, true, false, true,
null);long start = System.currentTimeMillis();//循环发送消息for (int i = 0; i < MESSAGE_COUNT; i++) {String body = "消息"+ i;//发布消息ch.basicPublish("", PUBLISHER_CONFIRMS_QUEUE_NAME1, null,
body.getBytes());//等待确认消息.只要消息被确认,这个⽅法就会被返回//如果超时过期, 则抛出TimeoutException。如果任何消息被nack(丢失),
waitForConfirmsOrDie将抛出IOException。ch.waitForConfirmsOrDie(5_000);}long end = System.currentTimeMillis();System.out.format("Published %d messages individually in %d ms",
MESSAGE_COUNT, end - start);
}
}
观察上⾯代码, 会发现这种策略是每发送⼀条消息后就调⽤channel.waitForConfirmsOrDie⽅法,之后等待服务端的确认, 这实际上是⼀种串⾏同步等待的⽅式. 尤其对于持久化的消息来说, 需要等待消息确
认存储在磁盘之后才会返回(调⽤Linux内核的fsync⽅法).
Publishing Messages in Batches(批量确认)
static void publishMessagesInBatch() throws Exception {try (Connection connection = createConnection()) {//创建信道Channel ch = connection.createChannel();//信道设置为confirm模式ch.confirmSelect();//声明队列ch.queueDeclare(PUBLISHER_CONFIRMS_QUEUE_NAME2, true, false, true,
null);int batchSize = 100;int outstandingMessageCount = 0;long start = System.currentTimeMillis();for (int i = 0; i < MESSAGE_COUNT; i++) {String body = "消息"+ i;//发送消息ch.basicPublish("", PUBLISHER_CONFIRMS_QUEUE_NAME2, null,
body.getBytes());outstandingMessageCount++;//批量确认消息if (outstandingMessageCount == batchSize) {ch.waitForConfirmsOrDie(5_000);outstandingMessageCount = 0;}}//消息发送完, 还有未确认的消息, 进⾏确认if (outstandingMessageCount > 0) {ch.waitForConfirmsOrDie(5_000);}long end = System.currentTimeMillis();System.out.format("Published %d messages in batch in %d ms",MESSAGE_COUNT,end - start);
}
}
相⽐于单独确认策略, 批量确认极⼤地提升了confirm的效率, 缺点是出现Basic.Nack或者超时时, 我们不清楚具体哪条消息出了问题. 客⼾端需要将这⼀批次的消息全部重发, 这会带来明显的重复消息数量.
当消息经常丢失时,批量确认的性能应该是不升反降的.
Handling Publisher Confirms Asynchronously(异步确认)
static void handlePublishConfirmsAsynchronously() throws Exception {try (Connection connection = createConnection()) {Channel ch = connection.createChannel();ch.queueDeclare(PUBLISHER_CONFIRMS_QUEUE_NAME3, false, false, true,
null);ch.confirmSelect();//有序集合,元素按照⾃然顺序进⾏排序,存储未confirm消息序号SortedSet<Long> confirmSet = Collections.synchronizedSortedSet(new
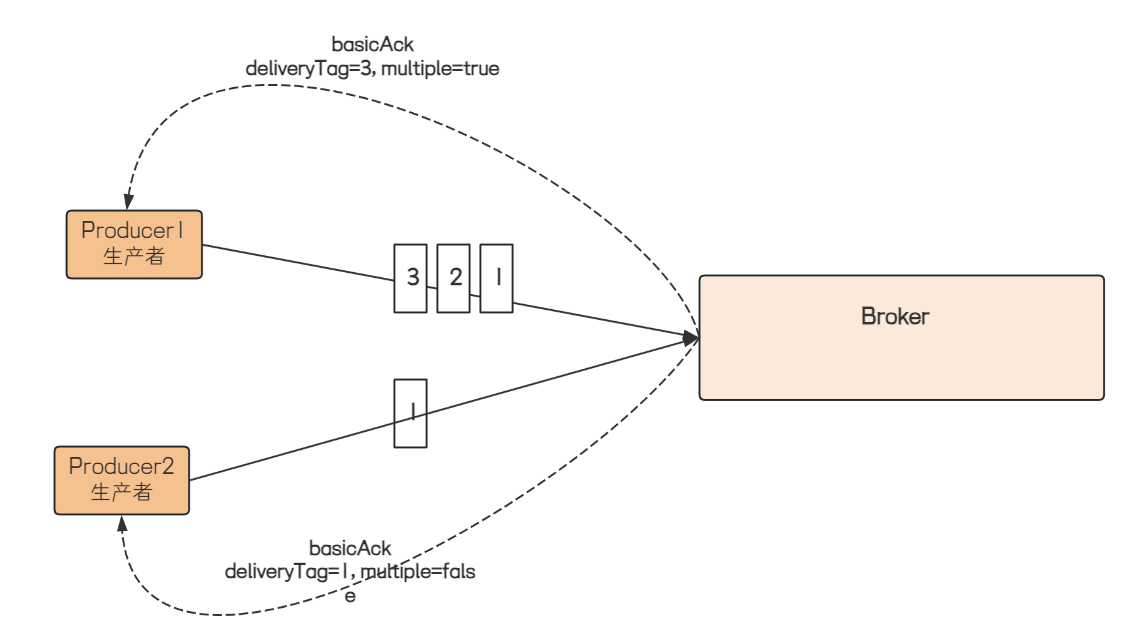
TreeSet<>());ch.addConfirmListener(new ConfirmListener() {@Overridepublic void handleAck(long deliveryTag, boolean multiple) throws
IOException {//System.out.println("ack, SeqNo: " + deliveryTag +",multiple:" +multiple);//multiple 批量//confirmSet.headSet(n)⽅法返回当前集合中⼩于n的集合if (multiple) {//批量确认:将集合中⼩于等于当前序号deliveryTag元素的集合清除,表⽰
这批序号的消息都已经被ack了confirmSet.headSet(deliveryTag+1).clear();} else {//单条确认:将当前的deliveryTag从集合中移除confirmSet.remove(deliveryTag);}}@Overridepublic void handleNack(long deliveryTag, boolean multiple) throws
IOException {System.err.format("deliveryTag: %d, multiple: %b%n",
deliveryTag, multiple);if (multiple) {//批量确认:将集合中⼩于等于当前序号deliveryTag元素的集合清除,表⽰
这批序号的消息都已经被ack了confirmSet.headSet(deliveryTag+1).clear();} else {//单条确认:将当前的deliveryTag从集合中移除confirmSet.remove(deliveryTag);}//如果处理失败, 这⾥需要添加处理消息重发的场景. 此处代码省略}});//循环发送消息long start = System.currentTimeMillis();for (int i = 0; i < MESSAGE_COUNT; i++) {String message = "消息" + i;//得到下次发送消息的序号, 从1开始long nextPublishSeqNo = ch.getNextPublishSeqNo();//System.out.println("消息序号:"+ nextPublishSeqNo);ch.basicPublish("", PUBLISHER_CONFIRMS_QUEUE_NAME3, null,
message.getBytes());//将序号存⼊集合中confirmSet.add(nextPublishSeqNo);}//消息确认完毕while (!confirmSet.isEmpty()){Thread.sleep(10);}long end = System.currentTimeMillis();System.out.format("Published %d messages and handled confirms
asynchronously in %d ms%n", MESSAGE_COUNT, end -start);
}
}
三种差异
异步确认>批量确认>单独确认
用Spring Boot整合RabbitMQ
在下面引入依赖
<!--Spring MVC相关依赖-->
<dependency><groupId>org.springframework.boot</groupId><artifactId>spring-boot-starter-web</artifactId>
</dependency>
<dependency><groupId>org.springframework.boot</groupId><artifactId>spring-boot-starter-test</artifactId><scope>test</scope>
</dependency>
<!--RabbitMQ相关依赖-->
<dependency><groupId>org.springframework.boot</groupId><artifactId>spring-boot-starter-amqp</artifactId>
</dependency>
并且配置yml配置,基本信息配置
#配置RabbitMQ的基本信息
spring:rabbitmq:host: 110.41.51.65port: 15673 #默认为5672username: studypassword: studyvirtual-host: bite #默认值为
Work Queue(⼯作队列)
生产者代码
public static final String WORK_QUEUE = "work_queue”;
声明队列
import com.bite.rabbitmq.constant.Constants;
import org.springframework.amqp.core.*;
import org.springframework.context.annotation.Bean;
import org.springframework.context.annotation.Configuration;
@Configuration
public class RabbitMQConfig {//1. ⼯作模式队列@Bean("workQueue")public Queue workQueue() {return QueueBuilder.durable(Constants.WORK_QUEUE).build();}
}
@RequestMapping("/producer")
@RestController
public class ProducerController {@Autowiredprivate RabbitTemplate rabbitTemplate;@RequestMapping("/work")public String work(){for (int i = 0; i < 10; i++) {//使⽤内置交换机发送消息, routingKey和队列名称保持⼀致rabbitTemplate.convertAndSend("", Constants.WORK_QUEUE, "hello spring amqp:work");}return "发送成功";}}
消费者代码
import com.bite.rabbitmq.constant.Constants;
import org.springframework.amqp.core.Message;
import org.springframework.amqp.rabbit.annotation.RabbitListener;
import org.springframework.stereotype.Component;
@Component
public class WorkListener {@RabbitListener(queues = Constants.WORK_QUEUE)public void listenerQueue(Message message){System.out.println("listener 1["+Constants.WORK_QUEUE+"]收到消息:" +
message);}@RabbitListener(queues = Constants.WORK_QUEUE)public void listenerQueue2(Message message){System.out.println("listener 2["+Constants.WORK_QUEUE+"]收到消息:" +
message);}}

Publish/Subscribe(发布/订阅)
生产者代码
发布/订阅模式
public static final String FANOUT_QUEUE1 = "fanout_queue1";
public static final String FANOUT_QUEUE2 = "fanout_queue2";
public static final String FANOUT_EXCHANGE_NAME = "fanout_exchange";
//声明2个队列, 观察是否两个队列都收到了消息
@Bean("fanoutQueue1")
public Queue fanoutQueue1() {return QueueBuilder.durable(Constants.FANOUT_QUEUE1).build();
}
@Bean("fanoutQueue2")
public Queue fanoutQueue2() {return QueueBuilder.durable(Constants.FANOUT_QUEUE2).build();
}
//声明交换机
@Bean("fanoutExchange")
public FanoutExchange fanoutExchange() {return
ExchangeBuilder.fanoutExchange(Constants.FANOUT_EXCHANGE_NAME).durable(true).bu
ild();
}
//队列和交换机绑定
@Bean
public Binding fanoutBinding(@Qualifier("fanoutExchange") FanoutExchange
exchange, @Qualifier("fanoutQueue1") Queue queue) {return BindingBuilder.bind(queue).to(exchange);
}
@Bean
public Binding fanoutBinding2(@Qualifier("fanoutExchange") FanoutExchange
exchange, @Qualifier("fanoutQueue2") Queue queue) {return BindingBuilder.bind(queue).to(exchange);
}
使用接口发送消息
@RequestMapping("/fanout")
public String fanoutProduct(){//routingKey为空, 表⽰所有队列都可以收到消息rabbitTemplate.convertAndSend(Constants.FANOUT_EXCHANGE_NAME, "","hello
spring boot: fanout");return "发送成功";}
消费者代码
import com.bite.rabbitmq.constant.Constants;
import org.springframework.amqp.core.Message;
import org.springframework.amqp.rabbit.annotation.RabbitListener;
import org.springframework.stereotype.Component;
@Component
public class FanoutListener {//指定监听队列的名称@RabbitListener(queues = Constants.FANOUT_QUEUE1)public void ListenerQueue(String message){System.out.println("["+Constants.FANOUT_QUEUE1+ "]接收到消息:"+ message);}@RabbitListener(queues = Constants.FANOUT_QUEUE2)public void ListenerQueue2(String message){System.out.println("["+Constants.FANOUT_QUEUE2+ "]接收到消息:"+ message);}}

Routing(路由模式)
生产者代码
public static final String DIRECT_QUEUE1="direct_queuel"
public static final String DIRECT"direct_queue2
public static final String DIRECT_EXCHANGE_NAME = "direct_exchange"
//Routing模式
@Bean("directQueue1")
public Queue routingQueue1() {return QueueBuilder.durable(Constants.DIRECT_QUEUE1).build();
}
@Bean("directQueue2")
public Queue routingQueue2() {return QueueBuilder.durable(Constants.DIRECT_QUEUE2).build();
}
//声明交换机
@Bean("directExchange")
public DirectExchange directExchange() {return
ExchangeBuilder.directExchange(Constants.DIRECT_EXCHANGE_NAME).durable(true).build();
}
//队列和交换机绑定
//队列1绑定orange
@Bean
public Binding directBinding(@Qualifier("directExchange") DirectExchange
exchange, @Qualifier("directQueue1") Queue queue) {return BindingBuilder.bind(queue).to(exchange).with("orange");
}
//队列2绑定black, green
@Bean
public Binding directBinding2(@Qualifier("directExchange") DirectExchange
exchange, @Qualifier("directQueue2") Queue queue) {return BindingBuilder.bind(queue).to(exchange).with("black");
}
@Bean
public Binding directBinding3(@Qualifier("directExchange") DirectExchange
exchange, @Qualifier("directQueue2") Queue queue) {return BindingBuilder.bind(queue).to(exchange).with("green");}
消费者代码
import com.bite.rabbitmq.constant.Constants;
import org.springframework.amqp.rabbit.annotation.RabbitListener;
import org.springframework.stereotype.Component;
@Component
public class DirectListener {//指定监听队列的名称@RabbitListener(queues = Constants.DIRECT_QUEUE1)public void ListenerQueue(String message){
System.out.println("["+Constants.DIRECT_QUEUE1+ "]接收到消息:"+ message);}@RabbitListener(queues = Constants.DIRECT_QUEUE2)public void ListenerQueue2(String message){System.out.println("["+Constants.DIRECT_QUEUE2+ "]接收到消息:"+ message);}
}
接口发送消息
@RequestMapping("/direct")
public String directProduct(String routingKey){//routingKey作为参数传递rabbitTemplate.convertAndSend(Constants.DIRECT_EXCHANGE_NAME,
routingKey,"hello spring boot: direct "+routingKey);return "发送成功";
}
通过调用接口发送routingkey为orange的消息。
Topics(通配符模式)
Topics和Routing模式的区别是:
1.topics模式使用的交换机类型为topic(Routing模式使用的交换机类型为direct)
2.topic类型的交换机在匹配规则上进行了扩展,BindingKey支持通配符匹配
生产者代码
public static final String TOPICS_QUEUE1 = "topics_queue1";
public static final String TOPICS_QUEUE2 = "topics_queue2";
public static final String TOPICS_EXCHANGE_NAME = "topics_exchange";
1
2
3
4
//topic模式
@Bean("topicsQueue1")
public Queue topicsQueue1() {return QueueBuilder.durable(Constants.TOPICS_QUEUE1).build();
}
@Bean("topicsQueue2")
public Queue topicsQueue2() {return QueueBuilder.durable(Constants.TOPICS_QUEUE2).build();
}
//声明交换机
@Bean("topicExchange")
public TopicExchange topicExchange() {return
ExchangeBuilder.topicExchange(Constants.TOPICS_EXCHANGE_NAME).durable(true).bui
ld();
}
//队列和交换机绑定
//队列1绑定error, 仅接收error信息
@Bean
public Binding topicBinding(@Qualifier("topicExchange") TopicExchange
exchange, @Qualifier("topicsQueue1") Queue queue) {return BindingBuilder.bind(queue).to(exchange).with("*.error");}@Bean
public Binding topicBinding2(@Qualifier("topicExchange") TopicExchange
exchange, @Qualifier("topicsQueue2") Queue queue) {return BindingBuilder.bind(queue).to(exchange).with("#.info");
}
@Bean
public Binding topicBinding3(@Qualifier("topicExchange") TopicExchange
exchange, @Qualifier("topicsQueue2") Queue queue) {return BindingBuilder.bind(queue).to(exchange).with("*.error");
}
接口发送消息
@RequestMapping("/topics")
public String topicProduct(String routingKey){//routingKey为空, 表⽰所有队列都可以收到消息rabbitTemplate.convertAndSend(Constants.TOPICS_EXCHANGE_NAME,
routingKey,"hello spring boot: topics "+routingKey);return "发送成功";
}
消费者代码
import com.bite.rabbitmq.constant.Constants;
import org.springframework.amqp.rabbit.annotation.RabbitListener;
import org.springframework.stereotype.Component;
@Component
public class TopicListener {//指定监听队列的名称@RabbitListener(queues = Constants.TOPICS_QUEUE1)public void ListenerQueue(String message){System.out.println("["+Constants.TOPICS_QUEUE1+ "]接收到消息:"+ message);}@RabbitListener(queues = Constants.TOPICS_QUEUE2)public void ListenerQueue2(String message){System.out.println("["+Constants.TOPICS_QUEUE2+ "]接收到消息:"+ message);}}