建立网站要什么条件和多少钱网络seo排名
目录
- 手撸管理系统之实战—项目布局实现
- 布局分析
- 使用方案
- 布局组件路由配置 router
- 第一步、路由配置
- 第二步、创建布局文件 `Aside`、`layoutHeader`、`layoutMain`文件
- 第三步、布局文件代码编写
- 第四步、layout/index.vue异步导入布局组件
- 第五步、左侧logo和系统名称
- 第六步、左侧菜单组件实现
- 第七步、左侧菜单路由配置`router`
- 第八步、右侧主区域指定渲染出口
- 第九步、创建路由切换过渡样式并引入
- 第十步、设置组件` <keep-alive>`进行页面缓存
- 第十一步、右侧头部导航区域实现
- 第十二步、菜单展开/收起使用pinia实现
- 第十三步、导航面包屑功能实现
- 第十四步、全屏退出全屏功能实现
- 第十五步、暗黑主题切换
- 效果:
手撸管理系统之实战—项目布局实现
布局分析


采用后台管理系统常用的左、右布局,分别为: 左侧菜单区域,右侧头部导航、右侧主区域。
使用方案
综上所示例,使用element Plus的布局方式Container 布局容器,用于布局的容器组件,方便快速搭建页面的基本结构:
<el-container>:外层容器。 当子元素中包含 <el-header> 或 <el-footer> 时,全部子元素会垂直上下排列, 否则会水平左右排列。
<el-header>:顶栏容器。<el-aside>:侧边栏容器。<el-main>:主要区域容器。<el-footer>:底栏容器。

布局组件路由配置 router
第一步、路由配置
-
在
src目录下新建layout目录,用于存放项目的布局组件, 在src/layout目录下,创建布局根组件index.vue,组件内容如下:<script setup lang='ts'> </script> <template><div>布局组件</div> </template> <style scoped> </style> -
在
src\router.js中增加路由配置,如下:import { createRouter, createWebHistory } from 'vue-router' import type { RouteRecordRaw } from 'vue-router'; // 路由配置数组(单独抽取,后面会后端动态加载) export const dynamicRoutes: RouteRecordRaw[] = [{path: '/',name: 'Layout',component: () => import('@/layout/index.vue'),} ]; // 创建路由实例 const router = createRouter({// 参数获取的是 vite.config.ts 中的 base 属性值history: createWebHistory(import.meta.env.BASE_URL),routes: dynamicRoutes }); export default router; -
App.vue指定路由组件渲染出口<router-view/><script setup lang='ts'> </script> <template><!-- 不要少了`class="h100"` 高度100%,不然布局的高度无法占满 --><div class="h100"><!-- 路由组件渲染出品 --><router-view></router-view></div> </template> <style scoped> </style> -
测试访问
http://127.0.0.1:8888/, 页面显示 布局组件
第二步、创建布局文件 Aside、layoutHeader、layoutMain文件

第三步、布局文件代码编写
layoutAside/index.vue 左侧布局
<template><!-- 左侧菜单栏 --><div class="h100"><el-aside class="layout-container layout-aside layout-aside-menu-200"></el-aside></div>
</template>
<script setup lang="ts" name="LayoutAside"></script>
<style></style>
layoutHeader/index.vue 右侧顶部布局
<template><!-- 右侧头部区域 --><el-header class="layout-header">左侧顶部</el-header>
</template>
<script setup lang="ts" name="LayoutHeader"></script>
<style></style>
layoutMain/index.vue 右侧内容区域布局
 <template><!-- 右侧主区域 --><el-main class="layout-main">内容区域 </el-main>
</template>
<script setup lang="ts" name="LayoutMain"></script>
<style scoped lang="scss">
:deep(.el-scrollbar__view) {/* 铺满高度 */height: 100%;
}
</style>
第四步、layout/index.vue异步导入布局组件
layout/index.vue引入左侧布局,header布局,及右侧main布局,这里进行异步导入组件【懒加载或按需加载】,进行使用布局组件。
<template><el-container class="layout-container"><layoutAside></layoutAside><!-- 右侧垂直 --><el-container direction="vertical"><layoutHeader></layoutHeader><layoutMain></layoutMain></el-container></el-container>
</template>
<script setup lang="ts" name="Layout">
// 异步导入
import { defineAsyncComponent } from 'vue';
const LayoutAside = defineAsyncComponent(() => import('./layoutAside/index.vue'));
const layoutMain = defineAsyncComponent(() => import('./layoutMain/index.vue'));
const LayoutHeader = defineAsyncComponent(() => import('./layoutHeader/index.vue'));
</script>
<style></style>

第五步、左侧logo和系统名称
新建layoutAside/logo.vue文件
<template><div class="layout-logo"><img class="layout-logo-img" src="@/assets/logo(1).png" alt="logo" /><span >系统名称</span></div>
</template>
<script lang="ts" setup name="LayoutLogo"></script>
<style></style>
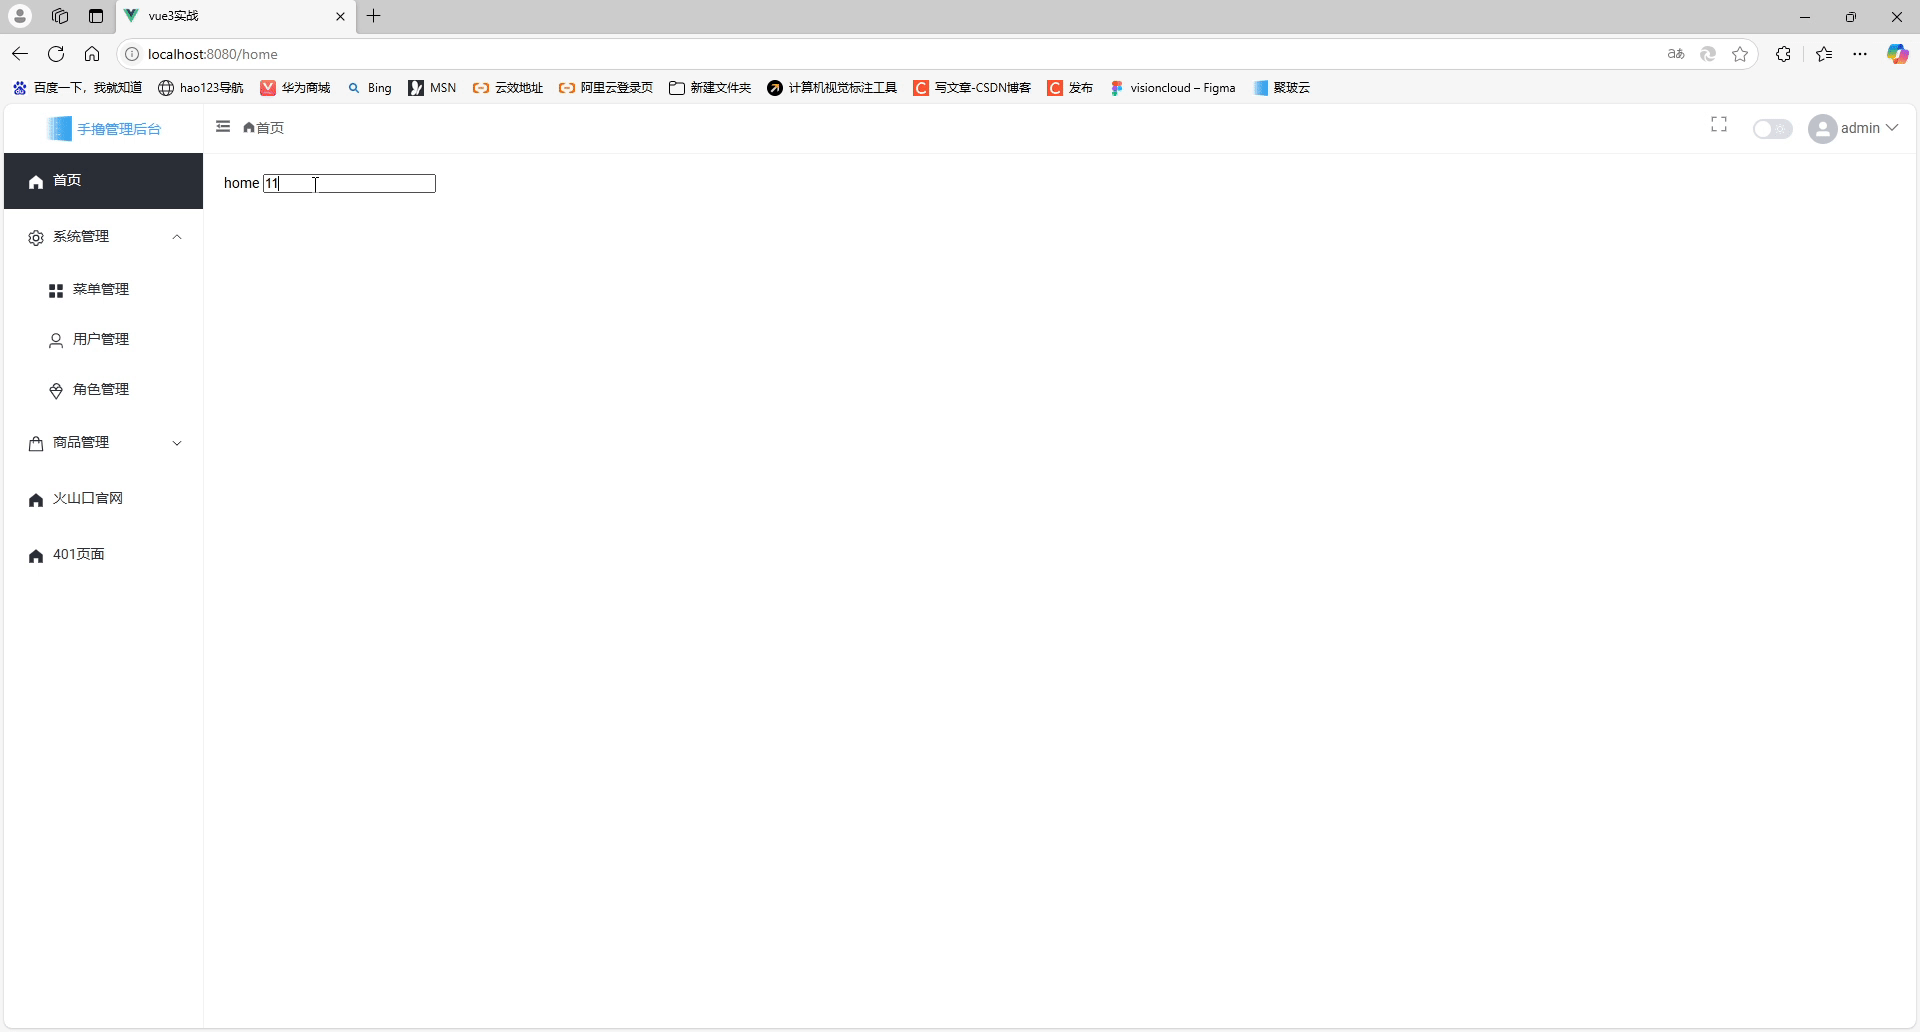
第六步、左侧菜单组件实现
菜单组件Menu参考:
el-menu 标签上有个 router="true" 属性开启导航路由功能,开启后 el-menu-item 的index属性指定路由地址。
default-active 属性默认选中哪个菜单, 注意 v-bind:default-active 才可以指定表达式。
创建侧边菜单组件: src/layout/layoutAside/verticalMenu.vue
<template><el-scrollbar>	<el-menu :collapse="isCollapse"  :default-openeds="['/system']"	:default-active="route.path" :router="true" background-color="transparent" class="el-menu-vertical-demo"><el-menu-item index="/home"><SvgIcon name="ele-HomeFilled" /><span>首页</span></el-menu-item><el-sub-menu index="/system"><template #title><SvgIcon name="ele-Setting" /><span>系统管理</span></template><el-menu-item index="/system/menu"><template #title><SvgIcon name="ele-Menu" /><span>菜单管理</span></template></el-menu-item><el-menu-item index="/system/user"><template #title><SvgIcon name="ele-User" /><span>用户管理</span></template></el-menu-item><el-menu-item index="/system/role"><template #title><SvgIcon name="ele-IceCream" /><span>角色管理</span></template></el-menu-item></el-sub-menu><el-sub-menu index="/goods"><template #title><SvgIcon name="ele-Goods" /><span>商品管理</span></template><el-menu-item index="/goods/list"><template #title><SvgIcon name="ele-GoodsFilled" /><span>商品列表</span></template></el-menu-item><el-menu-item index="/goods/category"><template #title><SvgIcon name="ele-Operation" /><span>商品分类</span></template></el-menu-item></el-sub-menu><el-menu-item index="/mengxuegu"><SvgIcon name="ele-HomeFilled" /><span>火山口官网</span></el-menu-item><el-menu-item index="/401"><SvgIcon name="ele-HomeFilled" /><span>401页面</span></el-menu-item></el-menu></el-scrollbar>
</template>
<script lang="ts" setup>
import {useRoute} from 'vue-router'
import { storeToRefs } from 'pinia';
import {useLayoutConfigStore} from '../../stores/layoutConfig'
const route = useRoute()
const layoutConfigStore = useLayoutConfigStore()
const { isCollapse } = storeToRefs(layoutConfigStore)
</script>
<style></style>
在layout/layoutAside/index.vue引入菜单组件 verticalMenu.vue和logo.vue
<template><!-- 左侧菜单栏 --><div class="h100"><el-aside class="layout-container layout-aside layout-aside-menu-200"><logo /><VerticalMenu /></el-aside></div>
</template><script setup lang="ts" name="LayoutAside">
import { defineAsyncComponent } from "vue";
const Logo = defineAsyncComponent(() => import("./logo.vue"));
const VerticalMenu = defineAsyncComponent(() => import("./verticalMenu.vue"));
</script>
<style></style>
第七步、左侧菜单路由配置router
在 src\views 目录下创建如下目录写入vue模板数据

例如:
<template><div>用户管理</div>
</template>
<script lang="ts" setup name="SystemUser"></script>
<style></style>
在 router/index.ts 中配置所有菜单路由,配置如下:
import { createRouter, createWebHistory } from 'vue-router'
import type { RouteRecordRaw } from 'vue-router'// 扩展 RouteMeta 接口,因为 Vue-Router 的配置路由对象的 meta 属性有限,所以需要扩展
declare module 'vue-router' {interface RouteMeta {title?: string; // 菜单标题icon?: string; // 图标linkTo?: string; // 外链地址cache?: boolean; //是否缓存:true缓存,false不缓存,会将 name 值用于 <keep-alive>的includes上hidden?: boolean; // 是否在菜单中显示:true显示,false隐藏isBreadcrumb?: boolean; // 是否显示到面包屑,默认或true会显示,false不显示。}
}
/***  路由表配置数组(单独抽取,后面扩展后端动态加载)*/
export const dynamicRoutes: RouteRecordRaw[] = [{path: '/',name: 'Layout',component: () => import('@/layout/index.vue'),children: [{path: '/home',name: 'Home',component: () => import('@/views/home/index.vue'),meta: {title: '首页',icon: 'ele-HomeFilled',cache: false,hidden: false,}},{path: '/system',name: 'System',redirect: '/system/menu',meta: {title: '系统管理',icon: 'ele-Setting'},children: [{path: '/system/menu',name: 'SystemMenu',component: () => import('@/views/system/menu/index.vue'),meta: {title: '菜单管理',icon: 'ele-Menu',catch: true,hidden: false}},{path: '/system/user',name: 'SystemUser',component: () => import('@/views/system/user/index.vue'),meta: {title: '用户管理',icon: 'ele-User',catch: true,hidden: false}},{path: '/system/role',name: 'SystemRole',component: () => import('@/views/system/role/index.vue'),meta: {title: '角色管理',icon: 'ele-User',catch: true,hidden: false}}]},{path: '/goods',name: 'Goods',redirect: '/goods/list',meta: {title: '商品管理',icon: 'ele-Goods'},children: [{path: '/goods/list',name: 'GoodsList',component: () => import('@/views/goods/list.vue'),meta: {title: '商品列表',icon: 'ele-GoodsFilled',catch: true,hidden: false}},{path: '/goods/category',name: 'GoodsCategory',component: () => import('@/views/goods/category.vue'),meta: {title: '商品分类',icon: 'ele-Operation',catch: true,hidden: false}}]},{path: '/wuyouke',name: 'Wuyouke',component: () => import('@/views/link/index.vue'),meta: {title: '火山口官网',icon: 'ele-Link',cache: false,hidden: false,linkTo: "https://www.baidu.com/"  // 跳转地址}},{path: '/401',name: 'NoPermission',component: () => import('@/views/error/401.vue'),meta: {title: '401页面',icon: 'ele-Warning',cache: true,hidden: false,},},{path: '/:path(.*)*', // 404匹配其他路由地址,匹配其他未找到的路由name: 'NotFound',component: () => import('@/views/error/404.vue'),meta: {title: '未找到此页面',cache: true,hidden: true,},},]}
]
const router = createRouter({history: createWebHistory(import.meta.env.BASE_URL),routes: dynamicRoutes
})
export default router
第八步、右侧主区域指定渲染出口
在 src\layout\layoutMain\index.vue 布局主区域中,指定子路由渲染出口。
 <template><!-- 右侧主区域 --><el-main class="layout-main"><el-scrollbar><div class="layout-main-warp"><router-view v-slot="{ Component }"><transition name="fade-transform" mode="out-in"><keep-alive> <component :is="Component"></component></keep-alive></transition></router-view></div></el-scrollbar></el-main>
</template>
<script setup lang="ts" name="LayoutMain">
</script>
<style scoped lang="scss">
:deep(.el-scrollbar__view) {/* 铺满高度 */height: 100%;
}
</style>
第九步、创建路由切换过渡样式并引入
创建src/styles/transition.scss专门定义过渡效果样式:
/* 页面切换动画- */
.fade-transform-enter-active,
.fade-transform-leave-active {transition: all .3s ease;
}
.fade-transform-enter-from {opacity: 0;transform: translateX(-20px);
}
.fade-transform-leave-to {opacity: 0;transform: translateX(20px);
}
.breadcrumb-enter-active,
.breadcrumb-leave-active {
transition: all .5s;
}
.breadcrumb-enter-from,.breadcrumb-leave-active {opacity: 0;transform: translateX(20px);}// 因为 TransitionGroup 不支持 mode="out-in",通过下面方式防止显示和隐藏效果同时出现。.breadcrumb-leave-active {position: absolute;z-index: -1;}
在 src/styles/index.scss 导入 src/styles/transition.scss
// ElementPlus 组件所有样式
@use 'element-plus/dist/index.css';
@use './app.scss';
@use './transition.scss';
第十步、设置组件 <keep-alive>进行页面缓存
对于 vue@3.2.34 及以上版本,在使用 <script setup> 的单文件组件时,vue 会根据组件文件名,自动推导出
name 属性值。
比如:名称为 LayoutMain.vue 或 layout-main.vue 的文件,自动推导出name属性值为 LayoutMain 。<keep-alive :include="[要缓存的组件name值]"> 在include指定的路由name,则在来回切换路由时对应组件会被缓存。
而当你在组件内显示手动指定 name 属性值后,会覆盖自动推导出的name名称。我使用插件 vite-plugin-vue-setup-extend-plus来进行快速实现。
npm i vite-plugin-vue-setup-extend-plus -D
在vite.config.ts配置插件,使用插件
import vue from '@vitejs/plugin-vue'
import vueSetupExtend from 'vite-plugin-vue-setup-extend-plus'
export default defineConfig({plugins: [vue(),vueSetupExtend() // 让 `<script setup name="xx">` 上 name 作为缓存组件名],
});
测试效果:

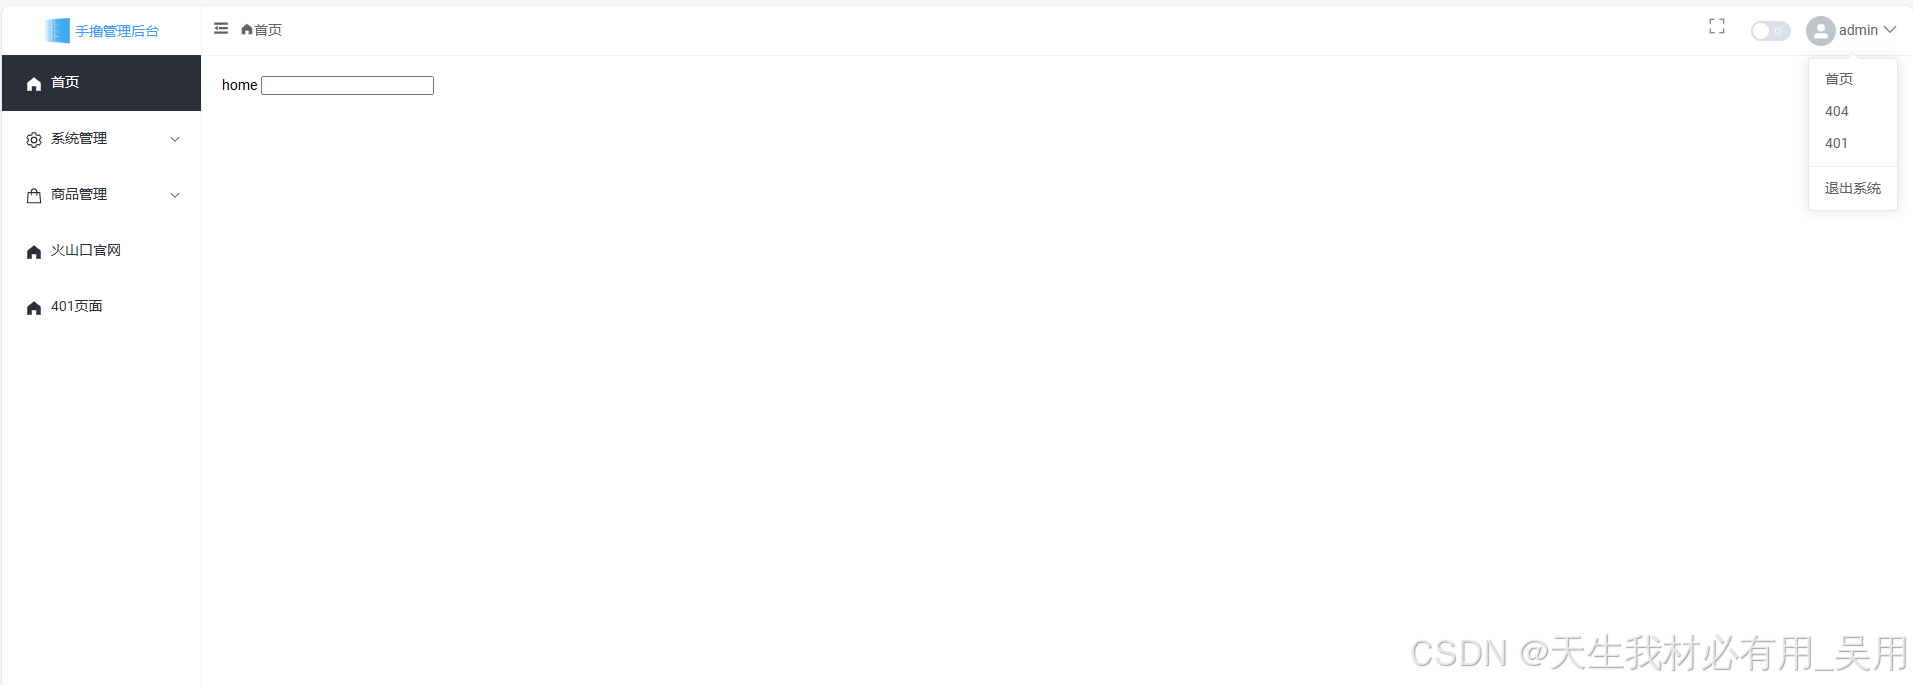
第十一步、右侧头部导航区域实现
菜单收缩、全屏、暗黑主题页面及功能实现,创建右侧头部左侧和右侧头部右侧组件,userDropdown.vue和breadcrumb.vue组件
breadcrumb.vue文件
<script setup lang='ts'>
import { ref, reactive } from 'vue'
</script>
<template><div class="layout-header-breadcrumb"><!-- 收缩 ele-Expand --><SvgIcon name="ele-Fold" class="layout-header-expand-icon"></SvgIcon><!-- 面包屑 --><el-breadcrumb separator="/"><el-breadcrumb-item :to="{ path: '/' }"><span class="flex-center"><SvgIcon name="ele-Setting" :size="14" />系统管理</span></el-breadcrumb-item><el-breadcrumb-item ><span class="flex-center"><SvgIcon name="ele-Menu" :size="14" />菜单管理</span></el-breadcrumb-item></el-breadcrumb></div>
</template>
<style scoped></style>
userDropdown.vue文件,头部右侧有:全屏图标、暗黑主题切换图标、用户头像下拉菜单等
<script setup lang='ts'>import { ref, reactive } from 'vue'import { useRouter } from 'vue-router';const router = useRouter();
</script>
<template>
<div class="layout-header-user"><div class="layout-header-user-icon mr5"><SvgIcon name="ele-FullScreen"></SvgIcon></div><div class="layout-header-user-icon mr5"><el-switch inline-prompt active-icon="ele-Moon" inactive-icon="ele-Sunny" style="--el-switch-on-color:#333;"/></div><el-dropdown><span class="user-dropdown-link"><!-- :src="circleUrl" --><el-avatar class="mr3" :size="30" icon="ele-UserFilled" />admin<SvgIcon class="ml3" name="ele-ArrowDown"></SvgIcon></span><template #dropdown><el-dropdown-menu><el-dropdown-item @click="router.push('/')">首页</el-dropdown-item><el-dropdown-item @click.prevent="router.push('/404')">404</el-dropdown-item><el-dropdown-item @click.prevent="router.push('/401')">401</el-dropdown-item><el-dropdown-item divided>退出系统</el-dropdown-item></el-dropdown-menu></template></el-dropdown>
</div>
</template>
<style scoped>
</style>
在 src/layout/layoutHeader/index.vue 中引用上面两个组件
<template><!-- 右侧头部区域 --><el-header class="layout-header"> <div class="layout-header-index"><!-- 左侧面包屑 --><Breadcrumb /><!-- 右侧用户信息下拉框 --><UserDropdown/></div></el-header>
</template>
<script setup lang="ts" name="LayoutHeader">
import { defineAsyncComponent } from 'vue';
const Breadcrumb = defineAsyncComponent(() => import('../../layout/layoutHeader/breadcrumb.vue'));
const UserDropdown = defineAsyncComponent(() => import('../../layout/layoutHeader/userDropdown.vue'));
</script>
<style></style>
效果:
第十二步、菜单展开/收起使用pinia实现
菜单收缩只要动态切换el-menu组件上的 collapse Prop值即可。因为collapse状态值在 layoutAside/verticalMenu.vue 中获取后,需要与头部组件layoutHeader/index.vue 共享,多组件共享同一状态值我们使用 pinia 状态管理。
- 创建类型接口文件
src/types/pinia.d.ts,定义布局配置的数据类型
/*** pinia状态类型定义*/
declare interface layoutConfigState{isCollapse:boolean; // 是否展开菜单globalTitle:string; // 网站主标题isFullscreen: boolean; // 是否全屏isDark: boolean;  // 是否暗黑主题
}
- 创建布局状态管理文件
src/stores/layoutConfig.ts
import { defineStore } from 'pinia'
import { Local } from '@/utils/storage'
import { nextTick } from 'vue'export const useLayoutConfigStore = defineStore('layoutConfig', {state: (): layoutConfigState => {return {isCollapse: false, // 菜单是否折叠globalTitle: "手撸管理后台", // 网站主标题isFullscreen: false, // 是否全屏isDark: false, // 黑暗模式}},getters: {},actions: {// 更新状态updateState(state:layoutConfigState){// 将传递的值更新到state状态中this.$patch(state)}}
})
nextTick(() => {const layoutConfig = useLayoutConfigStore()// 监听状态变化,将状态持久化layoutConfig.$subscribe((mutation, state) => {// 保存到浏览器的localStorage中Local.set('layoutConfig', state)})
})- 在
layoutAside/verticalMenu.vue中使用布局配置状态,模板中使用::collapse="isCollapse
<template><el-scrollbar><el-menu :collapse="isCollapse"  :default-openeds="['/system']"	:default-active="route.path" :router="true" background-color="transparent" class="el-menu-vertical-demo">......</el-menu></el-scrollbar>
</template>
<script lang="ts" setup>import {useRoute} from 'vue-router'import { storeToRefs } from 'pinia';import {useLayoutConfigStore} from '../../stores/layoutConfig'const route = useRoute()const layoutConfigStore = useLayoutConfigStore()const { isCollapse } = storeToRefs(layoutConfigStore)
</script>
<style></style>
- 在
layoutHeader/breadcrumb.vue中实现点击切换图标,进行展开/收起左侧菜单逻辑
<template><div class="layout-header-breadcrumb"><!-- 收缩图标 --><SvgIcon:name="layoutConfig.isCollapse ? 'ele-Expand' : 'ele-Fold'"@click="handleChangeCollapse"class="layout-header-expand-icon"/>......</div>
</template>
<script lang="ts" setup>
import { useLayoutConfigStore } from "../../stores/layoutConfig";
import { onMounted, ref } from "vue";
import { useRoute, useRouter, onBeforeRouteUpdate } from "vue-router";
import type {RouteLocationNormalized,RouteRecordNormalized,
} from "vue-router";
const route = useRoute();
const router = useRouter();
const layoutConfig = useLayoutConfigStore();
//  点击展开或收起左侧菜单
function handleChangeCollapse() {layoutConfig.isCollapse = !layoutConfig.isCollapse;
}
</script>
<style></style>
第十三步、导航面包屑功能实现
获取当前页面路由对象 route ,从路由对象中获取matched可获取当前路由的上N级路由对象,然后将数据
渲染到面包屑处在layoutHeader/breadcrumb.vue组件中实现:
<template><div class="layout-header-breadcrumb"><!-- 收缩图标 --><SvgIcon:name="layoutConfig.isCollapse ? 'ele-Expand' : 'ele-Fold'"@click="handleChangeCollapse"class="layout-header-expand-icon"/><!-- 面包屑 --><el-breadcrumb separator="/"><!-- v-for过滤效果 --><TransitionGroup name="breadcrumb"><el-breadcrumb-itemv-for="(item, index) in breadcrumbList":key="item.path"><!-- 最后一级路由(当前路由),不可点击跳转 --><span v-if="index === breadcrumbList.length - 1" class="flex-center"><SvgIcon v-if="item.meta.icon" :name="item.meta.icon" :size="14" />{{ item.meta.title }}</span><a v-else @click.prevent="handleLink(item)" class="flex-center"><SvgIcon v-if="item.meta.icon" :name="item.meta.icon" :size="14" />{{ item.meta.title }}</a></el-breadcrumb-item></TransitionGroup></el-breadcrumb></div>
</template><script lang="ts" setup>
import { useLayoutConfigStore } from "../../stores/layoutConfig";
import { onMounted, ref } from "vue";
import { useRoute, useRouter, onBeforeRouteUpdate } from "vue-router";
import type {RouteLocationNormalized,RouteRecordNormalized,
} from "vue-router";
const route = useRoute();
const router = useRouter();
// 面包屑渲染数据
const breadcrumbList = ref<RouteRecordNormalized[]>([]);
// 用于第一次加载时触发
onMounted(() => {getBreadcrumb(route);
});
// 路由更新时触发,当前目标路由对象
onBeforeRouteUpdate((to) => {getBreadcrumb(to);
});
function getBreadcrumb(to: RouteLocationNormalized) {// 过滤出当前有 meta.title 值且isBreadcrumb不为false的路由对象const matched = to.matched.filter((item) => item.meta && item.meta.title && item.meta.isBreadcrumb !== false);breadcrumbList.value = matched || [];
}const layoutConfig = useLayoutConfigStore();
//  点击展开或收起左侧菜单
function handleChangeCollapse() {layoutConfig.isCollapse = !layoutConfig.isCollapse;
}
// 点击面包屑的某标题跳转
function handleLink(_route: RouteRecordNormalized) {const { redirect, path } = _route;if (redirect) {router.push(<string>redirect);} else {router.push(path);}
}
</script>
<style></style>
上面的 src/styles/transition.scss文件中已经存在面包屑切换效果了。
第十四步、全屏退出全屏功能实现
我使用vueUse实现全屏非全屏步骤、官网:https://vueuse.org/、中文网:https://www.vueusejs.com/
- 安装 VueUse
npm i @vueuse/core
- 使用
useFullscreen函数实现全屏效果
<template><div class="layout-header-user"><div class="layout-header-user-icon mr5" @click="handleToggleFullscreen"><SvgIcon name="ele-FullScreen" /></div></div>
</template>
<script lang="ts" setup>
import { useFullscreen,useDark } from "@vueuse/core";
import { useLayoutConfigStore } from "../../stores/layoutConfig";
const layoutConfig = useLayoutConfigStore();
// 全屏切换
const { isFullscreen, toggle: toggleFullscreen } = useFullscreen();
// 点击切换全屏
async function handleToggleFullscreen() {await toggleFullscreen();// 更新状态layoutConfig.isFullscreen = isFullscreen.value;
}
</script>
<style></style>
第十五步、暗黑主题切换
Element Plus版本支持暗黑模式,导入暗黑样式文件,然后在index.html 的 html标签上添加一个class="dark" 的类名即可切换为暗黑模式。
- 在
src\styles\index.scss中导入暗黑主题css变量文件,我会把暗黑主题的变量文件放到最后
// ElementPlus 组件所有样式
@use 'element-plus/dist/index.css';
@use './app.scss';
@use './transition.scss';
// 暗黑主题-ElementPlus-CSS变量
@use 'element-plus/theme-chalk/dark/css-vars.css';
// 暗黑主题-自定义CSS样式
@use './dark.scss';
- 使用useDark实现高亮/暗黑模式动态切换
<template><div class="layout-header-user">......<div class="layout-header-user-icon mr5"><el-switchv-model="isDark"@change="changeDark"inline-promptactive-icon="ele-Moon"inactive-icon="ele-Sunny"style="--el-switch-on-color: #333"/></div>......</div>
</template>
<script lang="ts" setup>
import { useFullscreen,useDark } from "@vueuse/core";
import { useLayoutConfigStore } from "../../stores/layoutConfig";
const layoutConfig = useLayoutConfigStore();
// 全屏切换
const { isFullscreen, toggle: toggleFullscreen } = useFullscreen();
// 点击切换全屏
async function handleToggleFullscreen() {await toggleFullscreen();// 更新状态layoutConfig.isFullscreen = isFullscreen.value;
}
// 暗黑模式切换,会将状态值自动保存到localStorage中,:`vueuse-color-scheme: dark|auto`
// 会自动监听isDaek值得变化,来切换到对应主题
const isDark = useDark({initialValue:'dark'
});
// 切换暗黑模式,更新状态值
function changeDark(isDark:boolean){layoutConfig.isDark = isDark;
}
</script>
<style></style>
第十五步、监听 Pinia 状态持久化
在 src/stores/layoutConfig.ts 最后添加对 state 的监听器,一旦state更新,则保存到浏览器的
localStorage 中
import { defineStore } from 'pinia'
import { Local } from '@/utils/storage'
import { nextTick } from 'vue'
export const useLayoutConfigStore = defineStore('layoutConfig', {state: (): layoutConfigState => {return {isCollapse: false, // 菜单是否折叠globalTitle: "手撸管理后台", // 网站主标题isFullscreen: false, // 是否全屏isDark: false, // 黑暗模式}},getters: { },actions: {// 更新状态updateState(state:layoutConfigState){// 将传递的值更新到state状态中this.$patch(state)}}
})
nextTick(() => {const layoutConfig = useLayoutConfigStore()// 监听状态变化,将状态持久化layoutConfig.$subscribe((mutation, state) => {// 保存到浏览器的localStorage中Local.set('layoutConfig', state)})
})
在 App.vue 中的 onMounted 钩子中,当应用加载则读取localStorage中的 layoutConfig 状态值,更新到state 上
<script setup lang="ts" name="App">
import { onMounted } from 'vue';
import { Local } from './utils/storage';
import { useLayoutConfigStore } from './stores/layoutConfig';
const layoutConfigStore = useLayoutConfigStore();
onMounted(()=>{// 获取localStorage配置const layoutConfig = Local.get('layoutConfig');if(layoutConfig){layoutConfigStore.updateState(layoutConfig);}
})
</script>
<template><div class="h100"><router-view></router-view></div>
</template>
<style scoped></style>
效果:
下一篇:Vue3实战五、面包屑,收缩菜单,高亮暗黑主题切换,全屏功能实现>>>