采购软件管理系统小时seo百度关键词点击器
目录
- 作业介绍
- eye ray(计算像素坐标实际对应的空间坐标)
- rayTriangleIntersect 三角形与光线求交
- 其他代码
- Object及其派生
- Renerer.cpp
- trace
- castRay
GitHub主页:https://github.com/sdpyy
games101项目作业代码:https://github.com/sdpyy1/CppLearn/tree/main/games101
作业介绍

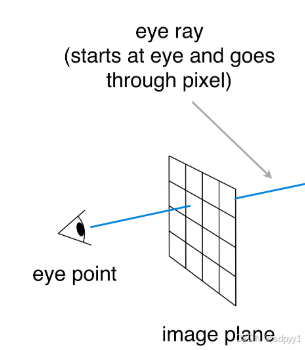
eye ray(计算像素坐标实际对应的空间坐标)
这里首先需要回顾一下光栅化过程中的各种space转换
- Model Space 模型自身的局部坐标系,类如.obj文件中定义的顶点位置,并不会随着在空间中移动而修改
- World Space 全局坐标系,所有物体在此空间中进行定位和交互
- View Space 以摄像机为原点的坐标系,看向-Z方向
- Clip Space 经投影矩阵(Projection Matrix)变换后的标准化坐标空间(范围[-1,1])
- Screen Space 经过视口转换映射到屏幕上
- Raster Space 用于表示最终渲染图像中每个像素的位置
遍历像素是在Raster Space中进行的,第一步要计算摄像机看向每个像素时,实际上看向的空间坐标。(在这里意识到之前学习的一个误区,经过视口变化后,xy坐标范围从[-1,1]变化为[0,width/heigth],而z坐标并不是变成从0开始,然后向-z变化,而是主要看最大深度和最小深度是如何设置的)
- x和y都加0.5移动到像素中心
- x + 0.5 / w i d t h , y + 0.5 / h e i g h t x+0.5/width,y+0.5/height x+0.5/width,y+0.5/height 缩小到[0,1]
- 下一步 2 ∗ ( i + 0.5 ) / w i d t h − 1 2 * ( i+0.5 )/width - 1 2∗(i+0.5)/width−1,扩大2倍左移一个单位,这样就移动到了[-1,1] (由于屏幕原点在左上角,y越往下越大,但是在NDC空间,y越往下越小,所以要反转y坐标)
- 因为原来屏幕不一定是正方形,需要给x*宽高比(此时已经在NDC坐标下)
- 最后将NDC坐标转换为摄像机视角下的坐标(给了fov,就是给了znear的位置),给x、y乘以tan(deg2rad(scene.fov * 0.5f)),这样就得到了当眼睛看向一个像素时,它实际上在znear上的位置
- 确实没有必要继续逆转换了,因为znear上的坐标在透视投影过程中并不会变化
给出这部分的完整代码
for (int j = 0; j < scene.height; ++j){for (int i = 0; i < scene.width; ++i){// generate primary ray directionfloat x;float y;// TODO: Find the x and y positions of the current pixel to get the direction// vector that passes through it.// Also, don't forget to multiply both of them with the variable *scale*, and// x (horizontal) variable with the *imageAspectRatio*// 映射到[-1,1]x = 2 * (i + 0.5) / scene.width - 1;y = 1 - 2 * (j + 0.5) / scene.height;// 找到对应znear的坐标x = x * scale * imageAspectRatio;y = y * scale;Vector3f dir = Vector3f(x, y, -1); // Don't forget to normalize this direction!normalize(dir);framebuffer[m++] = castRay(eye_pos, dir, scene, 0);}UpdateProgress(j / (float)scene.height);}
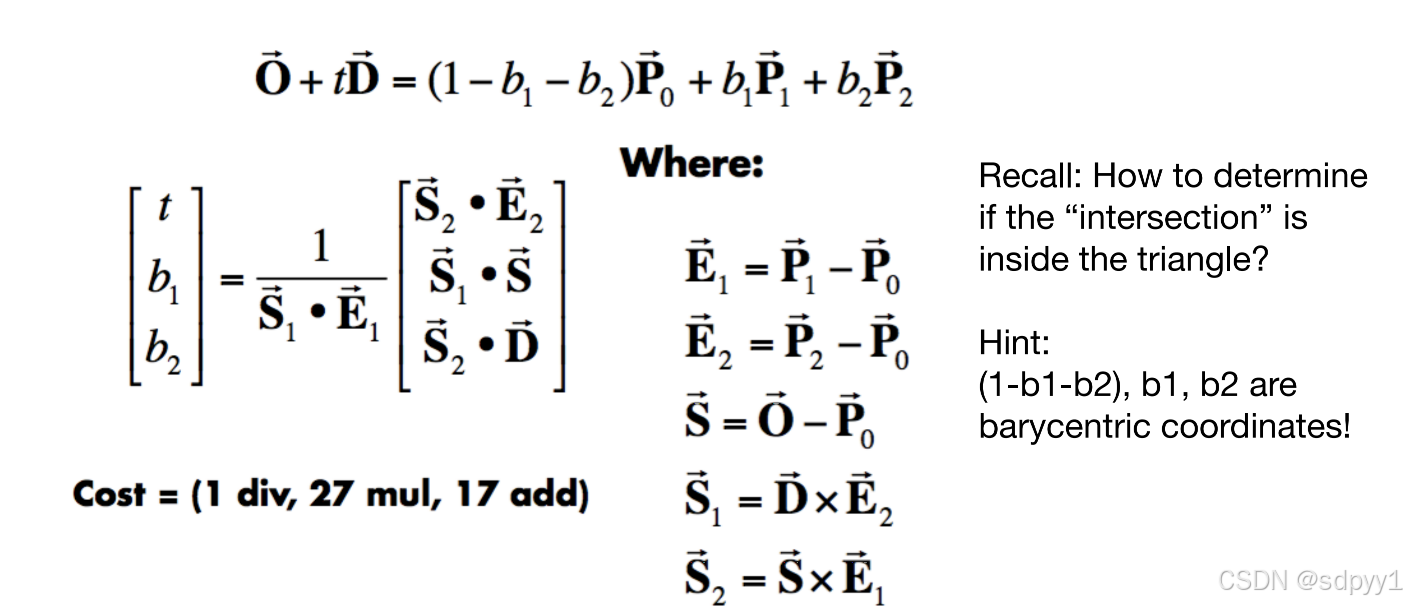
rayTriangleIntersect 三角形与光线求交
这里比较容易,因为有现成的公式,如果有交点,那这个交点可以用重心坐标表示,所以可以得出图中的等式,直接代码实现即可,最后记得判断结果的合理性(t要大于0,重心坐标三个分量都要大于0,等式已经限定了三者相加为1)
完整代码
bool rayTriangleIntersect(const Vector3f& v0, const Vector3f& v1, const Vector3f& v2, const Vector3f& orig,const Vector3f& dir, float& tnear, float& u, float& v)
{Vector3f e1 = v1-v0;Vector3f e2 = v2-v0;Vector3f s = orig - v0;Vector3f s1 = crossProduct(dir,e2);Vector3f s2 = crossProduct(s,e1);Vector3f tmp(dotProduct(s2,e2), dotProduct(s1,s), dotProduct(s2,dir));Vector3f ans = tmp/ dotProduct(s1,e1);tnear = ans.x;u = ans.y;v = ans.z;if (tnear > 0 && u>=0 && v>=0 && 1-u-v>0){return true;}return false;
}
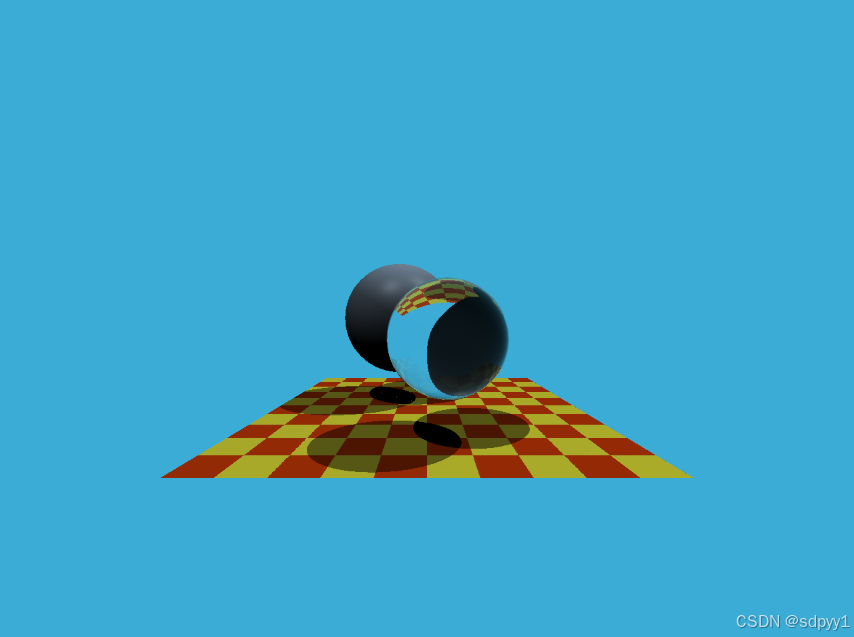
上边两步做完后,作业就结束了,输出的图如下
其他代码
Object及其派生
class Object
{
public:Object(): materialType(DIFFUSE_AND_GLOSSY), ior(1.3), Kd(0.8), Ks(0.2), diffuseColor(0.2), specularExponent(25){}virtual ~Object() = default;// 光线与Object是否有交点virtual bool intersect(const Vector3f&, const Vector3f&, float&, uint32_t&, Vector2f&) const = 0;// 负责计算交点处的表面属性virtual void getSurfaceProperties(const Vector3f&, const Vector3f&, const uint32_t&, const Vector2f&, Vector3f&,Vector2f&) const = 0;// 返回Object的漫反射颜色virtual Vector3f evalDiffuseColor(const Vector2f&) const{return diffuseColor;}// material propertiesMaterialType materialType;// 折射率float ior;// 漫反射和高光反射系数float Kd, Ks;// 漫反射颜色Vector3f diffuseColor;// 高光指数(Phong模型参数),控制高光区域的大小和锐利程度(值越大,高光越集中)float specularExponent;
};
Object有两个实现类Sphere和MeshTriangle
首先看看 Sphere
class Sphere : public Object
{
public:Sphere(const Vector3f& c, const float& r): center(c), radius(r), radius2(r * r){}// 实现求交 就是光线的方程与球的隐式方程联立求解bool intersect(const Vector3f& orig, const Vector3f& dir, float& tnear, uint32_t&, Vector2f&) const override{// analytic solutionVector3f L = orig - center;float a = dotProduct(dir, dir);float b = 2 * dotProduct(dir, L);float c = dotProduct(L, L) - radius2;float t0, t1;if (!solveQuadratic(a, b, c, t0, t1))return false;if (t0 < 0)t0 = t1;if (t0 < 0)return false;tnear = t0;return true;}// 返回的是法线void getSurfaceProperties(const Vector3f& P, const Vector3f&, const uint32_t&, const Vector2f&,Vector3f& N, Vector2f&) const override{// 球表面一点的法线就是这一点与圆心连接的线N = normalize(P - center);}Vector3f center;float radius, radius2;
};
其中求交问题参考下图,就是联立求解,solveQuadratic用来求二次方程的根

紧接着看一下MeshTriangle
class MeshTriangle : public Object
{
public:// 参数为顶点数组、索引数组、三角形数量、对应的纹理坐标MeshTriangle(const Vector3f* verts, const uint32_t* vertsIndex, const uint32_t& numTris, const Vector2f* st){uint32_t maxIndex = 0;for (uint32_t i = 0; i < numTris * 3; ++i)if (vertsIndex[i] > maxIndex)maxIndex = vertsIndex[i];maxIndex += 1;vertices = std::unique_ptr<Vector3f[]>(new Vector3f[maxIndex]);memcpy(vertices.get(), verts, sizeof(Vector3f) * maxIndex);vertexIndex = std::unique_ptr<uint32_t[]>(new uint32_t[numTris * 3]);memcpy(vertexIndex.get(), vertsIndex, sizeof(uint32_t) * numTris * 3);numTriangles = numTris;stCoordinates = std::unique_ptr<Vector2f[]>(new Vector2f[maxIndex]);memcpy(stCoordinates.get(), st, sizeof(Vector2f) * maxIndex);}// 求交 就是上边实现的功能bool intersect(const Vector3f& orig, const Vector3f& dir, float& tnear, uint32_t& index,Vector2f& uv) const override{bool intersect = false;for (uint32_t k = 0; k < numTriangles; ++k){const Vector3f& v0 = vertices[vertexIndex[k * 3]];const Vector3f& v1 = vertices[vertexIndex[k * 3 + 1]];const Vector3f& v2 = vertices[vertexIndex[k * 3 + 2]];float t, u, v;if (rayTriangleIntersect(v0, v1, v2, orig, dir, t, u, v) && t < tnear){tnear = t;uv.x = u;uv.y = v;index = k;intersect |= true;}}return intersect;}void getSurfaceProperties(const Vector3f&, const Vector3f&, const uint32_t& index, const Vector2f& uv, Vector3f& N,Vector2f& st) const override{const Vector3f& v0 = vertices[vertexIndex[index * 3]];const Vector3f& v1 = vertices[vertexIndex[index * 3 + 1]];const Vector3f& v2 = vertices[vertexIndex[index * 3 + 2]];Vector3f e0 = normalize(v1 - v0);Vector3f e1 = normalize(v2 - v1);// 直接用了顶点法线作为内部的法线N = normalize(crossProduct(e0, e1));const Vector2f& st0 = stCoordinates[vertexIndex[index * 3]];const Vector2f& st1 = stCoordinates[vertexIndex[index * 3 + 1]];const Vector2f& st2 = stCoordinates[vertexIndex[index * 3 + 2]];// 插值出来的纹理坐标st = st0 * (1 - uv.x - uv.y) + st1 * uv.x + st2 * uv.y;}// 生成一个缩放后的棋盘格纹理,颜色在橙色和黄色之间交替Vector3f evalDiffuseColor(const Vector2f& st) const override{float scale = 5;float pattern = (fmodf(st.x * scale, 1) > 0.5) ^ (fmodf(st.y * scale, 1) > 0.5);return lerp(Vector3f(0.815, 0.235, 0.031), Vector3f(0.937, 0.937, 0.231), pattern);}std::unique_ptr<Vector3f[]> vertices;uint32_t numTriangles;std::unique_ptr<uint32_t[]> vertexIndex;std::unique_ptr<Vector2f[]> stCoordinates;
};
Renerer.cpp
这里就是实现整体渲染逻辑的地方
trace
求交运行的地方,从代码可以看出每个像素都需要和场景中的每个物体进行求交,效率较低,下一次作业就是加速这快东西
std::optional<hit_payload> trace(const Vector3f &orig, const Vector3f &dir,const std::vector<std::unique_ptr<Object> > &objects)
{float tNear = kInfinity;std::optional<hit_payload> payload;// 用场景中所有的物体与光线进行求交for (const auto & object : objects){float tNearK = kInfinity;uint32_t indexK;Vector2f uvK;if (object->intersect(orig, dir, tNearK, indexK, uvK) && tNearK < tNear){payload.emplace();payload->hit_obj = object.get();payload->tNear = tNearK;payload->index = indexK;payload->uv = uvK;tNear = tNearK;}}return payload;
}
castRay
光线追踪的整体逻辑,递归函数很好理解,出口也很明显,具体逻辑都写注释了
Vector3f castRay(const Vector3f &orig, const Vector3f &dir, const Scene& scene,int depth)
{// 递归出口if (depth > scene.maxDepth) {return Vector3f(0.0,0.0,0.0);}Vector3f hitColor = scene.backgroundColor;if (auto payload = trace(orig, dir, scene.get_objects()); payload){Vector3f hitPoint = orig + dir * payload->tNear;Vector3f N; // normalVector2f st; // st coordinates// 获取该点位的法线和纹理坐标payload->hit_obj->getSurfaceProperties(hitPoint, dir, payload->index, payload->uv, N, st);// 根据材质不同进行不同的处理switch (payload->hit_obj->materialType) {// 反射+折射case REFLECTION_AND_REFRACTION:{// 获得反射方向Vector3f reflectionDirection = normalize(reflect(dir, N));// 获得折射方向Vector3f refractionDirection = normalize(refract(dir, N, payload->hit_obj->ior));// 当光线击中物体表面后,反射光线的起点如果直接使用 hitPoint(命中点),由于浮点数精度限制,新光线可能会误判为与同一物体再次相交(即“自交”),导致渲染错误(如表面黑斑或无限递归)。 根据反射方向与表面法线 N 的关系,将起点沿法线方向 轻微偏移,使其略微离开原始表面,避免自交。Vector3f reflectionRayOrig = (dotProduct(reflectionDirection, N) < 0) ?hitPoint - N * scene.epsilon :hitPoint + N * scene.epsilon;Vector3f refractionRayOrig = (dotProduct(refractionDirection, N) < 0) ?hitPoint - N * scene.epsilon :hitPoint + N * scene.epsilon;// 递归计算这次反射和折射后映射到该位置的颜色Vector3f reflectionColor = castRay(reflectionRayOrig, reflectionDirection, scene, depth + 1);Vector3f refractionColor = castRay(refractionRayOrig, refractionDirection, scene, depth + 1);// 菲涅尔效应(Fresnel Effect)动态混合反射和折射颜色。菲涅尔效应表明,光线与表面交互时,反射和折射的比例取决于入射角:当光线 垂直入射(入射角接近 0°)时,反射比例 kr 较小,折射占主导。float kr = fresnel(dir, N, payload->hit_obj->ior);hitColor = reflectionColor * kr + refractionColor * (1 - kr);break;}// 只有反射case REFLECTION:{float kr = fresnel(dir, N, payload->hit_obj->ior);Vector3f reflectionDirection = reflect(dir, N);Vector3f reflectionRayOrig = (dotProduct(reflectionDirection, N) < 0) ?hitPoint + N * scene.epsilon :hitPoint - N * scene.epsilon;hitColor = castRay(reflectionRayOrig, reflectionDirection, scene, depth + 1) * kr;break;}// BPhong光照模型了进行默认,这里重点要看一下阴影是如何产生的default:{// [comment]// We use the Phong illumation model int the default case. The phong model// is composed of a diffuse and a specular reflection component.// [/comment]Vector3f lightAmt = 0, specularColor = 0;Vector3f shadowPointOrig = (dotProduct(dir, N) < 0) ?hitPoint + N * scene.epsilon :hitPoint - N * scene.epsilon;// [comment]// Loop over all lights in the scene and sum their contribution up// We also apply the lambert cosine law// [/comment]for (auto& light : scene.get_lights()) {Vector3f lightDir = light->position - hitPoint;// square of the distance between hitPoint and the lightfloat lightDistance2 = dotProduct(lightDir, lightDir);lightDir = normalize(lightDir);float LdotN = std::max(0.f, dotProduct(lightDir, N));// is the point in shadow, and is the nearest occluding object closer to the object than the light itself?// 在一个只考虑光照模型的hitpoint上,以这个点为起始点,向光源方向发出光线,查看是否被遮挡,如果遮挡物距离比光影距离近,则生成阴影auto shadow_res = trace(shadowPointOrig, lightDir, scene.get_objects());bool inShadow = shadow_res && (shadow_res->tNear * shadow_res->tNear < lightDistance2);// 如果被遮挡,则漫反射贡献将变为0lightAmt += inShadow ? 0 : light->intensity * LdotN;Vector3f reflectionDirection = reflect(-lightDir, N);specularColor += powf(std::max(0.f, -dotProduct(reflectionDirection, dir)),payload->hit_obj->specularExponent) * light->intensity;}hitColor = lightAmt * payload->hit_obj->evalDiffuseColor(st) * payload->hit_obj->Kd + specularColor * payload->hit_obj->Ks;break;}}}return hitColor;
}