网站设计的人员分工朝阳seo
安全帽数据集
这里我们使用的安全帽数据集是HelmentDetection,这是一个公开数据集,里面包含5000张voc标注格式的图像,分为三个类别,分别是 0: head 1: helmet 2: person
安全帽数据集下载地址、
我们将数据集下载后,首先需要将其转换为YOLO标注格式:
import os
import xml.etree.ElementTree as ET
import random
import shutildef collect_classes(voc_annotations_dir):"""收集 VOC 数据集中所有出现的类别。:param voc_annotations_dir: 包含 VOC 格式 XML 文件的目录:return: 类别名称的集合"""classes = set()# 遍历所有 XML 文件for xml_file in os.listdir(voc_annotations_dir):if not xml_file.endswith('.xml'):continue# 构造输入文件路径voc_annotation_path = os.path.join(voc_annotations_dir, xml_file)# 解析 XML 文件tree = ET.parse(voc_annotation_path)root = tree.getroot()# 遍历每个目标并收集类别for obj in root.findall('object'):class_name = obj.find('name').textclasses.add(class_name)return sorted(classes)def create_class_mapping(classes):"""创建类别名称到索引的映射字典。:param classes: 类别名称列表:return: 类别名称到索引的映射字典"""return {class_name: idx for idx, class_name in enumerate(classes)}def convert_voc_to_yolo(voc_annotation_path, yolo_annotation_path, class_mapping):"""将单个 VOC 格式的标注文件转换为 YOLO 格式。:param voc_annotation_path: VOC 格式 XML 文件路径:param yolo_annotation_path: 输出的 YOLO 格式 TXT 文件路径:param class_mapping: 类别名称到索引的映射字典"""# 解析 XML 文件tree = ET.parse(voc_annotation_path)root = tree.getroot()# 获取图像尺寸size = root.find('size')image_width = int(size.find('width').text)image_height = int(size.find('height').text)# 存储 YOLO 格式的目标信息yolo_lines = []# 遍历每个目标for obj in root.findall('object'):# 获取类别名称class_name = obj.find('name').textif class_name not in class_mapping:print(f"类别 '{class_name}' 不在映射中,跳过该目标。")continue# 获取类别索引class_index = class_mapping[class_name]# 获取边界框坐标bbox = obj.find('bndbox')xmin = float(bbox.find('xmin').text)ymin = float(bbox.find('ymin').text)xmax = float(bbox.find('xmax').text)ymax = float(bbox.find('ymax').text)# 转换为 YOLO 格式的归一化坐标 (x_center, y_center, width, height)x_center = (xmin + xmax) / 2.0 / image_widthy_center = (ymin + ymax) / 2.0 / image_heightwidth = (xmax - xmin) / image_widthheight = (ymax - ymin) / image_height# 添加到 YOLO 格式的行yolo_lines.append(f"{class_index} {x_center:.6f} {y_center:.6f} {width:.6f} {height:.6f}")# 写入 YOLO 格式的文件with open(yolo_annotation_path, 'w') as f:f.write("\n".join(yolo_lines))def split_dataset(xml_files, train_ratio=0.8, val_ratio=0.2, test_ratio=0.1):"""将数据集按照指定比例划分为训练集、验证集和测试集。:param xml_files: 所有 XML 文件的列表:param train_ratio: 训练集比例,默认 0.7:param val_ratio: 验证集比例,默认 0.2:param test_ratio: 测试集比例,默认 0.1:return: 划分后的三个集合(训练集、验证集、测试集)"""random.shuffle(xml_files)  # 随机打乱文件顺序total_count = len(xml_files)# 计算各部分的分割点train_end = int(total_count * train_ratio)val_end = train_end + int(total_count * val_ratio)# 划分数据集train_set = xml_files[:train_end]val_set = xml_files[train_end:val_end]test_set = xml_files[val_end:]return train_set, val_set, test_setdef organize_files(voc_images_dir, voc_annotations_dir, output_dir, train_set, val_set, test_set):"""将图片和标注文件按照划分结果组织到对应的文件夹中。:param voc_images_dir: 包含原始图片的目录:param voc_annotations_dir: 包含原始标注文件的目录:param output_dir: 输出目录:param train_set: 训练集文件名列表:param val_set: 验证集文件名列表:param test_set: 测试集文件名列表"""# 创建输出目录结构images_dir = os.path.join(output_dir, "images")labels_dir = os.path.join(output_dir, "labels")os.makedirs(os.path.join(images_dir, "train"), exist_ok=True)os.makedirs(os.path.join(images_dir, "val"), exist_ok=True)os.makedirs(os.path.join(images_dir, "test"), exist_ok=True)os.makedirs(os.path.join(labels_dir, "train"), exist_ok=True)os.makedirs(os.path.join(labels_dir, "val"), exist_ok=True)os.makedirs(os.path.join(labels_dir, "test"), exist_ok=True)def copy_files(file_list, subset):"""复制文件到对应的子集目录中。"""for file_name in file_list:base_name = os.path.splitext(file_name)[0]# 复制图片src_image_path = os.path.join(voc_images_dir, base_name + ".png")dst_image_path = os.path.join(images_dir, subset, base_name + ".png")if os.path.exists(src_image_path):shutil.copy(src_image_path, dst_image_path)else:print(f"警告:未找到图片文件 {src_image_path}")# 复制标注文件src_label_path = os.path.join(voc_annotations_dir, base_name + ".txt")dst_label_path = os.path.join(labels_dir, subset, base_name + ".txt")if os.path.exists(src_label_path):shutil.copy(src_label_path, dst_label_path)else:print(f"警告:未找到标注文件 {src_label_path}")# 复制训练集、验证集和测试集copy_files(train_set, "train")copy_files(val_set, "val")copy_files(test_set, "test")print("图片和标注文件已成功组织到对应的文件夹中!")def batch_convert_voc_to_yolo(voc_images_dir, voc_annotations_dir, output_dir):"""批量将 VOC 格式的标注文件转换为 YOLO 格式,并划分数据集。:param voc_images_dir: 包含原始图片的目录:param voc_annotations_dir: 包含 VOC 格式 XML 文件的目录:param output_dir: 输出目录"""# 收集所有类别classes = collect_classes(voc_annotations_dir)class_mapping = create_class_mapping(classes)print("发现以下类别:", classes)# 获取所有 XML 文件xml_files = [f for f in os.listdir(voc_annotations_dir) if f.endswith('.xml')]# 划分数据集train_set, val_set, test_set = split_dataset(xml_files)print(f"训练集数量:{len(train_set)},验证集数量:{len(val_set)},测试集数量:{len(test_set)}")# 创建临时标注输出目录temp_labels_dir = os.path.join(output_dir, "temp_labels")os.makedirs(temp_labels_dir, exist_ok=True)# 转换所有标注文件为 YOLO 格式for xml_file in xml_files:# 构造输入和输出文件路径voc_annotation_path = os.path.join(voc_annotations_dir, xml_file)yolo_annotation_path = os.path.join(temp_labels_dir, os.path.splitext(xml_file)[0] + ".txt")# 转换单个文件convert_voc_to_yolo(voc_annotation_path, yolo_annotation_path, class_mapping)# 组织文件到对应的文件夹中organize_files(voc_images_dir, temp_labels_dir, output_dir, train_set, val_set, test_set)# 删除临时标注目录shutil.rmtree(temp_labels_dir)print("数据集转换与组织完成!")# 示例用法
if __name__ == "__main__":# 输入和输出目录voc_images_dir = "D:/project_mine/detection/datasets/HelmetDetection/train/JPEGImages"voc_annotations_dir = "D:/project_mine/detection/datasets/HelmetDetection/train/Annotations"output_dir = "D:/project_mine/detection/datasets/anquanmao"# 批量转换与划分batch_convert_voc_to_yolo(voc_images_dir, voc_annotations_dir, output_dir)
模型训练
模型训练很简单,我们只需要修改一下数据集配置文件即可
path: ../datasets/anquanmao # dataset root dir
train: images/train # train images (relative to 'path') 4 images
val: images/val # val images (relative to 'path') 4 images
test: # test images (optional)
# Classes
names:0: head1: helmet2: person
随后,即可开启模型训练
from ultralytics import YOLOmodel=YOLO("yolo11.yaml")#.load("yolo11n.pt")#.load("yolo11s.pt")  # build from YAML and transfer weights
# Train the model
results = model.train(data="anquanmao.yaml",epochs=60,batch=16,       # 根据GPU显存调整(T4建议batch=8)imgsz=640,device="0",     # 指定GPU IDoptimizer="AdamW",lr0=1e-4,warmup_epochs=4,label_smoothing=0.1,amp=True)
结果如下:
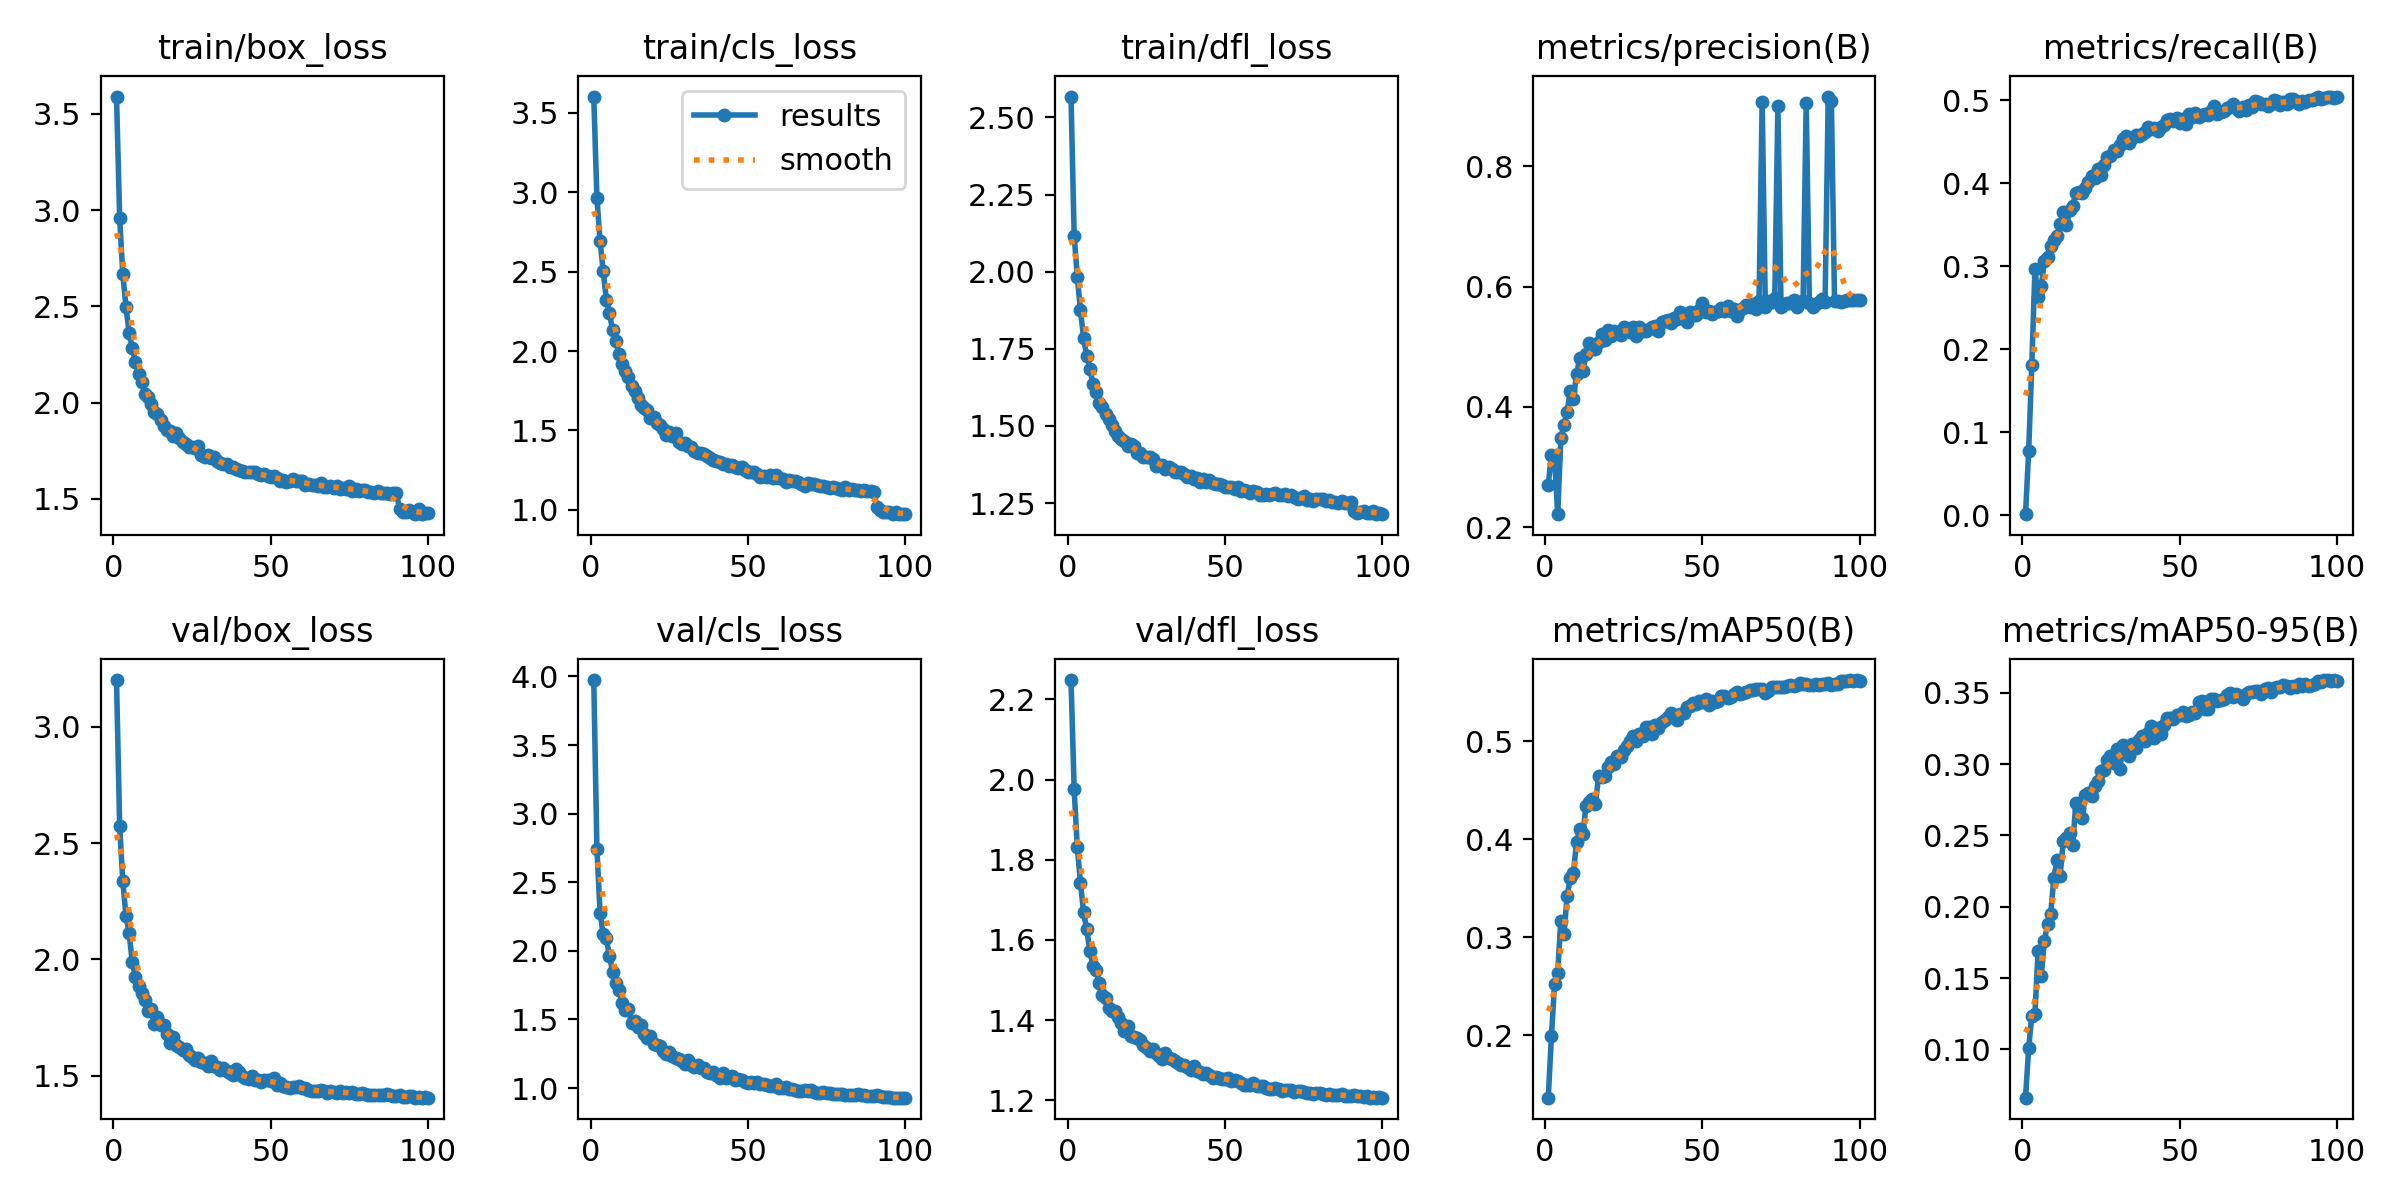
这里的mAP值不高是因为,人这个类别似乎缺失了,导致人这个类别的AP值为0,单独来看,头和安全帽的AP值均在0.5以上。
ONNX模型推理
为使其能够具有更好的扩展性,我们将原本的pt模型文件转换为ONNX格式,随后进行推理,代码如下:
import time
import cv2
import numpy as np
import onnxruntime
#from my_utils.detect.utils import detections_dog
from utils import xywh2xyxy, multiclass_nmsclass SafeHat:#初始化YOLO模型def __init__(self, path, conf_thres=0.7, iou_thres=0.5):self.conf_threshold = conf_thresself.iou_threshold = iou_thres# Initialize modelself.initialize_model(path)#调用推理def __call__(self, image):return self.detect_objects(image)#加载模型并获取模型的输入与输出结构def initialize_model(self, path):self.session = onnxruntime.InferenceSession(path,providers=onnxruntime.get_available_providers())self.get_input_details()self.get_output_details()#执行模型推理过程def detect_objects(self, image):input_tensor = self.prepare_input(image)# Perform inference on the imageoutputs = self.inference(input_tensor)self.boxes, self.scores, self.class_ids = self.process_output(outputs)return self.boxes, self.scores, self.class_ids#前处理操作def prepare_input(self, image):self.img_height, self.img_width = image.shape[:2]input_img = cv2.cvtColor(image, cv2.COLOR_BGR2RGB)# Resize input imageinput_img = cv2.resize(input_img, (self.input_width, self.input_height))# Scale input pixel values to 0 to 1input_img = input_img / 255.0input_img = input_img.transpose(2, 0, 1)input_tensor = input_img[np.newaxis, :, :, :].astype(np.float32)return input_tensor#具体使用onnx推理def inference(self, input_tensor):outputs = self.session.run(self.output_names, {self.input_names[0]: input_tensor})return outputs#后处理操作def process_output(self, output):predictions = np.squeeze(output[0]).T# Filter out object confidence scores below thresholdscores = np.max(predictions[:, 4:], axis=1)predictions = predictions[scores > self.conf_threshold, :]scores = scores[scores > self.conf_threshold]if len(scores) == 0:return [], [], []# Get the class with the highest confidenceclass_ids = np.argmax(predictions[:, 4:], axis=1)# Get bounding boxes for each objectboxes = self.extract_boxes(predictions)indices = multiclass_nms(boxes, scores, class_ids, self.iou_threshold)return boxes[indices], scores[indices], class_ids[indices]#box转换,包含尺度变换与xywh转换def extract_boxes(self, predictions):# Extract boxes from predictionsboxes = predictions[:, :4]boxes = self.rescale_boxes(boxes)boxes = xywh2xyxy(boxes)return boxes#尺度变换def rescale_boxes(self, boxes):# Rescale boxes to original image dimensionsinput_shape = np.array([self.input_width, self.input_height, self.input_width, self.input_height])boxes = np.divide(boxes, input_shape, dtype=np.float32)boxes *= np.array([self.img_width, self.img_height, self.img_width, self.img_height])return boxesdef get_input_details(self):model_inputs = self.session.get_inputs()self.input_names = [model_inputs[i].name for i in range(len(model_inputs))]self.input_shape = model_inputs[0].shapeself.input_height = self.input_shape[2]self.input_width = self.input_shape[3]def get_output_details(self):model_outputs = self.session.get_outputs()self.output_names = [model_outputs[i].name for i in range(len(model_outputs))]#     def draw_detections(self, image, draw_scores=True, mask_alpha=0.4):
#
#         return detections_dog(image, self.boxes, self.scores,
#                               self.class_ids, mask_alpha)
#
#
# if __name__ == "__main__":
#     model_path = "anquanmao.onnx"  # 替换为你的 TFLite 模型路径
#     image_path = "down_head.png"          # 替换为你的测试图像路径
#
#     # 初始化模型
#     detector = YOLODet(model_path)
#
#     # 加载图像
#     image = cv2.imread(image_path)
#
#     # 检测对象
#     boxes, scores, class_ids = detector(image)
#
#     # 绘制检测结果
#     result_image = detector.draw_detections(image)
#
#     # 显示结果
#     cv2.imshow("Detections", result_image)
#     cv2.waitKey(0)
#     cv2.destroyAllWindows()