服务好的做培训网站网络推广软文怎么写
文章目录
- aws(学习笔记第三十八课) codepipeline-build-deploy-github-manual
- 学习内容:
- 1. 整体架构
- 1.1 代码链接
- 1.2 全体处理架构
- 2. 代码分析
- 2.1 创建`ImageRepo`,并设定给`FargateTaskDef`
- 2.2 创建`CodeBuild project`
- 2.3 对`CodeBuild project`赋予权限(`ECR`的`image repo`)
- 2.4 生成`lambda`函数触发`codebuild`的首次执行
- 2.4.1 生成`lambda`函数触发`codebuild`
- 2.4.2 `lambda`函数触发`codebuild`的代码
- 2.4.3 `AWS Custom Resource`的代码
- 2.5 创建`vpc`和`ecs cluster`
- 2.5.1 创建`vpc`
- 2.5.2 创建`蓝绿部署`
- 2.5 创建`Application Loader Balancer`
- 2.6 创建`fargate service`
- 2.6.1 创建`fargate service`
- 2.6.1 在`fargate service`上进行`application target group`的`attach`
- 2.7 创建`code pipeline`
- 2.7.2 `codepipe`整体架构
- 2.7.1 创建`pipeline artifacts`
- 2.7.2 创建`source stage`
- 2.7.3 创建`build stage`
- 2.7.4 创建`deploy stage`
- 2.8 创建`code pipeline`
- 2.8.1 为`code build`设定`github`的`confidential`
- 2.8.2 最终创建`pipeline`
- 3 执行`CDK`
aws(学习笔记第三十八课) codepipeline-build-deploy-github-manual
- 使用
codepipeline-build-deploy
学习内容:
- 使用
codepipeline,★代码库不采用codecommit,而是github - 使用
codebuild - 使用
codedeploy
1. 整体架构
1.1 代码链接
- 代码链接(codepipeline-build-deploy-github-manual)
- 同时可以参照aws(学习笔记第二十课) codecommit以及codedeploy进行开发
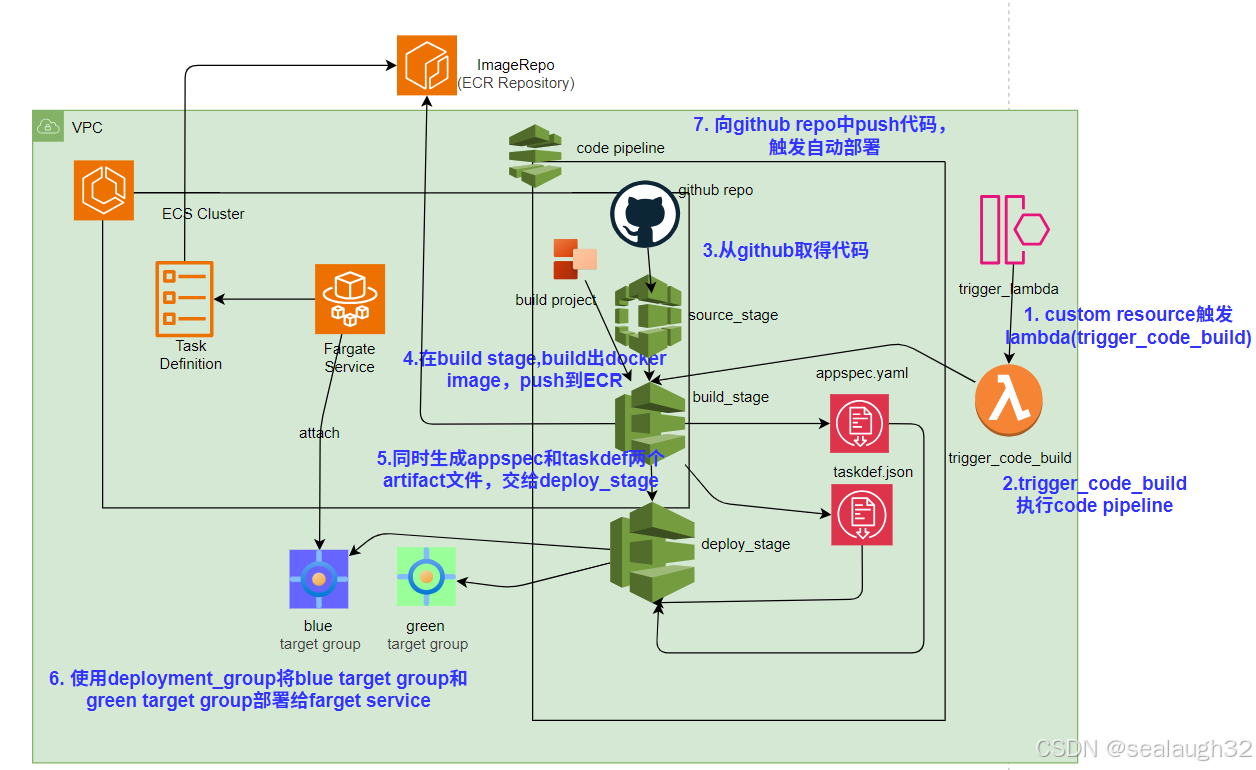
1.2 全体处理架构
2. 代码分析
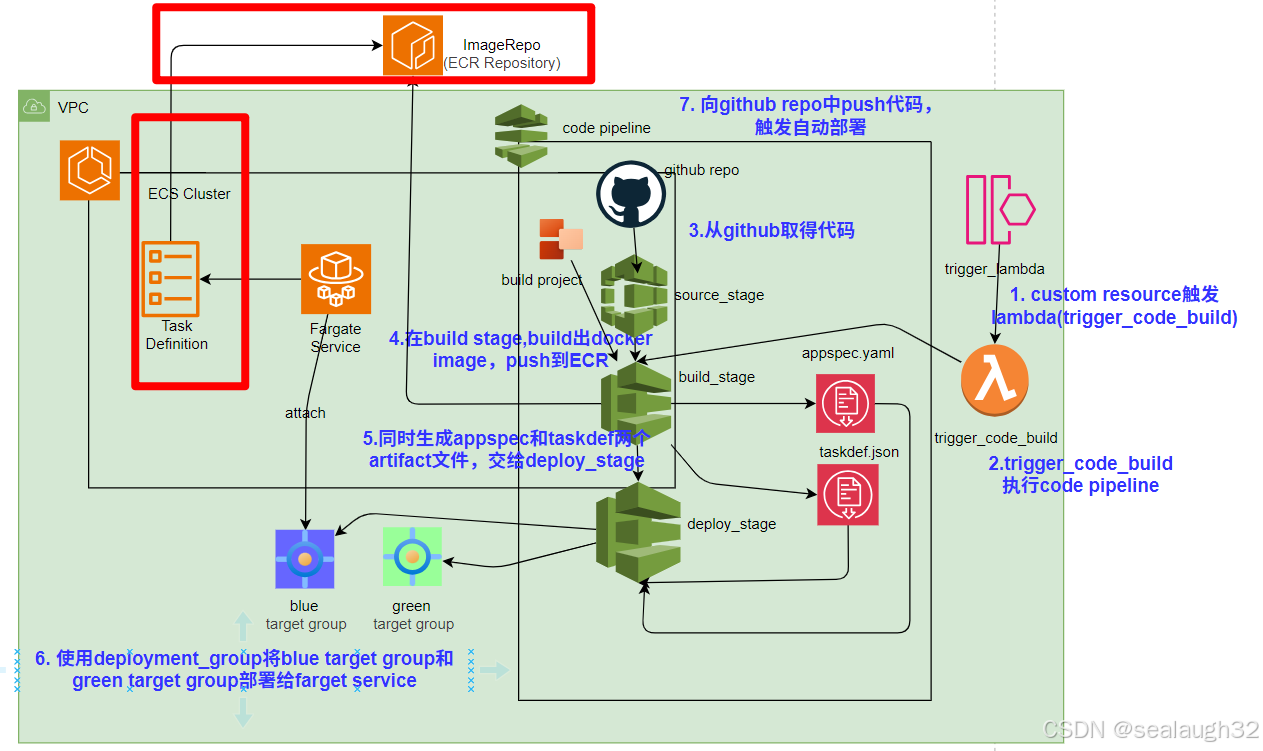
2.1 创建ImageRepo,并设定给FargateTaskDef
# Creates an Elastic Container Registry (ECR) image repositoryimage_repo = ecr.Repository(self, "ImageRepo")# Creates a Task Definition for the ECS Fargate servicefargate_task_def = ecs.FargateTaskDefinition(self, "FargateTaskDef")fargate_task_def.add_container("Container",container_name="web",image=ecs.ContainerImage.from_ecr_repository(image_repo),port_mappings=[{"containerPort": 80}])
注意,这里并没有指定具体的image的URI以及tag,这里只是指定了Image Repo(ECR)。后面会在CodeBuildStage阶段build出来docker image,并且接在CodeDeployStage阶段将该docker image部署到Fargate Service。
2.2 创建CodeBuild project
# CodeBuild project that builds the Docker imagebuild_image = codebuild.Project(self, "BuildImage",build_spec=codebuild.BuildSpec.from_source_filename("buildspec.yaml"),source=codebuild.Source.git_hub(owner="bufanli", # TODO: Replace with your GitHub usernamerepo="web_app", # TODO: Replace with your GitHub repository namebranch_or_ref="main",),environment=codebuild.BuildEnvironment(privileged=True),environment_variables={"AWS_ACCOUNT_ID": codebuild.BuildEnvironmentVariable(value=os.getenv('CDK_DEFAULT_ACCOUNT') or ""),"REGION": codebuild.BuildEnvironmentVariable(value=os.getenv('CDK_DEFAULT_REGION') or ""),"IMAGE_TAG": codebuild.BuildEnvironmentVariable(value="latest"),"IMAGE_REPO_NAME": codebuild.BuildEnvironmentVariable(value=image_repo.repository_name),"REPOSITORY_URI": codebuild.BuildEnvironmentVariable(value=image_repo.repository_uri),"TASK_DEFINITION_ARN": codebuild.BuildEnvironmentVariable(value=fargate_task_def.task_definition_arn),"TASK_ROLE_ARN": codebuild.BuildEnvironmentVariable(value=fargate_task_def.task_role.role_arn),"EXECUTION_ROLE_ARN": codebuild.BuildEnvironmentVariable(value=fargate_task_def.execution_role.role_arn)}
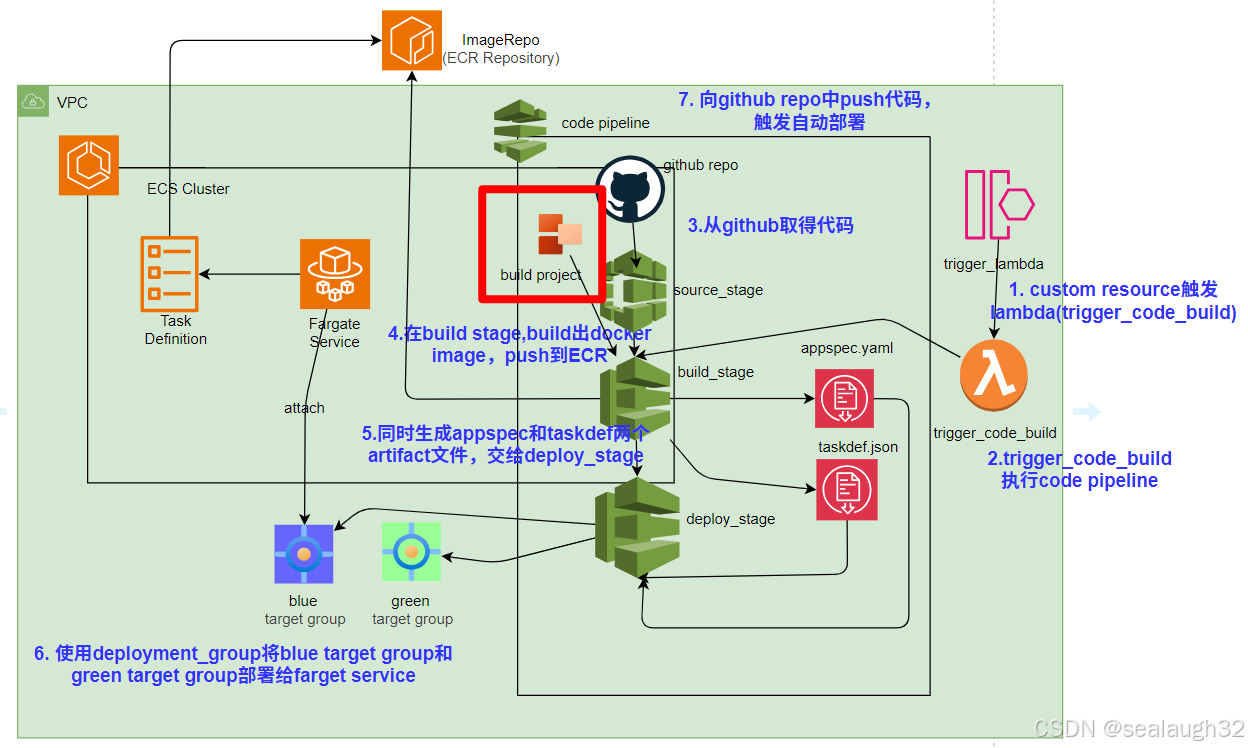
这里,设定build_spec文件,在app/buildspec.yml中,
- 设定
pre_build登录ecr (Amazon Elastic Container Registry(ECR),方便之后的向ecr进行镜像的登录。commands:- echo Logging in to Amazon ECR...- aws --version- aws ecr get-login-password --region $REGION | docker login --username AWS --password-stdin $AWS_ACCOUNT_ID.dkr.ecr.$REGION.amazonaws.com - 进行
build处理
这里的
注意,这里的环境给commands:- echo Building the Docker image...- docker build -t $IMAGE_REPO_NAME:$IMAGE_TAG .- docker tag $IMAGE_REPO_NAME:$IMAGE_TAG $AWS_ACCOUNT_ID.dkr.ecr.$REGION.amazonaws.com/$IMAGE_REPO_NAME:$IMAGE_TAGbuild_spec.yml传递变量都是通过env(环境变量)来传递的。
可以看到,这里build执行docker build命令,进行docker image的build。

- 进行
post build处理
这里的变量也同样是在codebuild中,在cdk的codebuild.project中,通过变量传递过来的。
commands:- echo Pushing the Docker image...- docker push $AWS_ACCOUNT_ID.dkr.ecr.$REGION.amazonaws.com/$IMAGE_REPO_NAME:$IMAGE_TAG- echo Container image to be used $REPOSITORY_URI:$IMAGE_TAG- sed -i "s|REPOSITORY_URI|${REPOSITORY_URI}|g" taskdef.json- sed -i "s|IMAGE_TAG|${IMAGE_TAG}|g" taskdef.json- sed -i "s|TASK_ROLE_ARN|${TASK_ROLE_ARN}|g" taskdef.json- sed -i "s|EXECUTION_ROLE_ARN|${EXECUTION_ROLE_ARN}|g" taskdef.json- sed -i "s|TASK_DEFINITION_ARN|${TASK_DEFINITION_ARN}|g" appspec.yaml- cat appspec.yaml && cat taskdef.json
2.3 对CodeBuild project赋予权限(ECR的image repo)
# Grants CodeBuild project access to pull/push images from/to ECR repoimage_repo.grant_pull_push(build_image)
2.4 生成lambda函数触发codebuild的首次执行
2.4.1 生成lambda函数触发codebuild
整体架构如下:
- aws custom resource triggers lambda on create event
- lambda executes code build project
- code build project starts source stage,build stage and deploy stage
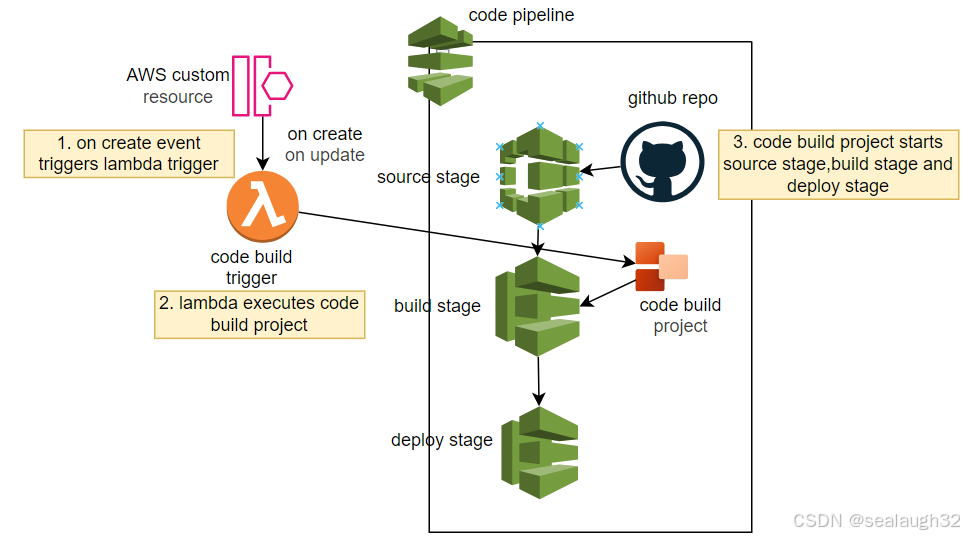
2.4.2 lambda函数触发codebuild的代码
CDK代码
注意,这里赋予了lamba权限,允许执行code build
# Lambda function that triggers CodeBuild image build projecttrigger_code_build = lambda_.Function(self, "BuildLambda",architecture=lambda_.Architecture.ARM_64,code=lambda_.Code.from_asset("lambda"),handler="trigger-build.handler",runtime=lambda_.Runtime.NODEJS_18_X,environment={"CODEBUILD_PROJECT_NAME": build_image.project_name,"REGION": os.getenv('CDK_DEFAULT_REGION') or ""},# Allows this Lambda function to trigger the buildImage CodeBuild projectinitial_policy=[iam.PolicyStatement(effect=iam.Effect.ALLOW,actions=["codebuild:StartBuild"],resources=[build_image.project_arn])])
lambda函数代码
const {CodeBuildClient,StartBuildCommand,
} = require("@aws-sdk/client-codebuild");exports.handler = async (event) => {const region = process.env.REGION;const buildProjectName = process.env.CODEBUILD_PROJECT_NAME;const codebuild = new CodeBuildClient({ region: region });const buildCommand = new StartBuildCommand({ projectName: buildProjectName });console.log("Triggering CodeBuild Project...");const buildResponse = await codebuild.send(buildCommand);console.log(buildResponse);return {statusCode: 200,body: "CodeBuild Project building...",};
};
2.4.3 AWS Custom Resource的代码
# Triggers a Lambda function using AWS SDKtrigger_lambda = custom.AwsCustomResource(self, "BuildLambdaTrigger",install_latest_aws_sdk=True,policy=custom.AwsCustomResourcePolicy.from_statements([iam.PolicyStatement(effect=iam.Effect.ALLOW,actions=["lambda:InvokeFunction"],resources=[trigger_code_build.function_arn],)]),on_create={"service": "Lambda","action": "invoke","physical_resource_id": custom.PhysicalResourceId.of("id"),"parameters": {"FunctionName": trigger_code_build.function_name,"InvocationType": "Event",},},on_update={"service": "Lambda","action": "invoke","parameters": {"FunctionName": trigger_code_build.function_name,"InvocationType": "Event",},})
2.5 创建vpc和ecs cluster
2.5.1 创建vpc
# Creates VPC for the ECS Clustercluster_vpc = ec2.Vpc(self, "ClusterVpc",ip_addresses=ec2.IpAddresses.cidr(cidr_block="10.75.0.0/16"))# Deploys the cluster VPC after the initial image build triggerscluster_vpc.node.add_dependency(trigger_lambda)
注意,这里创建vpc需要依赖trigger _lambda,只有当trigger lambda的aws custom resource创建好了,才能创建vpc。
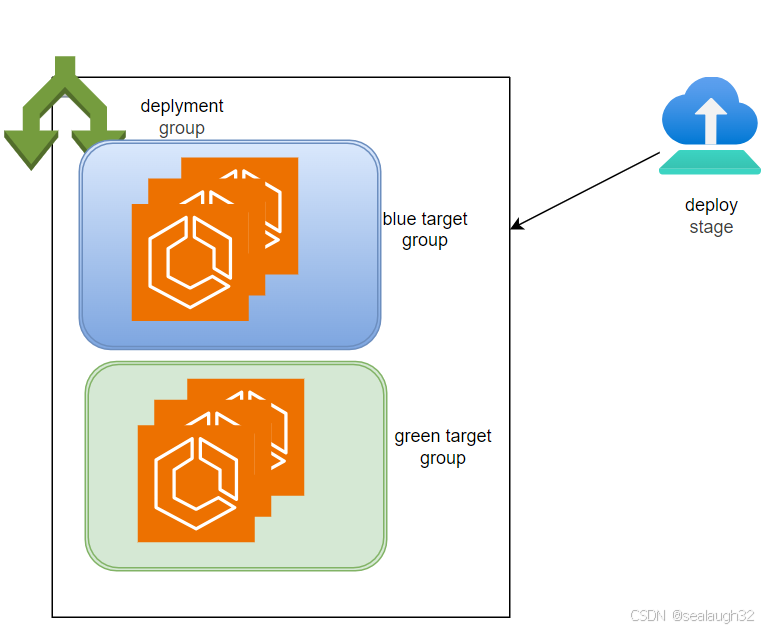
2.5.2 创建蓝绿部署
-
蓝绿部署的整体架构

- 【1】利用
CodeDepoly服务,开始进行application deploy - 【2】生成导入新的
application的Green Group - 【3】在
Application对开发者设定对Green Group的访问的listener - 【4】开发者对
Green Group进行动作确认,确保生产环境上没有问题 - 【5】在
Application对一般用户设定对访问的listener,让其指向Green Group,设定Blue Group为新的Green Group - 【6】删除原来的
Blue Group。这里取决于设定的策略,可能不是马上删除。
- 【1】利用
-
创建
ApplicationTargetGroup(blue)蓝色目标组target_group_blue = elb.ApplicationTargetGroup(self, "BlueTargetGroup",target_group_name="alb-blue-tg",target_type=elb.TargetType.IP,port=80,vpc=cluster_vpc)
-
创建
ApplicationTargetGroup(green)绿色目标组# Creates a new green Target Grouptarget_group_green = elb.ApplicationTargetGroup(self, "GreenTargetGroup",target_group_name="alb-green-tg",target_type=elb.TargetType.IP,port=80,vpc=cluster_vpc)
2.5 创建Application Loader Balancer
注意,这里 default_target_groups=[target_group_blue]默认的target group设成了blue group。
# Creates a new green Target Grouptarget_group_green = elb.ApplicationTargetGroup(self, "GreenTargetGroup",target_group_name="alb-green-tg",target_type=elb.TargetType.IP,port=80,vpc=cluster_vpc)# Creates a Security Group for the Application Load Balancer (ALB)albSg = ec2.SecurityGroup(self, "AlbSecurityGroup",vpc=cluster_vpc,allow_all_outbound=True)albSg.add_ingress_rule(peer=ec2.Peer.any_ipv4(),connection=ec2.Port.tcp(80),description="Allows access on port 80/http",remote_rule=False)# Creates a public ALBpublic_alb = elb.ApplicationLoadBalancer(self, "PublicAlb",vpc=cluster_vpc,internet_facing=True,security_group=albSg)# Adds a listener on port 80 to the ALBalb_listener = public_alb.add_listener("AlbListener80",open=False,port=80,default_target_groups=[target_group_blue])
2.6 创建fargate service
2.6.1 创建fargate service
注意,这里直接在创建fargate service的时候,直接创建ecs cluster。并且将task def和ecs cluster联系起来。
# Creates an ECS Fargate servicefargate_service = ecs.FargateService(self, "FargateService",desired_count=1,service_name="fargate-frontend-service",task_definition=fargate_task_def,cluster=ecs.Cluster(self, "EcsCluster",enable_fargate_capacity_providers=True,vpc=cluster_vpc),# Sets CodeDeploy as the deployment controllerdeployment_controller=ecs.DeploymentController(type=ecs.DeploymentControllerType.CODE_DEPLOY),)
2.6.1 在fargate service上进行application target group的attach
 # Adds the ECS Fargate service to the ALB target group
fargate_service.attach_to_application_target_group(target_group_blue)
2.7 创建code pipeline
2.7.2 codepipe整体架构

2.7.1 创建pipeline artifacts
# Creates new pipeline artifactssource_artifact = pipeline.Artifact("SourceArtifact")build_artifact = pipeline.Artifact("BuildArtifact")

source_artifact是由source_stage作成,由build_stage进行使用build_artifact是由build_stage作成,由deploy_stage进行使用,并且包括:appspec.ymltaskdef.json
2.7.2 创建source stage
# Creates the source stage for CodePipelinesource_stage = pipeline.StageProps(stage_name="Source",actions=[pipelineactions.GitHubSourceAction(action_name="GitHub",owner='XXXXXX', # TODO: Replace with your GitHub usernamerepo='web_app', # TODO: Replace with your GitHub repository namebranch="main",oauth_token=SecretValue.secrets_manager("github-access-token-secret"),output=source_artifact,)])
- 这里,需要设定几个地方:
owner这里是github工程的用户名,这里就是自己的github账号。repo这里是github库的名字。oauth_token,因为需要将aws的url(callback),注册给github,所以需要oauth_token进行验证。因为aws的source stage需要检测到github的commit,自动触发code pipeline,所以需要注册url(callback)。
下面的就是讲本次example程序中的application的部分push到github,创建一个示例的web application。

github的webhooks和codepipeline交互

- 在
cdk中练习使用aws secret manager

2.7.3 创建build stage
# Creates the build stage for CodePipelinebuild_stage = pipeline.StageProps(stage_name="Build",actions=[pipelineactions.CodeBuildAction(action_name="DockerBuildPush",input=pipeline.Artifact("SourceArtifact"),project=build_image,outputs=[build_artifact])])
- 这里使用
source stage生成的source artifact,进行docker build,之后将docker image进行push到aws ecr。 project设定这里要设定成前面创建的build_image
2.7.4 创建deploy stage
- 整体构造
- 创建
deployment group# Creates a new CodeDeploy Deployment Groupdeployment_group = codedeploy.EcsDeploymentGroup(self, "CodeDeployGroup",service=fargate_service,# Configurations for CodeDeploy Blue/Green deploymentsblue_green_deployment_config=codedeploy.EcsBlueGreenDeploymentConfig(listener=alb_listener,blue_target_group=target_group_blue,green_target_group=target_group_green)) - 创建
deploy stage# Creates the deploy stage for CodePipelinedeploy_stage = pipeline.StageProps(stage_name="Deploy",actions=[pipelineactions.CodeDeployEcsDeployAction(action_name="EcsFargateDeploy",app_spec_template_input=build_artifact,task_definition_template_input=build_artifact,deployment_group=deployment_group)])
2.8 创建code pipeline
2.8.1 为code build设定github的confidential
# Store Github credentials to CodeBuildcodebuild.GitHubSourceCredentials(self, "CodeBuildGitHubCreds",access_token=SecretValue.secrets_manager("github-access-token-secret"))
2.8.2 最终创建pipeline
# Creates an AWS CodePipeline with source, build, and deploy stagespipeline.Pipeline(self, "BuildDeployPipeline",pipeline_name="ImageBuildDeployPipeline",stages=[source_stage, build_stage, deploy_stage])
3 执行CDK
执行后继续更新。