简述建设一个商务网站的过程网络推广平台公司
一、背景
版本:【Sentinel-1.8.6】
模式:【Push 模式】
参照官网介绍:生产环境下使用Sentinel ,规则管理及推送模式有以下3种模式: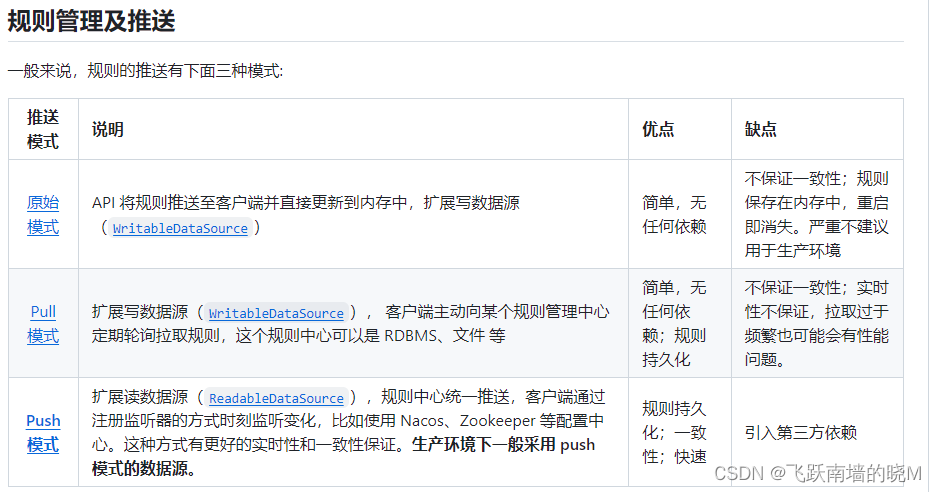
比较之后,目前微服务都使用了各种各样的配置中心,故采用Push 模式来进行持久化,这里也主要介绍集合 Nacos 的持久化。
二、流程结构图
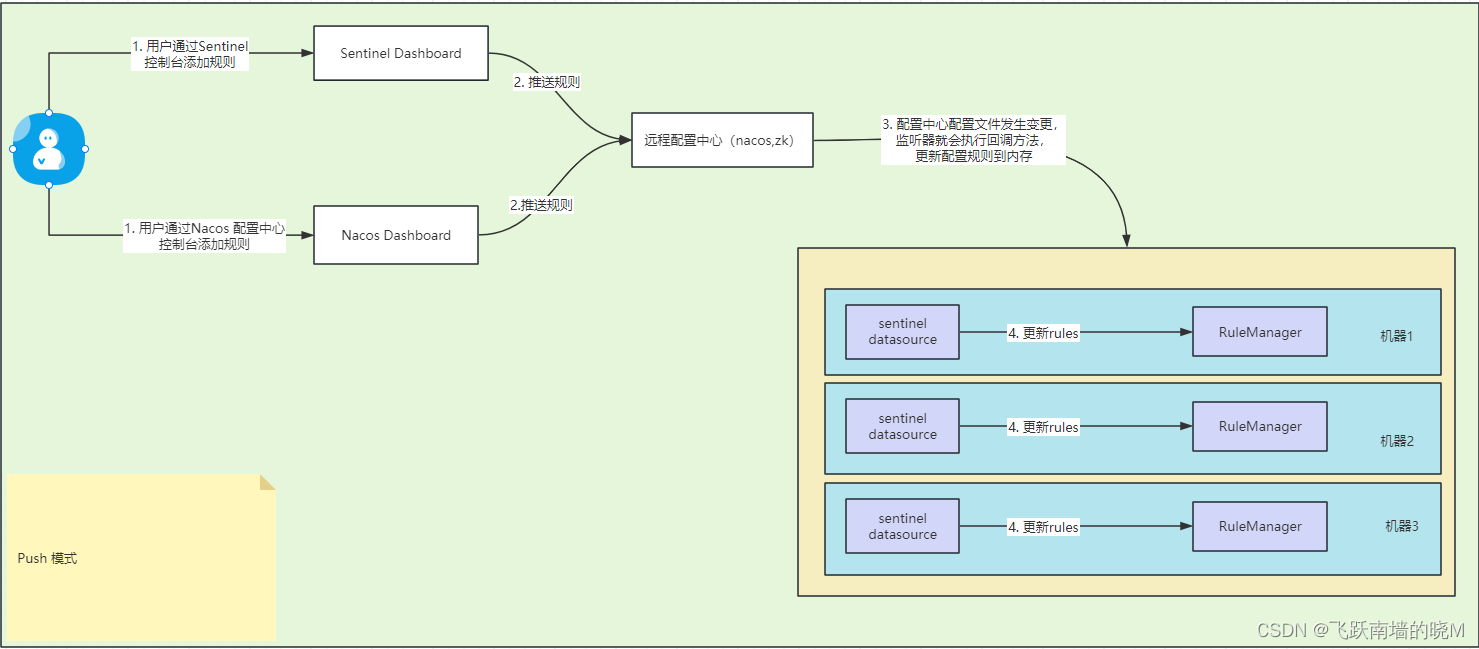
实现思路说明:微服务中增加基于Nacos的写数据源(WritableDataSource),当 Sentinel Dashboard 配置发生变更,则利用 nacos 配置变更通知微服务更新本地缓存。
三、代码整合
1. 在微服务中引入依赖。
 <!--sentinel持久化 采用 Nacos 作为规则配置数据源-->
<dependency><groupId>com.alibaba.csp</groupId><artifactId>sentinel-datasource-nacos</artifactId>
</dependency>
依赖缘由
(ps: 至于为何要引入这个依赖,在此做下展开说明,着急的同学请略过看)
可以看到这个依赖包的源码中只有一个类,那么这个类一定很重要了,看看它具体做了啥:

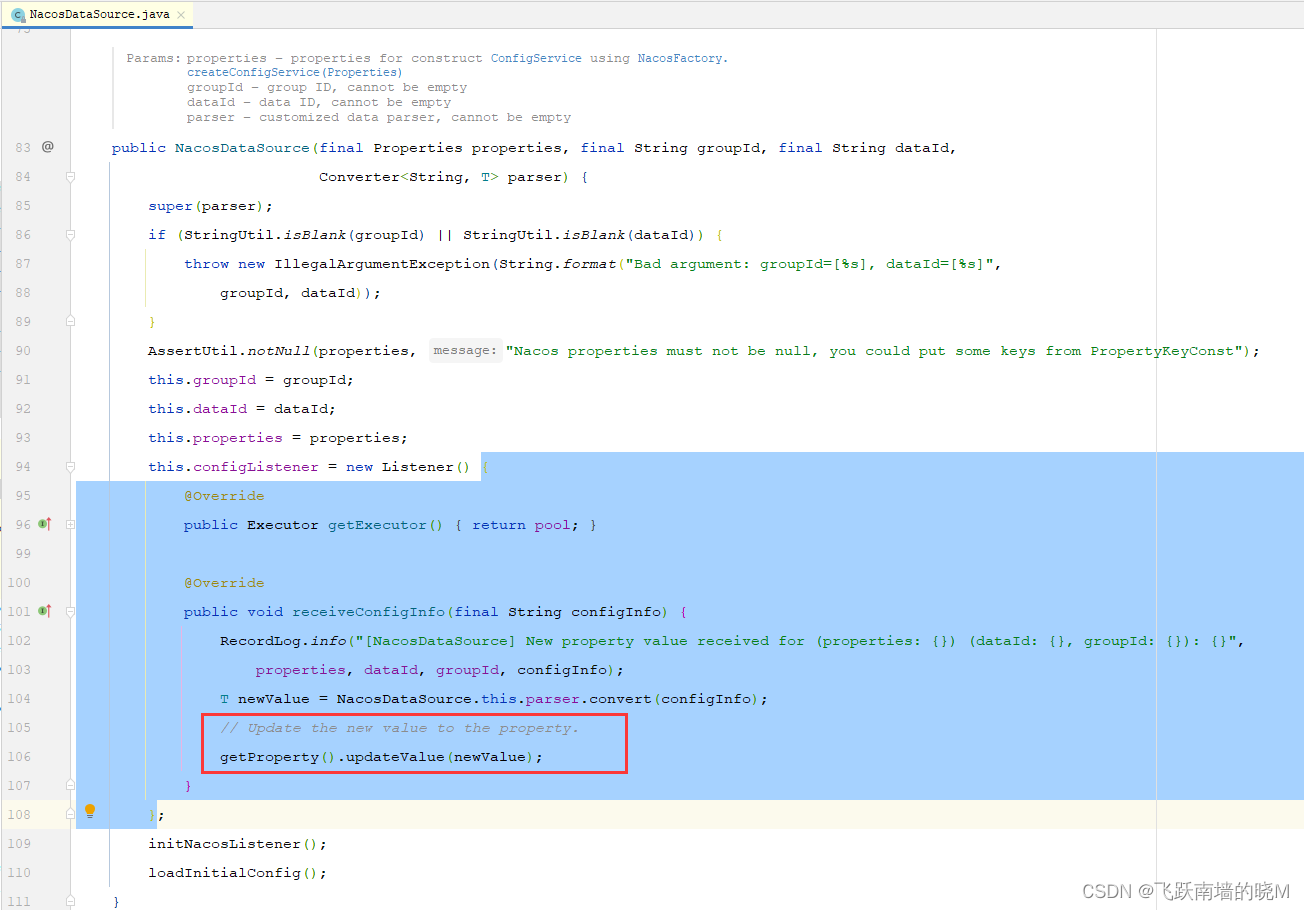
NacosDataSource 中构造方法如下,里面有个重要的东西: configListener,我们先记住红框框起来的地方。
看看具体的方法 initNacosListener(); 和 loadInitialConfig();
// 初始化 Nacos 监听器
private void initNacosListener() {try {// 根据数据源配置信息初始化Nacos 的配置服务: configService this.configService = NacosFactory.createConfigService(this.properties);// 添加配置监听器.configService.addListener(dataId, groupId, configListener);} catch (Exception e) {RecordLog.warn("[NacosDataSource] Error occurred when initializing Nacos data source", e);e.printStackTrace();}
}// 加载Nacos 已有配置文件
private void loadInitialConfig() {try {T newValue = loadConfig();if (newValue == null) {RecordLog.warn("[NacosDataSource] WARN: initial config is null, you may have to check your data source");}getProperty().updateValue(newValue);} catch (Exception ex) {RecordLog.warn("[NacosDataSource] Error when loading initial config", ex);}
}
又由于 NacosDataSource 继承自 AbstractDataSource,故此处的 loadConfig() 方法是调用 com.alibaba.csp.sentinel.datasource.AbstractDataSource#loadConfig() :
@Override
public T loadConfig() throws Exception {return loadConfig(readSource());
}
查看 readSource() 实现:跳转 NacosDataSource.readSource() 中:
@Override
public String readSource() throws Exception {if (configService == null) {throw new IllegalStateException("Nacos config service has not been initialized or error occurred");}// 原来是获取nacos 中的配置return configService.getConfig(dataId, groupId, DEFAULT_TIMEOUT);
}
综上查看,Nacos 已经实现了读取配置的代码,那么我们只需要实现写入部分以及相关的配置即可。
2. 自己实现 Nacos 写入代码
1.定义 NacosWritableDataSource 类
依据读取部分的代码实现,利用 nacos 的 com.alibaba.nacos.api.config.ConfigService#publishConfig(java.lang.String, java.lang.String, java.lang.String) 方法,既会修改持久化文件,也会同步到对应的微服务。代码如下:
public class NacosWritableDataSource<T> implements WritableDataSource<T> {private NacosDataSourceProperties nacosDataSourceProperties;private ConfigService configService;private final Converter<T, String> configEncoder;private final Lock lock = new ReentrantLock(true);public NacosWritableDataSource(NacosDataSourceProperties nacosDataSourceProperties, Converter<T, String> configEncoder) {this.nacosDataSourceProperties = nacosDataSourceProperties;this.configEncoder = configEncoder;// 初始化 Nacos configServiceinitConfigService();}private void initConfigService(){try {this.configService = NacosFactory.createConfigService(buildProperties(nacosDataSourceProperties));} catch (NacosException e) {e.printStackTrace();}}private Properties buildProperties(NacosDataSourceProperties nacosDataSourceProperties) {Properties properties = new Properties();if (!StringUtils.isEmpty(nacosDataSourceProperties.getServerAddr())) {properties.setProperty(PropertyKeyConst.SERVER_ADDR, nacosDataSourceProperties.getServerAddr());} else {properties.setProperty(PropertyKeyConst.ACCESS_KEY, nacosDataSourceProperties.getAccessKey());properties.setProperty(PropertyKeyConst.SECRET_KEY, nacosDataSourceProperties.getSecretKey());properties.setProperty(PropertyKeyConst.ENDPOINT, nacosDataSourceProperties.getEndpoint());}if (!StringUtils.isEmpty(nacosDataSourceProperties.getNamespace())) {properties.setProperty(PropertyKeyConst.NAMESPACE, nacosDataSourceProperties.getNamespace());}if (!StringUtils.isEmpty(nacosDataSourceProperties.getUsername())) {properties.setProperty(PropertyKeyConst.USERNAME, nacosDataSourceProperties.getUsername());}if (!StringUtils.isEmpty(nacosDataSourceProperties.getPassword())) {properties.setProperty(PropertyKeyConst.PASSWORD, nacosDataSourceProperties.getPassword());}return properties;}@Overridepublic void write(T value) throws Exception {lock.lock();try {// 发布新配置configService.publishConfig(nacosDataSourceProperties.getDataId(), nacosDataSourceProperties.getGroupId(), this.configEncoder.convert(value), ConfigType.JSON.getType());} catch (Exception e) {throw e;} finally {lock.unlock();}}@Overridepublic void close() throws Exception {}}上述只实现了数据配置更新与同步,我们还需要根据 Sentinel 的不用规则来区分具体是更新哪个文件,因此有下:
2.定义 SentinelNacosDataSourceHandler类
public class SentinelNacosDataSourceHandler implements SmartInitializingSingleton {private final SentinelProperties sentinelProperties;public SentinelNacosDataSourceHandler(SentinelProperties sentinelProperties) {this.sentinelProperties = sentinelProperties;}//实现SmartInitializingSingleton 的接口后,当所有非懒加载的单例Bean 都初始化完成以后,Spring 的IOC 容器会调用该接口的 afterSingletonsInstantiated() 方法@Overridepublic void afterSingletonsInstantiated() {sentinelProperties.getDatasource().values().forEach(this::registryWriter);}private void registryWriter(DataSourcePropertiesConfiguration dataSourceProperties) {final NacosDataSourceProperties nacosDataSourceProperties = dataSourceProperties.getNacos();if (nacosDataSourceProperties == null) {return;}final RuleType ruleType = nacosDataSourceProperties.getRuleType();// 通过数据源配置的 ruleType 来注册数据源switch (ruleType) {case FLOW:WritableDataSource<List<FlowRule>> flowRuleWriter = new NacosWritableDataSource<>(nacosDataSourceProperties, JSON::toJSONString);WritableDataSourceRegistry.registerFlowDataSource(flowRuleWriter);break;case DEGRADE:WritableDataSource<List<DegradeRule>> degradeRuleWriter = new NacosWritableDataSource<>(nacosDataSourceProperties, JSON::toJSONString);WritableDataSourceRegistry.registerDegradeDataSource(degradeRuleWriter);break;case PARAM_FLOW:WritableDataSource<List<ParamFlowRule>> paramFlowRuleWriter = new NacosWritableDataSource<>(nacosDataSourceProperties, JSON::toJSONString);ModifyParamFlowRulesCommandHandler.setWritableDataSource(paramFlowRuleWriter);break;case SYSTEM:WritableDataSource<List<SystemRule>> systemRuleWriter = new NacosWritableDataSource<>(nacosDataSourceProperties, JSON::toJSONString);WritableDataSourceRegistry.registerSystemDataSource(systemRuleWriter);break;case AUTHORITY:WritableDataSource<List<AuthorityRule>> authRuleWriter = new NacosWritableDataSource<>(nacosDataSourceProperties, JSON::toJSONString);WritableDataSourceRegistry.registerAuthorityDataSource(authRuleWriter);break;default:break;}}
}
3. Spring IOC 管理 SentinelNacosDataSourceHandler
@Configuration(proxyBeanMethods = false)
@AutoConfigureAfter(SentinelAutoConfiguration.class)
public class SentinelNacosDataSourceConfiguration {@Bean@ConditionalOnMissingBeanpublic SentinelNacosDataSourceHandler sentinelNacosDataSourceHandler(SentinelProperties sentinelProperties){return new SentinelNacosDataSourceHandler(sentinelProperties);}}
4. 配置文件
bootstrap.yml 中的配置文件内容如下:
spring:application:name: spring-cloud-sentinel-demo #微服务名称cloud:nacos:config: #配置nacos配置中心地址server-addr: 192.168.0.123:8847username: nacospassword: nacosfile-extension: yml # 指定配置文件的扩展名为ymlnamespace: 6a7dbc5f-b376-41c6-a282-74ad4fd4829b
nacos 中微服务对应的配置文件内容如下:(也就是 application.yml ):
server:port: 8800spring:application:name: spring-cloud-sentinel-demo #微服务名称cloud:nacos: #配置nacos注册中心地址discovery:server-addr: 192.168.0.123:8847username: nacospassword: nacossentinel:transport:dashboard: 192.168.0.123:8091datasource:flow-rules: #流控规则nacos:server-addr: 192.168.0.123:8847namespace: 6a7dbc5f-b376-41c6-a282-74ad4fd4829busername: nacospassword: nacosdataId: ${spring.application.name}-flow-rulesgroupId: SENTINEL_GROUP # 注意groupId对应Sentinel Dashboard中的定义data-type: jsonrule-type: flowdegrade-rules: #降级规则nacos:server-addr: 192.168.0.123:8847namespace: 6a7dbc5f-b376-41c6-a282-74ad4fd4829bdataId: ${spring.application.name}-degrade-rulesgroupId: SENTINEL_GROUPdata-type: jsonrule-type: degradeparam-flow-rules:nacos:server-addr: 192.168.0.123:8847namespace: 6a7dbc5f-b376-41c6-a282-74ad4fd4829bdataId: ${spring.application.name}-param-flow-rulesgroupId: SENTINEL_GROUPdata-type: jsonrule-type: param-flowauthority-rules:nacos:server-addr: 192.168.0.123:8847namespace: 6a7dbc5f-b376-41c6-a282-74ad4fd4829bdataId: ${spring.application.name}-authority-rulesgroupId: SENTINEL_GROUPdata-type: jsonrule-type: authoritysystem-rules:nacos:server-addr: 192.168.0.123:8847namespace: 6a7dbc5f-b376-41c6-a282-74ad4fd4829bdataId: ${spring.application.name}-system-rulesgroupId: SENTINEL_GROUPdata-type: jsonrule-type: system3. 测试
1. 在 Sentinel Dashboard 新建流控规则:

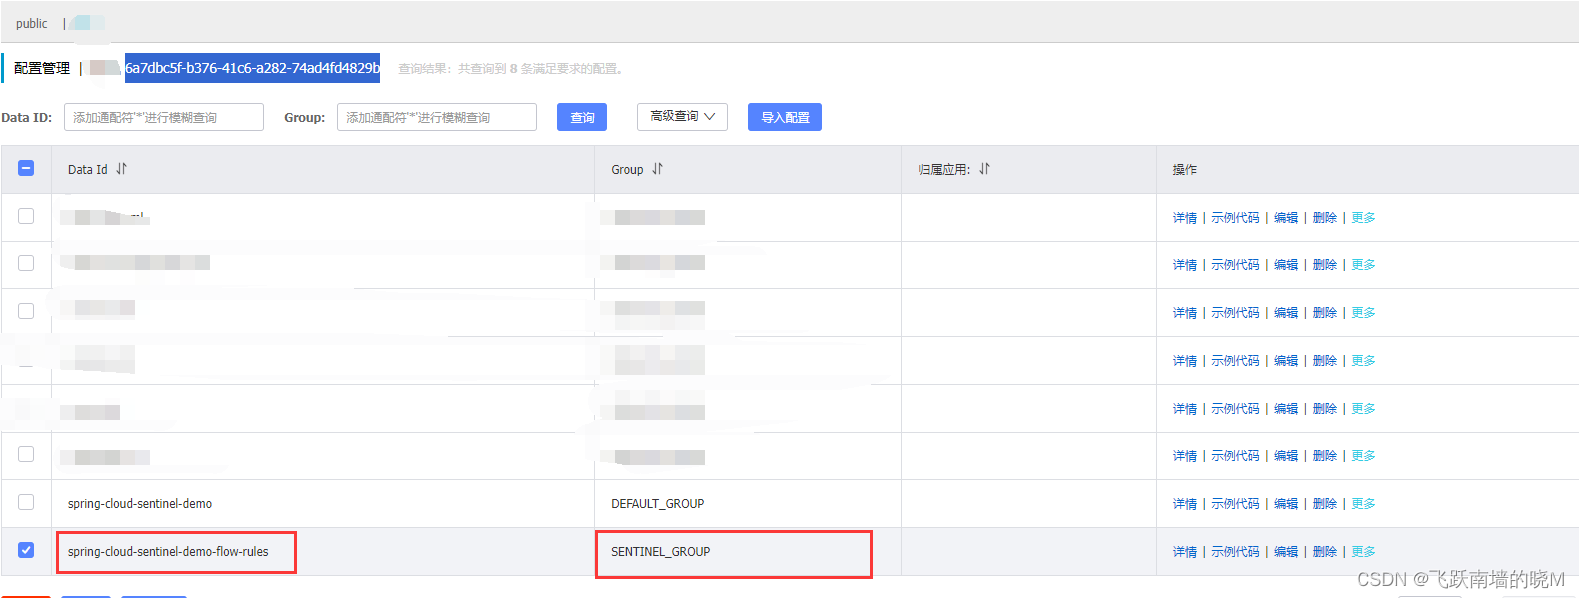
查看 Nacos 配置中心,在对应的 namespace 下多了一个配置文件:spring-cloud-sentinel-demo-flow-rules 因为在上述文件中指定了 flow-rules 数据源的 namespace 和 group :
 查看此配置文件的详情可以看到:内容就是刚才流控规则的序列化内容:
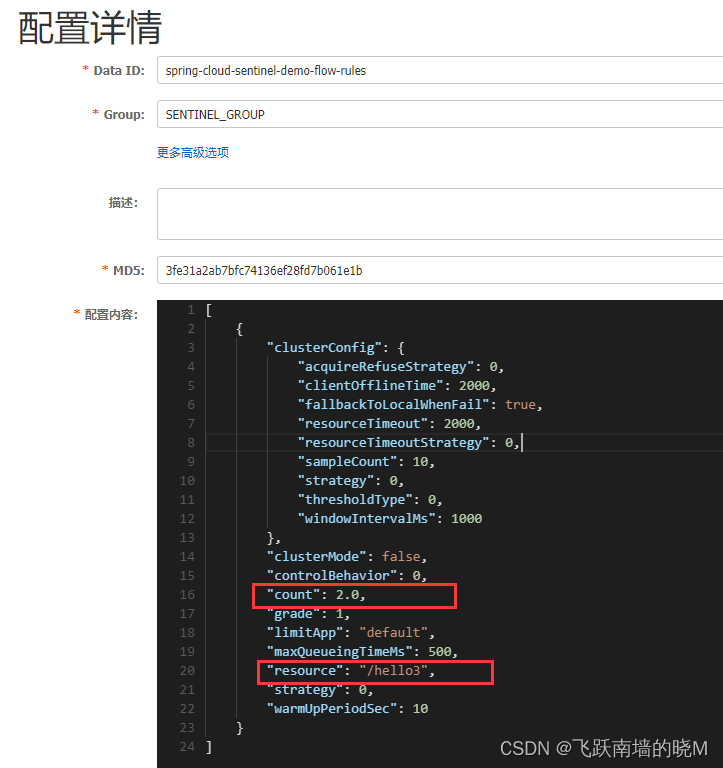
综上,Sentinel Dashboard 新建的规则可以成功序列化到 Nacos 的配置中。
2. 在 Nacos 控制台修改对应的 count,在Sentinel Dashboard 查看是否同步显示:
修改前先查看Sentinel Dashboard 目前流控的阈值为2:

修改Nacos 中 spring-cloud-sentinel-demo-flow-rules 的配置,并发布:
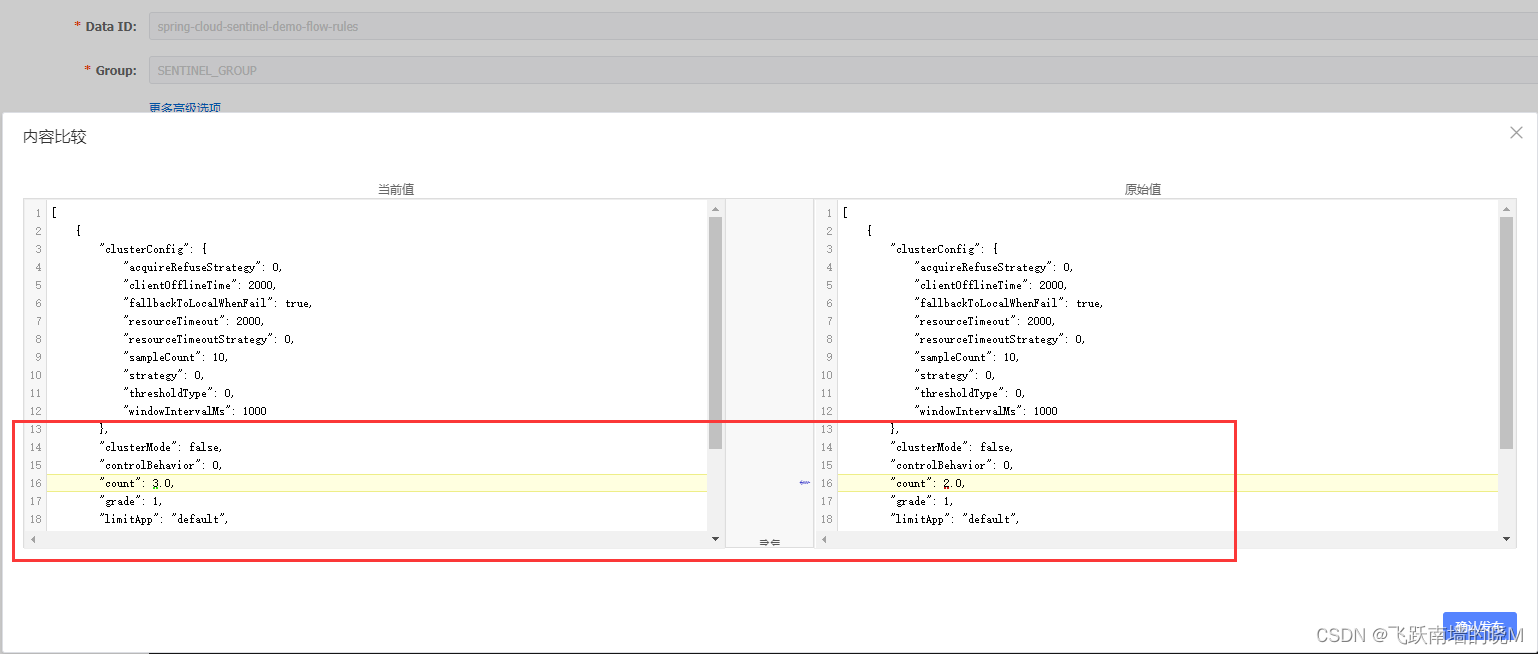
修改后查看 Sentinel Dashboard 目前流控的阈值为3:

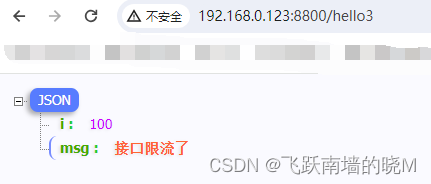
测试流控效果,已可以正常限流:
4. 其他规则也类似于流控规则
四、总结
最后附上这部分源码梳理图,可以结合上述内容一起理解。
