做招标应该关注什么网站seo的基本步骤顺序正确的是
内容将会持续更新,有错误的地方欢迎指正,谢谢!
| 拥有更好的学习体验 —— 不断努力,不断进步,不断探索 |
| 助力快速掌握 物理引擎 学习 为初学者节省宝贵的学习时间,避免困惑! |
前言:
在Unity开发中,构建一个可交互的高度尺控制器是许多3D工具类项目中的常见需求。本文将基于最新的 HeightGaugeController.cs 脚本,详细介绍如何通过 鼠标拖拽、坐标转换、触发器碰撞检测和轴向限制 实现一个完整的高度尺系统。
文章目录
- 🧭 一、项目背景与目标
- 🛠️ 二、对象层级结构与组件配置
- 1. 场景层级结构建议如下:
- 2. 关键组件说明
- 🔧 三、核心功能解析
- 1. 拖动逻辑
- 2. 限定上下范围
- 3. 碰撞检测并吸附表面
- 4. 使用本地坐标,支持轴向选择
- 5. 屏幕坐标 → 世界坐标 → 本地坐标转换(关键逻辑)
- 📐 四、核心函数 GetMeasurePos() 解析
- 📌 五、变量管理与状态同步
- 💡 六、自定义组件:MeasurementObject.cs
- ⚙️ 七、完整代码清单(含注释)
- 八、项目地址
🧭 一、项目背景与目标
在工业仿真、VR/AR 教学或虚拟装配场景中,我们经常需要模拟现实中的“高度尺”、“卡尺”等测量工具。
本教程将带你一步步实现一个 Unity 中的高度尺模拟系统 ,支持:
✅ 鼠标拖动爪子
✅ 精准限制移动范围(上下限)
✅ 碰撞物体后自动吸附表面
✅ 支持 X/Y/Z 轴向选择
✅ 使用本地坐标系,确保旋转不影响方向
✅ 屏幕坐标 → 世界坐标 → 本地坐标准确转换
✅ 对象层级结构与设置说明

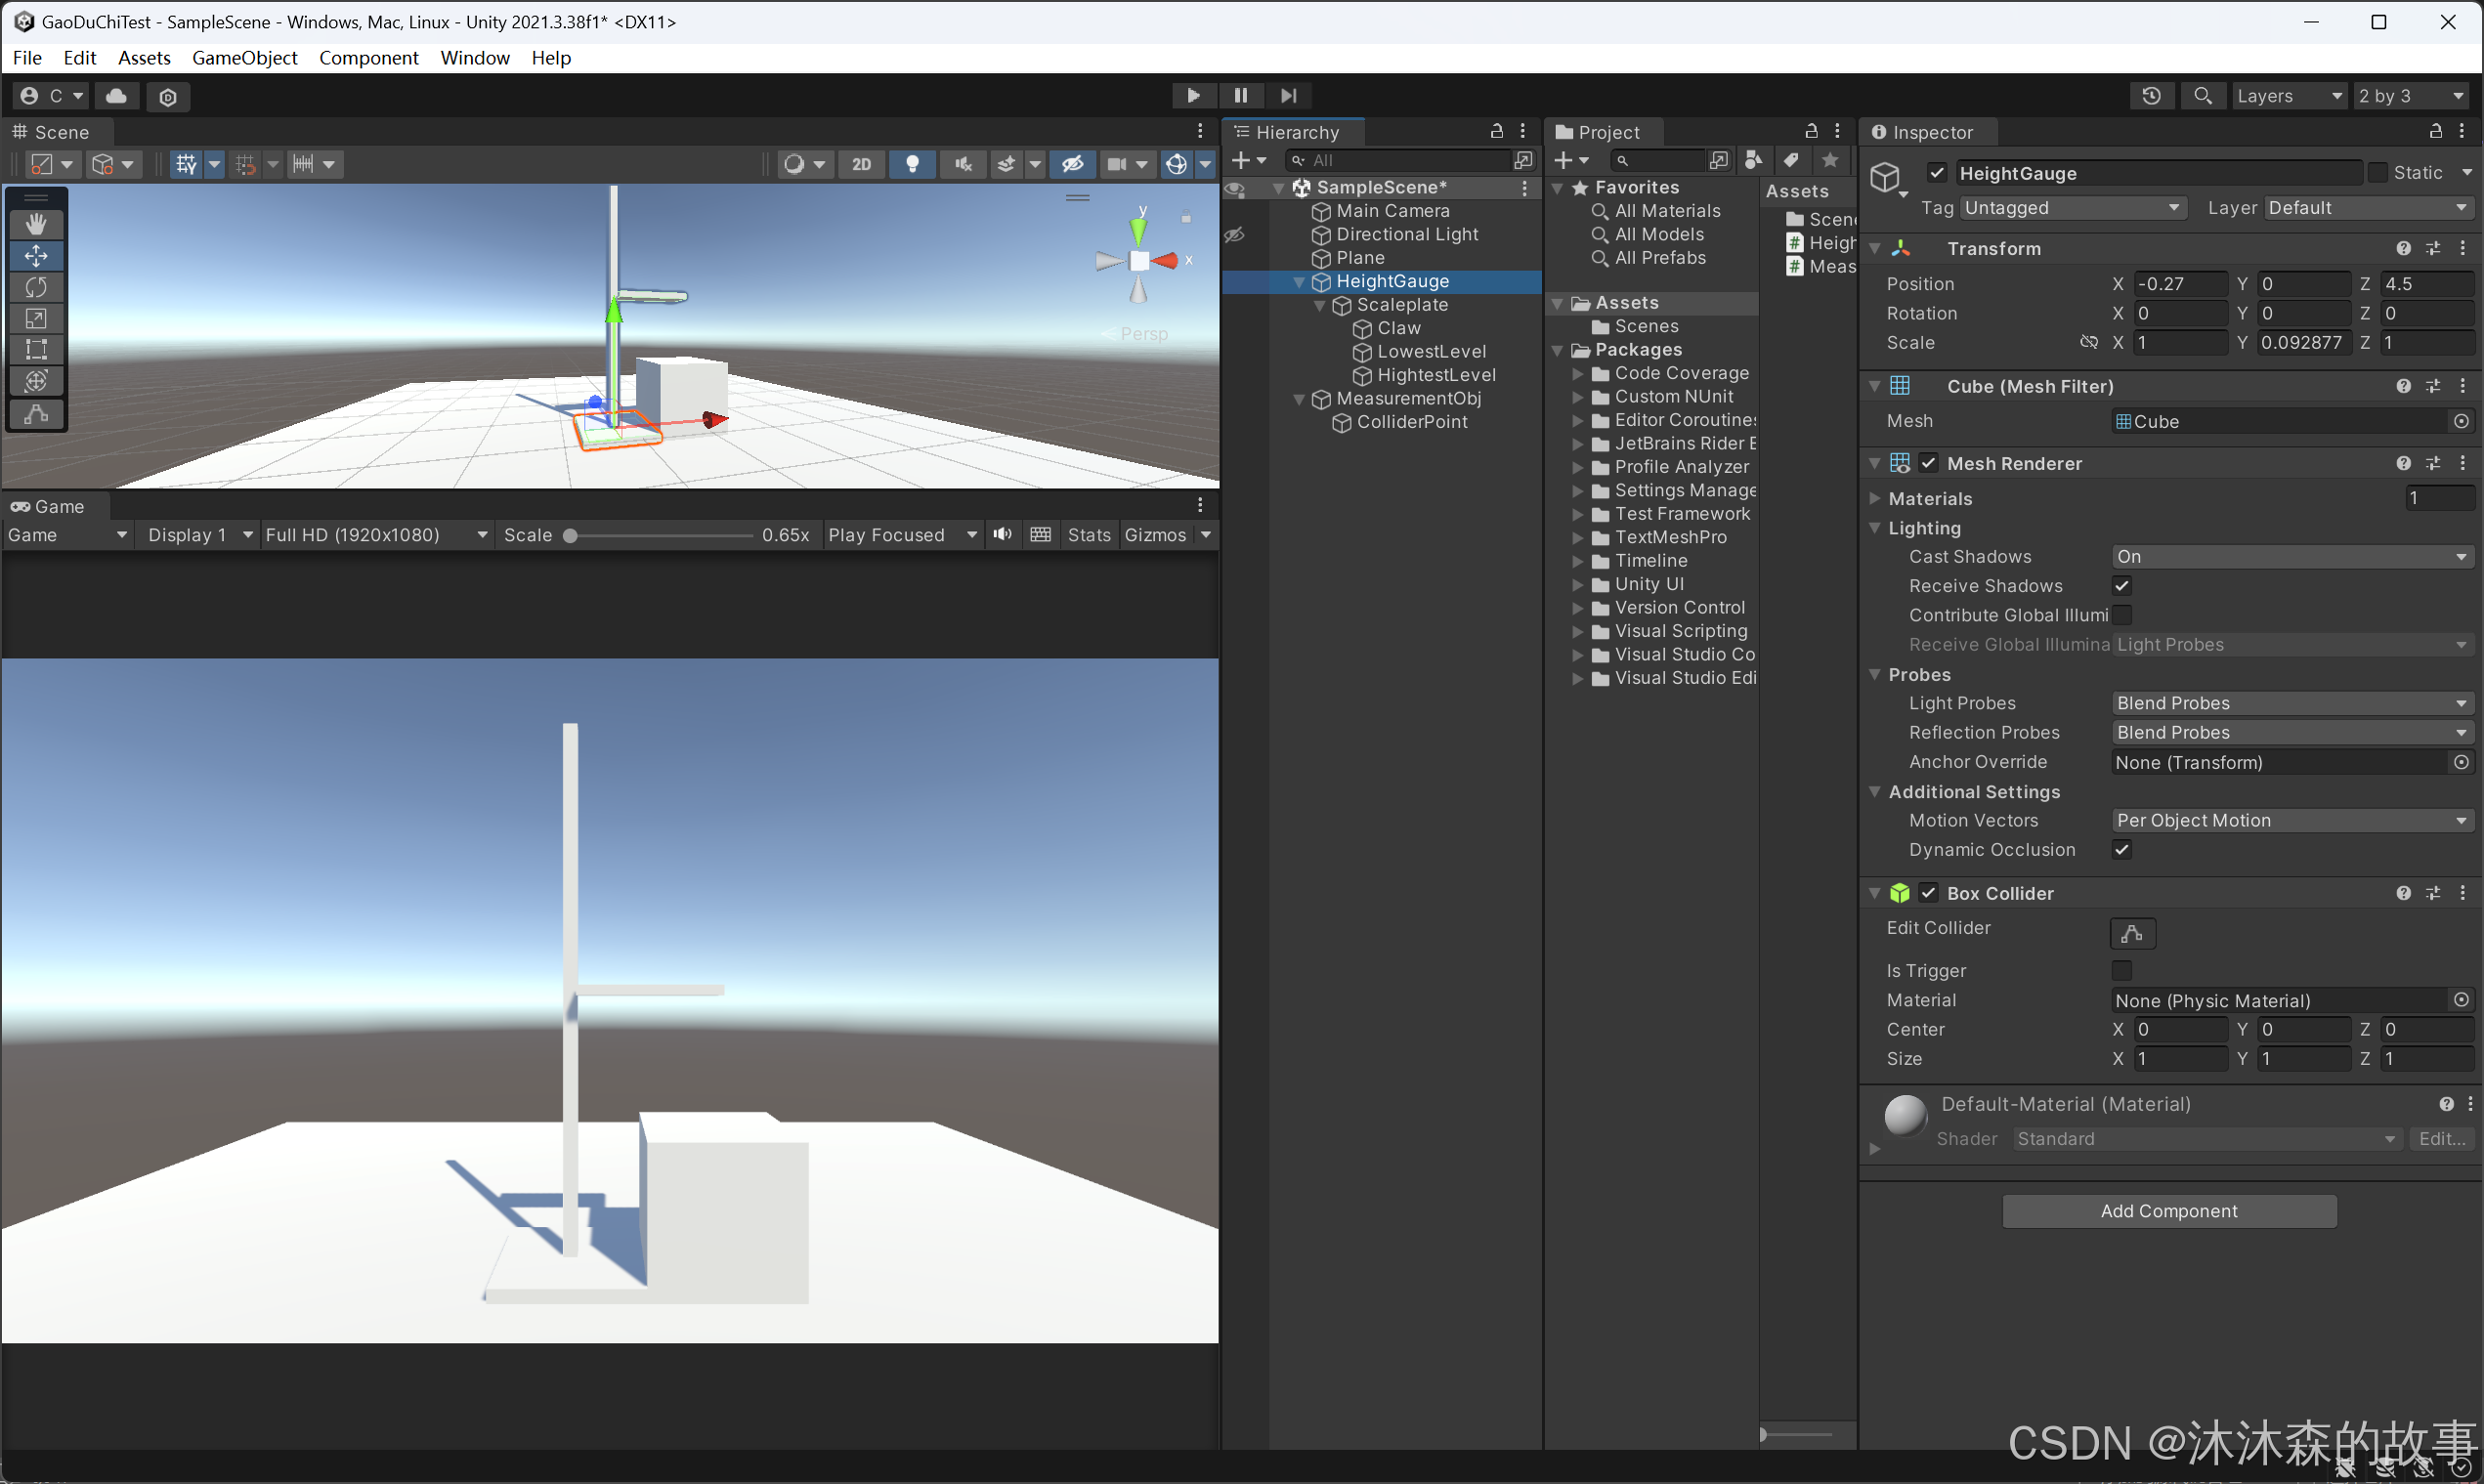
🛠️ 二、对象层级结构与组件配置
1. 场景层级结构建议如下:
HeightGauge(空对象)
├──Scaleplate
│	├── Claw (爪子)
│   │──	├── BoxCollider(勾选 isTrigger)
│   └──	└── HeightGaugeController.cs
│	│──	LowestLevel (底部刻度点)
│   └── └── Transform.localPosition.y = 0(作为参考点)
│	├── HighestLevel (顶部刻度点)
│   └── └── Transform.localPosition.y = 10(作为上限)
MeasurementObject (被测物体)  └── Collider + MeasurementObject.cs(定义接触面位置)
2. 关键组件说明
| BoxCollider (勾选 isTrigger ) | 用于触发检测,判断是否点击或碰到物体 |
| HeightGaugeController.cs | 核心脚本,控制拖动、限制、吸附、坐标转换 |
| MeasurementObject.cs | 提供触碰时的表面位置 |
🔧 三、核心功能解析
1. 拖动逻辑
private bool RaycastGrabClaw()
{Ray ray = Camera.main.ScreenPointToRay(Input.mousePosition);RaycastHit hit;if (Physics.Raycast(ray, out hit) && hit.transform == transform){return true;}return false;
}
原理说明:
- 使用射线检测判断是否点击到了当前爪子对象
- 如果返回 true,表示可以开始拖动
- 记录初始鼠标位置和爪子位置,用于后续计算偏移量
2. 限定上下范围
newPosition.y = Mathf.Clamp(newPosition.y, lowestLevel.localPosition.y, highestLevel.localPosition.y);
实现逻辑:
- 在 GetMeasurePos() 中对新位置做 Mathf.Clamp() 限制
- 确保不会超出标尺上下限
- 支持 X/Y/Z 轴自由切换
3. 碰撞检测并吸附表面
使用 Trigger 系统来检测是否接触到测量物体,并记录其表面位置:
private void OnTriggerStay(Collider other)
{if (((1 << other.gameObject.layer) & collisionLayer.value) != 0){isClawColliding = true;MeasurementObject measurement = other.GetComponent<MeasurementObject>();colliderPosition = measurement.surface.position;}
}private void OnTriggerExit(Collider other)
{if (((1 << other.gameObject.layer) & collisionLayer.value) != 0){isClawColliding = false;colliderPosition = Vector3.zero;}
}
吸附逻辑:
- 判断是否是向下移动
-若发生碰撞,则更新位置为接触点 - 不允许继续下移,但允许上移
if (newPosition.y <= clawTargetPos.y && isClawColliding)
{newPosition.y = clawTargetPos.y;
}
4. 使用本地坐标,支持轴向选择
public enum MeasurementAxis
{X,Y,Z
}
根据枚举值动态选择轴向:
switch (measurementAxis)
{case MeasurementAxis.X:// X 方向移动逻辑break;case MeasurementAxis.Y:// Y 方向移动逻辑break;case MeasurementAxis.Z:// Z 方向移动逻辑break;
}
优点:
- 爪子即使旋转也不会影响移动方向
- 支持横版、竖版等多种测量方式
5. 屏幕坐标 → 世界坐标 → 本地坐标转换(关键逻辑)
float GetDepthInCameraSpace()
{return Vector3.Dot(transform.position - Camera.main.transform.position, Camera.main.transform.forward);
}Vector3 ScenePointToLocalPoint()
{float depth = GetDepthInCameraSpace();Vector3 worldPos = Camera.main.ScreenToWorldPoint(new Vector3(Input.mousePosition.x, Input.mousePosition.y, depth));return WordPointToLocalPoint(worldPos);
}private Vector3 WordPointToLocalPoint(Vector3 worldPosition)
{return transform.parent.InverseTransformPoint(worldPosition);
}
转换流程:
- 获取相机到爪子的 Z 轴投影作为深度值
- 使用 ScreenToWorldPoint 转换屏幕坐标为世界坐标
- 再通过 InverseTransformPoint 转换为父级下的本地坐标
📌 注意:
- 深度值不能直接用 Input.mousePosition.z,而是要用相机空间中的 Z 投影
- 这样才能保证坐标转换准确无误
📐 四、核心函数 GetMeasurePos() 解析
private Vector3 GetMeasurePos()
{Vector3 newPosition = Vector3.zero;switch (measurementAxis){case MeasurementAxis.X:newPosition = clawInitialPos + new Vector3(delta.x, 0, 0);newPosition.x = Mathf.Clamp(newPosition.x, lowestLevel.localPosition.x, highestLevel.localPosition.x);if (newPosition.x <= clawTargetPos.x && isClawColliding){newPosition.x = clawTargetPos.x;}break;case MeasurementAxis.Y:newPosition = clawInitialPos + new Vector3(0, delta.y, 0);newPosition.y = Mathf.Clamp(newPosition.y, lowestLevel.localPosition.y, highestLevel.localPosition.y);if (newPosition.y <= clawTargetPos.y && isClawColliding){newPosition.y = clawTargetPos.y;}break;case MeasurementAxis.Z:newPosition = clawInitialPos + new Vector3(0, 0, delta.z);newPosition.z = Mathf.Clamp(newPosition.z, lowestLevel.localPosition.z, highestLevel.localPosition.z);if (newPosition.z <= clawTargetPos.z && isClawColliding){newPosition.z = clawTargetPos.z;}break;}return newPosition;
}
流程说明:
- 获取增量 :delta = mouseCurrentPos - mouseInitialPos
- 计算新位置 :基于初始位置 + 增量
- 限制范围 :使用 Mathf.Clamp() 防止越界
- 碰撞处理 :如果是向下移动且发生碰撞,禁止进一步下移
📌 五、变量管理与状态同步
为了避免松开鼠标后仍执行一次赋值导致误动作,加入了状态同步机制:
private void ResetVariables()
{mouseCurentPos = Vector3.zero;mouseInitialPos = Vector3.zero;clawInitialPos = Vector3.zero;clawTargetPos = Vector3.zero;delta = Vector3.zero;
}
并在松开鼠标时调用:
if (Input.GetMouseButtonUp(0))
{isDragging = false;ResetVariables();
}
💡 六、自定义组件:MeasurementObject.cs
为了让测量物体能提供“表面位置”,我们创建一个辅助类:
public class MeasurementObject : MonoBehaviour
{public Transform surface; // 表面位置(如物体顶部)
}
你可以把这个组件挂在测量物体上,并设置一个 Transform 来代表“接触面”的位置。
⚙️ 七、完整代码清单(含注释)
以下是完整 C# 脚本,已加入详细注释,方便理解和复用。
文件名:HeightGaugeController.cs
using UnityEngine;
public enum MeasurementAxis
{X,Y,Z
}public class HeightGaugeController : MonoBehaviour
{// 底部标尺的 Transformpublic Transform lowestLevel;// 顶部标尺的 Transformpublic Transform highestLevel;// 测量轴public MeasurementAxis measurementAxis = MeasurementAxis.Y;// 用于指定哪些层可以被击中public LayerMask collisionLayer;// 鼠标初始位置private Vector3 mouseInitialPos;// 鼠标当前目标位置private Vector3 mouseCurentPos;// 增量private Vector3 delta;// 爪子初始位置private Vector3 clawInitialPos;// 爪子目标位置private Vector3 clawTargetPos;private bool isDragging = false;public bool isClawColliding = false;private Vector3 colliderPosition; // 爪子碰撞器位置public float measureHeight; // 爪子高度void Update(){if (Input.GetMouseButtonDown(0)){if (RaycastGrabClaw()){isDragging = true;mouseInitialPos = ScenePointToLocalPoint();clawInitialPos = transform.localPosition;}}if (isDragging && Input.GetMouseButton(0)){mouseCurentPos = ScenePointToLocalPoint();delta = mouseCurentPos - mouseInitialPos;clawTargetPos = GetMeasurePos();transform.localPosition = clawTargetPos;measureHeight = (transform.localPosition - lowestLevel.localPosition).y;}if (Input.GetMouseButtonUp(0)){isDragging = false;ResetVariables();}}private void ResetVariables(){mouseCurentPos = Vector3.zero;  // 重置目标位置mouseInitialPos = Vector3.zero; // 重置初始位置clawInitialPos = Vector3.zero;  // 重置初始爪子位置clawTargetPos = Vector3.zero;   // 重置当前目标位置delta = Vector3.zero;           // 重置增量}/// <summary>/// 检测鼠标是否点击了爪子,并返回是否成功点击。/// </summary>/// <returns></returns>private bool RaycastGrabClaw(){// 检测鼠标是否点击了爪子Ray ray = Camera.main.ScreenPointToRay(Input.mousePosition);RaycastHit hit;if (Physics.Raycast(ray, out hit) && hit.transform == transform){return true;}return false;}/// <summary>/// 这里把屏幕坐标转换为世界坐标,使用target在相机空间中的 Z 轴深度。/// </summary>/// <param name="target"></param>Vector3 ScenePointToLocalPoint(){Vector3 currentScreenPos = Input.mousePosition;float depth = GetDepthInCameraSpace(); // 使用相同深度Vector3 worldPos = Camera.main.ScreenToWorldPoint(new Vector3(currentScreenPos.x, currentScreenPos.y, depth));return WordPointToLocalPoint(worldPos);}/// <summary>/// 获取物体在相机本地空间中的 Z 值(这才是 ScreenToWorldPoint 需要的深度)/// </summary>/// <param name="target"></param>/// <returns></returns>float GetDepthInCameraSpace(){return Vector3.Dot(transform.position - Camera.main.transform.position, Camera.main.transform.forward);}/// <summary>/// 把世界坐标转换为本地坐标/// </summary>/// <param name="worldPosition"></param>/// <returns></returns>private Vector3 WordPointToLocalPoint(Vector3 worldPosition){return transform.parent.InverseTransformPoint(worldPosition);}private Vector3 GetMeasurePos(){Vector3 newPosition = Vector3.zero;switch (measurementAxis){case MeasurementAxis.X:newPosition = clawInitialPos + new Vector3(delta.x, 0, 0);// 限制范围  newPosition.x = Mathf.Clamp(newPosition.x, lowestLevel.localPosition.x, highestLevel.localPosition.x);// 判断是否向下移动,并且碰撞了测量物体  if (newPosition.x <= clawTargetPos.x && isClawColliding){clawTargetPos = WordPointToLocalPoint(colliderPosition);// 如果是向下移动并且碰到物体,不允许继续下移  newPosition.x = clawTargetPos.x;}break;case MeasurementAxis.Y:newPosition = clawInitialPos + new Vector3(0, delta.y, 0);// 限制范围  newPosition.y = Mathf.Clamp(newPosition.y, lowestLevel.localPosition.y, highestLevel.localPosition.y);// 判断是否向下移动,并且碰撞了测量物体  if (newPosition.y <= clawTargetPos.y && isClawColliding){clawTargetPos = WordPointToLocalPoint(colliderPosition);// 如果是向下移动并且碰到物体,不允许继续下移  newPosition.y = clawTargetPos.y;}break;case MeasurementAxis.Z:newPosition = clawInitialPos + new Vector3(0, 0, delta.z);// 限制范围  newPosition.z = Mathf.Clamp(newPosition.z, lowestLevel.localPosition.z, highestLevel.localPosition.z);// 判断是否向下移动,并且碰撞了测量物体  if (newPosition.z <= clawTargetPos.z && isClawColliding){clawTargetPos = WordPointToLocalPoint(colliderPosition);// 如果是向下移动并且碰到物体,不允许继续下移  newPosition.z = clawTargetPos.z;}break;}return newPosition;}private void OnTriggerStay(Collider other){if (((1 << other.gameObject.layer) & collisionLayer.value) != 0){isClawColliding = true;MeasurementObject measurement = other.GetComponent<MeasurementObject>();colliderPosition = measurement.surface.position;}}private void OnTriggerExit(Collider other){if (((1 << other.gameObject.layer) & collisionLayer.value) != 0){isClawColliding = false;colliderPosition = Vector3.zero;}}
}
八、项目地址
以下是项目地址,有需要的小伙伴门可以自取:
https://download.csdn.net/download/caiprogram123/90943926
| 每一次跌倒都是一次成长 每一次努力都是一次进步 |
如果您喜欢本博客,请点赞和分享给更多的朋友,让更多人受益。同时,您也可以关注我的博客,以便及时获取最新的更新和文章。
在未来的写作中,我将继续努力,分享更多有趣、实用的内容。再次感谢大家的支持和鼓励,期待与您在下一篇博客再见!