微信网站建设计入什么科目南昌百度快速排名提升
MCP 是什么
Model Context Protocol, 模型上下文协议,是一种开放协议,用于标准化应用程序向大型语言模型(LLM)提供上下文的方式。可以将 MCP 视为 AI 应用的 USB-C 接口:正如 USB-C 为设备连接各种外设和配件提供了标准化方式,MCP 也为 AI 模型连接不同数据源和工具提供了统一标准。
为什么要用MCP呢?
MCP 可帮助在 LLM (Large Language Model,大语言模型)基础上构建智能代理和复杂工作流。由于 LLM 常需与数据和工具集成,MCP 提供了以下优势:
- 不断增长的预构建集成列表:让 LLM 可直接接入多种服务
- 灵活切换 LLM 供应商:支持多厂商模型的即插即用
- 数据安全保障最佳实践:在基础设施内安全管控敏感信息
MCP的架构
MCP 的核心是客户端-服务器架构,主机应用可连接多个服务器:
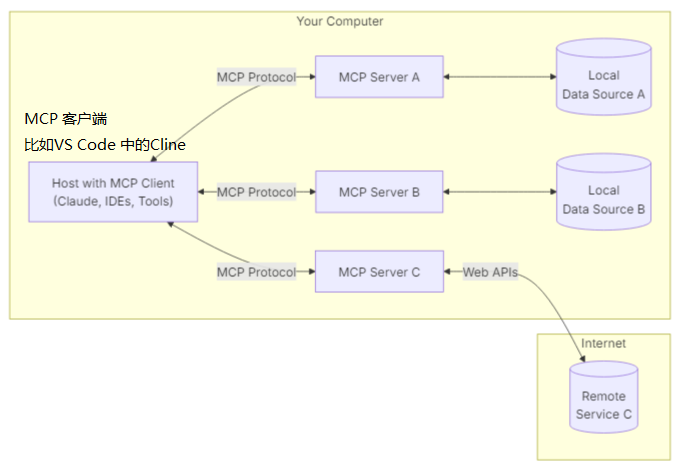
- Host(MCP 主机):需通过 MCP 访问数据的应用程序(如 Claude 桌面端、IDE 或 AI 工具)
- MCP Client(MCP 客户端):与服务器保持 1:1 连接的协议客户端
- MCP Server(MCP 服务器):通过标准化协议暴露特定能力的轻量级程序
- Local Data Source(本地数据源):服务器可安全访问的设备文件、数据库和服务
- Remote Service(远程服务):服务器可通过互联网连接的外部系统(如 API)
示例演示
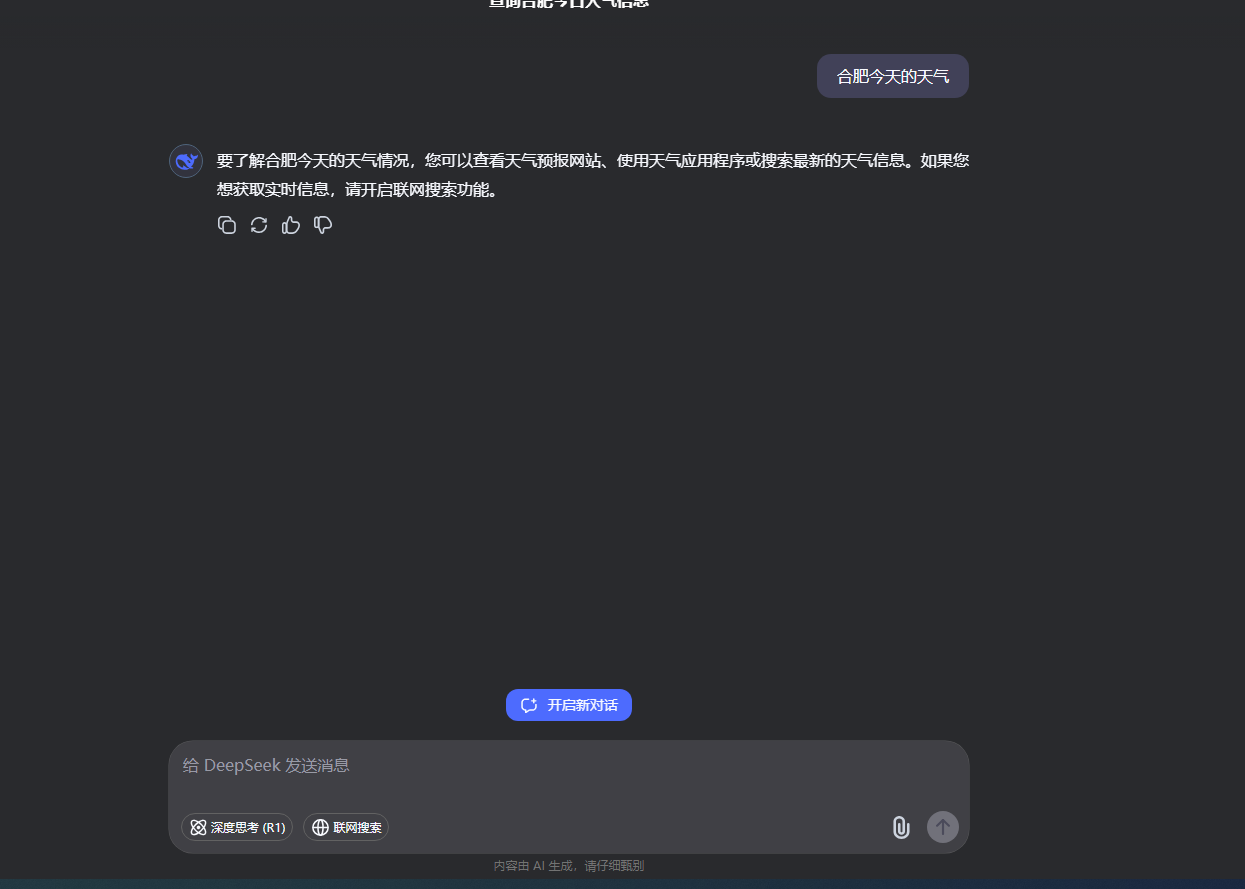
对于大模型而言,默认是不具备回答天气预报的功能的,包含Chat GPT,DeepSeek等。比如在DeepSeek 中,如果询问天气的话,会让你去查询天气预报网站。
当然,现在的LLM的Web页面提供了联网搜索的功能, 勾选的话,也是可以查询天气的。但是对于调用API接口的方式,是没有这种功能的。 于是,可以使用MCP了。
本篇接下来的示例就是演示一个MCP实现天气预报的功能。
MCP目前提供了NodeJS,Python和Java 三种SDK,本篇使用NodeJS进行演示。
MCP服务端开发
创建NodeJS的项目
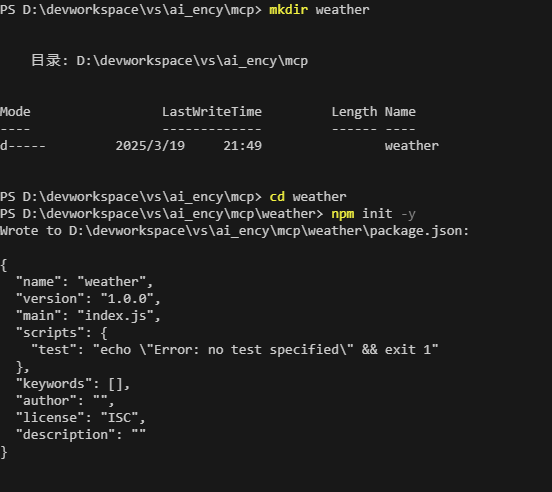
在命令行依次输入如下命令:
# 创建项目目录
mkdir weather
cd weather# 使用npm初始化项目
npm init -y# 安装依赖
npm install @modelcontextprotocol/sdk zod
npm install -D @types/node typescript# 创建文件
mdir src
new-item src\index.ts
这里在VS Code的终端输入,执行的效果如下:
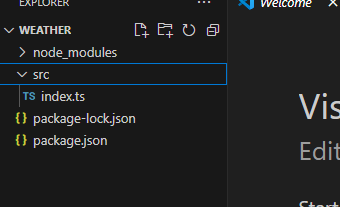
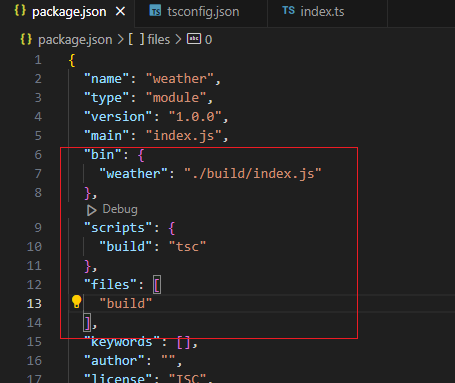
创建完成的项目目录结构如下:
修改 package.json
- 新增 “type”: “module”,
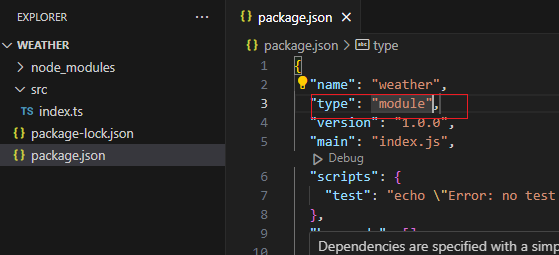
- 添加构建脚本
创建tsconfig.json
内容如下:
{"compilerOptions": {"target": "ES2022","module": "Node16","moduleResolution": "Node16","outDir": "./build","rootDir": "./src","strict": true,"esModuleInterop": true,"skipLibCheck": true,"forceConsistentCasingInFileNames": true},"include": ["src/**/*"],"exclude": ["node_modules"]
}
index.js
编写获取天气预报的代码:
import { McpServer } from "@modelcontextprotocol/sdk/server/mcp.js";
import { StdioServerTransport } from "@modelcontextprotocol/sdk/server/stdio.js";
import { z } from "zod";const NWS_API_BASE = "https://api.weather.gov";
const USER_AGENT = "weather-app/1.0";// Create server instance
const server = new McpServer({name: "weather",version: "1.0.0",
});// Helper function for making NWS API requests
async function makeNWSRequest<T>(url: string): Promise<T | null> {const headers = {"User-Agent": USER_AGENT,Accept: "application/geo+json",};try {const response = await fetch(url, { headers });if (!response.ok) {throw new Error(`HTTP error! status: ${response.status}`);}return (await response.json()) as T;} catch (error) {console.error("Error making NWS request:", error);return null;}
}interface AlertFeature {properties: {event?: string;areaDesc?: string;severity?: string;status?: string;headline?: string;};
}// Format alert data
function formatAlert(feature: AlertFeature): string {const props = feature.properties;return [`Event: ${props.event || "Unknown"}`,`Area: ${props.areaDesc || "Unknown"}`,`Severity: ${props.severity || "Unknown"}`,`Status: ${props.status || "Unknown"}`,`Headline: ${props.headline || "No headline"}`,"---",].join("\n");
}interface ForecastPeriod {name?: string;temperature?: number;temperatureUnit?: string;windSpeed?: string;windDirection?: string;shortForecast?: string;
}interface AlertsResponse {features: AlertFeature[];
}interface PointsResponse {properties: {forecast?: string;};
}interface ForecastResponse {properties: {periods: ForecastPeriod[];};
}// Register weather tools
server.tool("get-alerts","Get weather alerts for a state",{state: z.string().length(2).describe("Two-letter state code (e.g. CA, NY)"),},async ({ state }) => {const stateCode = state.toUpperCase();const alertsUrl = `${NWS_API_BASE}/alerts?area=${stateCode}`;const alertsData = await makeNWSRequest<AlertsResponse>(alertsUrl);if (!alertsData) {return {content: [{type: "text",text: "Failed to retrieve alerts data",},],};}const features = alertsData.features || [];if (features.length === 0) {return {content: [{type: "text",text: `No active alerts for ${stateCode}`,},],};}const formattedAlerts = features.map(formatAlert);const alertsText = `Active alerts for ${stateCode}:\n\n${formattedAlerts.join("\n")}`;return {content: [{type: "text",text: alertsText,},],};},
);server.tool("get-forecast","Get weather forecast for a location",{latitude: z.number().min(-90).max(90).describe("Latitude of the location"),longitude: z.number().min(-180).max(180).describe("Longitude of the location"),},async ({ latitude, longitude }) => {// Get grid point dataconst pointsUrl = `${NWS_API_BASE}/points/${latitude.toFixed(4)},${longitude.toFixed(4)}`;const pointsData = await makeNWSRequest<PointsResponse>(pointsUrl);if (!pointsData) {return {content: [{type: "text",text: `Failed to retrieve grid point data for coordinates: ${latitude}, ${longitude}. This location may not be supported by the NWS API (only US locations are supported).`,},],};}const forecastUrl = pointsData.properties?.forecast;if (!forecastUrl) {return {content: [{type: "text",text: "Failed to get forecast URL from grid point data",},],};}// Get forecast dataconst forecastData = await makeNWSRequest<ForecastResponse>(forecastUrl);if (!forecastData) {return {content: [{type: "text",text: "Failed to retrieve forecast data",},],};}const periods = forecastData.properties?.periods || [];if (periods.length === 0) {return {content: [{type: "text",text: "No forecast periods available",},],};}// Format forecast periodsconst formattedForecast = periods.map((period: ForecastPeriod) =>[`${period.name || "Unknown"}:`,`Temperature: ${period.temperature || "Unknown"}°${period.temperatureUnit || "F"}`,`Wind: ${period.windSpeed || "Unknown"} ${period.windDirection || ""}`,`${period.shortForecast || "No forecast available"}`,"---",].join("\n"),);const forecastText = `Forecast for ${latitude}, ${longitude}:\n\n${formattedForecast.join("\n")}`;return {content: [{type: "text",text: forecastText,},],};},
);// 主函数
async function main() {const transport = new StdioServerTransport();await server.connect(transport);console.error("Weather MCP Server running on stdio");
}main().catch((error) => {console.error("Fatal error in main():", error);process.exit(1);
});
上面的代码实现了天气服务。它通过调用美国National Weather Service (NWS) API 获取
- 天气警报:get-alerts
- 天气预报:get-forecast
构建
npm run build
运行构建命令后会在build 目录下产生一个构建的 index.js 文件。
使用MCP Inspector 查看MCP服务
MCP提供了一个检查器,这是一款交互式开发者工具,专为测试和调试 MCP 服务器设计。
使用方式很简单,执行如下命令
npx @modelcontextprotocol/inspector node build/index.js
执行完成,会启动一个Web 服务。
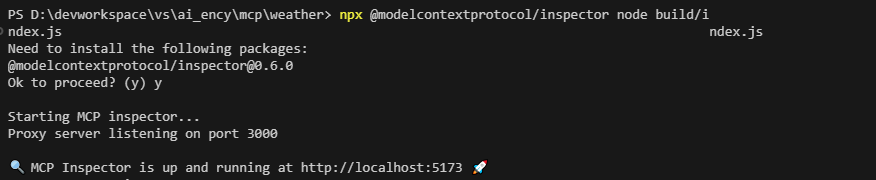
在浏览器中打开控制台输出的地址: http://localhost:5173/
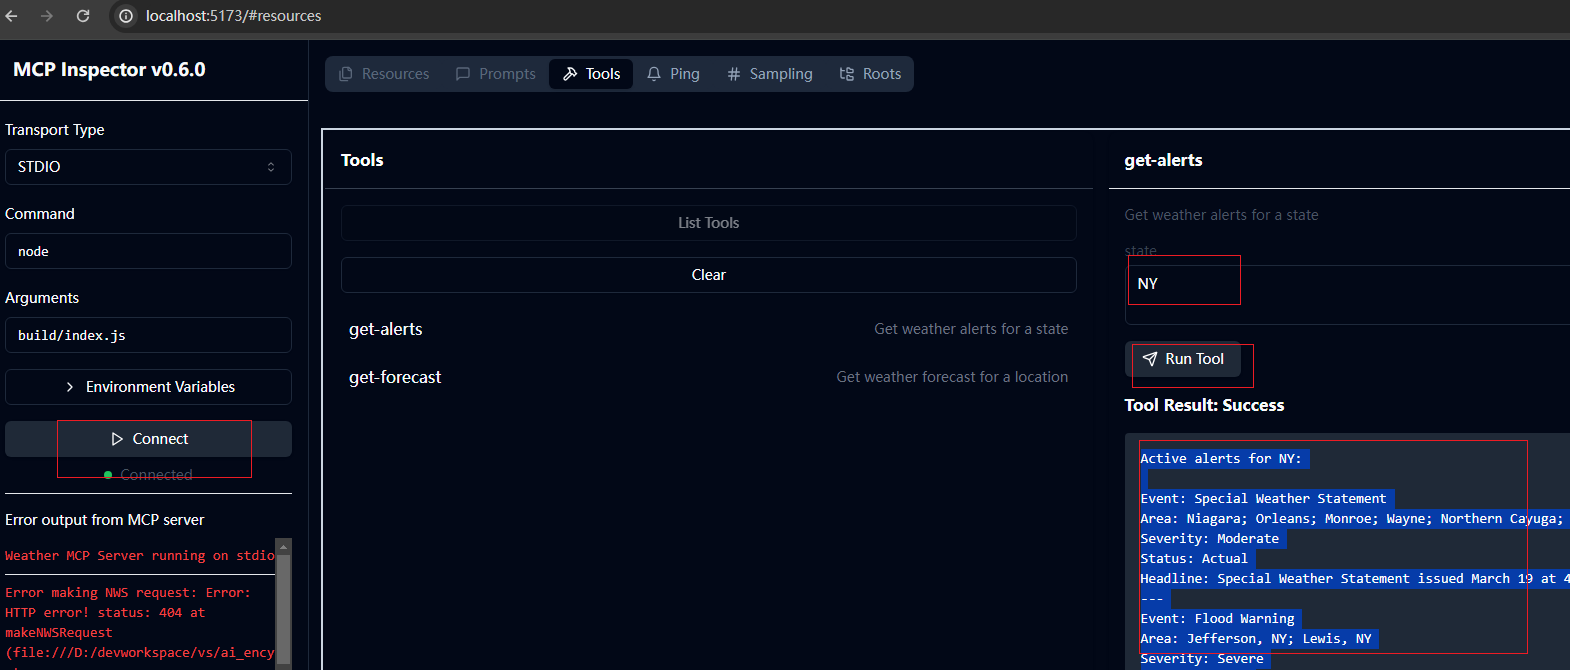
点击Connect 之后,就可以看到在代码中写的两个服务了,选择 get-alert,在State 输入NY ,也就是查询纽约州的天气警报, 最后点击Run Tool 就可以看到纽约州的一些天气的警报。
到这里,聪明的你可能要问了,这不就是调用一个在线API实现的一个Web服务吗? 和LLM有什么关系呢?
别急,这里只是演示MCP服务的效果,关键的是这个服务可以提供给LLM使用,因为它定义了一些和LLM交互的信息格式。通过MCP服务端的演示之后就会豁然开朗了。
MCP客户端使用
这里使用Roo Code作为MCP客户端来演示。
首先需要在VS Code 中安装Roo Code,认证授权之后打开Roo Code。
- 点击上方的 “MCP Servers”
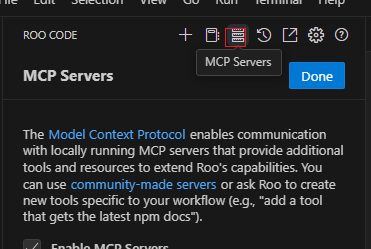
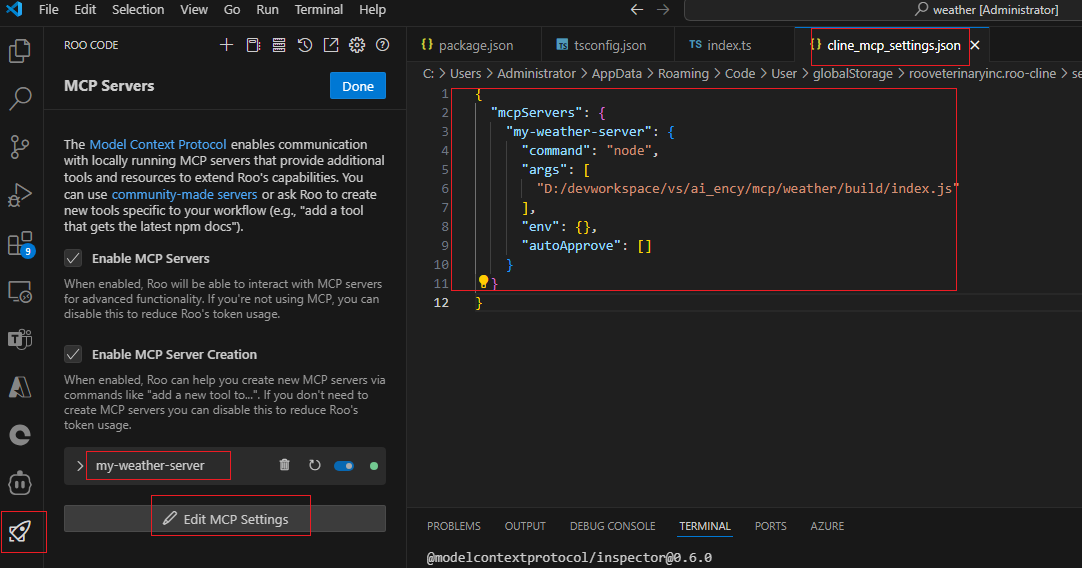
- 点击 Edit MCP Settings 之后,会在编辑器打开一个配置文件,
补充下面的mcpServers 的配置:
"mcpServers": {"my-weather-server": {"command": "node","args": ["D:/devworkspace/vs/ai_ency/mcp/weather/build/index.js"],"env": {},"autoApprove": []}}
保存之后,在左侧的区块就会多出一个MCP 的Server了,如下图:
回到Roo Code 的Chat 对话框,输入天气相关的对话,则这里就可以自动执行相关的任务并输出。这里因为网络的原因,这台机器没有完整的跑出结果,但还是贴一个执行中的图。
