有趣的网站 知乎百度怎么搜索图片
注:图片来自官网,侵删
本小节主要讲解如何创建一个spotbugs的自定义规则检测项目,不具体展开规则编写,这里以IDEA为例
一、创建项目
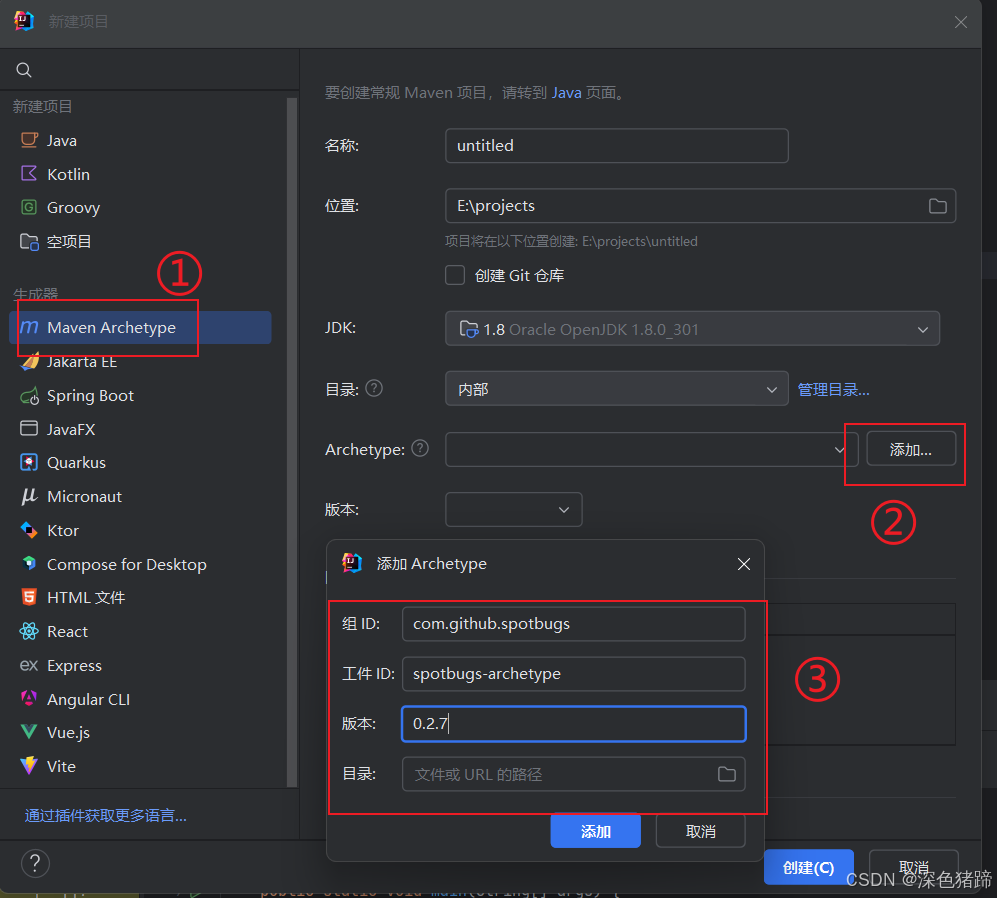
首先,创建一个maven项目。这里可以使用maven archetype的方式创建。具体的版本信息可以参考https://mvnrepository.com/artifact/com.github.spotbugs/spotbugs-archetype
groupId: com.github.spotbugs
artifactId: spotbugs-archetype
version: 0.2.7
二、初识项目结构
项目创建成功后,项目结构如下
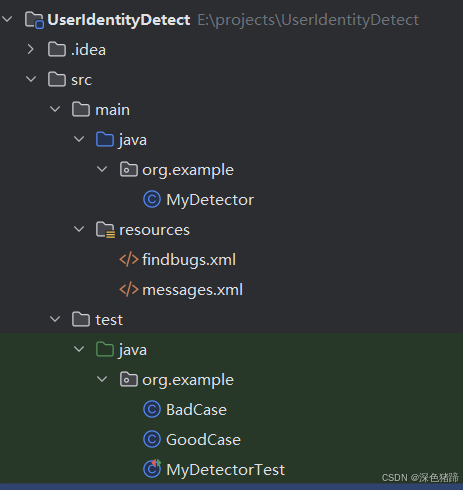
- MyDetector所在目录org.example是检测代码的核心目录,MyDetector是生成的demo
package org.example;import org.apache.bcel.Const;import edu.umd.cs.findbugs.BugInstance;
import edu.umd.cs.findbugs.BugReporter;
import edu.umd.cs.findbugs.bcel.OpcodeStackDetector;public class MyDetector extends OpcodeStackDetector {private final BugReporter bugReporter;public MyDetector(BugReporter bugReporter) {this.bugReporter = bugReporter;}@Overridepublic void sawOpcode(int seen) {if (seen != Const.GETSTATIC) {return;}if (getClassConstantOperand().equals("java/lang/System")&& getNameConstantOperand().equals("out")) {// report bug when System.out is used in codeBugInstance bug = new BugInstance(this, "MY_BUG", NORMAL_PRIORITY).addClassAndMethod(this).addSourceLine(this, getPC());bugReporter.reportBug(bug);}}
}
spotbugs是基于class文件进行分析检测的,通过继承类和方法中的"OpCode"能窥探一二
- findbugs.xml和messages.xml是用于配置检测器规则(如前面的MyDetector)和相关的报告信息的。其中,messages.xml支持国际化(如著名的find-sec-bugs中,配置的messages_ja.xml是日文版本)
findbugs.xml
<?xml version="1.0" encoding="UTF-8"?>
<FindbugsPlugin xmlns:xsi="http://www.w3.org/2001/XMLSchema-instance"xsi:noNamespaceSchemaLocation="findbugsplugin.xsd"pluginid="org.example.UserIdentityDetect"><Detector class="org.example.MyDetector" reports="MY_BUG" /><BugPattern abbrev="MY" type="MY_BUG" category="CORRECTNESS" />
</FindbugsPlugin>
messages.xml
<?xml version="1.0" encoding="UTF-8"?>
<MessageCollection xmlns:xsi="http://www.w3.org/2001/XMLSchema-instance"xsi:noNamespaceSchemaLocation="messagecollection.xsd"><Plugin><ShortDescription>My SpotBugs Plugin</ShortDescription><Details>This plugin provides original detectors</Details></Plugin><Detector class="org.example.MyDetector"><Details>Original detector to detect MY_BUG bug pattern.</Details></Detector><BugPattern type="MY_BUG"><ShortDescription>Explain bug pattern shortly.</ShortDescription><LongDescription>Explain existing problem in code, and how developer should improve their implementation.</LongDescription><Details>
<![CDATA[
<p>Explain existing problem in code, and how developer should improve their implementation.</p>
]]></Details></BugPattern><BugCode abbrev="MY">My SpotBugs BugCode</BugCode>
</MessageCollection>
- test目录下是单元测试程序demo,这里不多赘述
三、使用demo程序
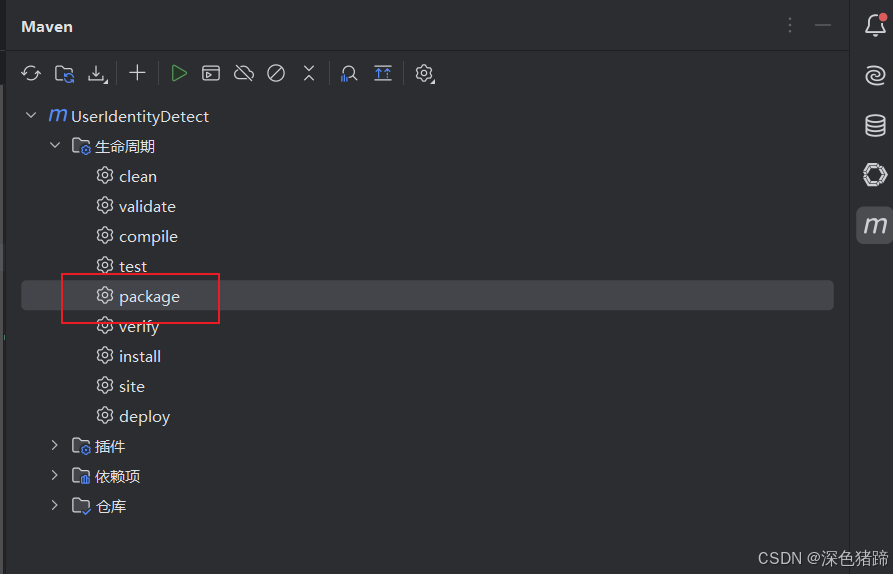
- 打包自定义的规则插件。使用IDEA自带的maven打包工具即可,或者使用maven打包命令,最终产物是一个jar文件
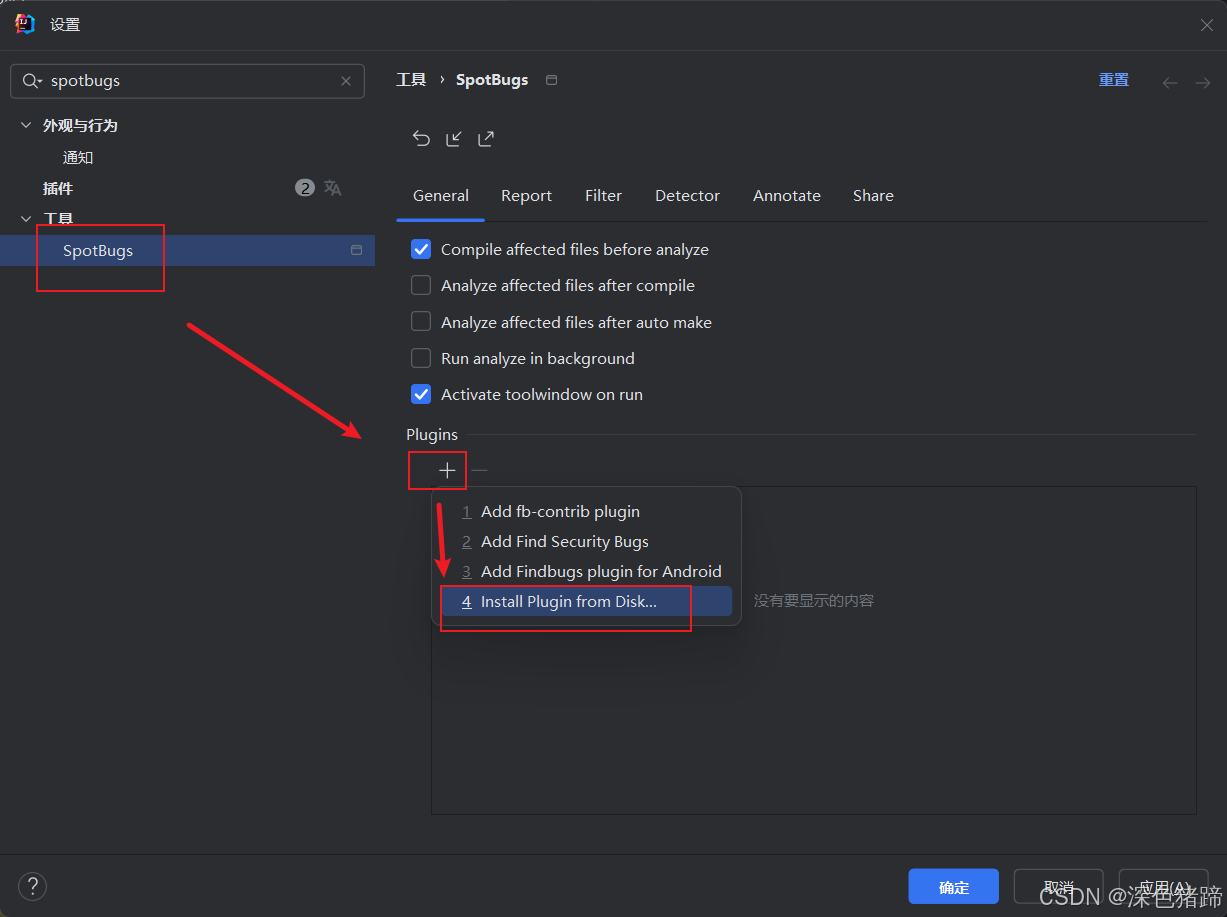
- 打开IDEA的设置面板,搜索spotbugs,点击
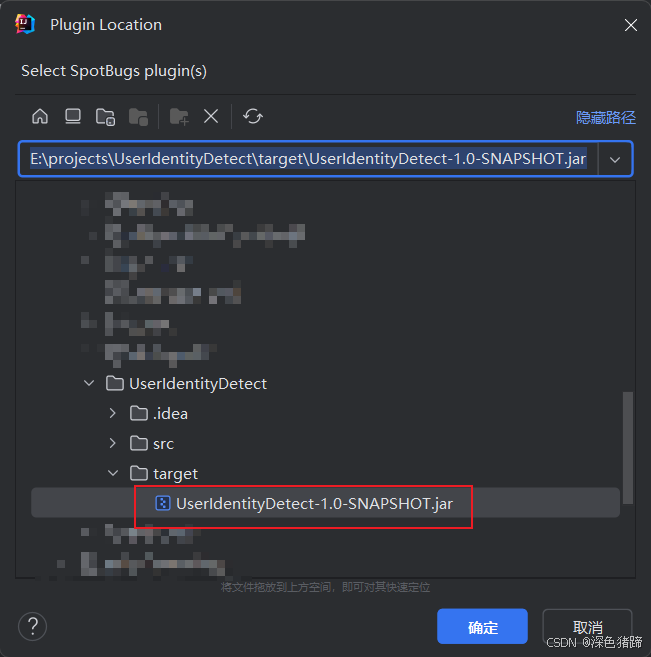
SpotBugs进入配置界面,点击Install Plugin from Disk…(从磁盘安装插件)即可
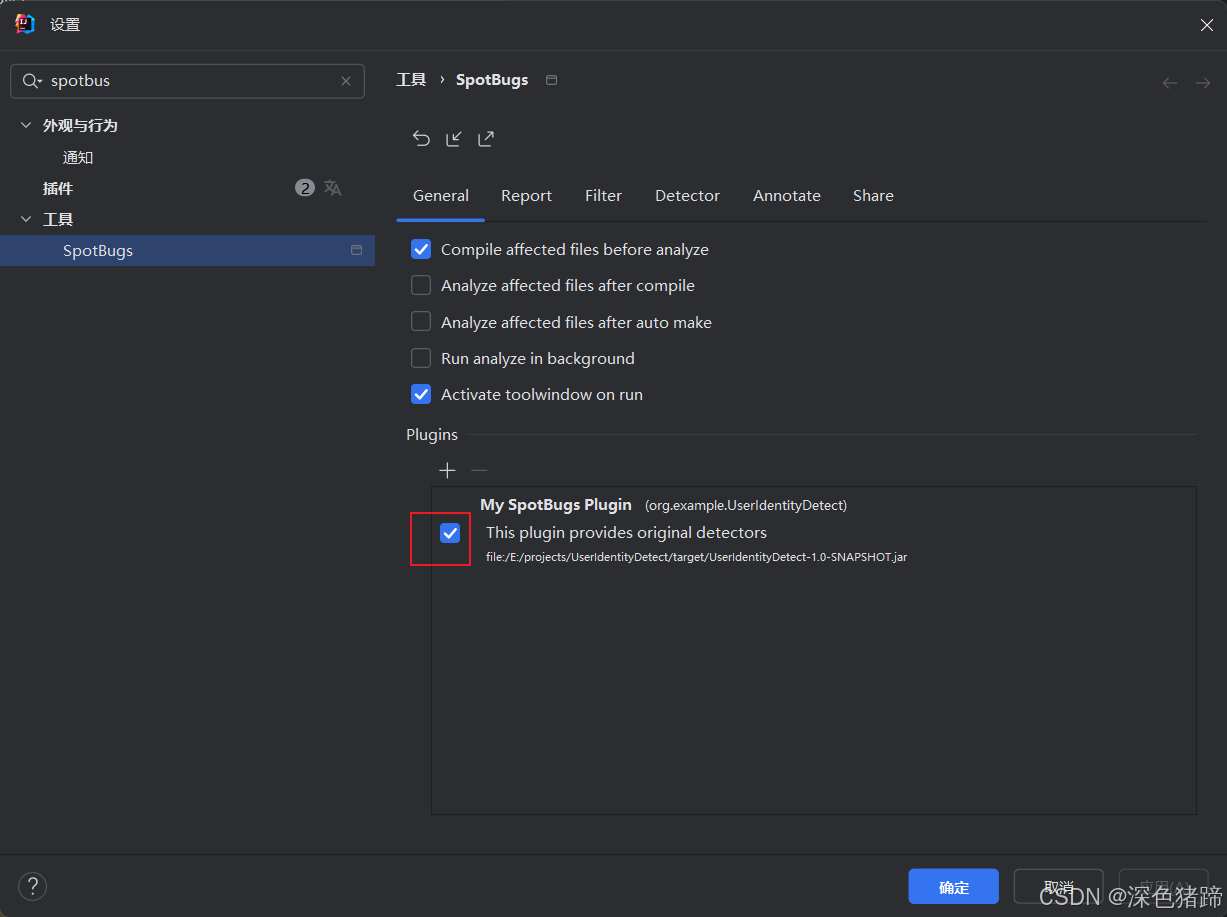
勾选即可
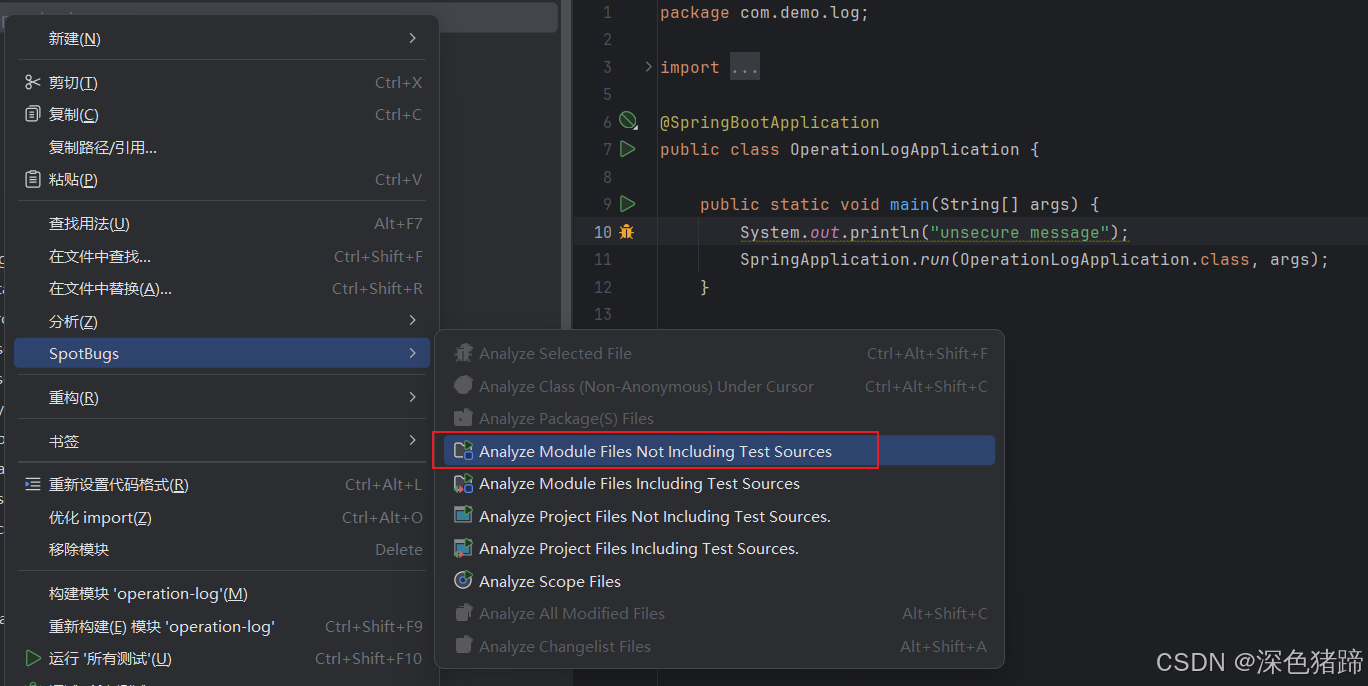
- 随便找一个程序进行测试即可,这里使用的demo是一个简单的springboot项目,打印了一串用于测试的信息"unsecure message"(demo测试规则是检测所有使用了System.out的地方)
- 最终检测到打印输出
