Xinference安装、使用详细笔记
提示:文章写完后,目录可以自动生成,如何生成可参考右边的帮助文档
Xinference安装、使用详细笔记
- 支持推理引擎
- 安装Xinference
- 启动Xinference
- 关于模型的推理引擎
- 运行 qwen2.5-instruct
- 管理模型
- 官方详细文档:
- 具体使用:
- 对话大模型
- 文本嵌入模型
- 重排模型
- 文本转语音 TTS
- 语音转文本模型 ASR
支持推理引擎
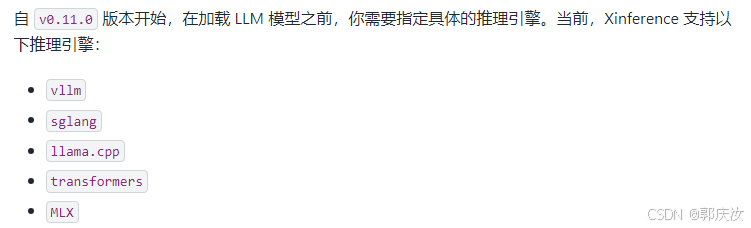
安装Xinference
Xinference 在 Linux, Windows, MacOS 上都可以通过 pip 来安装。如果需要使用 Xinference 进行模型推理,可以根据不同的模型指定不同的引擎。
如果你希望能够推理所有支持的模型,可以用以下命令安装所有需要的依赖:
要求python版本3.10
pip install "xinference[all]"
如果你只想安装必要的依赖,接下来是如何操作的详细步骤。
Transformers 引擎
PyTorch(transformers) 引擎支持几乎有所的最新模型,这是 Pytorch 模型默认使用的引擎:
pip install "xinference[transformers]"
vLLM 引擎
安装 xinference 和 vLLM:
pip install "xinference[vllm]"

# FlashInfer is optional but required for specific functionalities such as sliding window attention with Gemma 2.
# For CUDA 12.4 & torch 2.4 to support sliding window attention for gemma 2 and llama 3.1 style rope
pip install flashinfer -i https://flashinfer.ai/whl/cu124/torch2.4
# For other CUDA & torch versions, please check https://docs.flashinfer.ai/installation.html
Llama.cpp 引擎
Xinference 通过 xllamacpp 或 llama-cpp-python 支持 gguf 格式的模型。xllamacpp 由 Xinference 团队开发,并将在未来成为 llama.cpp 的唯一后端。

初始步骤:
pip install xinference
xllamacpp 的安装说明:
CPU 或 Mac Metal:
pip install -U xllamacpp
Cuda:
pip install xllamacpp --force-reinstall --index-url https://xorbitsai.github.io/xllamacpp/whl/cu124
llama-cpp-python 不同硬件的安装方式:
Apple M系列:
CMAKE_ARGS="-DLLAMA_METAL=on" pip install llama-cpp-python
英伟达显卡:
CMAKE_ARGS="-DLLAMA_CUBLAS=on" pip install llama-cpp-python
AMD 显卡:
CMAKE_ARGS="-DLLAMA_HIPBLAS=on" pip install llama-cpp-python
SGLang 引擎:
SGLang 具有基于 RadixAttention 的高性能推理运行时。它通过在多个调用之间自动重用KV缓存,显著加速了复杂 LLM 程序的执行。它还支持其他常见推理技术,如连续批处理和张量并行处理。
初始步骤:
pip install "xinference[sglang]"

# For CUDA 12.4 & torch 2.4 to support sliding window attention for gemma 2 and llama 3.1 style rope
pip install flashinfer -i https://flashinfer.ai/whl/cu124/torch2.4
# For other CUDA & torch versions, please check https://docs.flashinfer.ai/installation.html
MLX 引擎:
MLX-lm 用来在苹果 silicon 芯片上提供高效的 LLM 推理。
初始步骤:
pip install "xinference[mlx]"
启动Xinference
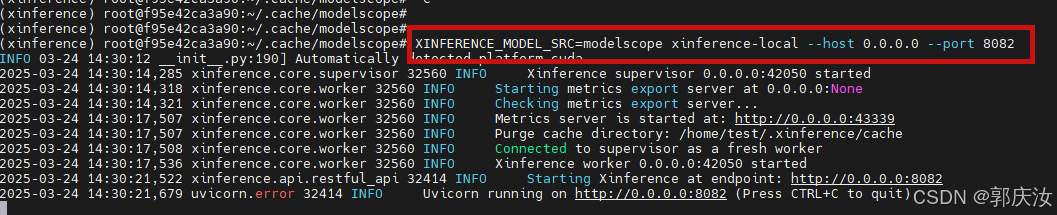
Xinference 也允许从其他模型托管平台下载模型。可以通过在拉起 Xinference 时指定环境变量,比如,如果想要从 ModelScope 中下载模型,可以使用如下命令:
XINFERENCE_MODEL_SRC=modelscope xinference-local --host 0.0.0.0 --port 9997
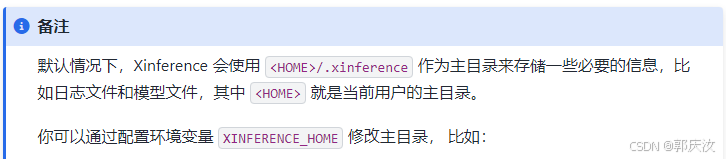
XINFERENCE_HOME=/tmp/xinference xinference-local --host 0.0.0.0 --port 8082
恭喜!你已经在本地拉起了 Xinference 服务。一旦 Xinference 服务运行起来,可以有多种方式来使用,包括使用网页、cURL 命令、命令行或者是 Xinference 的 Python SDK。
可以通过访问 http://127.0.0.1:9997/ui 来使用 UI,访问 http://127.0.0.1:9997/docs 来查看 API 文档。
可以通过以下命令安装后,利用 Xinference 命令行工具或者 Python 代码来使用:
pip install xinference
命令行工具是 xinference。可以通过以下命令查看有哪些可以使用的命令:
xinference --help
输出:
Usage: xinference [OPTIONS] COMMAND [ARGS]...

Options:
  -v, --version       Show the version and exit.
  --log-level TEXT
  -H, --host TEXT
  -p, --port INTEGER
  --help              Show this message and exit.

Commands:
  cached
  cal-model-mem
  chat
  engine
  generate
  launch
  list
  login
  register
  registrations
  remove-cache
  stop-cluster
  terminate
  unregister
  vllm-models
如果只需要安装 Xinference 的 Python SDK,可以使用以下命令安装最少依赖。需要注意的是版本必须和 Xinference 服务的版本保持匹配。
pip install xinference-client==${SERVER_VERSION}
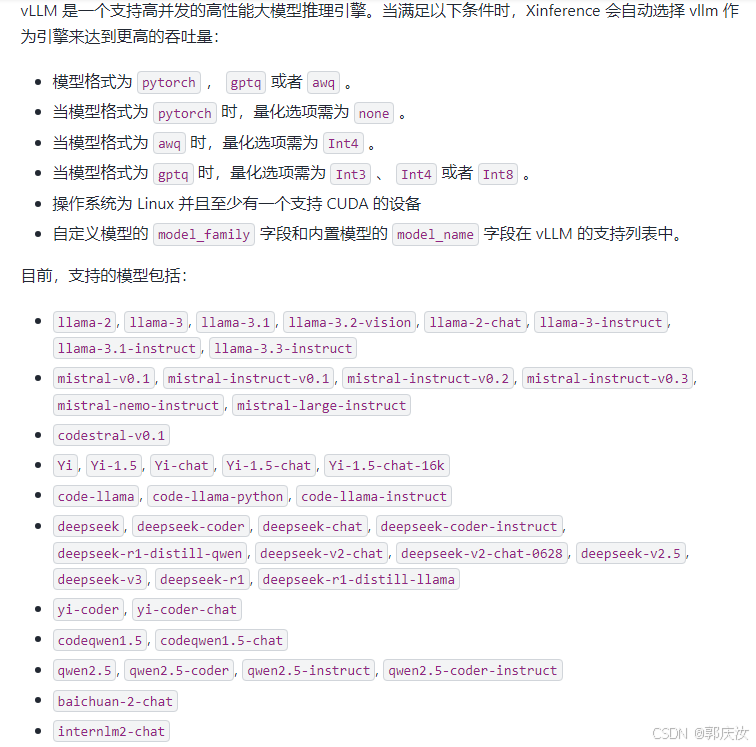
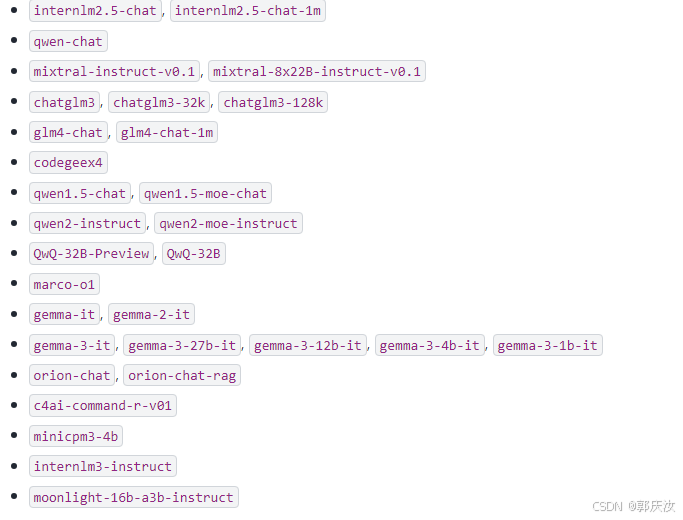
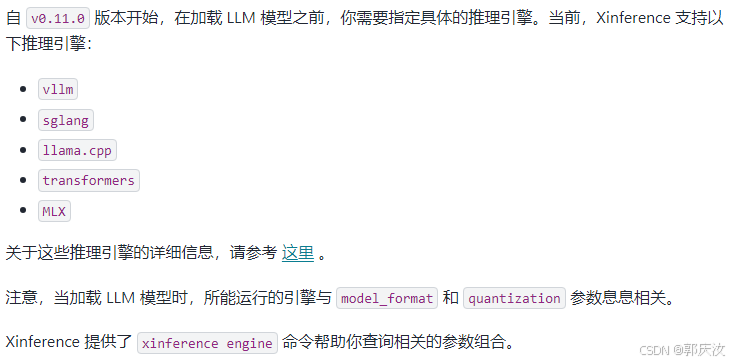
关于模型的推理引擎
例如:
我想查询与 qwen-chat 模型相关的参数组合,以决定它能够怎样跑在各种推理引擎上。
xinference engine -e <xinference_endpoint> --model-name qwen-chat
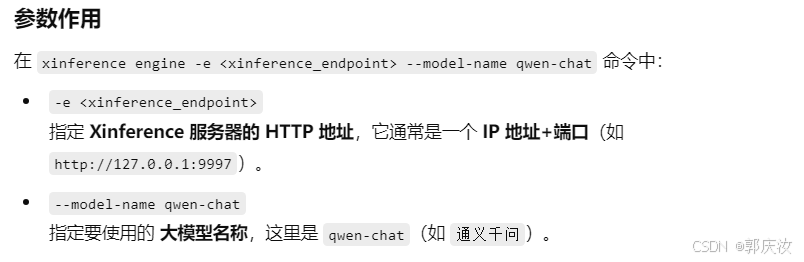
我想将 qwen-chat 跑在 VLLM 推理引擎上,但是我不知道什么样的其他参数符合这个要求
xinference engine -e <xinference_endpoint> --model-name qwen-chat --model-engine vllm
我想加载 GGUF 格式的 qwen-chat 模型,我需要知道其余的参数组合。
xinference engine -e <xinference_endpoint> --model-name qwen-chat -f ggufv2
总之,相比于之前的版本,当加载 LLM 模型时,需要额外传入 model_engine 参数。你可以通过 xinference engine 命令查询你想运行的推理引擎与其他参数组合的关系。
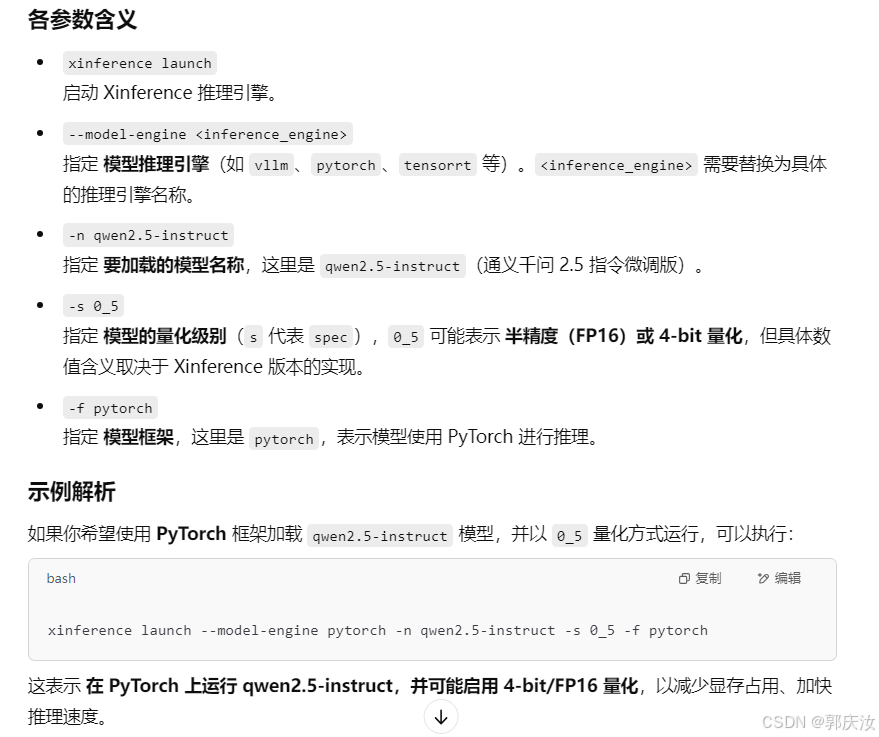
运行 qwen2.5-instruct
让我们来运行一个内置的 qwen2.5-instruct 模型。当你需要运行一个模型时,第一次运行是要从HuggingFace 下载模型参数,一般来说需要根据模型大小下载10到30分钟不等。当下载完成后,Xinference本地会有缓存的处理,以后再运行相同的模型不需要重新下载。
注意:
XINFERENCE_MODEL_SRC=modelscope xinference-local --host 0.0.0.0 --port 9997
以使用 --model-uid 或者 -u 参数指定模型的 UID,如果没有指定,Xinference 会随机生成一个 ID。默认的 ID 和模型名保持一致。
shell
xinference launch --model-engine <inference_engine> -n qwen2.5-instruct -s 0_5 -f pytorch
cURL:
curl -X 'POST' \
  'http://127.0.0.1:9997/v1/models' \
  -H 'accept: application/json' \
  -H 'Content-Type: application/json' \
  -d '{
  "model_engine": "<inference_engine>",
  "model_name": "qwen2.5-instruct",
  "model_format": "pytorch",
  "size_in_billions": "0_5"
}'
python
from xinference.client import RESTfulClient
client = RESTfulClient("http://127.0.0.1:9997")
model_uid = client.launch_model(
  model_engine="<inference_engine>",
  model_name="qwen2.5-instruct",
  model_format="pytorch",
  size_in_billions="0_5"
)
print('Model uid: ' + model_uid)
out:
Model uid: qwen2.5-instruct

xinference launch --model-engine vllm -n qwen2.5-instruct -s 0_5 -f pytorch --gpu_memory_utilization 0.9

# 在运行模型时,gpu_memory_utilization=0.9 会传到 vllm 后端。

cURL
curl -X 'POST' \
  'http://127.0.0.1:9997/v1/chat/completions' \
  -H 'accept: application/json' \
  -H 'Content-Type: application/json' \
  -d '{
    "model": "qwen2.5-instruct",
    "messages": [
        {
            "role": "system",
            "content": "You are a helpful assistant."
        },
        {
            "role": "user",
            "content": "What is the largest animal?"
        }
    ]
  }'
python
from xinference.client import RESTfulClient
client = RESTfulClient("http://127.0.0.1:9997")
model = client.get_model("qwen2.5-instruct")
model.chat(
    messages=[
        {"role": "user", "content": "Who won the world series in 2020?"}
    ]
)
out:
{
  "id": "chatcmpl-8d76b65a-bad0-42ef-912d-4a0533d90d61",
  "model": "qwen2.5-instruct",
  "object": "chat.completion",
  "created": 1688919187,
  "choices": [
    {
      "index": 0,
      "message": {
        "role": "assistant",
        "content": "The largest animal that has been scientifically measured is the blue whale, which has a maximum length of around 23 meters (75 feet) for adult animals and can weigh up to 150,000 pounds (68,000 kg). However, it is important to note that this is just an estimate and that the largest animal known to science may be larger still. Some scientists believe that the largest animals may not have a clear \"size\" in the same way that humans do, as their size can vary depending on the environment and the stage of their life."
      },
      "finish_reason": "None"
    }
  ],
  "usage": {
    "prompt_tokens": -1,
    "completion_tokens": -1,
    "total_tokens": -1
  }
}
Xinference 提供了与 OpenAI 兼容的 API,所以可以将 Xinference 运行的模型当成 OpenAI的本地替代。比如:
from openai import OpenAI
client = OpenAI(base_url="http://127.0.0.1:9997/v1", api_key="not used actually")

response = client.chat.completions.create(
    model="qwen2.5-instruct",
    messages=[
        {"role": "system", "content": "You are a helpful assistant."},
        {"role": "user", "content": "What is the largest animal?"}
    ]
)
print(response)
管理模型
除了启动模型,Xinference 提供了管理模型整个生命周期的能力。同样的,你可以使用命令行、cURL 以及 Python 代码来管理:
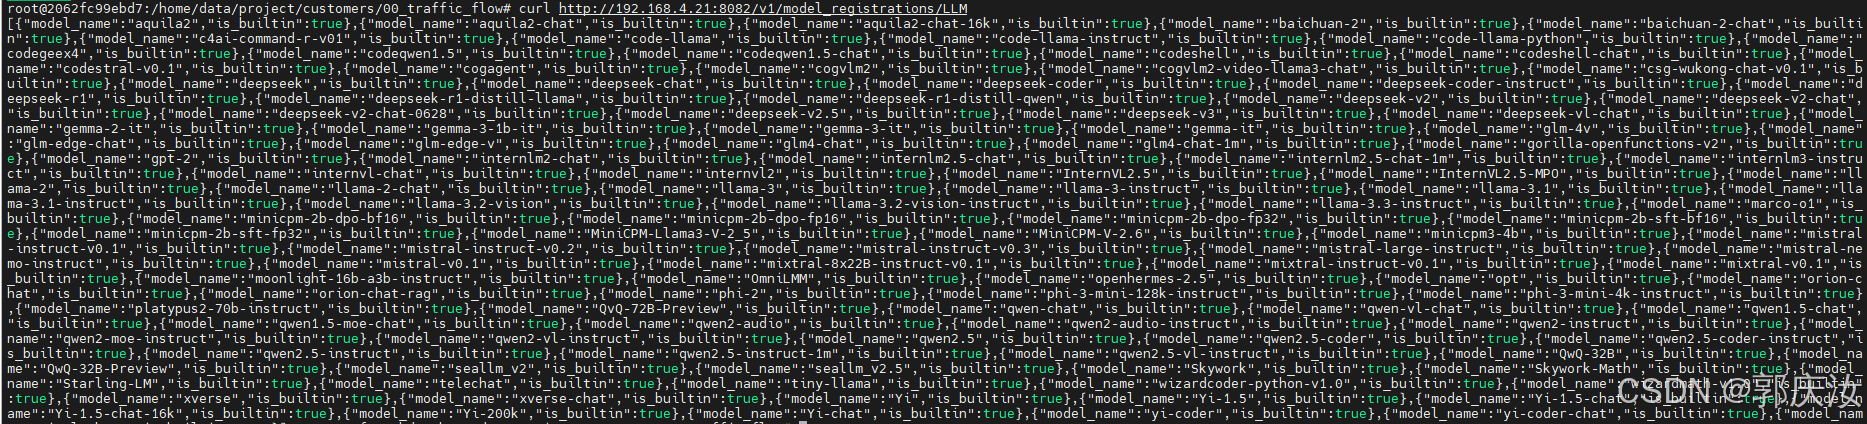
可以列出所有 Xinference 支持的指定类型的模型:
shell:
xinference registrations -t LLM
cURL:
curl http://127.0.0.1:9997/v1/model_registrations/LLM
python:
from xinference.client import RESTfulClient
client = RESTfulClient("http://127.0.0.1:9997")
print(client.list_model_registrations(model_type='LLM'))
接下来的命令可以列出所有在运行的模型:
shell:
xinference list
或者:xinference list --endpoint http://127.0.0.1:8082
关闭目前运行模型:
xinference stop --model-uid deepseek-r1-distill-qwen-7b
cURL:
curl http://127.0.0.1:9997/v1/models
python:
from xinference.client import RESTfulClient
client = RESTfulClient("http://127.0.0.1:9997")
print(client.list_models())
当你不需要某个正在运行的模型,可以通过以下的方式来停止它并释放资源:
xinference terminate --model-uid "qwen2.5-instruct"
cURL:
curl -X DELETE http://127.0.0.1:9997/v1/models/qwen2.5-instruct
python
from xinference.client import RESTfulClient
client = RESTfulClient("http://127.0.0.1:9997")
client.terminate_model(model_uid="qwen2.5-instruct")
官方详细文档:
https://inference.readthedocs.io/zh-cn/latest/models/index.html
具体使用:
对话大模型
启动Xinference服务
# 1、指定端口
XINFERENCE_MODEL_SRC=modelscope xinference-local --host 0.0.0.0 --port 8082
模型下并启动
新开一个命令终端,执行如下指令
XINFERENCE_MODEL_SRC=modelscope xinference launch --endpoint http://localhost:8082     \
--model-engine vLLM     \
--model-name deepseek-r1-distill-qwen     \
--size-in-billions 1_5     \
--model-format pytorch     \
--quantization none   \
--model-uid  deepseek-r1-distill-qwen_1_5 \
======================================================================
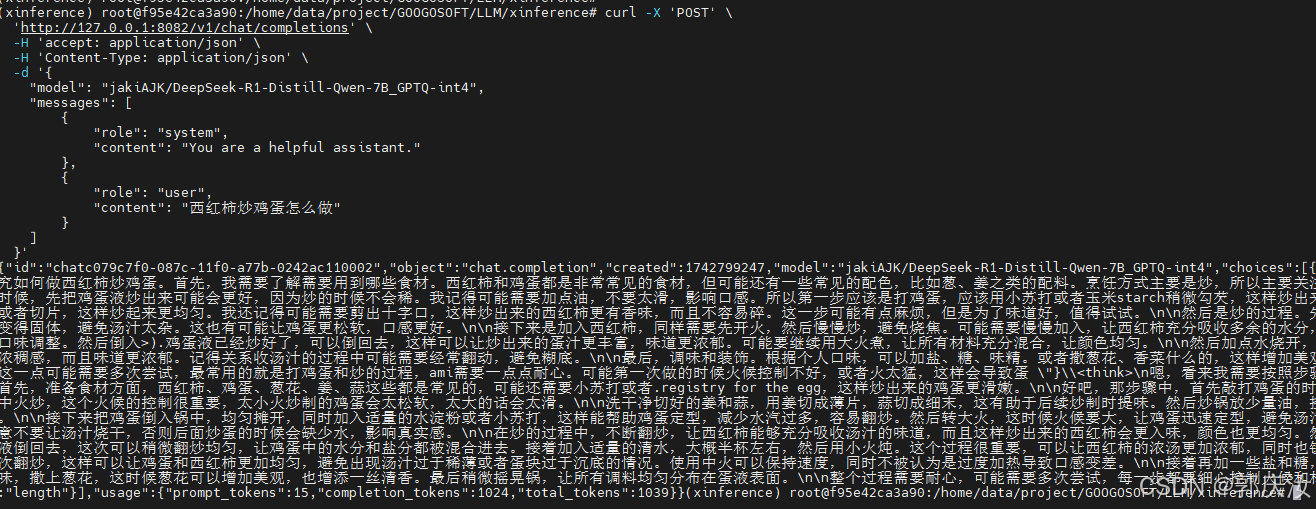
加载jakiAJK/DeepSeek-R1-Distill-Qwen-7B_GPTQ-int4模型
XINFERENCE_MODEL_SRC=modelscope xinference launch --endpoint http://localhost:8082   \
--model-engine vLLM \
--model-name deepseek-r1-distill-qwen \
--size-in-billions 7 \
--model-format gptq \
--quantization Int4  \
--model-uid jakiAJK/DeepSeek-R1-Distill-Qwen-7B_GPTQ-int4

注意:下述的cURL语句中,model字段要填写返回的 Model uid 字段
访问:
curl -X 'POST' \
  'http://127.0.0.1:8082/v1/chat/completions' \
  -H 'accept: application/json' \
  -H 'Content-Type: application/json' \
  -d '{
    "model": "jakiAJK/DeepSeek-R1-Distill-Qwen-7B_GPTQ-int4",
    "messages": [
        {
            "role": "system",
            "content": "You are a helpful assistant."
        },
        {
            "role": "user",
            "content": "西红柿炒鸡蛋怎么做"
        }
    ]
  }'
查看目前运行模型:
xinference list --endpoint http://127.0.0.1:8082

关闭运行模型:
xinference stop --model-uid deepseek-r1-distill-qwen-7b
文本嵌入模型
启动:bge-m3模型
Model Name: bge-m3
Languages: zh, en
Abilities: embed
Specifications
Dimensions: 1024
Max Tokens: 8192
Model ID: BAAI/bge-m3
Model Hubs: Hugging Face, ModelScope
XINFERENCE_MODEL_SRC=modelscope xinference launch --endpoint http://localhost:8082   \
 --model-name bge-m3 \
 --model-type embedding  \
 --model-uid BAAI/bge-m3

重排模型
XINFERENCE_MODEL_SRC=modelscope xinference launch --endpoint http://localhost:8082   \
--model-name bge-reranker-base \
--model-type rerank \
--model-uid BAAI/bge-reranker-base

文本转语音 TTS
torchaudio 升级到 2.5.0 或更新的版本后,老的 ffmpeg 似乎不支持了。可以用 conda 安装:
conda install -c conda-forge “ffmpeg<7”
XINFERENCE_MODEL_SRC=modelscope xinference launch --endpoint http://localhost:8082   \
--model-name ChatTTS \
--model-type audio \
--model-uid ChatTTS \
--gpu-idx 0
cURL:
curl -X 'POST' \
  'http://192.168.4.21:8082/v1/audio/speech' \
  -H 'accept: application/json' \
  -H 'Content-Type: application/json' \
  -d '{
    "model": "ChatTTS",
    "input": "谷歌浏览器是我们非常喜欢的一款浏览器,一些小伙伴会在该浏览器中进行录音操作,有些时候会需要使用到麦克风功能,但是有小伙伴发现在该浏览器中无法使用麦克风功能,其实这是由于该浏览器中的麦克风功能被关闭了,我们需要进入到隐私和安全的窗口中,点击进入到网站设置页面,即可找到麦克风功能,我们将网站请求使用您的麦克风选项进行点击启用即可,下方是关于如何使用谷歌浏览器启用麦乐风功能的具体操作方法,如果你需要的情况下可以看看方法教程,希望小编的方法教程对大家有所帮助。",
    "voice": "echo",
    "response_format":"mp3",
    "speed": 0.8
  }' --output output.wav
参数:“speed”: 0.8——设置播放速度
=============================================================================================
XINFERENCE_MODEL_SRC=modelscope xinference launch --endpoint http://localhost:8082   \
--model-name CosyVoice2-0.5B \
--model-type audio \
--model-uid CosyVoice2-0.5B

访问:
curl -X 'POST' \
  'http://192.168.4.21:8082/v1/audio/speech' \
  -H 'accept: application/json' \
  -H 'Content-Type: application/json' \
  -d '{
    "model": "CosyVoice2-0.5B",
    "input": "人之初,性本善,,,,哈哈哈,我是小妖怪,逍遥又自在",
    "voice": "中文男",
    "response_format":"mp3",
    "speed": 1.1
  }' --output output.wav
[‘中文女’, ‘中文男’, ‘日语男’, ‘粤语女’, ‘英文女’, ‘英文男’, ‘韩语女’]
语音转文本模型 ASR
XINFERENCE_MODEL_SRC=modelscope xinference launch --endpoint http://localhost:8082   \
--model-name whisper-large-v3 \
--model-type audio \
--model-uid whisper-large-v3 \
--gpu-idx 0