esp32s3文心一言/豆包(即火山引擎)大模型实现智能语音对话--流式语音识别
一、引言
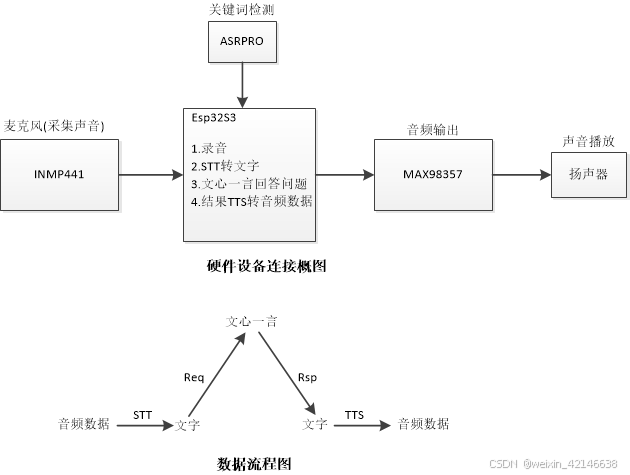
在之前的帖子《Esp32S3通过文心一言大模型实现智能语音对话》中,我们介绍了如何使用Esp32S3微控制器与文心一言大模型实现基本的智能语音对话功能,但受限于语音识别技术,只能处理2-3秒的音频数据。为了提升用户体验,满足更长时间的语音聊天对话需求,本次优化采用了流式语音识别技术,并添加了语音唤醒模块,实现了语音关键词唤醒功能。
二、开发环境介绍
1、arduino开发平台;
2、所需设备:Esp32s3、inmp441、max98357、ASRPRO语音模块、ILI9488显示屏,杜邦线(接线);
3、大模型:百度的文心一言大模型,豆包的火山引擎大模型;
4、语音识别(STT)和语音合成(TTS):使用百度语音识别和语音合成;
5、使用语言:C/C++;
三、拓扑图
四、设备购买链接
1、esp32s3:
2、inmp441:
3、max98357:
4、ASRPRO语音模块:
5、扬声器:
6、杜邦线:
7、ILI9488显示屏
五、接线
1、INMP441与Esp32S3接线
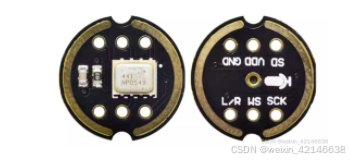
1.1、inmp44介绍
INMP441是一款高性能,低功耗,数字输出,带底部端口的全向MEMS麦克风。该完整的INMP441解决方案由一个MEMS传感器,信号组成调节,模数转换器,抗混叠滤波器,电源管理和行业标准的24位I²S接口。I²S接口允许INMP441直接连接到数字处理器,如DSP和微控制器,无需使用用于系统中的音频编解码器。INMP441具有高信噪比,是一款出色的选择近场应用。 INMP441具有扁平宽带频率响应,导致自然声音高清晰度。
1.2、inmp441接口定义
SCK:I²S接口的串行数据时钟。
WS:用于I²S接口的串行数据字选择。
L/R:左/右声道选择。设置为低电平时,麦克风在I²S帧的左声道输出信号。设置为高电平时,麦克风在右声道输出信号。
SD:I²S接口的串行数据输出。
VDD:输入电源,1.8V至3.3V。
GND:电源地。
1.3、实物图
1.4、接线
| Esp32S3 | INMP441 |
| GPIO 8引脚 | WS |
| GPIO 46引脚 | SCK |
| GPIO 9引脚 | SD |
| GND引脚 | L/R 和GND |
| 3.3V引脚 | VDD |
2、MAX98357与Esp32S3接线
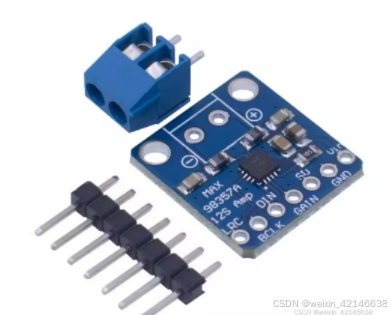
2.1、max98357介绍
这是一个采用标准的I2S作为数字音频输入,内置解码器,可将数字音频信号解码为模拟信号,并拥有内置放大器,可以直接驱动扬声器的D类放大器。因其工作效率高,可以以2.7V~5.5V的直流电压运行,因此非常适合便携式及电池供电的音频播放项目
2.2、max98357接口定义
VIN:电源正(2.5V-5.5V)。
GND:电源地。
SD:关机和频道选择。SD MODE拉低以将器件处于关断状态。
GAIN:增益和频道选择。在TDM模式下,增益固定为12dB。
DIN:数字信号输入。
BCLK:位时钟输入。
LRC:I2S与LJ模式的左/右时钟。同步时钟用于TDM模式。
2.3、实物图
2.4、接线
| Esp32S3 | MAX98357 |
| GPIO 19引脚 | DIN |
| GPIO 20引脚 | BCLK |
| GPIO 21引脚 | LRC |
| GND引脚 | GND |
| 3.3V引脚 | VIN |
3、ASRPRO与Esp32S3接线
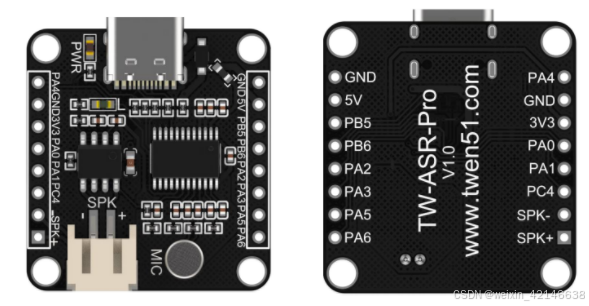
3.1、ASRPRO语音模块介绍
ASRPRO是一款高性能、低功耗的语音识别芯片,在使用过程中可以设置唤醒词和命令词。唤醒词用于将模块从待机状态切换到工作状态,防止误触发;命令词则用于执行具体的语音指令。本文中主要是借用了唤醒词的功能,使得esp32s3板子可以依赖语音唤醒。
3.2、接口定义
该模块接口可自行查资料了解。
3.3、实物图
3.4、接线
| Esp32S3 | ASRPRO |
| GPIO 10引脚 | PA_2 |
| GPIO 11引脚 | PA_3 |
4、扬声器与MAX98357接线
这个接线比较简单,自己看着接就行。
六、源码-模块化开发
文件目录如下:
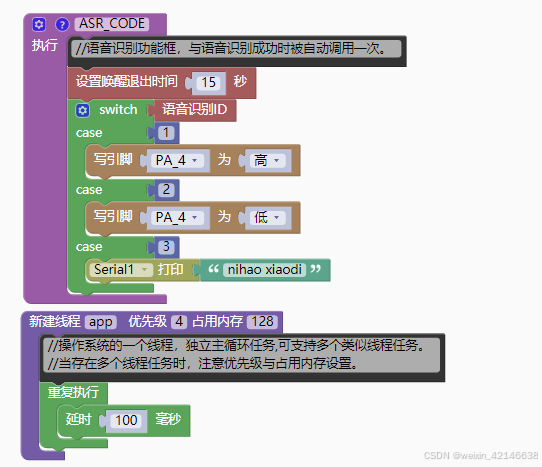
1、ASRPRO语音模块上的代码
1.1、拖拉式编程如下:

1.2、字符编程如下:
#include "asr.h"
extern "C"{ void * __dso_handle = 0 ;}
#include "setup.h"
#include "HardwareSerial.h"

uint32_t snid;
String Rec;
void UART_RX();
void ASR_CODE();
void app();

//{speak:小蝶-清新女声,vol:2,speed:10,platform:haohaodada}
//{playid:10001,voice:欢迎使用语音助手,用天问五幺唤醒我。}
//{playid:10002,voice:我退下了,用天问五幺唤醒我}

void UART_RX(){
  while (1) {
    if(Serial.available() > 0){
      Rec = Serial.readString();
      if(Rec == "on"){
        digitalWrite(4,1);
        Serial1.print("nihao xiaodi");
      }
      else if(Rec == "off"){
        digitalWrite(4,0);
        Serial1.print("off");
      }
    }
    delay(2);
  }
  vTaskDelete(NULL);
}

/*描述该功能...
*/
void ASR_CODE(){
  //语音识别功能框,与语音识别成功时被自动调用一次。
  set_state_enter_wakeup(15000);
  switch (snid) {
   case 1:
    digitalWrite(4,1);
    break;
   case 2:
    digitalWrite(4,0);
    break;
   case 3:
    Serial1.print("nihao xiaodi");
    break;
  }

}

void app(){
  //操作系统的一个线程,独立主循环任务,可支持多个类似线程任务。
  //当存在多个线程任务时,注意优先级与占用内存设置。
  while (1) {
    delay(100);
  }
  vTaskDelete(NULL);
}

void hardware_init(){
  //需要操作系统启动后初始化的内容
  vol_set(1);
  setPinFun(13,SECOND_FUNCTION);
  setPinFun(14,SECOND_FUNCTION);
  Serial.begin(9600);
  setPinFun(2,FORTH_FUNCTION);
  setPinFun(3,FORTH_FUNCTION);
  Serial1.begin(9600);
  Rec = "";
  xTaskCreate(UART_RX,"UART_RX",128,NULL,4,NULL);
  xTaskCreate(app,"app",128,NULL,4,NULL);
  vTaskDelete(NULL);
}

void setup()
{
  //需要操作系统启动前初始化的内容
  //{ID:0,keyword:"唤醒词",ASR:"天问五幺",ASRTO:"我在呢"}
  //{ID:3,keyword:"唤醒词",ASR:"你好小迪",ASRTO:"在呢"}
  //{ID:1,keyword:"命令词",ASR:"打开继电器",ASRTO:"已经打开继电器"}
  //{ID:2,keyword:"命令词",ASR:"关闭继电器",ASRTO:"已经关闭继电器"}
  setPinFun(4,FIRST_FUNCTION);
  pinMode(4,output);
  digitalWrite(4,0);
}
2、INMP441与MAX98357初始化接口
在my_inmp441_max98357.h文件中,实现初始化inmp441与max98357的接口。
// 头文件
#include <driver/i2s.h>
#include <hal/i2s_types.h>

//按照接线确定编号
#define INMP441_WS 8
#define INMP441_SCK 46
#define INMP441_SD 9

#define MAX98357_LRC 21
#define MAX98357_BCLK 20
#define MAX98357_DIN 19

i2s_config_t inmp441_i2s_config = {
  .mode = i2s_mode_t(I2S_MODE_MASTER | I2S_MODE_RX),
  .sample_rate = 16000,
  .bits_per_sample = i2s_bits_per_sample_t(16),
  .channel_format = I2S_CHANNEL_FMT_ONLY_LEFT,
  .communication_format = i2s_comm_format_t(I2S_COMM_FORMAT_STAND_I2S),
  .intr_alloc_flags = ESP_INTR_FLAG_EDGE,
  .dma_buf_count = 8,   // buffer 的数量
  .dma_buf_len = 128    // buffer的大小,单位是i2s_bits_per_sample_t 采样位数,越小播放需要越及时时延越小,否则相反
};

const i2s_pin_config_t inmp441_gpio_config = {
  .bck_io_num = INMP441_SCK,
  .ws_io_num = INMP441_WS,
  .data_out_num = -1,
  .data_in_num = INMP441_SD
};

i2s_config_t max98357_i2s_config = {
  .mode = i2s_mode_t(I2S_MODE_MASTER | I2S_MODE_TX),
  .sample_rate = 16000,
  .bits_per_sample = i2s_bits_per_sample_t(16),
  .channel_format = I2S_CHANNEL_FMT_ONLY_LEFT,
  .communication_format = i2s_comm_format_t(I2S_COMM_FORMAT_STAND_MSB),
  .intr_alloc_flags = ESP_INTR_FLAG_LEVEL1,
  .dma_buf_count = 8,
  .dma_buf_len = 128
};

const i2s_pin_config_t max98357_gpio_config = {
  .bck_io_num = MAX98357_BCLK,
  .ws_io_num = MAX98357_LRC,
  .data_out_num = MAX98357_DIN,
  .data_in_num = -1
};

void inmp441_max98357_setup()
{
  i2s_driver_install(I2S_NUM_0, &inmp441_i2s_config, 0, NULL);
  i2s_set_pin(I2S_NUM_0, &inmp441_gpio_config);

  i2s_driver_install(I2S_NUM_1, &max98357_i2s_config, 0, NULL);
  i2s_set_pin(I2S_NUM_1, &max98357_gpio_config);
}

void inmp441_max98357_loop() {
  uint16_t data[1024];
  esp_err_t result;
  size_t bytes_read = 0;
  result = i2s_read(I2S_NUM_0, &data, sizeof(data), &bytes_read, portMAX_DELAY);
  //Serial.println(bytes_read);
  size_t bytes_write;
  result = i2s_write(I2S_NUM_1, &data, sizeof(data), &bytes_write, portMAX_DELAY);
}
2、STT和TTS(语音识别和语音合成接口)
在my_stt_tts.h文件中通过百度语音识别和语音合成API接口实现语音与文字互转功能。
#include <HTTPClient.h>
#include <ArduinoJson.h>
#include <base64.h>
#include <cJSON.h>
#include <UrlEncode.h>

#define TXT_DATA_LEN 1024 //STT txt len
#define ADC_DATA_LEN 1024*16 //read data len
const int data_json_len = ADC_DATA_LEN * 2 * 1.4;

// 1、修改百度语言技术的用户信息:https://console.bce.baidu.com/ai/?fromai=1#/ai/speech/app/list
const int STT_DEV_PID = 1537; //选填,输入法模型 1737-英语 1537-普通话(近场识别模型) 1936-普通话远程识别 1837-四川话
const char *STT_TTS_CUID = "CoPY70iMA468o2r4PVLWmlLCruuYQd6G"; //用户唯一标识,用来区分用户,计算UV值。建议填写能区分用户的机器 MAC 地址或 IMEI 码,长度为60字符以内。
const char *STT_TTS_CLIENT_ID = "sOKyRkOGpc76TYCNvGcd2F1i"; //API Key
const char *STT_TTS_CLIENT_SECRET = "CoPY70iMA468o2r4PVLWmlLCruuYQd6G"; //Secret Key

String stt_tts_token;
String stt_tts_gainToken() {
  HTTPClient stt_http;
  String token;
  String url = String("https://aip.baidubce.com/oauth/2.0/token?grant_type=client_credentials&client_id=") + STT_TTS_CLIENT_ID + "&client_secret=" + STT_TTS_CLIENT_SECRET;

  stt_http.begin(url);
  int httpCode = stt_http.GET();

  if (httpCode > 0) {
    String payload = stt_http.getString();
    DynamicJsonDocument doc(1024);
    deserializeJson(doc, payload);
    token = doc["access_token"].as<String>();
    Serial.println("stt:" + token);
  } else {
    Serial.println("Error on HTTP request for token");
  }
  stt_http.end();
  return token;
}

void stt_tts_setup()
{
  stt_tts_token = stt_tts_gainToken();
  //Serial.println(stt_tts_token.c_str());
}

void stt_assembleJson(uint16_t *data, char *data_json)
{
  if (stt_tts_token == "")
  {
    stt_tts_setup();
  }

  strcat(data_json, "{");
  strcat(data_json, "\"format\":\"pcm\",");
  strcat(data_json, "\"rate\":16000,");
  strcat(data_json, "\"dev_pid\":1537,");
  strcat(data_json, "\"channel\":1,");
  strcat(data_json, "\"cuid\":\""); strcat(data_json, STT_TTS_CUID); strcat(data_json, "\",");
  strcat(data_json, "\"token\":\""); strcat(data_json, stt_tts_token.c_str()); strcat(data_json, "\",");
  sprintf(data_json + strlen(data_json), "\"len\":%d,", ADC_DATA_LEN * sizeof(uint16_t));
  strcat(data_json, "\"speech\":\"");
  strcat(data_json, base64::encode((uint8_t *)data, ADC_DATA_LEN * sizeof(uint16_t)).c_str());
  //int tmp = base64::decode((char *)adc_data, adc_data_len, data_json);
  strcat(data_json, "\"");
  strcat(data_json, "}");
  //Serial.println(data_json);
  return;
}

String getTextFromResponse(String response)
{
  // Parse JSON response
  DynamicJsonDocument jsonDoc(1024);
  deserializeJson(jsonDoc, response);
  String outputText = jsonDoc["result"];
  int len = strlen(outputText.c_str());
  String output = outputText.substring(2, len-2);
  //Serial.println(output);
  return output;
}

//待优化,合成成功,返回的Content-Type以“audio”开头,
//合成出现错误,则会返回json文本,具体header信息为:Content-Type: application/json
int getInfoFromTtsResponse(String response, LLM_MSG_RSP_T *rsp)
{
  // Parse JSON response
  DynamicJsonDocument jsonDoc(1024);
  deserializeJson(jsonDoc, response);
  rsp->err_msg = (String)jsonDoc["err_msg"];
  //rsp->err_msg = tmp1.c_str();
  rsp->err_no = jsonDoc["err_no"];;
  //Serial.println(rsp->err_msg);
  //Serial.println(rsp->err_no);
  return rsp->err_no;
}


HTTPClient http_client_stt;

String sendToSTT_test(uint16_t *data)
{
  char *data_json = (char *)malloc(data_json_len*sizeof(char));
  memset(data_json, '\0', data_json_len*sizeof(char));
  stt_assembleJson(data, data_json);
  int httpCode = http_client_stt.POST(data_json);
  free(data_json);
}

String sendToSTT(uint16_t *data)
{
  HTTPClient http_client_stt;
  http_client_stt.begin("http://vop.baidu.com/server_api");//短语音识别请求地址: 标准版http://vop.baidu.com/server_api, 极速版https://vop.baidu.com/pro_api
  http_client_stt.addHeader("Content-Type", "application/json");

  char *data_json = (char *)malloc(data_json_len*sizeof(char));
  memset(data_json, '\0', data_json_len*sizeof(char));
  stt_assembleJson(data, data_json);
  int httpCode = http_client_stt.POST(data_json);
  free(data_json);

  if (httpCode > 0) {
    if (httpCode == HTTP_CODE_OK) {
      String response = http_client_stt.getString();
      //Serial.println(response);
      String outputText = getTextFromResponse(response);
      http_client_stt.end();
      return outputText;
    }
  } else {
    Serial.printf("[HTTP] POST failed, error: %s\n", http_client_stt.errorToString(httpCode).c_str());
    http_client_stt.end();
    return String("响应失败请重新获取!");
  }
}

String sendToTTS(String InputText, int *len) {

  InputText = urlEncode(InputText);//tex字段2次urlencode
  InputText = urlEncode(InputText);//百度为了更好地兼容,支持1次及2次urlencode, 其中2次urlencode可以覆盖全部的特殊字符。因而推荐传递tex 参数时做2次urlencode编码。
  HTTPClient http;
  char* tts_url = "https://tsn.baidu.com/text2audio"; // 百度语音合成的API URL
  http.begin(tts_url); // 初始化HTTP请求
  http.addHeader("Content-Type", "application/x-www-form-urlencoded"); // 根据API要求添加HTTP头  application/x-www-form-urlencoded

  if (stt_tts_token == "")
  {
    stt_tts_setup();
  }
  String payload = String("tex=")+InputText.c_str()+String("&tok=")+stt_tts_token.c_str()+String("&cuid=")+STT_TTS_CUID+String("&ctp=1&lan=zh&spd=5&pit=1&vol=1&per=5&aue=4");
  //Serial.println(payload);

  String outputText;
  int httpCode = http.POST(payload); // 发送POST请求
  if (httpCode == HTTP_CODE_OK) {
    String response = http.getString(); // 获取响应体
    //Serial.println(response);
    LLM_MSG_RSP_T rsp_info;
    if (getInfoFromTtsResponse(response, &rsp_info))
    {
        Serial.println(response);
        outputText = rsp_info.err_msg;
        return outputText;
    }
    *len = http.getSize();
    //Serial.println(*len);
    http.end(); // 结束HTTP请求
    return response;
  } else {
    Serial.println("Error in the HTTP request");
    outputText = String("Error in the HTTP request");
  }

  http.end(); // 结束HTTP请求
  return outputText;
}

void audio_play_by_text(String input)
{
    g_current_state |= LLM_PLAY_AUDIO_FLAG;
    int len = 0, i = 0, tmp = 0;
    String Output;
    uint16_t *wr_data = NULL;
    size_t bytes_write = 0;

    Output = sendToTTS(input, &len);
    wr_data = (uint16_t *)malloc(1024*16*sizeof(uint16_t));//1s
    for (i = 0; i < len; i+=(1024*16*sizeof(uint16_t)))
    {
      memset(wr_data, '\0', 1024*16*sizeof(uint16_t));
      tmp = len - i;
      if (len - i > 1024*16*sizeof(uint16_t))
        tmp = 1024*16*sizeof(uint16_t);

      memcpy(wr_data, Output.c_str()+i, tmp);
      esp_err_t result = i2s_write(I2S_NUM_1, wr_data, tmp, &bytes_write, portMAX_DELAY);
    }
    free(wr_data);

    g_current_state &= ~LLM_PLAY_AUDIO_FLAG;
    return;
}
3、通过API接口访问文心一言大模型
在my_ErnieBot.h文件中实现访问文心一言大模型API接口获取响应结果。
#include <HTTPClient.h>
#include <ArduinoJson.h>
#include "my_common.h"

// Replace with your OpenAI API key
const char* ERNIE_BOT_CLIENT_ID = "vCe0kXozst5OI6LC8BJNJsQ9";//API Key
const char* ERNIE_BOT_CLIENT_SECRET = "3iTfEAnHRaoP0Uiml00ACw6TPFsHbFt6";//Secret Key

String ErnieBot_accessToken;

String ErnieBotGainToken() {
  HTTPClient http;
  String token;
  String url = String("https://aip.baidubce.com/oauth/2.0/token?grant_type=client_credentials&client_id=") + ERNIE_BOT_CLIENT_ID + "&client_secret=" + ERNIE_BOT_CLIENT_SECRET;

  http.begin(url);
  int httpCode = http.GET();

  if (httpCode > 0) {
    String payload = http.getString();
    DynamicJsonDocument doc(1024);
    deserializeJson(doc, payload);
    token = doc["access_token"].as<String>();
    Serial.println("ErnieBot:" +  token);
  } else {
    Serial.println("Error on HTTP request for token");
  }
  http.end();
  return token;
}

String getErnieBotAnswer(String inputText, int *ret) {
  //Serial.println(inputText.c_str());
  HTTPClient http;
  http.setTimeout(1000000);
  String apiUrl = String("https://aip.baidubce.com/rpc/2.0/ai_custom/v1/wenxinworkshop/chat/completions?access_token=") + ErnieBot_accessToken.c_str();
  http.begin(apiUrl);
  http.addHeader("Content-Type", "application/json");
  String payload = "{\"messages\":[{\"role\": \"user\",\"content\": \"" + inputText + "两百字以内。" + "\"}],\"disable_search\": false,\"enable_citation\": false}";
  Serial.println(payload.c_str());
  int httpResponseCode = http.POST(payload);
  if (httpResponseCode == 200) {
    String response = http.getString();
    http.end();
    if (ret)
        *ret = ESP_SUCCEED;
    Serial.println(response);

    // Parse JSON response
    DynamicJsonDocument jsonDoc(1024);
    deserializeJson(jsonDoc, response);
    String outputText = jsonDoc["result"];
    return outputText;
  } else {
    http.end();
    Serial.printf("Error %i \n", httpResponseCode);
    if (ret)
        *ret = ESP_FAILT;
    return "<error>";
  }
}

void ErnieBot_setup() {
  ErnieBot_accessToken = ErnieBotGainToken();
  //Serial.println(ErnieBot_accessToken.c_str());
  String answer = getErnieBotAnswer("你好,文心一言", NULL);
  Serial.println("<Test Answer: " + answer);
}
4、通过API接口访问豆包(火山引擎)大模型
在my_Doubao.h文件中实现访问文心一言大模型API接口获取响应结果。
#include <HTTPClient.h>
#include <ArduinoJson.h>
#include "my_common.h"

// Replace with your OpenAI API key
const char* doubao_apiKey = "4ab25fbb-ce6c-4f02-95f6-63073227d141";

String getDoubaoAnswer(String inputText, int *ret) {
  //Serial.println(inputText.c_str());
  HTTPClient http;
  http.setTimeout(1000000);

  String apiUrl = "https://ark.cn-beijing.volces.com/api/v3/chat/completions";
  http.begin(apiUrl);
  http.addHeader("Content-Type", "application/json");
  String token_key = String("Bearer ") + doubao_apiKey;
  http.addHeader("Authorization", token_key);

  //256k上下文推理: ep-20241230152833-5fcsh
  //快速响应: ep-20241230144301-t84jj
  String payload = "{\"model\":\"ep-20241230152833-5fcsh\",\"messages\":[{\"role\":\"system\",\"content\":\"你是我的AI助手vor,你必须用中文回答且字数不超过85个\"},{\"role\":\"user\",\"content\":\"" + inputText + "\"}],\"temperature\": 0.3}";

  //Serial.println(payload.c_str());
  int httpResponseCode = http.POST(payload);
  if (httpResponseCode == 200) {
    String response = http.getString();
    http.end();
    if (ret)
        *ret = ESP_SUCCEED;
    //Serial.println(response);

    // Parse JSON response
    DynamicJsonDocument jsonDoc(1024);
    deserializeJson(jsonDoc, response);
    String outputText = jsonDoc["choices"][0]["message"]["content"];
    return outputText;
  } else {
    http.end();
    Serial.printf("Error %i \n", httpResponseCode);
    if (ret)
        *ret = ESP_FAILT;
    return "<error>";
  }
}

void Doubao_setup() {
  String answer = getDoubaoAnswer("你好,豆包!", NULL);
  Serial.println("<Test Answer: " + answer);
}
5、WiFi模块
在my_wifi.h文件中初始化wifi功能。
#include <WiFi.h>

void wifi_setup() {
  Serial.println("\n-- Start connecting to WiFi! --");
  WiFi.disconnect(true);
  // 3、填写您的wifi账号密码
  WiFi.begin("wifi name", "password");
  while (WiFi.status() != WL_CONNECTED) {
    Serial.print(".");
    vTaskDelay(200);
  }
  Serial.println("\n-- wifi connect success! --");
}
6、common文件
在my_common.h文件中定义各个模块共同调用的参数。
#ifndef MY_COMMON
#define MY_COMMON
#if 1
#include <Arduino.h>
#include "base64.h"
#include <WiFiClientSecure.h>
#include "HTTPClient.h"
#include <ArduinoJson.h>
#include <ArduinoWebsockets.h>
#include <Wire.h>
#include <SD.h>
#include "freertos/FreeRTOS.h"
#include "freertos/task.h"
// 与AP模式和Web服务器有关的库
#include <AsyncTCP.h>
#include <ESPAsyncWebServer.h>
#include <Preferences.h>
#endif

#define ESP_SUCCEED 0
#define ESP_FAILT 1

#define BIT(n)             (1LLU << (n))
#define SET_BIT(mask, n)   ((mask) |= BIT(n))
#define RESET_BIT(mask, n) ((mask) &= ~BIT(n))
#define ISSET_BIT(mask, n) (!!((mask)&BIT(n)))
#define LLM_STANDBY_MODE              BIT(1) //待机状态标记
#define LLM_CONTINUOUS_DIALOGUE_STATE BIT(2) //连续对话状态标记
#define LLM_TTS_STANDBY_STATE         BIT(3) //TTS线程进入待机状态
#define LLM_RECORDING_STANDBY_STATE   BIT(4) //音频数据采集线程进入待机状态
#define LLM_REAWAKEN_FLAG             BIT(5) //重复唤醒标记
#define LLM_TTS_POLL_FLAG             BIT(6) //POLL task结束标记
#define LLM_PLAY_AUDIO_FLAG           BIT(7) //音频播放状态,置位1--播放中
#define LLM_FIRST_RSP_FLAG            BIT(8) //大模型响应标记,第一个响应后置位,即哪个模型响应快使用哪个做TTS

int g_current_state = 0;

typedef struct LLM_MSG_RSP
{
    String err_msg;
    int err_no;
}LLM_MSG_RSP_T;

#endif
7、核心逻辑代码文件
在esp32_ai_llm.h文件中编码实现调用各个模块接口代码,把各个模块功能串联起来实现最终语音唤醒以及连续对话的功能。
流式语音识别逻辑目前在该文件中,后续会摘出来单独作为一个模块。
七、效果展示
整体流程已经基本调通,效果展示后面拍好视频后补上来。
各模块源码无保留在第五章节,loop()函数各位老铁自己调用模块接口实现。
从无到有实现目前的效果,有参考其他大佬的帖子,也有自己摸索实现的部分,知识劳动成果,实属不易。
如果需要技术支持,欢迎骚扰(+v:Sw-striving)!