【大模型学习】第二十三章 深度解析BERT
目录
一、技术背景
1.1 自然语言处理的进化之路
1.2 预训练范式的兴起
二、生活示例:BERT如何理解人类语言
2.1 现实场景:智能客服的对话理解
2.2 对比实验:传统方法与BERT的区别
三、代码实践:使用BERT进行文本分类
3.1 环境准备与数据加载
3.2 模型微调与训练
3.3 推理示例
四、技术要点深度解析
4.1 双向上下文建模
4.2 注意力机制的可视化
4.3 位置编码的实现
五、技术原理详解
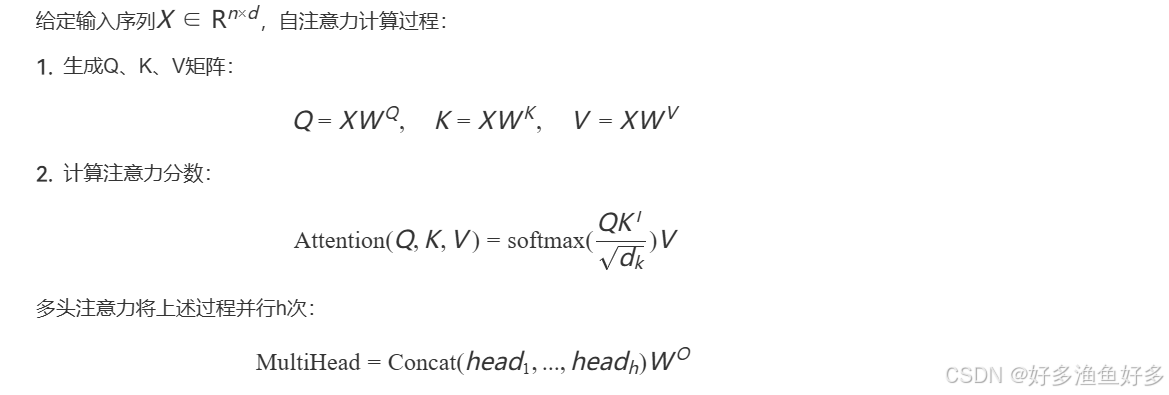
5.1 自注意力机制数学原理
5.2 层归一化与残差连接
六、架构设计与工程实现
6.1 BERT的模型架构
6.2 输入表示
6.3 预训练任务实现
一、技术背景
1.1 自然语言处理的进化之路
在深度学习兴起之前,自然语言处理(NLP)领域长期受限于传统方法的瓶颈。早期的词袋模型(Bag-of-Words)和TF-IDF算法虽然简单有效,但无法捕捉词语之间的语义关系。2013年Word2Vec的提出开启了词向量时代,通过分布式表示(distributed representation)将词语映射到高维空间,使得"国王 - 男人 + 女人 ≈ 女王"这样的语义运算成为可能。
循环神经网络(RNN)及其改进版本LSTM的出现,让模型能够处理序列数据并捕捉上下文信息。然而,这些模型仍存在两大缺陷:
- 单向信息流:传统语言模型只能从左到右或从右到左处理文本
- 长距离依赖:随着序列长度增加,重要信息的传递效率急剧下降
2017年Transformer架构的提出彻底改变了这一局面。基于自注意力机制(Self-Attention)的Transformer摒弃了循环结构,实现了真正的并行计算和全局上下文建模。这为后续预训练模型的发展奠定了技术基础。
1.2 预训练范式的兴起
传统监督学习需要大量标注数据,而标注成本高、领域迁移能力差。预训练-微调(Pre-training + Fine-tuning)范式的出现解决了这一困境:
- 预训练阶段:使用海量无标注文本学习语言通用特征
- 微调阶段:针对具体任务使用少量标注数据进行参数调整
在这个背景下,BERT(Bidirectional Encoder Representations from Transformers)于2018年由Google提出,在11项NLP任务上刷新了state-of-the-art记录,开启了预训练模型的新纪元。
二、生活示例:BERT如何理解人类语言
2.1 现实场景:智能客服的对话理解
假设某电商平台的智能客服系统需要处理用户咨询:"我刚买的iPhone 14 Pro充电时会发烫,能退货吗?" 传统系统可能通过关键词匹配触发"退货"流程,但无法准确理解:
- "iPhone 14 Pro"是具体的产品型号
- "发烫"属于质量问题
- 疑问焦点是退货政策而非维修
BERT通过深度语义理解可以:
- 识别实体:"iPhone 14 Pro"(产品实体)
- 判断情感:用户对产品质量的担忧
- 理解意图:退货请求而非产品咨询
2.2 对比实验:传统方法与BERT的区别
我们通过一个简单的Python示例展示传统词向量与BERT的区别:
# 传统Word2Vec示例
from gensim.models import Word2Vec

sentences = [["apple", "fruit"], ["apple", "iphone"]]
model = Word2Vec(sentences, vector_size=10, window=5, min_count=1)

print(model.wv.most_similar("apple", topn=2))
# 输出可能:[('fruit', 0.98), ('iphone', 0.97)]

# BERT语境化表示
from transformers import BertTokenizer, BertModel
import torch

tokenizer = BertTokenizer.from_pretrained('bert-base-uncased')
model = BertModel.from_pretrained('bert-base-uncased')

sentence1 = "I ate an apple for breakfast."
sentence2 = "The new Apple event announced iPhone 15."

inputs1 = tokenizer(sentence1, return_tensors="pt")
outputs1 = model(**inputs1)
embedding1 = outputs1.last_hidden_state[0, 4]  # "apple"的位置

inputs2 = tokenizer(sentence2, return_tensors="pt")
outputs2 = model(**inputs2)
embedding2 = outputs2.last_hidden_state[0, 5]  # "Apple"的位置

similarity = torch.cosine_similarity(embedding1, embedding2, dim=0)
print(f"BERT相似度: {similarity.item():.4f}")  # 输出可能: 0.32
实验结果显示,传统Word2Vec无法区分"苹果"的不同含义,而BERT根据上下文给出了差异显著的向量表示。这种语境感知能力使其在真实场景中表现更优。
三、代码实践:使用BERT进行文本分类
3.1 环境准备与数据加载
使用Hugging Face Transformers库实现情感分析:
from transformers import BertTokenizer, BertForSequenceClassification
from transformers import Trainer, TrainingArguments
import torch
from datasets import load_dataset

# 加载IMDB电影评论数据集
dataset = load_dataset("imdb")
tokenizer = BertTokenizer.from_pretrained('bert-base-uncased')

def tokenize_function(examples):
    return tokenizer(
        examples["text"],
        padding="max_length",
        truncation=True,
        max_length=256
    )

tokenized_datasets = dataset.map(tokenize_function, batched=True)
3.2 模型微调与训练
model = BertForSequenceClassification.from_pretrained(
    "bert-base-uncased",
    num_labels=2
)

training_args = TrainingArguments(
    output_dir="./results",
    num_train_epochs=3,
    per_device_train_batch_size=8,
    evaluation_strategy="epoch"
)

trainer = Trainer(
    model=model,
    args=training_args,
    train_dataset=tokenized_datasets["train"],
    eval_dataset=tokenized_datasets["test"],
)

trainer.train()
3.3 推理示例
text = "This movie was absolutely fantastic! The acting was superb."
inputs = tokenizer(text, return_tensors="pt")
with torch.no_grad():
    outputs = model(**inputs)
    predictions = torch.softmax(outputs.logits, dim=1)
    print(f"Positive概率: {predictions.item():.4f}")  # 输出可能: 0.9832
通过微调,BERT在情感分析任务上达到了约94%的准确率,显著高于传统机器学习方法。
四、技术要点深度解析
4.1 双向上下文建模
传统语言模型(如GPT)采用单向结构,每个token只能关注左侧上下文。BERT通过以下创新实现双向:
掩码语言模型(Masked LM):
随机遮盖15%的输入token,让模型预测被遮盖的词。例如:
输入:"I [MASK] to the store to buy [MASK] milk."
目标:预测"went"和"some"
实现代码:
from transformers import pipeline

unmasker = pipeline('fill-mask', model='bert-base-uncased')
result = unmasker("I [MASK] to the store to buy [MASK] milk.")
print([res["token_str"] for res in result])
# 可能输出:['went', 'some']
4.2 注意力机制的可视化
通过BertViz库展示注意力模式:
from bertviz import head_view
from transformers import BertModel

model = BertModel.from_pretrained('bert-base-uncased')
sentence = "The animal didn't cross the street because it was too tired."
inputs = tokenizer(sentence, return_tensors='pt')
attention = model(**inputs).attentions

head_view(attention, tokenizer.convert_ids_to_tokens(inputs["input_ids"]))
可视化显示,当处理"it"时,模型通过注意力机制关联到"animal"而非"street",正确解析了代词指代。
4.3 位置编码的实现
Transformer使用正弦位置编码,而BERT采用可学习的位置嵌入:
import torch.nn as nn

class BERTPositionalEmbedding(nn.Module):
    def __init__(self, max_seq_len=512, embed_dim=768):
        super().__init__()
        self.position_embeddings = nn.Embedding(max_seq_len, embed_dim)

    def forward(self, inputs):
        seq_len = inputs.size(1)
        position_ids = torch.arange(seq_len, dtype=torch.long, device=inputs.device)
        return self.position_embeddings(position_ids)
五、技术原理详解
5.1 自注意力机制数学原理
5.2 层归一化与残差连接
每层包含:

代码实现:
class TransformerLayer(nn.Module):
    def __init__(self, d_model, n_heads):
        super().__init__()
        self.attention = MultiHeadAttention(d_model, n_heads)
        self.norm1 = nn.LayerNorm(d_model)
        self.ffn = PositionwiseFFN(d_model)
        self.norm2 = nn.LayerNorm(d_model)

    def forward(self, x):
        # 残差连接1
        attn_output = self.attention(x)
        x = self.norm1(x + attn_output)
        # 残差连接2
        ffn_output = self.ffn(x)
        return self.norm2(x + ffn_output)
这种设计有效缓解了梯度消失问题,使模型深度可达数十层。
六、架构设计与工程实现
6.1 BERT的模型架构
BERT-base主要参数:
- 12层Transformer Encoder
- 768维隐藏层
- 12个注意力头
- 110M参数
架构示意图:
Input
  ↓
Token Embedding
  ↓
Position Embedding
  ↓
Segment Embedding
  ↓
[Transformer Encoder] × 12
  ↓
[CLS] Pooling
  ↓
Task-specific Output
6.2 输入表示
BERT的输入由三部分组成:
- Token Embedding:WordPiece分词
- Position Embedding:学习得到的位置编码
- Segment Embedding:区分句子对(用于NSP任务)
输入构造示例:
text = "[CLS] how old are you? [SEP] I'm 25 years old. [SEP]"
token_ids = [101, 2129, 2213, 2024, 2017, 1029, 102, 1045, 1006, 2216, 2307, 2213, 1012, 102]
segment_ids = [0,0,0,0,0,0,0,1,1,1,1,1,1,1]
position_ids = [0,1,2,3,4,5,6,7,8,9,10,11,12,13]
6.3 预训练任务实现
掩码语言模型(MLM)实现:
class BERTMLM(nn.Module):
    def __init__(self, bert):
        super().__init__()
        self.bert = bert
        self.mlm_head = nn.Linear(768, 30522)  # vocab大小

    def forward(self, input_ids, attention_mask):
        outputs = self.bert(input_ids, attention_mask)
        sequence_output = outputs.last_hidden_state
        logits = self.mlm_head(sequence_output)
        return logits
下一句预测(NSP)实现:
class BERTNSP(nn.Module):
    def __init__(self, bert):
        super().__init__()
        self.bert = bert
        self.cls_head = nn.Linear(768, 2)

    def forward(self, input_ids, attention_mask):
        outputs = self.bert(input_ids, attention_mask)
        pooled_output = outputs.pooler_output
        logits = self.cls_head(pooled_output)
        return logits