Nginx的应用
什么是Nginx:
Nginx是一款高性能的开源Web服务器、反向代理服务器和电子邮件代理服务器。它以高并发、低内存消耗和模块化设计著称,常用于负载均衡、静态内容服务和API网关等场景。
正向代理:
正向代理位于客户端和互联网之间,代表客户端向外部服务器发起请求。典型用途包括绕过网络限制或匿名访问。客户端需要明确配置代理服务器地址。
反向代理:
反向代理位于服务器端,接收客户端请求并转发给后端服务器,隐藏真实服务器信息。常用于负载均衡、缓存静态内容或提供SSL加密。
安装Nginx:
运行Nginx:
他的运行文件的在:/usr/sbin
运行命令:./nginx 就可以直接运行了
之后可以使用命令:
使用 ps -ref|grep nginx 产看是否运行

使用:curl localhost:80查看时候成功运行:

配置本机的域名解析:
我们为自己的本机设置一个域名,但是外网是访问不到的,下面展示我们的配置过程。
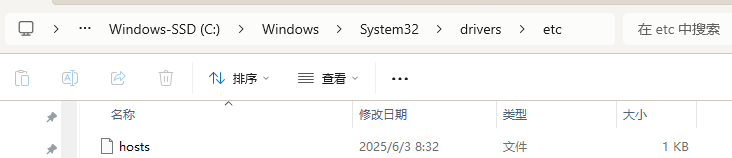
- 打开host文件:在这个目录下的C:\Windows\System32\drivers\etc
 在文件中大家可以填写,如果出现权限问题,大家改一下权限就可以了。或者是将文件放到权限可以的文件中修改,之后再粘贴回来
配置外网域名:
去阿里云等去买就可以了。
大家可以在案例中使用
Nginx基本命令:
查看版本号:
nginx -v
nginx version: nginx/1.26.1
快速关闭nginx的命令:
[root@localhost sbin]# ./nginx -s stop
启动命令:
[root@localhost sbin]# ./nginx
重载配置文件命令:
我们nginx的配置文件的目录是:/etc/nginx

我们对于配置文件在修改之后,如果不重启nginx的话他是不会生效的,这是需要重新加载配置文件。
./nginx -s reload #使用这个命令重新加载nginx
优雅的关闭
./nginx -s quit
使用Linux命令关闭:
kill -s quit <pid> # pid 可以通过查看id的方式查看
Nginx配置文件(重要知识):
#这是初始的配置文件
user nginx; 配置用户
worker_processes auto; 配置工作的数量,按着当前的己去自动设置
error_log /var/log/nginx/error.log notice; 错误日志路径
pid /var/run/nginx.pid; 放置pid
----------------------上面的简单命令是全局块,他们对全局生效------------------------------events { events:他的作用是nginx的服务器和网络连接相关的配置
worker_connections 1024; 表示支持的最多连接数是1024
}
http { http块:配置的是代理,缓存,日志等等等等,他的里面还会有server块
include /etc/nginx/mime.types; 文件的引入
default_type application/octet-stream;log_format main '$remote_addr - $remote_user [$time_local] "$request" '
'$status $body_bytes_sent "$http_referer" '
'"$http_user_agent" "$http_x_forwarded_for"'; 日志的格式access_log /var/log/nginx/access.log main; 访问日志的路径
sendfile on;
#tcp_nopush on;keepalive_timeout 65; 连接超时配置
#gzip on;
include /etc/nginx/conf.d/*.conf;
}

带有server块的配置文件:
在配置文件中server块可以是多个,每个server块中的location块也是多个
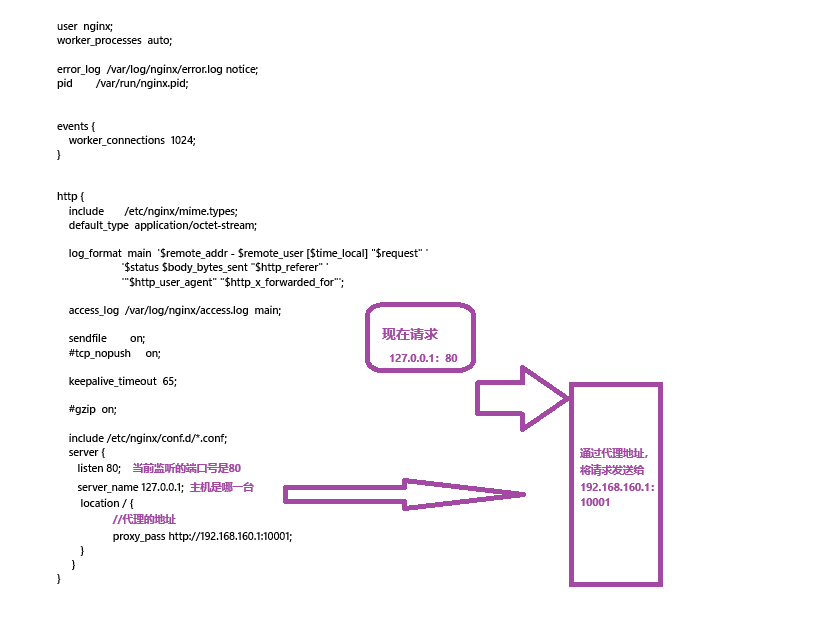
user nginx;
worker_processes auto;error_log /var/log/nginx/error.log notice;
pid /var/run/nginx.pid;
events {
worker_connections 1024;
}
http {
include /etc/nginx/mime.types;
default_type application/octet-stream;log_format main '$remote_addr - $remote_user [$time_local] "$request" '
'$status $body_bytes_sent "$http_referer" '
'"$http_user_agent" "$http_x_forwarded_for"';access_log /var/log/nginx/access.log main;
sendfile on;
#tcp_nopush on;keepalive_timeout 65;
#gzip on;
include /etc/nginx/conf.d/*.conf;
server {
listen 80;
server_name 127.0.0.1;
location / {
# root /usr/share/nginx/html;
proxy_pass http://192.168.160.1:10001;
}
}
}
反向代理案例演示:
单台代理:
案例要求
- 请求Linux上的80端口
- Nginx接受请求
- 转发请求到Tomcat
- 返回tomcat页面
首先编写配置文件:
user nginx;
worker_processes auto;error_log /var/log/nginx/error.log notice;
pid /var/run/nginx.pid;
events {
worker_connections 1024;
}
http {
include /etc/nginx/mime.types;
default_type application/octet-stream;log_format main '$remote_addr - $remote_user [$time_local] "$request" '
'$status $body_bytes_sent "$http_referer" '
'"$http_user_agent" "$http_x_forwarded_for"';access_log /var/log/nginx/access.log main;
sendfile on;
#tcp_nopush on;keepalive_timeout 65;
#gzip on;
# include /etc/nginx/conf.d/*.conf;
server {
listen 80; #我们监听80端口
server_name localhost; #服务器名是localhost,也可以是自己的Linux地址172.20.10.5
location / {
proxy_pass http://172.20.10.5:8080; #将消息请求转发到http://172.20.10.5:8080地址
# proxy_pass http://192.168.160.1:10001;
}
}
}
这是如果我们访问我的Linux的80端口,就会将请求交给我的LInux上的TomCat处理。

Nginx反向代理成功
多台代理
编写一个库存服务,通过Nginx实现他的负载均衡和反向代理。通过编写配置文件实现。 与上面的相比,现在我们反向代理多个服务器。
场景展示:
- 创建两个web项目,一个端口号为5555,一个端口号7777
- 修改配置文件,
- 查看执行结果
修改配置文件:
其实就是添加配置文件,我们通过配置server块实现多台的代理:
创建项目7777:
其实就是最简单的web项目
# 配置文件
# 应用服务 WEB 访问端口
server.port=7777
编写controller
@RestController
public class TestController {@GetMapping("/test7777")public String test(){return "当前端口是7777";}
}
创建6666同方式
配置文件如下:
当下的配置文件是使用80端口代理5555,使用7777端口代理7777
cat /etc/nginx/nginx.conf
user nginx;
worker_processes auto;error_log /var/log/nginx/error.log notice;
pid /var/run/nginx.pid;
events {
worker_connections 1024;
}
http {
include /etc/nginx/mime.types;
default_type application/octet-stream;log_format main '$remote_addr - $remote_user [$time_local] "$request" '
'$status $body_bytes_sent "$http_referer" '
'"$http_user_agent" "$http_x_forwarded_for"';access_log /var/log/nginx/access.log main;
sendfile on;
#tcp_nopush on;keepalive_timeout 65;
#gzip on;
# include /etc/nginx/conf.d/*.conf;
server {
listen 80;
server_name localhost;
location / {
# proxy_pass http://172.20.10.5:8080;
proxy_pass http://172.20.10.4:5555;
# proxy_pass http://192.168.160.1:10001;
}
}
server{
listen 7777;
server_name localhost;
location / {
proxy_pass http://172.20.10.4:7777;
}
}
}
运行结果:


使用同一个端口代理两个服务,使用路径进行匹配:
在localtion块中,他的匹配规则如下:
- 无修饰符:前缀匹配(最长匹配优先)。
=:精确匹配,必须完全相同。^~:前缀匹配,优先级高于正则,但不检查正则。~:区分大小写的正则匹配。~*:不区分大小写的正则匹配。
location = / {# 规则 A:精确匹配根路径
}location ^~ /images/ {# 规则 B:前缀匹配 /images/,不检查后续正则
}location ~* \.(gif|jpg|png)$ {# 规则 C:正则匹配图片后缀
}location / {# 规则 D:普通前缀匹配,作为默认规则
}
他的匹配的优先级是:
- 精确匹配(
=):优先级最高,一旦匹配立即停止搜索。 - 前缀匹配(
^~):优先级次之,匹配后不再检查正则。 - 正则匹配(
~和~*):按配置文件中出现的顺序依次检查,一旦匹配立即停止搜索。 - 普通前缀匹配(无修饰符):记录最长匹配结果,继续检查正则;若正则未匹配,则使用该最长前缀匹配。
当前使用7777端口代理5555和7777项目配置文件:
user nginx;
worker_processes auto;error_log /var/log/nginx/error.log notice;
pid /var/run/nginx.pid;
events {
worker_connections 1024;
}
http {
include /etc/nginx/mime.types;
default_type application/octet-stream;log_format main '$remote_addr - $remote_user [$time_local] "$request" '
'$status $body_bytes_sent "$http_referer" '
'"$http_user_agent" "$http_x_forwarded_for"';access_log /var/log/nginx/access.log main;
sendfile on;
#tcp_nopush on;keepalive_timeout 65;
#gzip on;
# include /etc/nginx/conf.d/*.conf;
server {
listen 80;
server_name localhost;
location / {
proxy_pass http://172.20.10.5:8080;
# proxy_pass http://172.20.10.4:5555;
# proxy_pass http://192.168.160.1:10001;
}
}
server{
listen 7777;
server_name localhost;
location ~ /test7777 {
proxy_pass http://172.20.10.4:7777;
}
location ~ /test5555{
proxy_pass http://172.20.10.4:5555;
}
}
}
展示结果:


负载均衡
定义:
负载均衡(Load Balancing)是一种将网络流量或计算任务分配到多个服务器、网络链路或其他计算资源上的技术,旨在优化资源使用、最大化吞吐量、最小化响应时间,并避免单点故障
项目测试负载均衡:
使用nginx实现负载均衡,通过服务5555,7777查看效果;
他的创建方式同上面一样。
修改配置文件:
user nginx;
worker_processes auto;error_log /var/log/nginx/error.log notice;
pid /var/run/nginx.pid;
events {
worker_connections 1024;
}
http {
include /etc/nginx/mime.types;
default_type application/octet-stream;log_format main '$remote_addr - $remote_user [$time_local] "$request" '
'$status $body_bytes_sent "$http_referer" '
'"$http_user_agent" "$http_x_forwarded_for"';access_log /var/log/nginx/access.log main;
sendfile on;
#tcp_nopush on;keepalive_timeout 65;
#gzip on;
upstream myServer{
server 172.20.10.4:5555;
server 172.20.10.4:7777;
}# include /etc/nginx/conf.d/*.conf;
server {
listen 80;
server_name localhost;
location / {
proxy_pass http://172.20.10.5:8080;
# proxy_pass http://172.20.10.4:5555;
# proxy_pass http://192.168.160.1:10001;
}
}
server{
listen 9999;
server_name localhost;
location /{
proxy_pass http://myServer;
}
}
}

负载均衡算法:
Nginx支持四种算法:
- 轮询:可以添加权重。
- 最小连接数:当前连接的活跃的服务数越少,优先连接
- IPHash:计算ip的Hash值。
- Generic Hash
服务权重:
动静分离:
nginx集群搭建:
系统的高可用:
Windowds安装LUA环境:
首先进入官网:https://www.lua.org/


之后就是就简单的安装就可以了。
Linux上安装Lua:
在Linux上输入lua:操作系统自带了一个lua
大家也可以使用命令安装:
curl -L -R -O https://www.lua.org/ftp/lua-5.4.8.tar.gz
tar zxf lua-5.4.8.tar.gz
cd lua-5.4.8
make all test
这就安装成功了