iOS Widget 开发-9:可配置 Widget:使用 IntentConfiguration 实现参数选择
iOS Widget 支持通过“参数化”配置内容,让用户在添加 Widget 时根据个人偏好选择展示内容。这一功能通过 IntentConfiguration 实现,是打造个性化、可复用小组件的关键。
本篇文章介绍如何使用 IntentConfiguration(基于 .intentdefinition)为 Widget 提供可配置参数——以“选择蔬菜”为示例,讲解从创建 .intentdefinition 文件、生成代码、在 Widget 中使用到实现动态选项(Intents Extension)的完整流程,并给出调试与注意事项。
1. 概念回顾:IntentConfiguration 是什么
IntentConfiguration是 WidgetKit 提供给第三方参数配置的经典方式,基于 Intents 框架。使用时,Widget 编辑界面会自动呈现意图中定义的参数选择器。- 主要三种 WidgetConfiguration:
StaticConfiguration:无配置项,固定展示内容。IntentConfiguration:基于.intentdefinition(Intents),通过 Intent 文件或 Intents extension 提供选项。AppIntentConfiguration:iOS 16 引入的基于AppIntents的现代方式(更推荐在 iOS 16+ 环境使用)。
何时使用 IntentConfiguration:需要支持 iOS 14/15 的项目,或者已有 .intentdefinition 工作流,需要兼容旧系统。
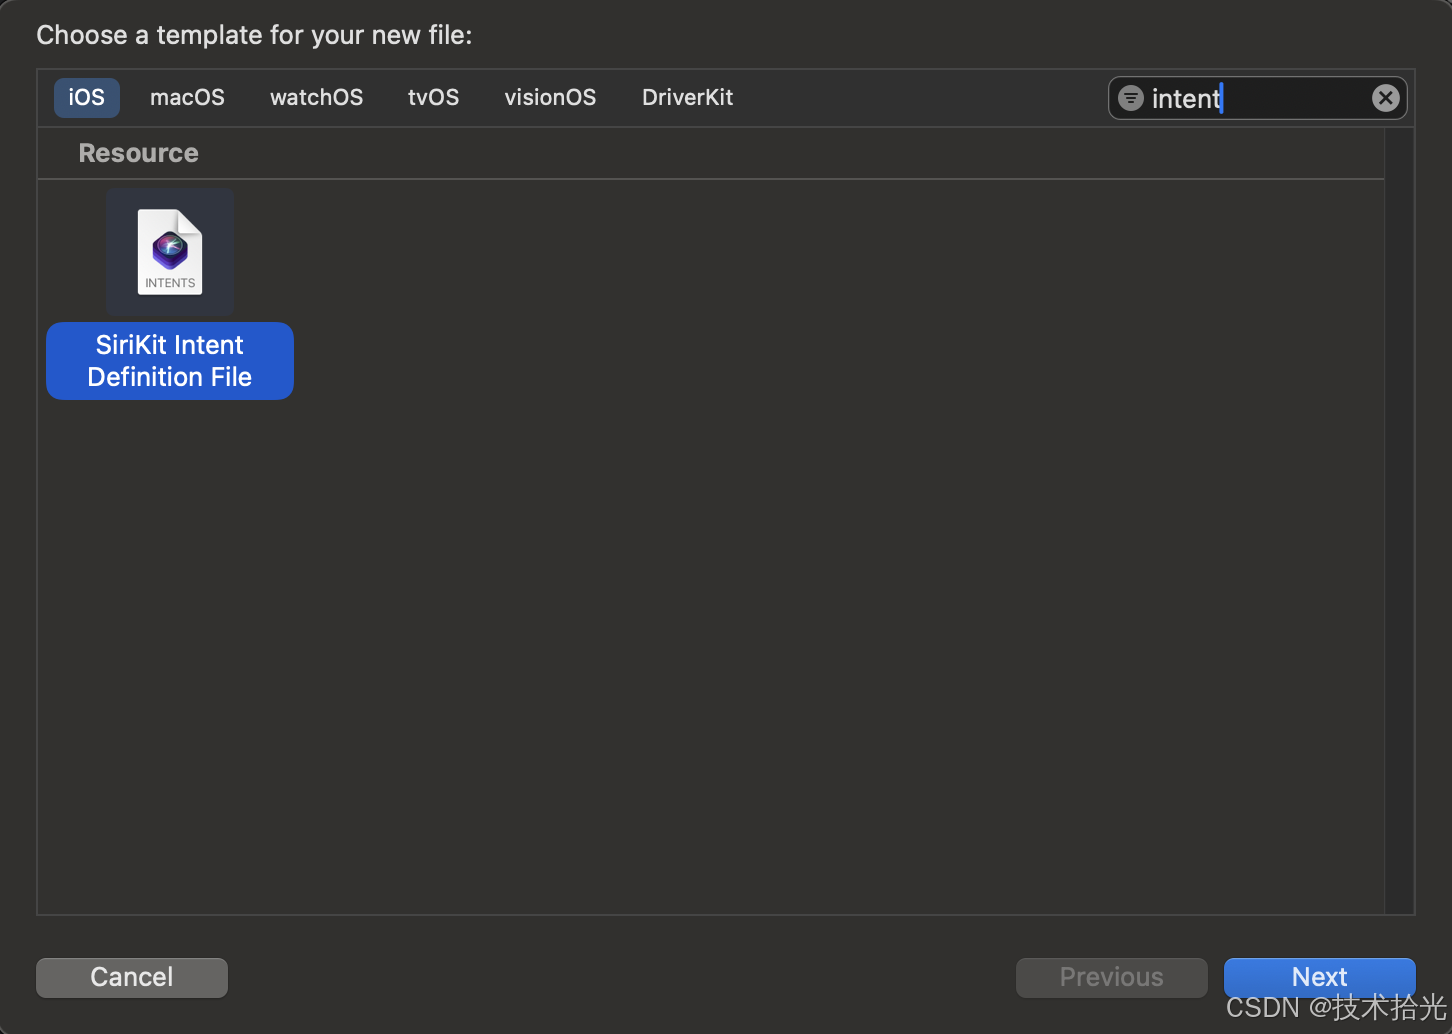
2. 在 Xcode 中创建 .intentdefinition(静态选项)
以下以“选择蔬菜(SelectVegetableIntent)”为例:
在 Project Navigator 中,选择项目或 Widget 的 group,选择 File → New → File from Template。
在模板列表选择 Resource 下的 SiriKit Intent Definition file.
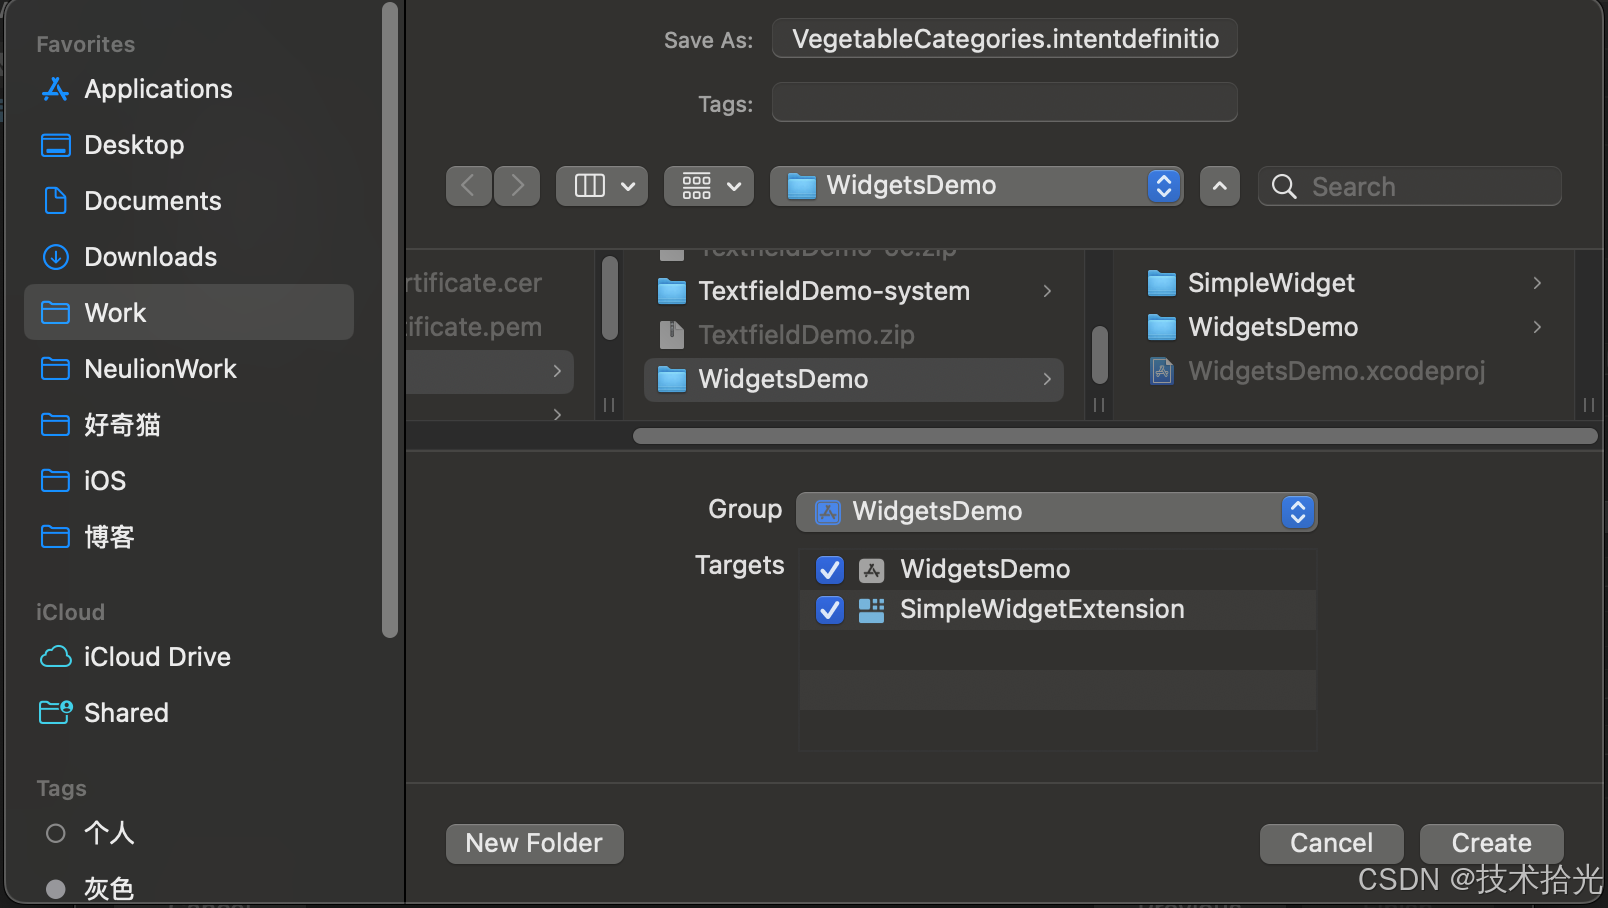
点击 Next,命名为 VegetableCategories.intentdefinition 或 IntentDefinitions.intentdefinition,注意两个 target 都要勾选。
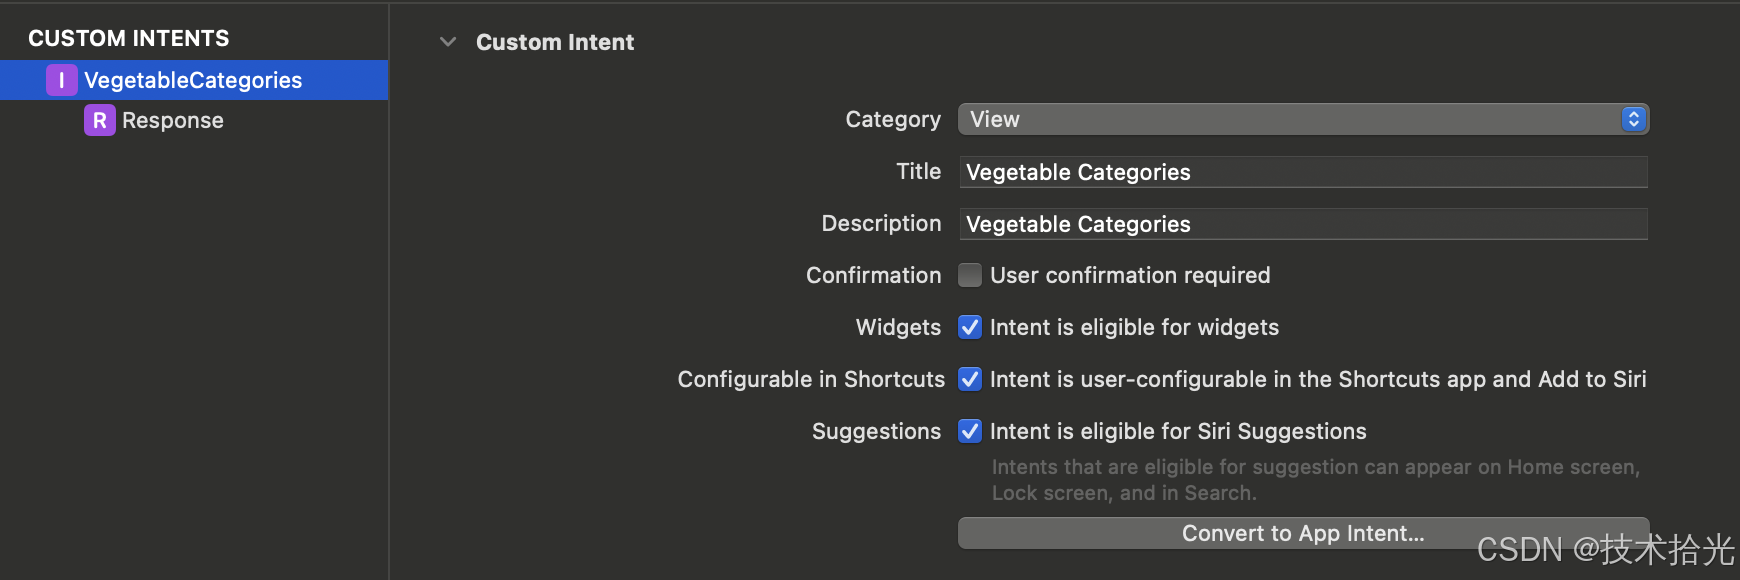
打开该文件,左下角点击 +,选择 New Intent,命名为 VegetableCategories(或你喜欢的名称)。
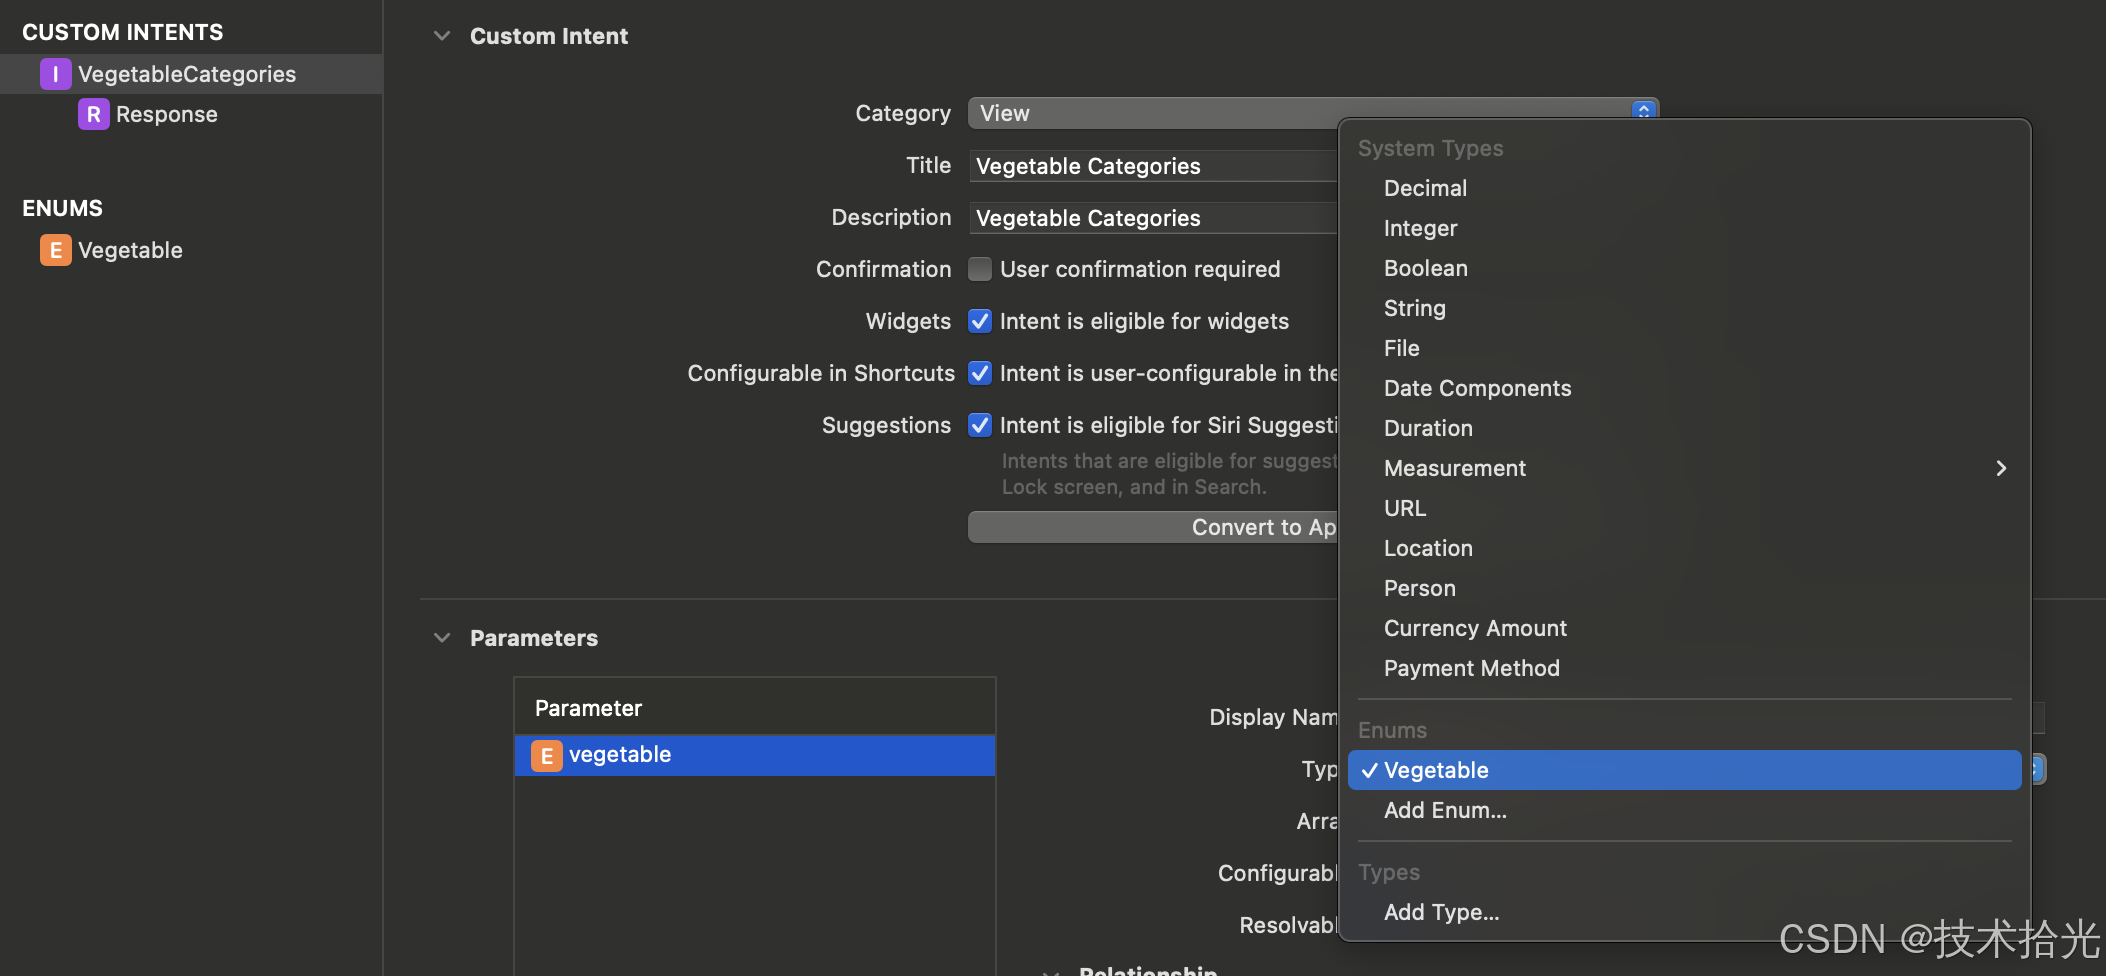
在这个文件里面,需要更改几个地方,将 Category 设置为 View,顺便将 Description 写一下,记得把 Intent is eligible for widgets 勾选上。
现在点击左下角+号创建一个 Enum, 命名为 Vegetable,并在 Cases 中添加一些类型。
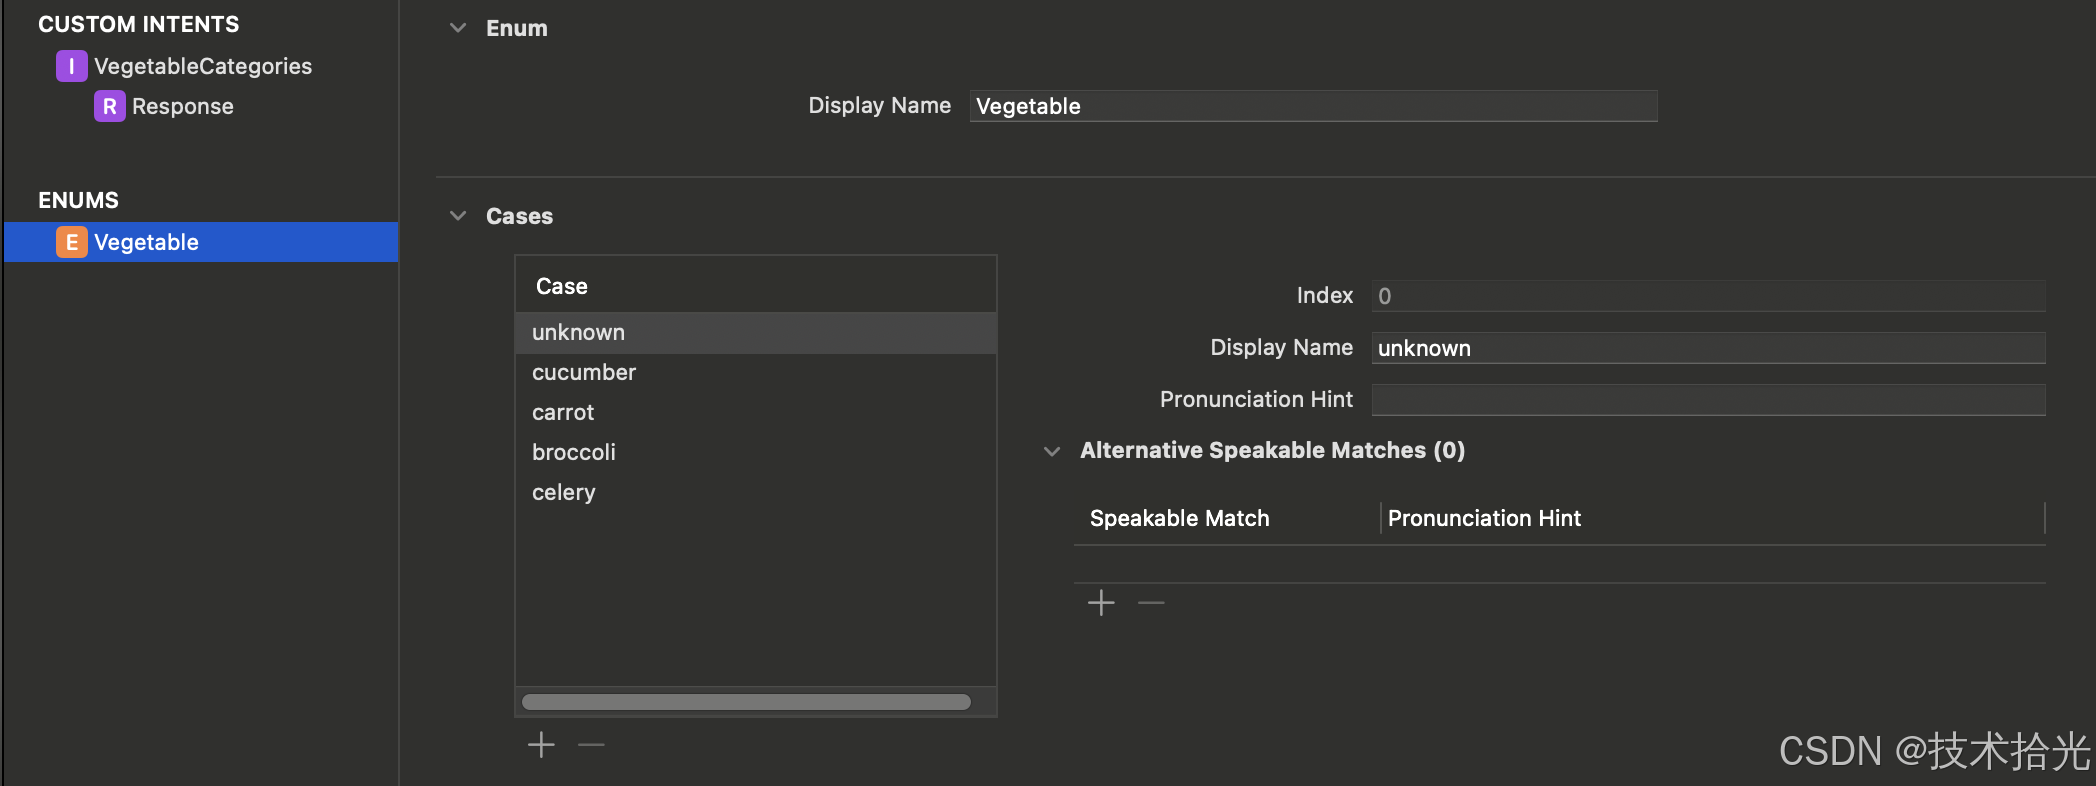
现在选择刚才创建的 VegetableCategories intent,在 Parameters 中创建一个属性 vegetable,并选择类型为刚才创建的 enum。
到此,一个简单的 intentdefinition 文件就创建完了。
那么在项目中如何使用呢?
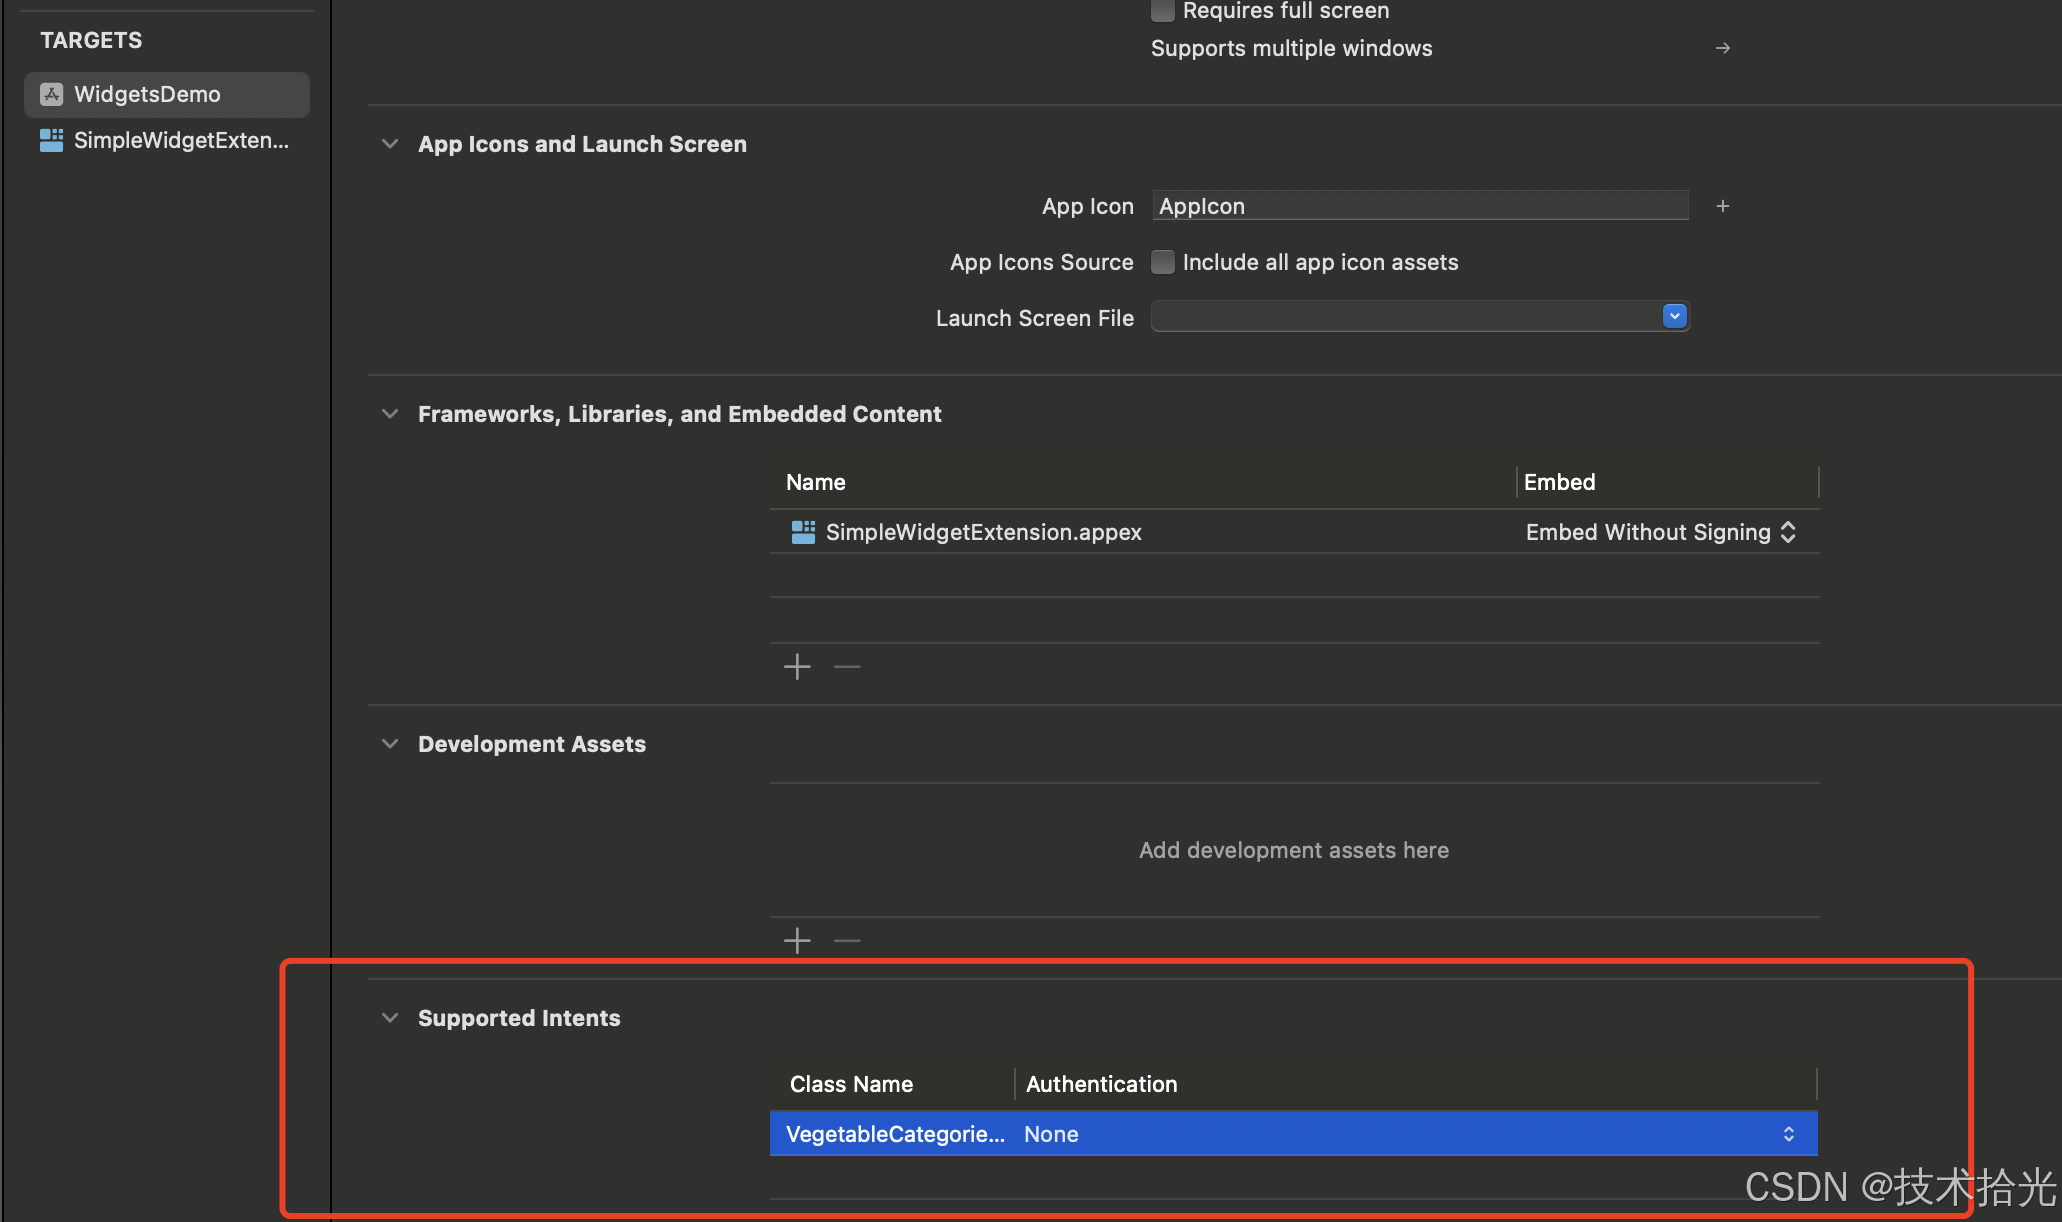
选中主工程的 target,在 General 下面的 Supported Intents 中添加刚才创建的 VegetableCategoriesIntent。
回到我们 Widget extension 中,修改代码如下:
struct VegetableCategoriesProvider: IntentTimelineProvider {func placeholder(in context: Context) -> SimpleEntry {SimpleEntry(date: Date(), configuration: VegetableCategoriesIntent())}func getSnapshot(for configuration: VegetableCategoriesIntent, in context: Context, completion: @escaping @Sendable (SimpleEntry) -> Void) {let simpleEntry = SimpleEntry(date: Date(), configuration: configuration)completion(simpleEntry)}func getTimeline(for configuration: VegetableCategoriesIntent, in context: Context, completion: @escaping @Sendable (Timeline<SimpleEntry>) -> Void) {let vegetableName = vegetableName(for: configuration)let currentDate = Date()let entry = SimpleEntry(date: currentDate, configuration: configuration, vegetableName: vegetableName)let timeline = Timeline(entries: [entry], policy: .atEnd)completion(timeline)}
}func vegetableName(for configuration: VegetableCategoriesIntent) -> String {switch configuration.vegetable {case .carrot:return "Carrot"case .broccoli:return "Broccoli"case .cucumber:return "Cucumber"case .celery:return "Celery"case .unknown:return "Unknown"}
}struct SimpleEntry: TimelineEntry {let date: Datelet configuration: VegetableCategoriesIntentvar vegetableName: String?
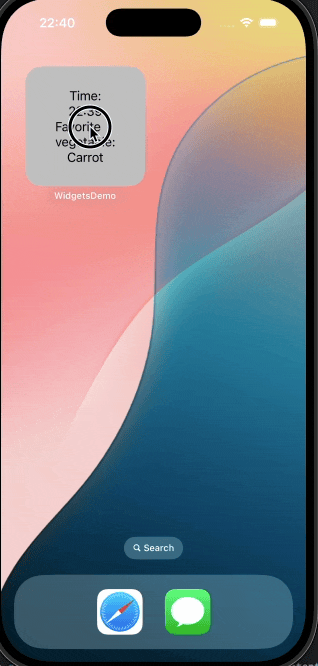
}struct SimpleWidgetEntryView : View {var entry: VegetableCategoriesProvider.Entryvar body: some View {VStack {Text("Time:")Text(entry.date, style: .timer)Text("Favorite vegetable:")Text(entry.vegetableName ?? "未选择")}}
}struct SimpleWidget: Widget {let kind: String = "SimpleWidget"var body: some WidgetConfiguration {IntentConfiguration(kind: kind, intent: VegetableCategoriesIntent.self, provider: VegetableCategoriesProvider()) { entry inSimpleWidgetEntryView(entry: entry).containerBackground(.fill.tertiary, for: .widget)}}
}
顺利的话编译就通过了,上面代码中修改了以下 UI,将选择的 vegetable 显示出来了。
3. 动态创建 ConfigurationIntent(以 Country Widget 为例)
首先先看几个概念:
- Configuration Intent:用于在 Widget 配置界面(或 Shortcuts UI)提供“参数选择”。
- AppIntents:Apple 在较新 SDK 中提供的替代/补充方案,用于定义可供系统调用的动作与实体。
- AppEntity:在 AppIntents 中表示一个“实体对象”(如联系人、地点或本例的国家),支持被系统识别、建议与持久化。
- EntityQuery:为 AppEntity 提供加载/查找/建议项的方法(同步或异步)。
- parameterSummary:用于在系统 UI 中以简洁的方式展示当前参数的摘要。
Summary { \.$country }会把参数投影(projected)值显示出来。
下面我们创建一个选择国家的 Widget,我们用 CountrySelectIntent(一个 Configuration Intent)作为 Widget 的配置参数,并通过 CountryEntry: AppEntity + CountryEntryQuery: EntityQuery 来提供建议列表与实体解析。Widget 的 TimelineProvider 读取用户选择的实体,渲染对应内容。
3.1 在 Intent 文件中定义实体与参数(CountrySelectIntent.swift)
// CountrySelectIntent: 用于 Widget 配置的 Intent 定义
struct CountrySelectIntent: WidgetConfigurationIntent {static var title: LocalizedStringResource = "Select Country"static var description: IntentDescription = "Choose a country to display its information in the widget."// 使用 AppEntity 类型作为参数,可在系统 UI 中显示实体并支持建议列表@Parameter(title: "Country", description: "select a country")var country: CountryEntry// 在 UI 摘要处显示已选的 country(即 CountryEntry 的 displayRepresentation)static var parameterSummary: some ParameterSummary {Summary { \.$country }}
}
关键点说明:
@Parameter的类型是CountryEntry(实现了AppEntity),不是普通的String。这使得系统能展示“实体选择”界面,而不是只能输入文本。parameterSummary的Summary { \.$country }表达式用来告诉系统在 Widget 编辑中如何显示用户当前的选择;\.$country是参数的投影值(projected value),它会渲染为实体的displayRepresentation。
接着看 CountryEntry 与 CountryEntryQuery:
// CountryEntry: 一个轻量的 AppEntity,用来表示“国家”这一实体
struct CountryEntry: AppEntity, Identifiable {// 系统展示类型名称static var typeDisplayRepresentation: TypeDisplayRepresentation {TypeDisplayRepresentation(name: "Country")}// 默认的查询实现(当系统需要列出/解析此实体时会使用它)static var defaultQuery = CountryEntryQuery()// AppEntity 需要一个唯一 id,这里以 countryCode 作为 idvar id: String { countryCode }let countryCode: String// 方便在运行时获取一个默认实体(eg. 用作回退值)static func defaultValue() -> CountryEntry {CountryEntry(countryCode: "US")}// 给调用方暴露一个友好的 namevar countName: String {Self.names[countryCode] ?? countryCode}// 国家代码 -> 名称 映射(可扩展为更多国家或国际化)private static let names: [String: String] = ["US": "United States","CA": "Canada","GB": "United Kingdom","FR": "France","DE": "Germany"]// 用于 AppIntents/UI 的显示;系统会把这个字符串展示在选择/摘要中var displayRepresentation: DisplayRepresentation {let name = Self.names[countryCode] ?? countryCode// 这里使用简单的 stringLiteral 表示:"United States (US)"return DisplayRepresentation(stringLiteral: "\(name) (\(countryCode))")}
}// CountryEntryQuery: 实现 EntityQuery
struct CountryEntryQuery: EntityQuery {typealias EntityType = CountryEntry// 静态的示例数据(可替换为从网络或数据库加载的动态列表)var dataList: [CountryEntry] = [CountryEntry(countryCode: "US"),CountryEntry(countryCode: "CA"),CountryEntry(countryCode: "GB"),CountryEntry(countryCode: "FR"),CountryEntry(countryCode: "DE")]// 系统使用的默认 querystatic var defaultQuery: CountryEntryQuery {return CountryEntryQuery()}// entities(for:): 给定一组标识符,返回对应实体。通常用于反解析已保存的配置。func entities(for identifiers: [String]) async throws -> [CountryEntry] {return identifiers.map { CountryEntry(countryCode: $0) }}// suggestedEntities(): 返回供 UI 显示的建议实体列表(可以是静态或动态的)func suggestedEntities() async throws -> [CountryEntry] {return dataList}
}
说明:
CountryEntry用countryCode作为id,并实现displayRepresentation返回可读文本(系统用于 UI 展示)。CountryEntryQuery的suggestedEntities()返回系统将用来显示在选择界面的建议项(本示例返回静态列表,但可以改为异步从网络加载)。entities(for:)用于把标识符数组还原为实体(系统在持久化/恢复配置时会调用)。
3.2 在 Widget 中使用 Configuration Intent
Widget 使用 AppIntentConfiguration(或 IntentConfiguration)来指定 intent 类型与 provider:
struct CountryProvider: AppIntentTimelineProvider {typealias Intent = CountrySelectIntenttypealias Entry = CountryTimelineEntryfunc placeholder(in context: Context) -> CountryTimelineEntry {CountryTimelineEntry(date: Date(), configuration: CountrySelectIntent(), country: CountryEntry(countryCode: "US"))}func snapshot(for configuration: CountrySelectIntent, in context: Context) async -> CountryTimelineEntry {CountryTimelineEntry(date: Date(), configuration: CountrySelectIntent(), country: CountryEntry(countryCode: "US"))}func timeline(for configuration: CountrySelectIntent, in context: Context) async -> Timeline<CountryTimelineEntry> {let currentDate = Date()let entry = CountryTimelineEntry(date: currentDate, configuration: configuration, country: configuration.country)let timeline = Timeline(entries: [entry], policy: .atEnd)return timeline}
}struct CountryTimelineEntry: TimelineEntry {let date: Datelet configuration: CountrySelectIntentlet country: CountryEntry
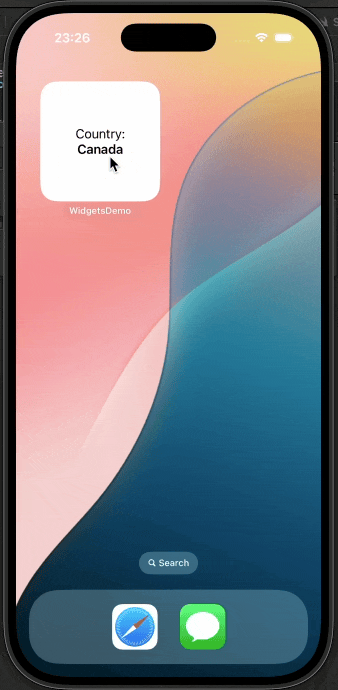
}struct CountryView: View {var entry: CountryProvider.Entryvar body: some View {VStack {Text("Country:")Text(entry.country.countName).font(.headline)}}
}struct CountryWidget: Widget {let kind: String = "CountryWidget"var body: some WidgetConfiguration {AppIntentConfiguration(kind: kind, intent: CountrySelectIntent.self, provider: CountryProvider()) { entry inCountryView(entry: entry)}.configurationDisplayName("Country Widget").description("Displays information about the selected country.")}
}
关键点:
CountryProvider.timeline(for:in:)的configuration参数是CountrySelectIntent,并且configuration.country是CountryEntry实例(由系统生成/反序列化),可以直接用于渲染。- 在
placeholder/snapshot中,建议提供合理值。
使用示例仅仅是为了使用 Intent,并未对数据进行本地缓存以及一些其他的优化。
4. 本地化、性能与安全注意事项
- 本地化:在
.intentdefinition中为每个 Item 设置本地化的 displayString,或在 Localizable.strings 中提供翻译。 - 性能:Intents extension 运行时间短,避免同步等待网络请求;若确需网络,使用缓存(App Group)并优先返回缓存结果。
- 权限与隐私:如果动态选项涉及用户隐私数据(联系人、日历等),在主 App 中请求并获取权限,Intents extension 需谨慎处理权限敏感操作。
5. AppIntents 的简要对比与迁移建议
- iOS 16 引入了
AppIntents,它使用 Swift 原生 API 编写 Intent,替代了.intentdefinition的可视化工作流。 - 优点:写 Swift 代码更直观,测试更方便。缺点:最低支持 iOS 16。
- 迁移建议:如果你的应用仅面向 iOS 16+,优先考虑
AppIntentConfiguration;若需兼容 iOS 14/15 或已有大量.intentdefinition,继续使用 Intents 文件。
6. 总结
- 使用
IntentConfiguration可以为 Widget 提供用户可配置的参数选择,适用于需要兼容较旧 iOS 版本或已有.intentdefinition的项目。 - 静态选项简单直接:直接在
.intentdefinition文件中添加 Items 并生成代码。 - 动态选项需实现相应的 Intents 协议及回调,注意性能与缓存策略。
- 推荐实践:把图片资源放在 Widget 的 Assets、把耗时网络操作迁移到 App 并通过 App Group 缓存结果、在
.intentdefinition中做好本地化。
最后,希望能够帮助到有需要的朋友,如果觉得有帮助,还望点个赞,添加个关注,笔者也会不断地努力,写出更多更好用的文章。