线程通信---java
线程
我们知道,线程是进程的最小执行单位,一个进程可以拥有多个线程,那么就会引入两个问题:
- 多个线程之间
如何进行通信 - 多个线程对同一个数据进行操作,如何保证程序正确执行,也就是
线程安全问题
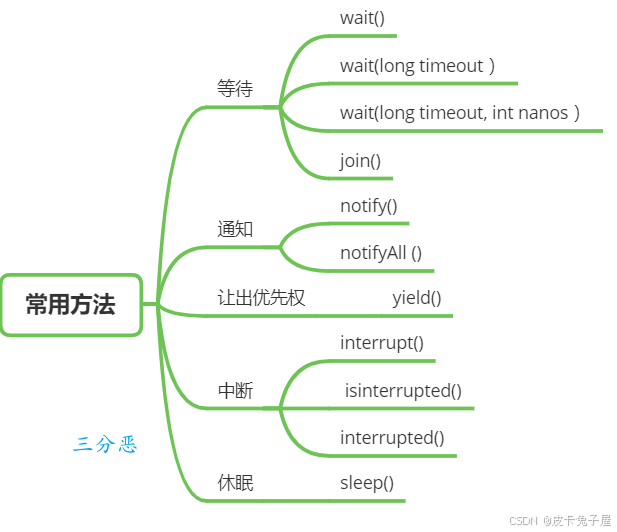
线程的常用调度方法有:
线程通信和线程安全
线程通信和线程安全并不是完全独立的
- 线程通信依赖线程安全:线程通信通常涉及共享变量或资源的状态变化,而这些共享资源必须是线程安全的,否则通信本身可能失败
- 例子:
使用 wait()/notify() 时,必须在 synchronized 块内操作共享对象的监视器。如果没有同步,线程可能在未持有锁的情况下调用 wait(),导致 IllegalMonitorStateException,或者多个线程同时修改状态,破坏通信逻辑。
- 例子:
- 线程安全需要线程通信:在某些场景下,线程安全不仅需要互斥访问,还需要线程间的协作。例如,一个线程等待条件满足后才能安全访问资源
- 例子:
生产者-消费者模型中,消费者线程需要等待生产者生产数据。如果没有通信机制(比如队列为空时直接访问),会导致数据不一致或异常。
- 例子:
- Java 中许多线程通信和线程安全的实现机制是重叠或互补的
1.共享变量(volatile)
- volatile关键字用于修饰变量,当一个线程修改了volatile修饰的变量的值,其他线程能够立即看到最新的值,从而避免了线程之间的数据不一致(
可见性) 防止指令重排,volatile 变量的写入不会被重排序到它之前的代码。- 缺点:
volatile并不能解决多线程并发下的复合操作问题,比如i++这种操作不是原子操作,如果多个线程同时对i进行自增操作,volatile不能保证线程安全。
public class VolatileExample {
    private volatile boolean running = true;

    public void start() {
        new Thread(() -> {
            while (running) {
                System.out.println("线程运行中...");
            }
        }).start();
    }

    public void stop() {
        running = false; // 修改立即可见
    }

    public static void main(String[] args) throws InterruptedException {
        VolatileExample example = new VolatileExample();
        example.start();
        Thread.sleep(1000);
        example.stop();
    }
}
2.wait() / notify() / notifyAll()
- wait() 和 notify() 是定义在 java.lang.Object 类中的方法,用于让线程等待和唤醒线程
- 基于对象监视器(monitor),确保在调用这些方法时,线程已经获得了对象的监视器锁,即**
必须在 synchronized 块内使用**,否则会抛出 IllegalMonitorStateException。 - 缺点:只能唤醒一个(notify())或全部(notifyAll()),不够灵活
- 内置的 synchronized 关键字
不支持中断等待,线程如果在进入 synchronized 块前等待锁,就算被中断,也不会停止等待。
public class WaitNotifyExample {
    private static final Object lock = new Object();
    private static boolean condition = false;

    public static void main(String[] args) {
        // 消费者线程
        Thread consumer = new Thread(() -> {
            synchronized (lock) {
                while (!condition) { // 使用 while 循环等待条件满足
                    try {
                        System.out.println("消费者等待数据...");
                        lock.wait(); // 释放锁并等待
                    } catch (InterruptedException e) {
                        Thread.currentThread().interrupt();
                        e.printStackTrace();
                    }
                }
                System.out.println("消费者处理数据...");
            }
        });

        // 生产者线程
        Thread producer = new Thread(() -> {
            try {
                Thread.sleep(1000); // 模拟数据准备时间
            } catch (InterruptedException e) {
                Thread.currentThread().interrupt();
                e.printStackTrace();
            }
            synchronized (lock) {
                condition = true; // 改变条件
                System.out.println("生产者生产了数据,通知消费者...");
                lock.notify(); // 唤醒等待中的消费者线程
            }
        });

        consumer.start();
        producer.start();
    }
}
3.Lock 和 Condition
- ReentrantLock 提供锁机制,Condition 通过 await() 和 signal() 实现等待和唤醒,是 wait()/notify() 的增强替代品。
可中断性: ReentrantLock 实现了可中断性,这意味着线程在等待锁的过程中,可以被其他线程中断而提前结束等待。在底层,ReentrantLock 使用了与 LockSupport.park() 和 LockSupport.unpark() 相关的机制来实现可中断性。设置超时时间: ReentrantLock 支持在尝试获取锁时设置超时时间,即等待一定时间后如果还未获得锁,则放弃锁的获取。这是通过内部的 tryAcquireNanos 方法来实现的。公平锁和非公平锁: 在直接创建 ReentrantLock 对象时,默认情况下是非公平锁。公平锁是按照线程等待的顺序来获取锁,而非公平锁则允许多个线程在同一时刻竞争锁,不考虑它们申请锁的顺序。公平锁可以通过在创建 ReentrantLock 时传入 true 来设置
ReentrantLock fairLock = new ReentrantLock(true);
可重入性: ReentrantLock 支持可重入性,即同一个线程可以多次获得同一把锁,而不会造成死锁。这是通过内部的 holdCount 计数来实现的。多个条件变量: ReentrantLock 支持多个条件变量,每个条件变量可以与一个 ReentrantLock 关联。
import java.util.concurrent.locks.Lock;
import java.util.concurrent.locks.ReentrantLock;
import java.util.concurrent.locks.Condition;

public class ProducerConsumerExample {
    // 定义一个可重入锁
    private final Lock lock = new ReentrantLock();
    // 定义两个条件:notFull 用于生产者等待队列有空位,notEmpty 用于消费者等待队列中有数据
    private final Condition notFull = lock.newCondition();
    private final Condition notEmpty = lock.newCondition();

    // 定义一个缓冲区及相关指针和计数器
    private final int[] buffer = new int[10];
    private int count = 0;   // 当前存储的数据个数
    private int putPtr = 0;  // 生产者写入数据的位置
    private int takePtr = 0; // 消费者取数据的位置

    // 生产者方法:向缓冲区添加数据
    public void put(int data) throws InterruptedException {
        lock.lock();
        try {
            // 如果缓冲区满了,则等待 notFull 条件满足
            while (count == buffer.length) {
                notFull.await();
            }
            buffer[putPtr] = data;
            putPtr = (putPtr + 1) % buffer.length;
            count++;
            // 添加数据后,通知消费者:缓冲区不为空了
            notEmpty.signal();
        } finally {
            lock.unlock();
        }
    }

    // 消费者方法:从缓冲区取数据
    public int take() throws InterruptedException {
        lock.lock();
        try {
            // 如果缓冲区为空,则等待 notEmpty 条件满足
            while (count == 0) {
                notEmpty.await();
            }
            int data = buffer[takePtr];
            takePtr = (takePtr + 1) % buffer.length;
            count--;
            // 取走数据后,通知生产者:缓冲区有空位了
            notFull.signal();
            return data;
        } finally {
            lock.unlock();
        }
    }

    public static void main(String[] args) {
        ProducerConsumerExample example = new ProducerConsumerExample();

        // 启动生产者线程
        Thread producer = new Thread(() -> {
            for (int i = 0; i < 20; i++) {
                try {
                    example.put(i);
                    System.out.println("Produced: " + i);
                    Thread.sleep(100); // 模拟生产耗时
                } catch (InterruptedException e) {
                    Thread.currentThread().interrupt();
                }
            }
        });

        // 启动消费者线程
        Thread consumer = new Thread(() -> {
            for (int i = 0; i < 20; i++) {
                try {
                    int data = example.take();
                    System.out.println("Consumed: " + data);
                    Thread.sleep(150); // 模拟消费耗时
                } catch (InterruptedException e) {
                    Thread.currentThread().interrupt();
                }
            }
        });

        producer.start();
        consumer.start();
    }
}
4.BlockingQueue(阻塞队列)
- 基于队列(如 ArrayBlockingQueue、LinkedBlockingQueue),通过 put() 和 take() 实现阻塞式数据传递。
- 内BlockingQueue的实现都是线程安全的,所有队列的操作或使用内置锁或是其他形式的并发控制来保证原子。
- 缺点:功能单一,仅限数据传递。容量有限可能导致阻塞。
import java.util.concurrent.*;

public class BlockingQueueExample {
    private BlockingQueue<String> queue = new ArrayBlockingQueue<>(10);

    public void produce() throws InterruptedException {
        queue.put("数据"); // 放入数据
    }

    public void consume() throws InterruptedException {
        String data = queue.take(); // 取出数据
        System.out.println("消费: " + data);
    }

    public static void main(String[] args) {
        BlockingQueueExample example = new BlockingQueueExample();
        new Thread(() -> {
            try {
                example.produce();
            } catch (InterruptedException e) {
                e.printStackTrace();
            }
        }).start();
        new Thread(() -> {
            try {
                example.consume();
            } catch (InterruptedException e) {
                e.printStackTrace();
            }
        }).start();
    }
}
5.Thread.interrupt()
- 通过调用线程的 interrupt() 方法
设置中断标志,等线程自行中断
public class InterruptExample {
    public static void main(String[] args) throws InterruptedException {
        Thread thread = new Thread(() -> {
            while (!Thread.currentThread().isInterrupted()) {
                System.out.println("运行中...");
                try {
                    Thread.sleep(1000);
                } catch (InterruptedException e) {
                    System.out.println("被中断");
                    return;
                }
            }
        });
        thread.start();
        Thread.sleep(3000);
        thread.interrupt(); // 中断线程
    }
}
6.CountDownLatch / CyclicBarrier / Semaphore
- CountDownLatch:
允许一个或多个线程等待其他一组线程完成操作后再继续执行。它通过一个计数器来实现,计数器初始化为线程的数量,每个线程完成任务后调用countDown方法将计数器减一,当计数器为零时,等待的线程可以继续执行。常用于多个线程完成各自任务后,再进行汇总或下一步操作的场景。
import java.util.concurrent.CountDownLatch;

public class CountDownLatchExample {
    public static void main(String[] args) throws InterruptedException {
        int threadCount = 3;
        CountDownLatch latch = new CountDownLatch(threadCount);

        for (int i = 0; i < threadCount; i++) {
            new Thread(() -> {
                try {
                    // 模拟任务执行
                    Thread.sleep((long) (Math.random() * 1000));
                    System.out.println(Thread.currentThread().getName() + " 完成任务");
                } catch (InterruptedException e) {
                    Thread.currentThread().interrupt();
                } finally {
                    latch.countDown(); // 任务完成,计数器减一
                }
            }).start();
        }

        latch.await(); // 等待所有子线程完成
        System.out.println("所有子线程已完成,主线程继续执行");
    }
}
- CyclicBarrier:
让一组线程互相等待,直到所有线程都到达某个屏障点后,再一起继续执行。与CountDownLatch不同的是,CyclicBarrier可以重复使用,当所有线程都通过屏障后,计数器会重置,可以再次用于下一轮的等待。适用于多个线程需要协同工作,在某个阶段完成后再一起进入下一个阶段的场景。
import java.util.concurrent.CyclicBarrier;

public class CyclicBarrierExample {
    public static void main(String[] args) {
        int threadCount = 3;
        CyclicBarrier barrier = new CyclicBarrier(threadCount, () -> {
            System.out.println("所有任务已到达屏障点,继续执行...");
        });

        for (int i = 0; i < threadCount; i++) {
            new Thread(() -> {
                try {
                    // 模拟任务执行
                    Thread.sleep((long) (Math.random() * 1000));
                    System.out.println(Thread.currentThread().getName() + " 到达屏障点");
                    barrier.await(); // 等待其他线程到达
                    System.out.println(Thread.currentThread().getName() + " 继续执行");
                } catch (Exception e) {
                    Thread.currentThread().interrupt();
                }
            }).start();
        }
    }
}
- Semaphore:
信号量,用于控制同时访问某个资源的线程数量。它维护了一个许可计数器,线程在访问资源前需要获取许可,如果有可用许可,则获取成功并将许可计数器减一,否则线程需要等待,直到有其他线程释放许可。常用于控制对有限资源的访问,如数据库连接池、线程池中的线程数量等。
import java.util.concurrent.Semaphore;

public class SemaphoreExample {
    public static void main(String[] args) {
        int threadCount = 5;
        Semaphore semaphore = new Semaphore(2); // 允许两个线程同时访问

        for (int i = 0; i < threadCount; i++) {
            new Thread(() -> {
                try {
                    semaphore.acquire(); // 获取许可
                    System.out.println(Thread.currentThread().getName() + " 获取许可,开始执行");
                    // 模拟任务执行
                    Thread.sleep((long) (Math.random() * 1000));
                    System.out.println(Thread.currentThread().getName() + " 释放许可");
                } catch (InterruptedException e) {
                    Thread.currentThread().interrupt();
                } finally {
                    semaphore.release(); // 释放许可
                }
            }).start();
        }
    }
}
7. Future 和 Callable
通过 Future 获取线程执行结果,结合 Callable 实现异步通信。
import java.util.concurrent.*;

public class FutureExample {
    public static void main(String[] args) throws Exception {
        ExecutorService executor = Executors.newSingleThreadExecutor();
        Future<Integer> future = executor.submit(() -> {
            Thread.sleep(1000);
            return 42;
        });
        System.out.println("结果: " + future.get()); // 阻塞等待
        executor.shutdown();
    }
}