Vue3 KeepAlive(缓存组件实例)
Vue3 KeepAlive(缓存组件实例)
- 1. 内置组件简介
- 2. component 元素(动态组件)
- 3. KeepAlive 基本使用方式
- 3.1 切换组件(未使用 KeepAlive,组件会销毁再重新创建)
- 3.2 切换组件(使用 KeepAlive,组件会进行缓存)
- 3. 使用细节
- 3.1 包含/排除(include/exclude)
- 3.2 最大缓存实例数(max)
- 3.3 缓存实例的生命周期(onActivated 和 onDeactivated)
1. 内置组件简介
在 Vue 中也提供了一些内置组件:
- Transition(一个元素或组件进入和离开 DOM 时应用动画)
- TransitionGroup(对 v-for 列表中的元素或组件的插入、移除和顺序改变添加动画效果)
- KeepAlive(在多个组件间动态切换时缓存被移除的组件实例)
- Teleport(将一个组件内部的一部分模板“传送”到该组件的 DOM 结构外层的位置去)
- Suspense(在组件树中协调对异步依赖的处理)
其中,KeepAlive 对于项目而言,最为常用,我们先进行介绍,其他内置组件,后续在添加具体的使用说明。
2. component 元素(动态组件)
component 元素,一个用于渲染动态组件或元素的“元组件”。要渲染的实际组件由 is prop 决定。
它是和 slot、template 等元素类似的一种特殊元素,这种元素是模板语法的一部分。但它们并非真正的组件,同时在模板编译期间会被编译掉。因此,它们通常在模板中用小写字母书写。
3. KeepAlive 基本使用方式
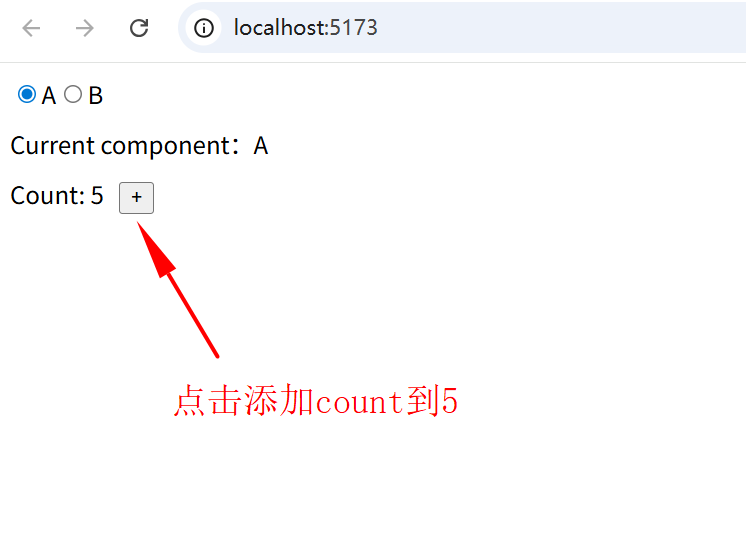
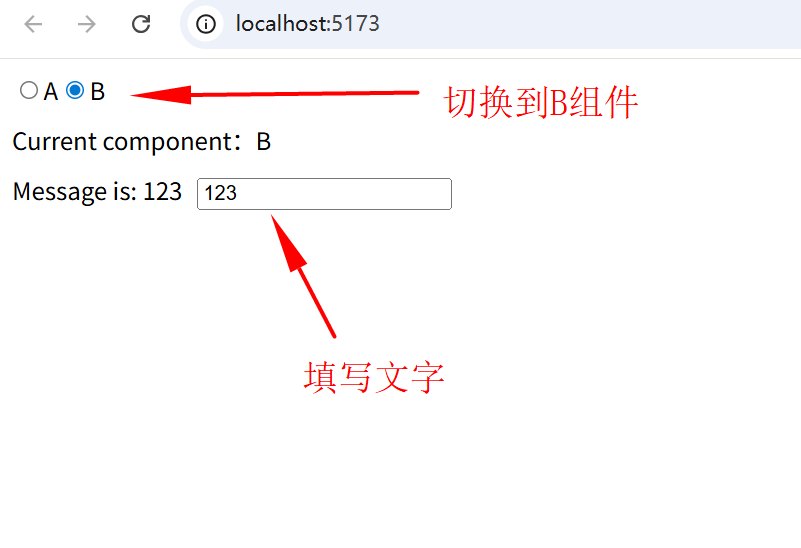
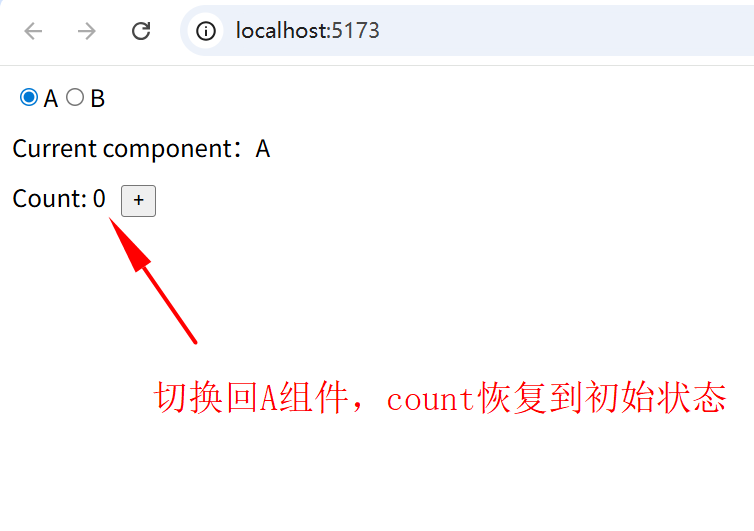
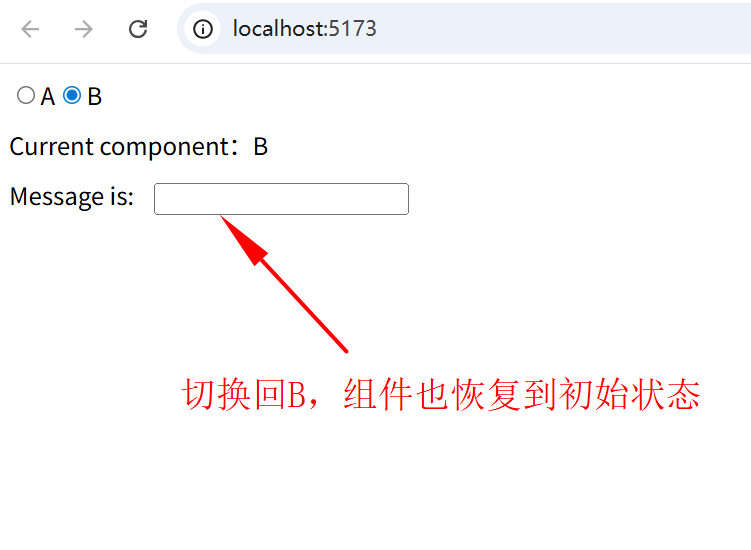
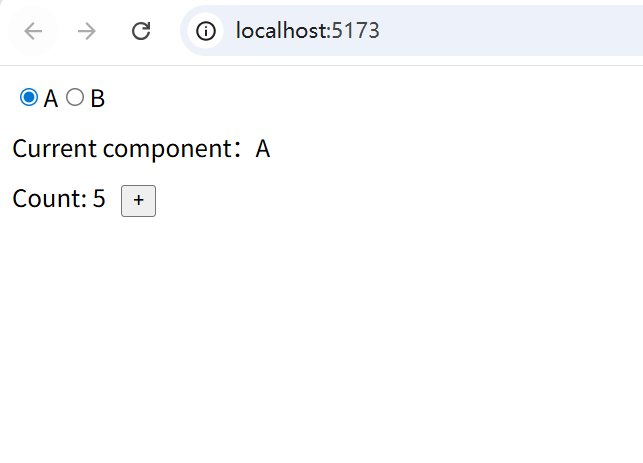
3.1 切换组件(未使用 KeepAlive,组件会销毁再重新创建)
关键代码:
<component :is="activeComponent" />
完整代码如下。
父组件 App.vue:
<template><div><input type="radio" v-model="activeComponent" :value="A" /><label for="A">A</label><input type="radio" v-model="activeComponent" :value="B" /><label for="B">B</label></div><div>Current component:{{ activeComponent.__name }}</div><div><component :is="activeComponent" /></div>
</template><script setup>
import { shallowRef, watch } from 'vue';
import A from '@/components/A.vue';import B from '@/components/B.vue';
const activeComponent = shallowRef(A);
watch(activeComponent, (newVal) => {console.log(newVal);
});
</script><style lang="scss" scoped>
div{margin-bottom: 10px;
}
</style>
子组件 A.vue:
<template><div><span>Count: {{ count }}</span><button @click="count++">+</button></div>
</template><script setup name="A">
import { ref } from 'vue'
const count = ref(0)
</script><style lang="scss" scoped>
button{margin-left: 10px;
}
</style>
子组件 B.vue:
<template><div><span>Message is: {{ message }}</span><input type="text" v-model="message" /></div>
</template><script setup name="B">
import { ref } from 'vue'
const message = ref('')
</script><style lang="scss" scoped>
input{margin-left: 10px;
}
</style>
3.2 切换组件(使用 KeepAlive,组件会进行缓存)
修改 App.vue 的关键代码,外部加上一层 KeepAlive:
<KeepAlive><component :is="activeComponent" />
</KeepAlive>
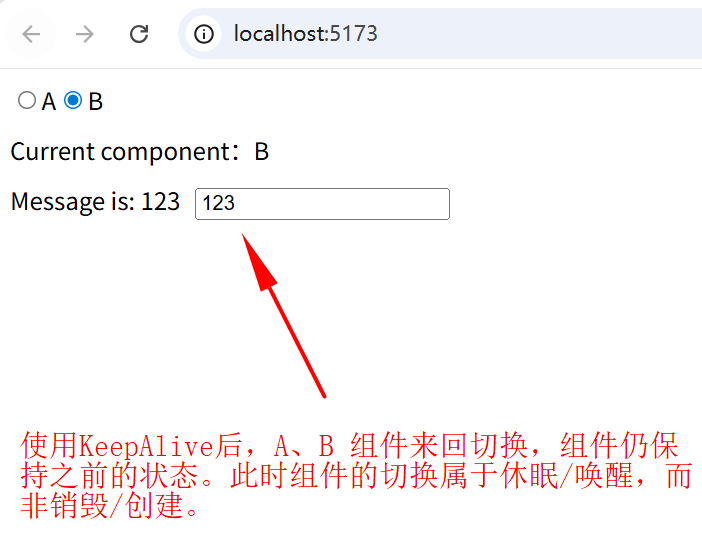
使用 KeepAliec 后,组件间切换,组件会仍然保持之前的状态。
此时的组件切换,属于休眠/唤醒,而非销毁/创建。
3. 使用细节
3.1 包含/排除(include/exclude)
在使用 KeepAlive 时,会默认缓存内部的所有切换的组件。那如果我们只想缓存部分组件,可以通过 include 或 exclude prop 来定制该行为。
这两个 prop 的值都可以是一个以英文逗号分隔的字符串、一个正则表达式,或是包含这两种类型的一个数组:
<!-- 以英文逗号分隔的字符串 -->
<KeepAlive include="a,b"><component :is="view" />
</KeepAlive><!-- 正则表达式 (需使用 `v-bind`) -->
<KeepAlive :include="/a|b/"><component :is="view" />
</KeepAlive><!-- 数组 (需使用 `v-bind`) -->
<KeepAlive :include="['a', 'b']"><component :is="view" />
</KeepAlive>
它会根据组件的
name选项进行匹配,所以组件如果想要条件性地被KeepAlive缓存,就必须显式声明一个name选项。
在 3.2.34 或以上的版本中,使用
<script setup>的单文件组件会自动根据文件名生成对应的name选项,无需再手动声明。
3.2 最大缓存实例数(max)
通过传入 max prop 来限制可被缓存的最大组件实例数。
<KeepAlive> 的行为在指定了 max 后类似一个 LRU 缓存:如果缓存的实例数量即将超过指定的那个最大数量,则最久没有被访问的缓存实例将被销毁,以便为新的实例腾出空间。
<KeepAlive :max="10"><component :is="activeComponent" />
</KeepAlive>
3.3 缓存实例的生命周期(onActivated 和 onDeactivated)
当一个组件实例从 DOM 上移除但因为被 <KeepAlive> 缓存而仍作为组件树的一部分时,它将变为不活跃状态而不是被卸载。当一个组件实例作为缓存树的一部分插入到 DOM 中时,它将重新被激活。
一个持续存在的组件可以通过 onActivated() 和 onDeactivated() 注册相应的两个状态的生命周期钩子:
<script setup>
import { onActivated, onDeactivated } from 'vue'onActivated(() => {// 调用时机为首次挂载// 以及每次从缓存中被重新插入时
})onDeactivated(() => {// 在从 DOM 上移除、进入缓存// 以及组件卸载时调用
})
</script>
请注意:
onActivated 在组件挂载时也会调用,并且 onDeactivated 在组件卸载时也会调用。
这两个钩子不仅适用于 缓存的根组件,也适用于缓存树中的后代组件。
看个例子。A组件新增一个子组件A1,B组件新增一个子组件B1。
A1.vue:
<template><div>这是A1组件内容(A的子组件)</div>
</template><script setup>
import { onActivated, onDeactivated } from 'vue';onActivated(() => {console.log('A1 onActivated')
})
onDeactivated(() => {console.log('A1 onDeactivated')
})
</script><style lang="scss" scoped>
div{margin-top: 10px;
}
</style>
A.vue:
<template><div class="A"><span>Count: {{ count }}</span><button @click="count++">+</button><A1></A1></div>
</template><script setup name="A">
import { ref, onActivated, onDeactivated } from 'vue';
import A1 from './A1.vue'const count = ref(0)onActivated(() => {console.log('A onActivated')
})
onDeactivated(() => {console.log('A onDeactivated')
})
</script><style lang="scss" scoped>
.A{border: 1px solid red;padding: 10px;
}
button{margin-left: 10px;
}
</style>
B1.vue:
<template><div>这是B1组件内容(B的子组件)</div>
</template><script setup>
import { onActivated, onDeactivated } from 'vue';onActivated(() => {console.log('B1 onActivated')
})
onDeactivated(() => {console.log('B1 onDeactivated')
})
</script><style lang="scss" scoped>
div{margin-top: 10px;
}
</style>
B.vue:
<template><div class="B"><span>Message is: {{ message }}</span><input type="text" v-model="message" /><B1 /></div>
</template><script setup name="B">
import { ref, onActivated, onDeactivated } from 'vue';
import B1 from './B1.vue'
const message = ref('')
onActivated(() => {console.log('B onActivated')
})
onDeactivated(() => {console.log('B onDeactivated')
})
</script><style lang="scss" scoped>
.B{border: 1px solid red;padding: 10px;
}
input{margin-left: 10px;
}
</style>
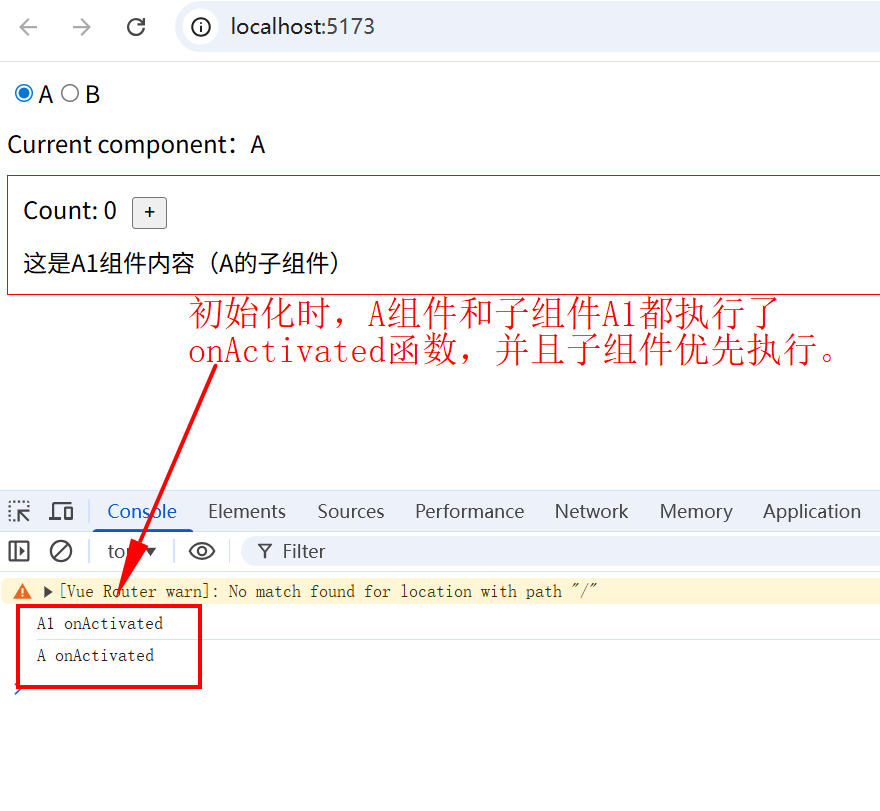
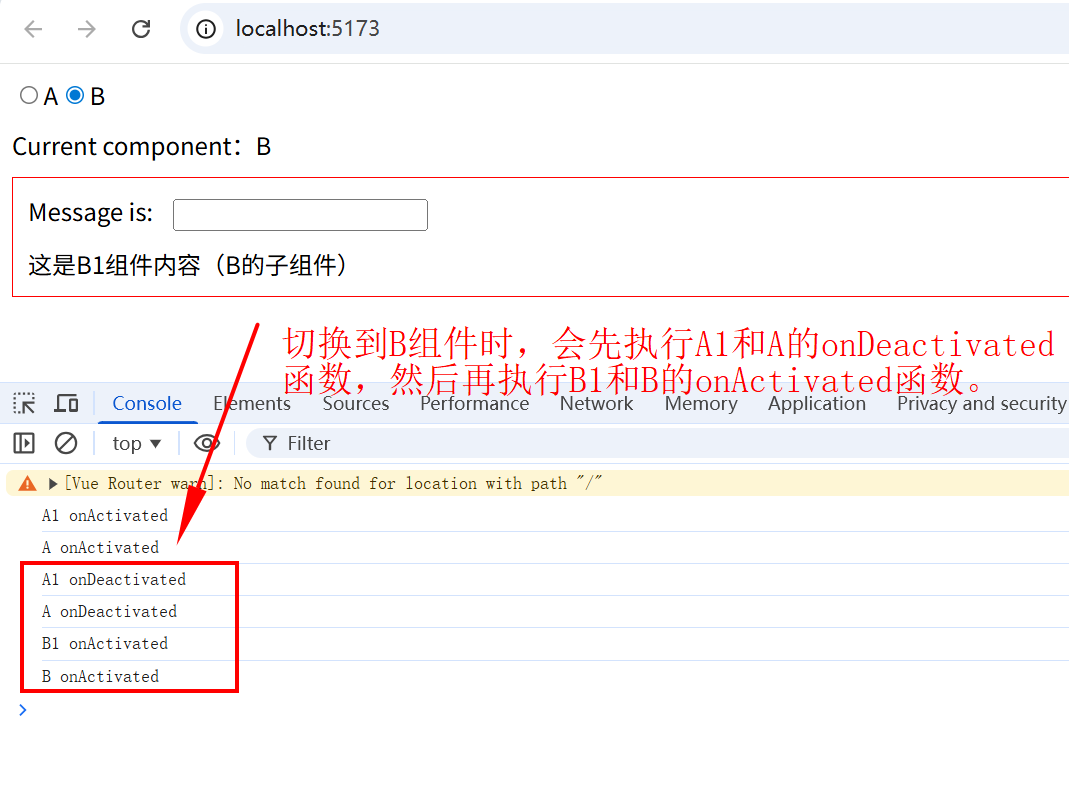
总结下 onActivated(激活), onDeactivated(休眠)生命周期钩子的执行顺序:
(1)由内而外(先执行子组件,再执行父组件的);
(2)由前到后(先执行上个组件的休眠,再执行下个组件的激活)。
上一章 《Vue 用户管理系统(路由相关练习二)》