RHCE Day1 例行性工作——定时任务和远程连接
一、定时任务
1、at一次性任务
命令格式: at [参数] [时间]
(1) 使用方法:
① at now +n min/hour/day/week/mouth
[root@server ~]# at now + 1min
warning: commands will be executed using /bin/sh
at> touch /tmp/{1..10}
at> <EOT> #ctrl + D  ===== ^D (表示设置任务)
②at HH:MM /HH:mm YYYY-mm-dd
# 指定时间点创建定时任务,如果创建的时间已经过去,那么将会设置到第二天进行
[root@server ~]# at 22:32
warning: commands will be executed using /bin/sh
at> touch /tmp/{a..z}
at> <EOT>[root@server ~]# at 22:30
warning: commands will be executed using /bin/sh
at> ls
at> <EOT>
job 7 at Sat Oct 25 22:30:00 2025
[root@server ~]# at -l
7	Sat Oct 25 22:30:00 2025 a root# 不允许使用简化的日期格式
[root@server ~]# at 0:0 2026-1-1
Error in day of month. Last token seen: :
Garbled time# 添加一个较远日期的定时任务
[root@server ~]# at 00:00 2026-01-01
warning: commands will be executed using /bin/sh
at> echo "happy new year"
at> <EOT>
job 8 at Thu Jan  1 00:00:00 2026
[root@server ~]# at -l
7	Sat Oct 25 22:30:00 2025 a root
8	Thu Jan  1 00:00:00 2026 a root# 不允许创建一个过去时间段的定时任务
[root@server ~]# at 00:00 2025-01-01
at: refusing to create job destined in the past
(2)常用的相关参数:
① - l :查看还未执行的任务列表
[root@server ~]# at -l
5	Fri Oct 24 22:30:00 2025 a root
② - c : 用来查看任务详情的命令,通常设定的任务在输出的倒数第二行
[root@server ~]# at -c 8
...
echo "happy new year"marcinDELIMITER1f84b651
③ - d :删除指定的任务
[root@server ~]# at -l
7	Sat Oct 25 22:30:00 2025 a root
8	Thu Jan  1 00:00:00 2026 a root
[root@server ~]# at -d 7
[root@server ~]# at -l
8	Thu Jan  1 00:00:00 2026 a root
[root@server ~]# at -d 8
[root@server ~]# at -l
④ - f :定时执行一个脚本文件
[root@server ~]# at -f ~/ll.sh 22:00
warning: commands will be executed using /bin/sh
job 10 at Sat Oct 25 22:00:00 2025
(3) 配置文件:
▶at.allow :白名单,当白名单存在时,系统中的用户必须在白名单中才可以使用at命令。
▶ at.deny :黑名单,不让使用at命令的用户可以加入到黑名单中。
❗❗❗白名单优先级高于黑名单,所以系统中默认是没有白名单的,只有黑名单。
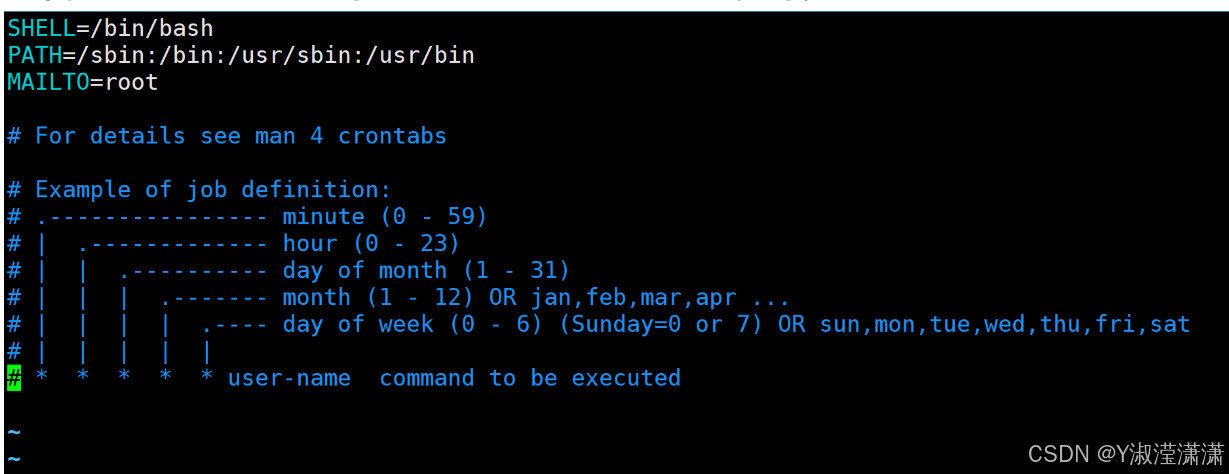
2、cron周期性任务
任务格式:
个人任务:* * * * * 命令/脚本
系统任务:* * * * * 用户 命令/脚本
(1)常用的相关参数:
① - e 编辑当前用户的周期任务列表
[root@server etc]# crontab -e
crontab: installing new crontab
② - l 查看定时任务列表
[root@server etc]# crontab -l
0 8 15 * 1 touch /tmp/{1..10}
③ - r 清空定时任务
[root@server etc]# crontab -l
0 8 15 * 1 touch /tmp/{1..10}
* * * * * rm -f /tmp/*
[root@server etc]# crontab -r
[root@server etc]# crontab -l
no crontab for root
④ - u 指定某个用户创建/清空/查看他的定时任务
[root@server etc]# crontab -u redhat -e
no crontab for redhat - using an empty one
crontab: installing new crontab
[root@server etc]# crontab -l
no crontab for root
[root@server etc]# crontab -u redhat -l
* * * * * rm -rf /tmp/*
⑤ - i 清空定时任务时进行提醒
[root@server etc]# crontab -u redhat -ir
crontab: really delete redhat's crontab? y
[root@server etc]# crontab -u redhat -l
no crontab for redhat
(2)配置文件
-
/etc/cron.deny: 黑名单 他的优先级低于 白名单 cron.allow, 只要白名单存在 黑名单就不生效
-
/etc/crontab: 系统级别的定时任务 我们可以在其中指定某个用户 执行某个任务
-
/var/spool/cron/用户的名称: 该目录中保存的是各个用户自己的定时任务,每个人定时任务文件用该用户名命名。
-
/etc/cron.d/ :用户自定义的批量定时任务
- /etc/cron.d/0hourly:定义每小时执行的 cron 周期性任务。
-
/etc/cron.hourly/、/etc/cron.daily/、/etc/cron.weekly/、/etc/cron.monthly/
- 定时任务 每小时 每天 每周 每月的目录,可以再其中加入自己写的脚本
-
/etc/anacrontab:配置 anacron 任务,确保系统关机错过的周期性任务自动补跑。
实验
- 每小时的奇数分钟在 tmp 目录中创建 1-10 十个文件,每小时的偶数放分钟
删除这些文件
[root@server etc]#crontab -e
---------------------------------
1-59/2 * * * * touch /tmp/{1..10}
0-58/2 * * * * rm -rf /tmp/{1..10}
----------------------------------
二、远程连接
1、简介远程连接技术
- telnet : 已经不在使用,原因明文传输。
- ssh及openssh:ssh是一个通信协议,openssh是具体一个实现。
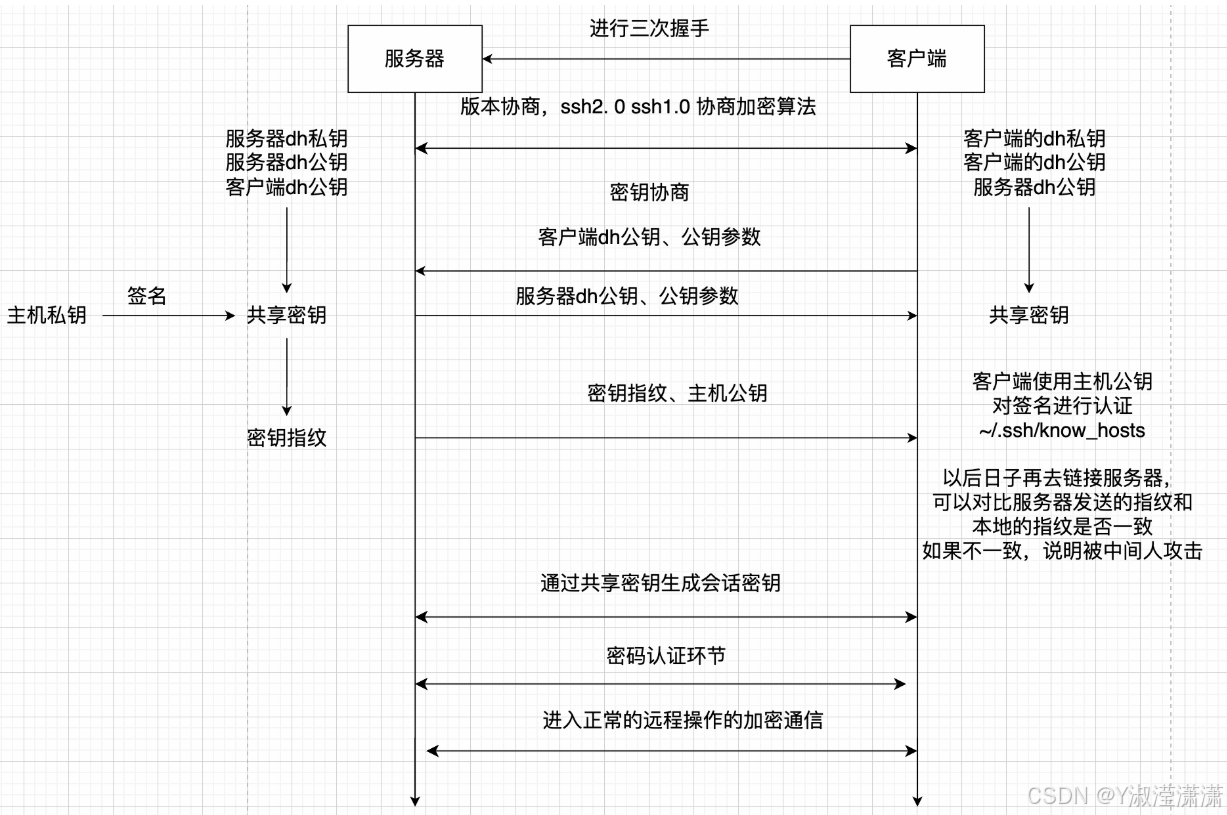
2、ssh连接过程
3、ssh的配置文件
# 所有ssh_host开头的文件都是 ssh主机密钥 总共有3对,分时rsa ecdsa ed5519三种非对称加密算法产生的密钥对
[root@server ssh]# ls
moduli
ssh_host_ecdsa_key.pub
ssh_config       # ssh客户端主配置文件
ssh_host_ed25519_key
ssh_config.d        # ssh客户端的子配置文件目录(子配置的优先级高于主配置)
ssh_host_ed25519_key.pub
sshd_config         # ssh服务端主配置文件
ssh_host_rsa_key
sshd_config.d       # ssh服务端的子配置文件目录(子配置的优先级高于主配置)
ssh_host_rsa_key.pub
ssh_host_ecdsa_key
- sshd_config
❗❗❗大多数的服务在修改完配置文件之后都需要重新将服务启动。
# 在世界范围内有一个关于计算机的共识:
# 计算机的0-1024端口是固定的给某些特定的程序使用
# 例:明文web服务他的端口号(http):80 加密web服务端口(https):443
# 远程加密链接协议ssh:22 telnet:2321 #Port 22 ssh的专用服务端口22 #AddressFamily any23 #ListenAddress 0.0.0.0 ssh监听所有ipv424 #ListenAddress ::  ssh监听所有ipv625# 下面这三个文件是 ssh主机私钥保存位置26 #HostKey /etc/ssh/ssh_host_rsa_key27 #HostKey /etc/ssh/ssh_host_ecdsa_key28 #HostKey /etc/ssh/ssh_host_ed25519_key39 #LoginGraceTime 2m 登录时输入密码市场不能超过2分钟40 #PermitRootLogin prohibit-password #禁止root使用密码登录49 AuthorizedKeysFile      .ssh/authorized_keys # 客户端使用免密登录时,必须将自己的公钥保存在这个文件中,否则无法免密登录65 #PasswordAuthentication yes 是否允许使用密码登录66 #PermitEmptyPasswords no 是否允许空密码登陆110 #ClientAliveInterval 100 # 发送激活包的时间间隔
111 #ClientAliveCountMax 3 # 发送几次激活包
实验
1、修改ssh服务器端的端口号 33
vim /etc/ssh/sshd_config
---------------------------------
22 Port 33
---------------------------------
2、拒绝root账户远程登录 (不仅仅要修改掉主配置文件,子配置文件的修改才是关键)
#修改子配置文件
[root@server ssh]# vim /etc/ssh/sshd_config.d/01-permitrootlogin.conf
------------------------------------------
PermitRootLogin no
------------------------------------------
#查看主配置文件 /etc/ssh/sshd_config,确保没有与子配置冲突的 PermitRootLogin 配置(若有则注释或修改为 no)
[root@server ssh]# vim  /etc/ssh/sshd_config
------------------------------------------
PermitRootLogin no
------------------------------------------
#重启 SSH 服务
[root@server ssh]#systemctl restart sshd
3、允许特定账户进行ssh登录,其它账户无法登录
[root@server ssh]#vim /etc/ssh/sshd_config
-------------------------------------
AllowUsers redhat#在配置文件的开头添加
-------------------------------------
#重启 SSH 服务
[root@server ssh]#systemctl restart sshd
4、虚拟机之间免密登陆
#客户端上
#在客户端虚拟机生成密钥对
[root@clinet ~]# ssh-keygen -t rsa
#将客户端公钥传输到服务端虚拟机
[root@clinet ~]# ssh-copy-id root@192.168.10.100