多模态的大模型文本分类模型代码(二)——模型初步运行
一、模型结构
我的观点是,先让模型跑起来了解模型结构才能更好的进行微调。
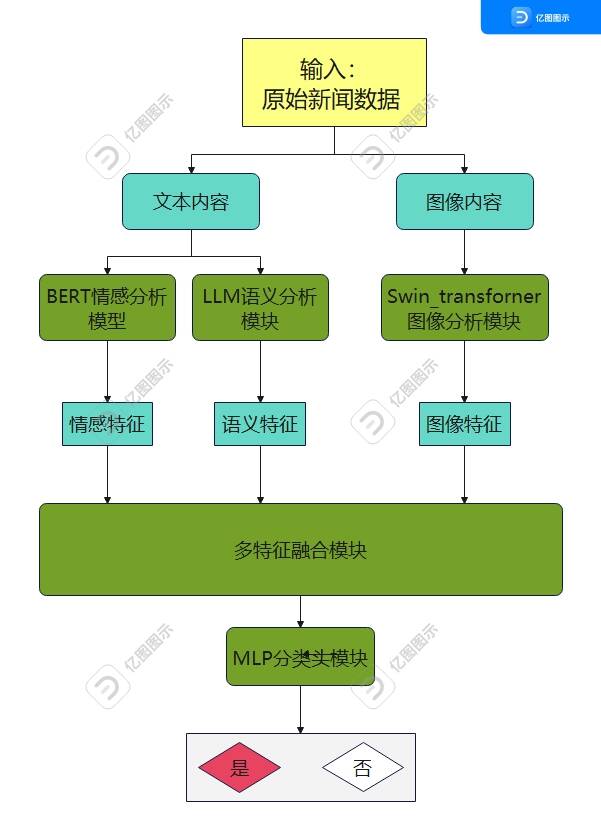
模型结构:输入的文本通过DeepSeek-R1模型提取深层语义特征,同时通过BERT模型捕捉其情感倾向特征,而输入的图像则经由Swin Transformer编码为一系列视觉patch特征。接着,在特征融合阶段,文本与情感特征被拼接成一个统一的查询向量,通过交叉注意力机制去“审视”和“提问”图像特征(作为键和值),从而动态地计算出与文本内容最相关的视觉区域,并聚合为一个富含上下文信息的视觉向量。最后,这个提炼出的视觉向量与原始的文本-情感查询向量再次拼接,形成一个全面融合了语义、情感和视觉信息的最终特征表示,该特征被送入一个MLP(多层感知机)分类器,以完成最终的分类任务。如图
基于以上模型设计出以下运行代码(段尾),代码结构如下:
跨模态分类模型代码
├─ 1. 基础配置层(无类,全局代码)
│ ├─ 依赖库导入(torch、pandas、PIL等)
│ ├─ 设备配置(自动选择cuda/cpu,全局变量device)
│ └─ 警告过滤(warnings.filterwarnings("ignore"))
│
├─ 2. 核心模型层(2个类,实现特征融合与分类)
│ ├─ CrossModalFusion(交叉注意力融合模块)
│ │ ├─ __init__() # 初始化投影层与Softmax
│ │ └─ forward() # 前向传播,输出融合特征
│ │
│ └─ MLPClassifier(MLP分类器模块)
│ ├─ __init__() # 初始化MLP分类器序列
│ │ ├─ 参数:input_dim, hidden_dim, num_classes, dropout_prob
│ │ └─ 操作:定义Sequential(线性层→ReLU→Dropout→线性层)
│ └─ forward() # 前向传播,输出分类logits
│ ├─ 参数:fused_features(融合特征)
│ └─ 操作:融合特征输入MLP,输出分类logits
│
├─ 3. 特征提取层(1个类,管理3类预训练模型)
│ └─ FeatureExtractors(多模态特征提取器)
│ ├─ __init__() # 初始化3个预训练模型与Tokenizer
│ │ ├─ 参数:deepseek_name, bert_name, swin_model_dir(模型路径)
│ │ ├─ 操作1:初始化DeepSeek Tokenizer + Model,设置pad_token
│ │ ├─ 操作2:初始化情感BERT Tokenizer + Model
│ │ ├─ 操作3:初始化Swin Model(加载配置,忽略尺寸不匹配)
│ │ └─ 操作4:所有模型设为eval()模式
│ │
│ ├─ extract_text_features() # 提取文本语义特征(DeepSeek)
│ │ ├─ 参数:texts(文本列表)
│ │ └─ 操作:Tokenize→模型前向→取last_hidden_state[:, -1, :]
│ │
│ ├─ extract_sentiment_features() # 提取情感特征(BERT)
│ │ ├─ 参数:texts(文本列表)
│ │ └─ 操作:Tokenize→模型前向→取pooler_output
│ │
│ └─ extract_image_features() # 提取图像特征(Swin)
│ ├─ 参数:images_bytes_list(图像字节流列表)
│ └─ 操作:字节流转PIL图→图像变换→模型前向→取last_hidden_state
│
└─ 4. 主流程层(无类,全局函数)
└─ main() # 完整业务流程(数据处理→特征提取→模型运行→结果输出)
├─ 配置参数定义(文件路径、批次大小、模型维度等)
├─ 初始化FeatureExtractors实例(加载所有预训练模型)
├─ 获取特征维度(text_dim/sentiment_dim/image_dim)
├─ 读取Parquet数据→处理文本字段→检查标签列
└─ 分批处理数据
二、具体代码
1、基础配置层
设备设置部分作用:自动选择cuda/cpu。
import torch
import torch.nn as nn
import pandas as pd
from PIL import Image
import io
import timm
from transformers import (AutoTokenizer, AutoModel, BertModel, BertTokenizer,SwinModel, SwinConfig
)
from tqdm.auto import tqdm
import warnings# 忽略一些不必要的警告
warnings.filterwarnings("ignore")# 设备配置
device = torch.device('cuda' if torch.cuda.is_available() else 'cpu')
print(f"Using device: {device}")
2、特征融合与分类代码
①、模态融合
本文使用的模态融合方法是交叉融合方法,代码为CrossModalFusion类,其中包括两个方法__init__和forward;其中__init__是类的初始化方法、forward 方法是 PyTorch 中所有 nn.Module 子类的心脏。
__init__方法参数:text_dim, sentiment_dim, image_dim, fusion_dim 三个模态和融合后的特征向量的维度数量,无返回值。
def __init__(self, text_dim, sentiment_dim, image_dim, fusion_dim):super().__init__()self.fusion_dim = fusion_dim# 将文本和情感特征拼接后投影到融合维度self.query_proj = nn.Linear(text_dim + sentiment_dim, fusion_dim)# 将图像特征投影到融合维度self.key_proj = nn.Linear(image_dim, fusion_dim)self.value_proj = nn.Linear(image_dim, fusion_dim)self.softmax = nn.Softmax(dim=-1)forward方法是一个特殊的方法,你必须在你自定义的模型类中实现它,用来定义模型的前向传播逻辑——也就是说,输入数据如何一层一层地流经网络,最终变成输出。与之相对的还有一个反向传播逻辑方法
backward。forward是 PyTorch
nn.Module的核心,它定义了模型如何处理输入数据并产生输出。它不会被你手动直接调用),而是在以下几种关键情况下被 PyTorch 自动调用:当你像调用函数一样调用你的模型对象时,PyTorch 会自动在后台执行
forward方法,并附加上许多重要的幕后工作。在模型训练、推理的每个步骤中,
forward方法都会被调用。
def forward(self, text_features, sentiment_features, image_features):# 1. 创建统一的查询combined_query = torch.cat([text_features, sentiment_features], dim=-1)Q = self.query_proj(combined_query).unsqueeze(1) # (B, 1, fusion_dim)# 2. 准备 Key 和 ValueK = self.key_proj(image_features) # (B, num_patches, image_dim)V = self.value_proj(image_features) # (B, num_patches, image_dim)# 3. 计算注意力分数attention_scores = torch.matmul(Q, K.transpose(-2, -1)) / (self.fusion_dim ** 0.5)# 4. 获取注意力权重attention_weights = self.softmax(attention_scores)# 5. 加权求和得到视觉上下文向量context_vector = torch.matmul(attention_weights, V)context_vector = context_vector.squeeze(1)# 6. 形成最终融合特征fused_features = torch.cat([context_vector, combined_query], dim=-1)return fused_features②、分类器
本文使用的分类方法是MLP分类方法,代码为MLPClassifier类,其中包括两个方法__init__和forward;
class MLPClassifier(nn.Module):"""MLP分类器"""def __init__(self, input_dim, hidden_dim, num_classes, dropout_prob=0.3):super().__init__()self.classifier = nn.Sequential(nn.Linear(input_dim, hidden_dim),nn.ReLU(),nn.Dropout(p=dropout_prob),nn.Linear(hidden_dim, num_classes))def forward(self, fused_features):logits = self.classifier(fused_features)return logits3、特征提取代码
作为一种多模态的大模型分类方法、本文使用的特征提取模块分为三部分:提取文本语义特征、提取情感特征、提取图像特征。代码为FeatureExtractors类,一共四个方法:初始化方法和三个特征提取方法。
①、初始化方法
初始化方法的作用是加载模型和分词器。
__init__方法参数:deepseek_name、bert_name、swin_model_dir,分别是三个模型的路径。
核心代码如下:
# --- 文本特征提取器 ---self.deepseek_tokenizer = AutoTokenizer.from_pretrained(deepseek_name, trust_remote_code=True)if self.deepseek_tokenizer.pad_token is None:self.deepseek_tokenizer.pad_token = self.deepseek_tokenizer.eos_tokenself.deepseek_model = AutoModel.from_pretrained(deepseek_name, trust_remote_code=True).to(device)# --- 情感特征提取器 ---self.bert_tokenizer = BertTokenizer.from_pretrained(bert_name)self.bert_model = BertModel.from_pretrained(bert_name).to(device)# --- 图像特征提取器 ---swin_config = SwinConfig.from_pretrained(swin_model_dir)self.image_model = SwinModel.from_pretrained(pretrained_model_name_or_path=swin_model_dir,config=swin_config,ignore_mismatched_sizes=True).to(device)# 设置为评估模式self.deepseek_model.eval()self.bert_model.eval()self.image_model.eval()②、文本语义特征方法:extract_text_features
参数:text文本内容
def extract_text_features(self, texts):"""使用DeepSeek-R1提取文本语义特征"""inputs = self.deepseek_tokenizer(texts, return_tensors='pt', padding=True, truncation=True, max_length=256).to(device)with torch.no_grad():outputs = self.deepseek_model(**inputs)features = outputs.last_hidden_state[:, -1, :]return features③、文本情感特征方法:extract_sentiment_features
参数:text文本内容
def extract_sentiment_features(self, texts):"""使用BERT提取文本情感特征"""inputs = self.bert_tokenizer(texts, return_tensors='pt', padding=True, truncation=True, max_length=128).to(device)with torch.no_grad():outputs = self.bert_model(**inputs)features = outputs.pooler_outputreturn features④、图像特征方法:extract_image_features
图像预处理设置:
使用timm库创建图像预处理管道
is_training=False表示推理模式
mean和std是ImageNet标准化参数
crop_pct=1.0保持原始图像比例
transform = timm.data.create_transform(is_training=False,mean=[0.485, 0.456, 0.406],std=[0.229, 0.224, 0.225],crop_pct=1.0,
)
图像批量处理:
遍历字节数组列表,将每张图片转换为RGB格式
应用预处理变换(缩放、归一化等)
将处理后的图像存入列表
processed_images = []
for img_bytes in images_bytes_list:image = Image.open(io.BytesIO(img_bytes)).convert('RGB')processed_images.append(transform(image))
张量构建:
将预处理后的图像列表堆叠成批次张量
移动到指定设备(CPU/GPU)
image_tensor = torch.stack(processed_images).to(device)
特征提取:
将图像张量输入预训练模型
提取最后一层隐藏状态作为特征表示返回形状为[batch_size, seq_len, hidden_dim]的特征张量
with torch.no_grad():outputs = self.image_model(pixel_values=image_tensor)features = outputs.last_hidden_state
torch.no_grad()禁用梯度计算,节省内存return features
4、主函数代码:
①、配置
def main():# --- 配置 ---PARQUET_FILE_PATH = '../VLDbench.parquet' # 修改为你的Parquet文件路径BATCH_SIZE = 4FUSION_DIM = 512CLASSIFIER_HIDDEN_DIM = 256NUM_CLASSES = 2OUTPUT_FILE_NAME = '../dataset/probability_class.parquet' # 输出文件名,按要求设置
②、初始化
# --- 初始化 ---extractors = FeatureExtractors()# 获取特征维度text_dim = extractors.deepseek_model.config.hidden_sizesentiment_dim = extractors.bert_model.config.hidden_sizeimage_dim = extractors.image_model.num_features# 初始化融合模块和分类器fusion_module = CrossModalFusion(text_dim, sentiment_dim, image_dim, FUSION_DIM).to(device)classifier = MLPClassifier(input_dim=FUSION_DIM + text_dim + sentiment_dim,hidden_dim=CLASSIFIER_HIDDEN_DIM,num_classes=NUM_CLASSES).to(device)③、读取数据
数据集的预处理
# --- 读取和处理数据 ---print(f"Reading data from {PARQUET_FILE_PATH}...")df = pd.read_parquet(PARQUET_FILE_PATH)# 只保留前100条数据用于演示df = df.head(1000).reset_index(drop=True)# 合并文本字段df['full_text'] = df['headline'].fillna('') + " " + df['article_text'].fillna('')# 检查multimodal_label列是否存在if 'multimodal_label' not in df.columns:raise ValueError("Error: 'multimodal_label' column not found in the dataset!")④、分批处理
# --- 分批处理 ---results = []num_batches = (len(df) + BATCH_SIZE - 1) // BATCH_SIZEfor i in tqdm(range(num_batches), desc="Processing batches"):batch_df = df.iloc[i * BATCH_SIZE: (i + 1) * BATCH_SIZE]texts = batch_df['full_text'].tolist()images_dict_list = batch_df['image'].tolist()# 提取图像字节流images_bytes = [item['bytes'] for item in images_dict_list]# 获取对应行的multimodal_labelmultimodal_labels = batch_df['multimodal_label'].tolist()# 特征提取text_feats = extractors.extract_text_features(texts)sentiment_feats = extractors.extract_sentiment_features(texts)image_feats = extractors.extract_image_features(images_bytes)# 特征融合与分类fused_feats = fusion_module(text_feats, sentiment_feats, image_feats)logits = classifier(fused_feats)probabilities = torch.softmax(logits, dim=-1)# 保存关键结果(仅保留需要的三个字段)for j in range(len(batch_df)):results.append({'index': batch_df.index[j],'multimodal_label': multimodal_labels[j],'probability_class_0': probabilities[j][0].cpu().item(),'probability_class_1': probabilities[j][1].cpu().item(),})⑤、输出
# --- 生成最终输出文件 ---# 转换为DataFrame并按原索引排序results_df = pd.DataFrame(results)results_df = results_df.set_index('index').sort_index()# 确保输出文件只包含这三个字段final_output_df = results_df[['multimodal_label', 'probability_class_0', 'probability_class_1']]# 保存到指定文件final_output_df.to_parquet(OUTPUT_FILE_NAME)print(f"\nProcessing complete!")print(f"Results saved to {OUTPUT_FILE_NAME}")print(f"\nFile contains {len(final_output_df)} rows with columns: {list(final_output_df.columns)}")# 显示前5条结果预览print("\nFirst 5 results:")print(final_output_df.head())三、完整版代码
import torch
import torch.nn as nn
import pandas as pd
from PIL import Image
import io
import timm
from transformers import (AutoTokenizer, AutoModel, BertModel, BertTokenizer,SwinModel, SwinConfig
)
from tqdm.auto import tqdm
import warnings# 忽略一些不必要的警告
warnings.filterwarnings("ignore")# 设备配置
device = torch.device('cuda' if torch.cuda.is_available() else 'cpu')
print(f"Using device: {device}")# ==============================================================================
# 1.模型的交叉注意力机制与MLP分类器
# ==============================================================================class CrossModalFusion(nn.Module):"""交叉注意力融合模块"""def __init__(self, text_dim, sentiment_dim, image_dim, fusion_dim):super().__init__()self.fusion_dim = fusion_dim# 将文本和情感特征拼接后投影到融合维度self.query_proj = nn.Linear(text_dim + sentiment_dim, fusion_dim)# 将图像特征投影到融合维度self.key_proj = nn.Linear(image_dim, fusion_dim)self.value_proj = nn.Linear(image_dim, fusion_dim)self.softmax = nn.Softmax(dim=-1)def forward(self, text_features, sentiment_features, image_features):# 1. 创建统一的查询combined_query = torch.cat([text_features, sentiment_features], dim=-1)Q = self.query_proj(combined_query).unsqueeze(1)  # (B, 1, fusion_dim)# 2. 准备 Key 和 ValueK = self.key_proj(image_features)  # (B, num_patches, image_dim)V = self.value_proj(image_features)  # (B, num_patches, image_dim)# 3. 计算注意力分数attention_scores = torch.matmul(Q, K.transpose(-2, -1)) / (self.fusion_dim ** 0.5)# 4. 获取注意力权重attention_weights = self.softmax(attention_scores)# 5. 加权求和得到视觉上下文向量context_vector = torch.matmul(attention_weights, V)context_vector = context_vector.squeeze(1)# 6. 形成最终融合特征fused_features = torch.cat([context_vector, combined_query], dim=-1)return fused_featuresclass MLPClassifier(nn.Module):"""MLP分类器"""def __init__(self, input_dim, hidden_dim, num_classes, dropout_prob=0.3):super().__init__()self.classifier = nn.Sequential(nn.Linear(input_dim, hidden_dim),nn.ReLU(),nn.Dropout(p=dropout_prob),nn.Linear(hidden_dim, num_classes))def forward(self, fused_features):logits = self.classifier(fused_features)return logits# ==============================================================================
# 2. 特征提取器类
# ==============================================================================class FeatureExtractors:"""一个类来管理所有特征提取模型"""def __init__(self,deepseek_name=r'C:\Ranall\model\DeepSeek-R1-Distill-Qwen-7B-News-Classifier',bert_name=r'C:\Ranall\model\bert-emotion',swin_model_dir=r'C:\Ranall\model\swin_transformer'):print("Loading models... This may take a while.")# --- 文本特征提取器 ---self.deepseek_tokenizer = AutoTokenizer.from_pretrained(deepseek_name, trust_remote_code=True)if self.deepseek_tokenizer.pad_token is None:self.deepseek_tokenizer.pad_token = self.deepseek_tokenizer.eos_tokenself.deepseek_model = AutoModel.from_pretrained(deepseek_name, trust_remote_code=True).to(device)# --- 情感特征提取器 ---self.bert_tokenizer = BertTokenizer.from_pretrained(bert_name)self.bert_model = BertModel.from_pretrained(bert_name).to(device)# --- 图像特征提取器 ---swin_config = SwinConfig.from_pretrained(swin_model_dir)self.image_model = SwinModel.from_pretrained(pretrained_model_name_or_path=swin_model_dir,config=swin_config,ignore_mismatched_sizes=True).to(device)# 设置为评估模式self.deepseek_model.eval()self.bert_model.eval()self.image_model.eval()print("All models loaded successfully.")def extract_text_features(self, texts):"""使用DeepSeek-R1提取文本语义特征"""inputs = self.deepseek_tokenizer(texts, return_tensors='pt', padding=True, truncation=True, max_length=256).to(device)with torch.no_grad():outputs = self.deepseek_model(**inputs)features = outputs.last_hidden_state[:, -1, :]return featuresdef extract_sentiment_features(self, texts):"""使用BERT提取文本情感特征"""inputs = self.bert_tokenizer(texts, return_tensors='pt', padding=True, truncation=True, max_length=128).to(device)with torch.no_grad():outputs = self.bert_model(**inputs)features = outputs.pooler_outputreturn featuresdef extract_image_features(self, images_bytes_list):"""使用Hugging Face SwinModel提取图像特征"""transform = timm.data.create_transform(is_training=False,mean=[0.485, 0.456, 0.406],std=[0.229, 0.224, 0.225],crop_pct=1.0,)processed_images = []for img_bytes in images_bytes_list:image = Image.open(io.BytesIO(img_bytes)).convert('RGB')processed_images.append(transform(image))image_tensor = torch.stack(processed_images).to(device)with torch.no_grad():outputs = self.image_model(pixel_values=image_tensor)features = outputs.last_hidden_statereturn features# ==============================================================================
# 3. 主流程
# ==============================================================================def main():# --- 配置 ---PARQUET_FILE_PATH = '../VLDbench.parquet'  # 修改为你的Parquet文件路径BATCH_SIZE = 4FUSION_DIM = 512CLASSIFIER_HIDDEN_DIM = 256NUM_CLASSES = 2OUTPUT_FILE_NAME = '../dataset/probability_class.parquet'  # 输出文件名,按要求设置# --- 初始化 ---extractors = FeatureExtractors()# 获取特征维度text_dim = extractors.deepseek_model.config.hidden_sizesentiment_dim = extractors.bert_model.config.hidden_sizeimage_dim = extractors.image_model.num_features# 初始化融合模块和分类器fusion_module = CrossModalFusion(text_dim, sentiment_dim, image_dim, FUSION_DIM).to(device)classifier = MLPClassifier(input_dim=FUSION_DIM + text_dim + sentiment_dim,hidden_dim=CLASSIFIER_HIDDEN_DIM,num_classes=NUM_CLASSES).to(device)# --- 读取和处理数据 ---print(f"Reading data from {PARQUET_FILE_PATH}...")df = pd.read_parquet(PARQUET_FILE_PATH)# 只保留前100条数据用于演示df = df.head(1000).reset_index(drop=True)# 合并文本字段df['full_text'] = df['headline'].fillna('') + " " + df['article_text'].fillna('')# 检查multimodal_label列是否存在if 'multimodal_label' not in df.columns:raise ValueError("Error: 'multimodal_label' column not found in the dataset!")# --- 分批处理 ---results = []num_batches = (len(df) + BATCH_SIZE - 1) // BATCH_SIZEfor i in tqdm(range(num_batches), desc="Processing batches"):batch_df = df.iloc[i * BATCH_SIZE: (i + 1) * BATCH_SIZE]texts = batch_df['full_text'].tolist()images_dict_list = batch_df['image'].tolist()# 提取图像字节流images_bytes = [item['bytes'] for item in images_dict_list]# 获取对应行的multimodal_labelmultimodal_labels = batch_df['multimodal_label'].tolist()# 特征提取text_feats = extractors.extract_text_features(texts)sentiment_feats = extractors.extract_sentiment_features(texts)image_feats = extractors.extract_image_features(images_bytes)# 特征融合与分类fused_feats = fusion_module(text_feats, sentiment_feats, image_feats)logits = classifier(fused_feats)probabilities = torch.softmax(logits, dim=-1)# 保存关键结果(仅保留需要的三个字段)for j in range(len(batch_df)):results.append({'index': batch_df.index[j],'multimodal_label': multimodal_labels[j],'probability_class_0': probabilities[j][0].cpu().item(),'probability_class_1': probabilities[j][1].cpu().item(),})# --- 生成最终输出文件 ---# 转换为DataFrame并按原索引排序results_df = pd.DataFrame(results)results_df = results_df.set_index('index').sort_index()# 确保输出文件只包含这三个字段final_output_df = results_df[['multimodal_label', 'probability_class_0', 'probability_class_1']]# 保存到指定文件final_output_df.to_parquet(OUTPUT_FILE_NAME)print(f"\nProcessing complete!")print(f"Results saved to {OUTPUT_FILE_NAME}")print(f"\nFile contains {len(final_output_df)} rows with columns: {list(final_output_df.columns)}")# 显示前5条结果预览print("\nFirst 5 results:")print(final_output_df.head())if __name__ == '__main__':main()